Gabe's 86 flaireside rebuild
#1
 08-08-2014, 02:43 PM

Gabe's 86 flaireside rebuild
I've posted some pics of what I've been doing lately in different threads, but I figured I would make my own build thread so they will be in one place.
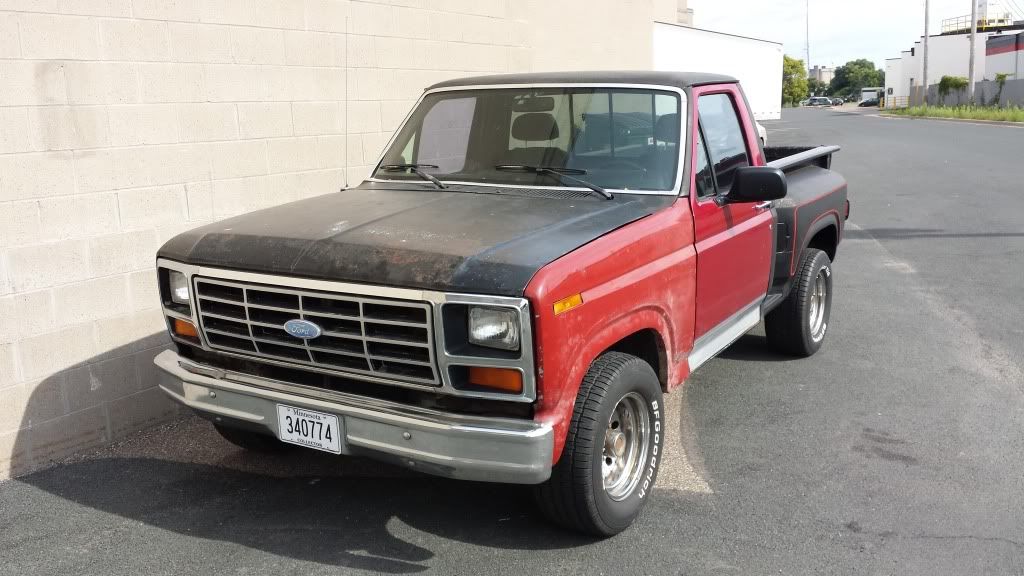
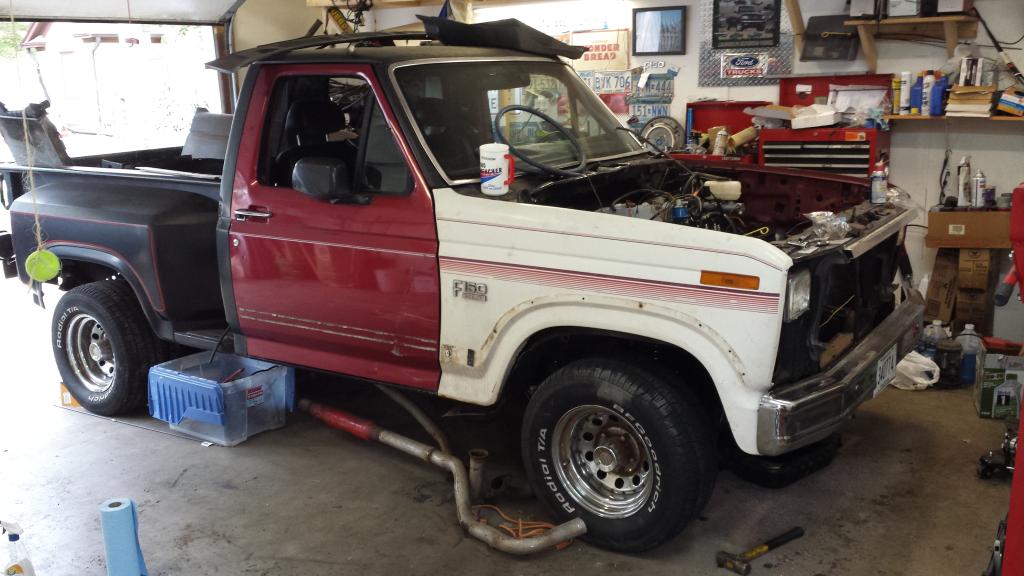
This is my 86 flairside:
My project has several parts:
1) take out the 300, put in V8
2) rebuild front suspension
3) add a/c
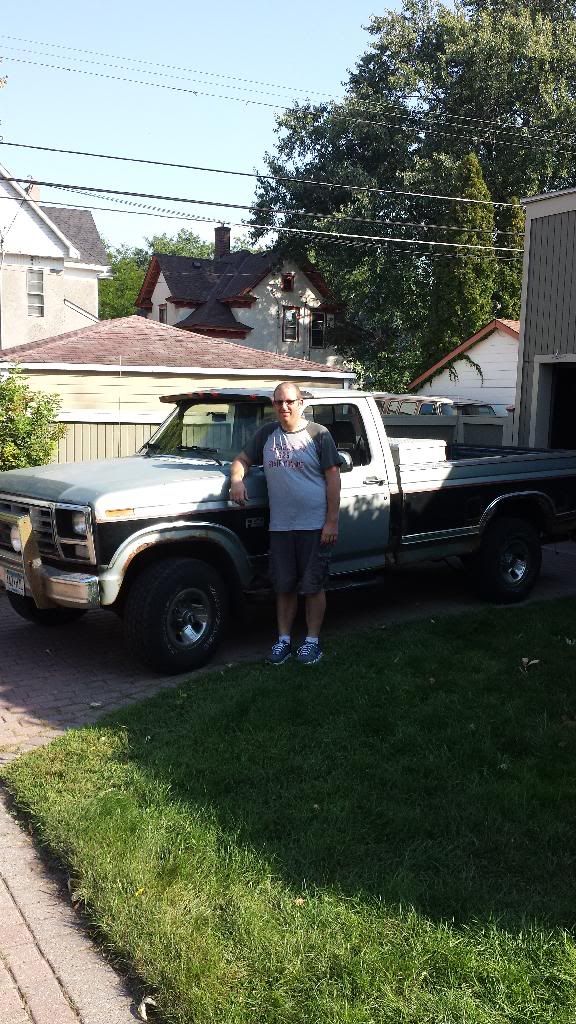
To help in procuring parts I retired my dd 86 f150 due to rust, the cab was shot. It gave my the engine (302 FI), a/c parts, dash, core support and lots of misc parts. It don't look far away, but both cab corners were shot, and enough was rusted away so that the drivers door would'nt shut without pushing my hand in on the back of the cab.
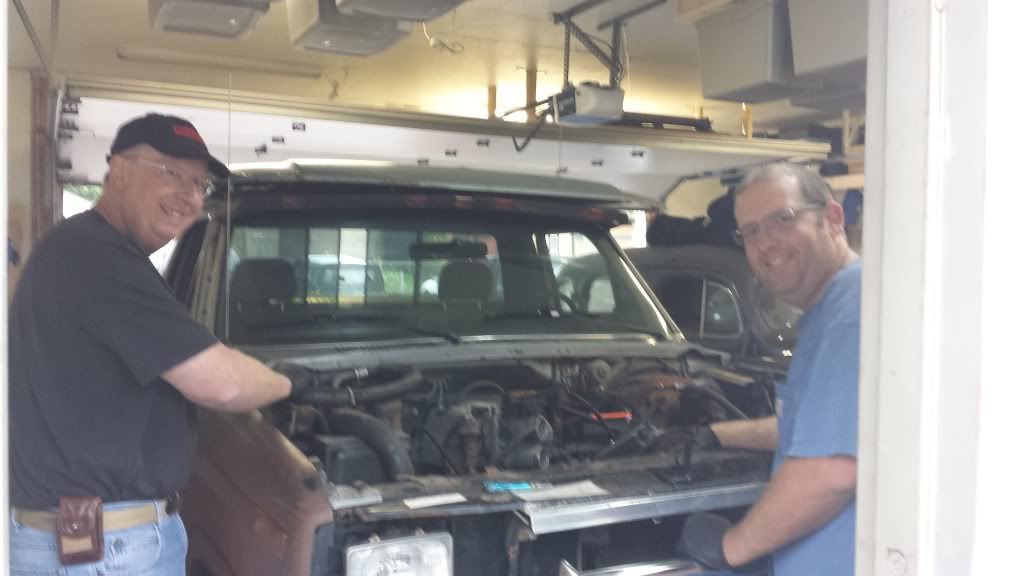
I started off by stripping parts off my old truck, I'm on the right, my dad on the left.
after I took the engine down I sprayed degreaser on it, then pressure washed it.
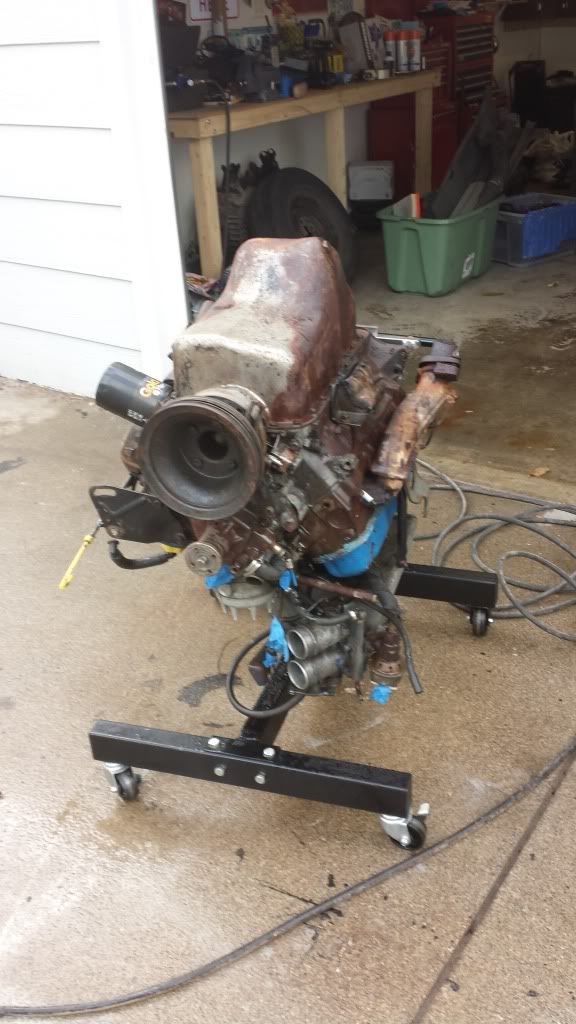
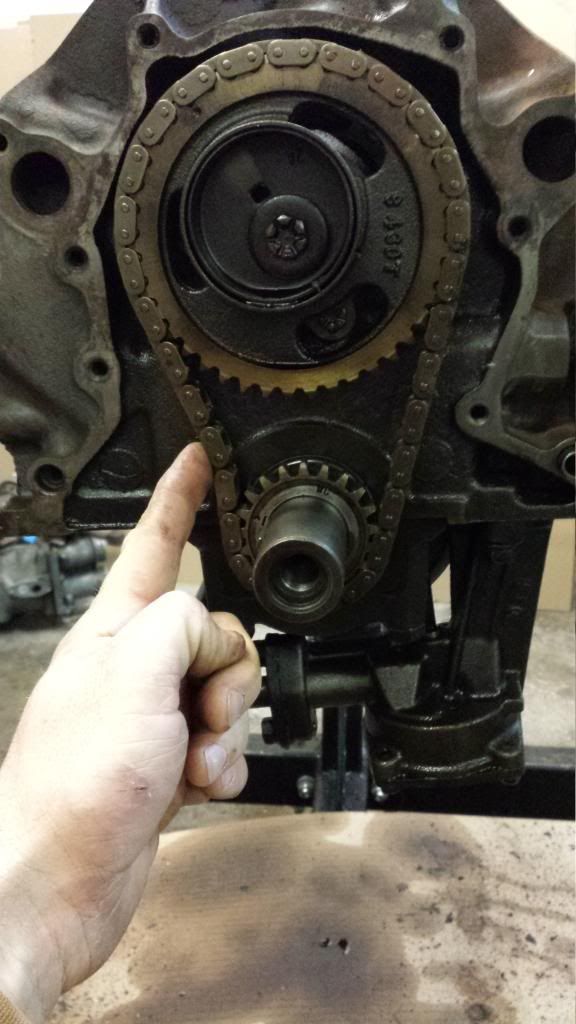
Over the winter I tore engine down to the block, Installed a comp cams 31-255-5 cam, a new timing set, as you can see the old one had some slop in it
After that I painted the block, and started re-assembling the engine.


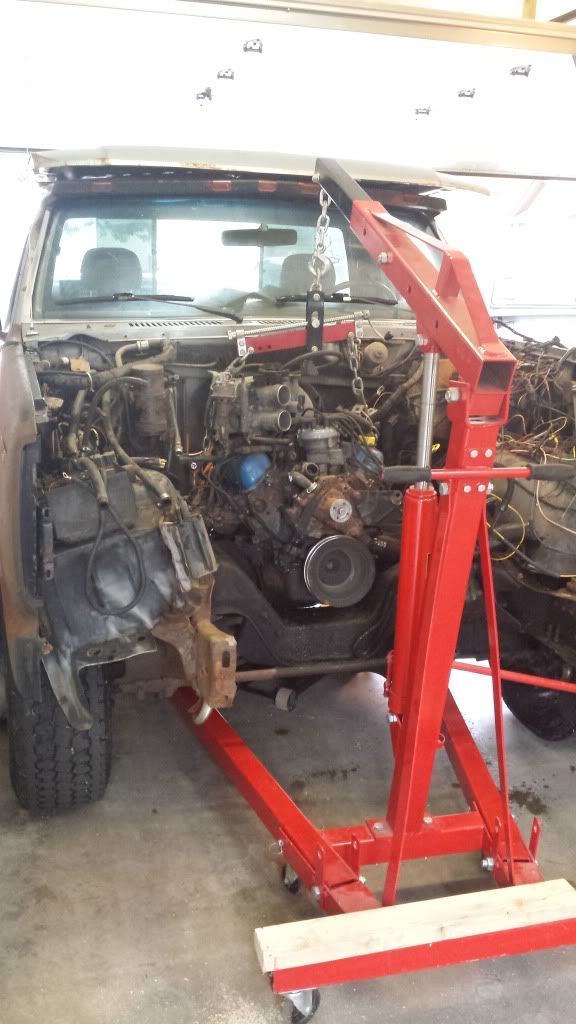
after I finished the engine, I started taking the front clip off to make things alot easier on myself.
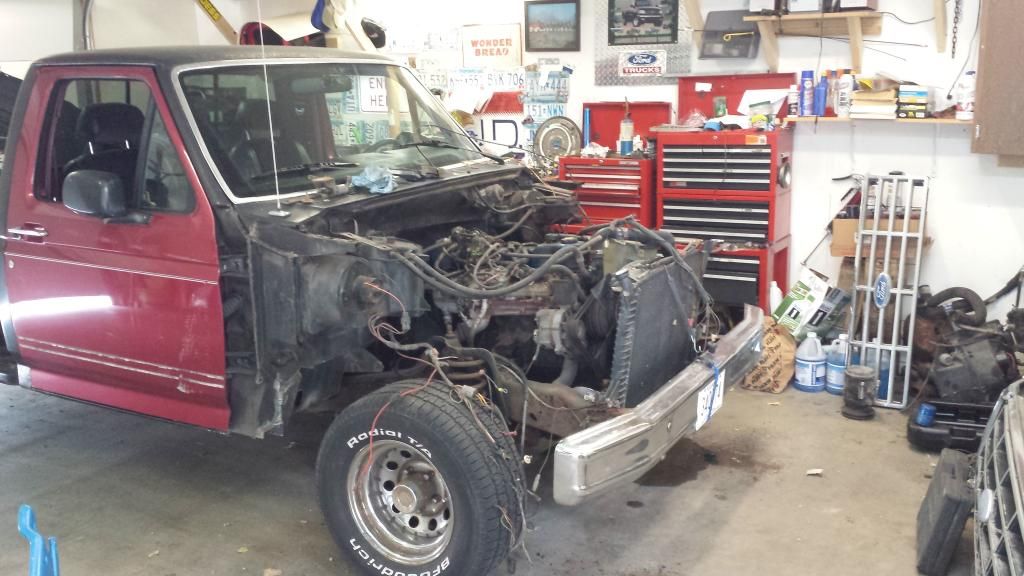
Then out the engine came!!

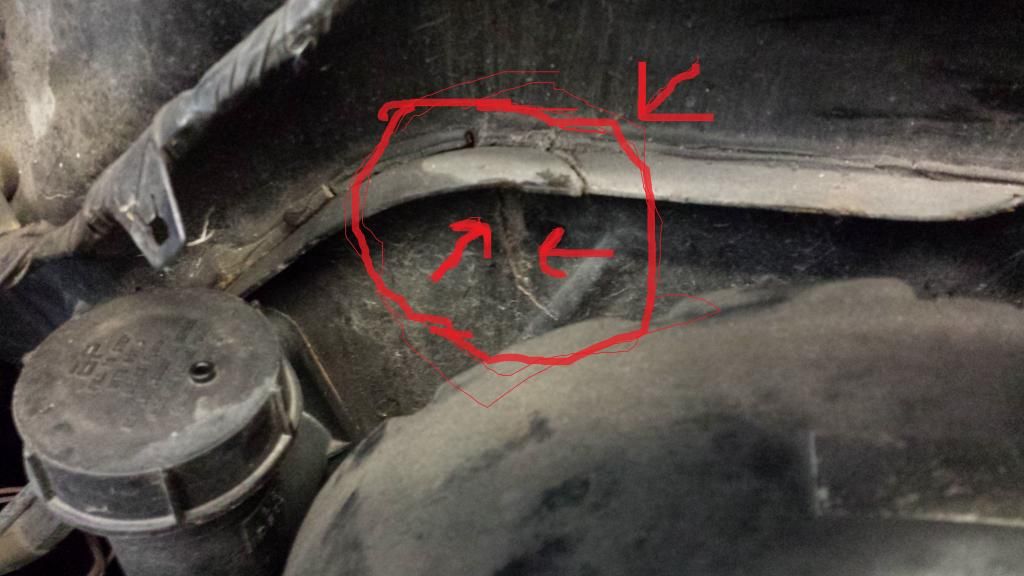
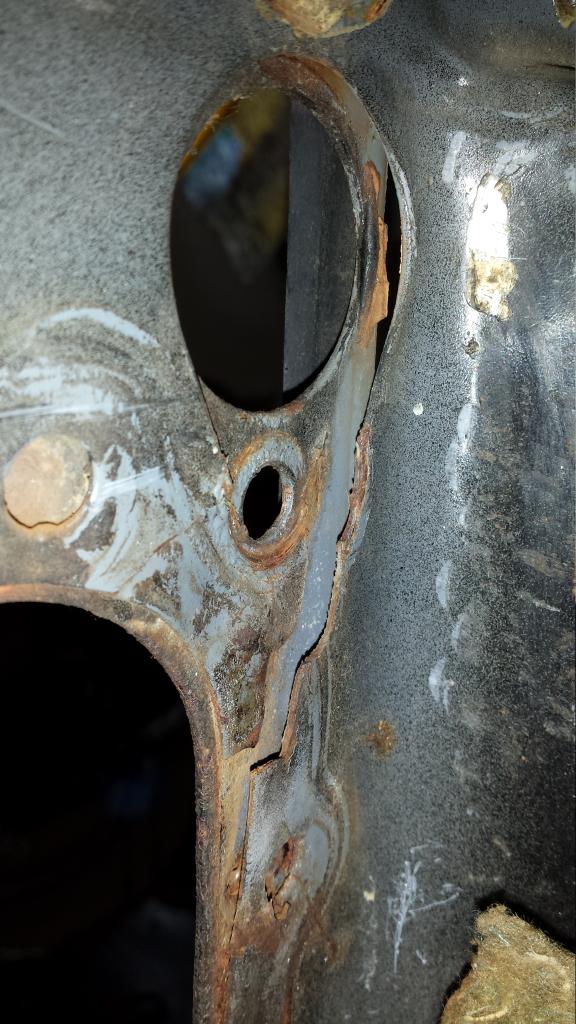
along the way I discovered a crack in the firewall
The solution:

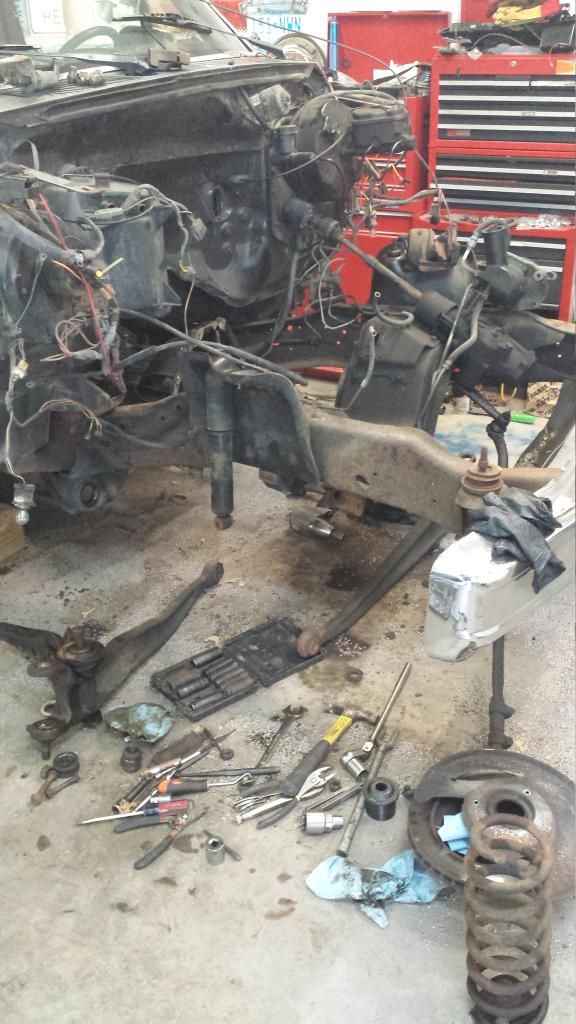
Next step: re-build front suspension. I didn't have trouble removing the upper ball joints, but I had a hell of a time with the lower ones. A good friend of mine works for a Peterbuilt dealer, and he let me use their 100 ton press, That finally did the trick
Here's where I'm at today, new balljoints, pivot busings inststalled, getting ready to paint the front half of the frame.

More to come!!!
This is my 86 flairside:

My project has several parts:
1) take out the 300, put in V8
2) rebuild front suspension
3) add a/c
To help in procuring parts I retired my dd 86 f150 due to rust, the cab was shot. It gave my the engine (302 FI), a/c parts, dash, core support and lots of misc parts. It don't look far away, but both cab corners were shot, and enough was rusted away so that the drivers door would'nt shut without pushing my hand in on the back of the cab.

I started off by stripping parts off my old truck, I'm on the right, my dad on the left.


after I took the engine down I sprayed degreaser on it, then pressure washed it.

Over the winter I tore engine down to the block, Installed a comp cams 31-255-5 cam, a new timing set, as you can see the old one had some slop in it

After that I painted the block, and started re-assembling the engine.


after I finished the engine, I started taking the front clip off to make things alot easier on myself.

Then out the engine came!!

along the way I discovered a crack in the firewall

The solution:

Next step: re-build front suspension. I didn't have trouble removing the upper ball joints, but I had a hell of a time with the lower ones. A good friend of mine works for a Peterbuilt dealer, and he let me use their 100 ton press, That finally did the trick
Here's where I'm at today, new balljoints, pivot busings inststalled, getting ready to paint the front half of the frame.


More to come!!!
#4
08-14-2014, 04:33 PM
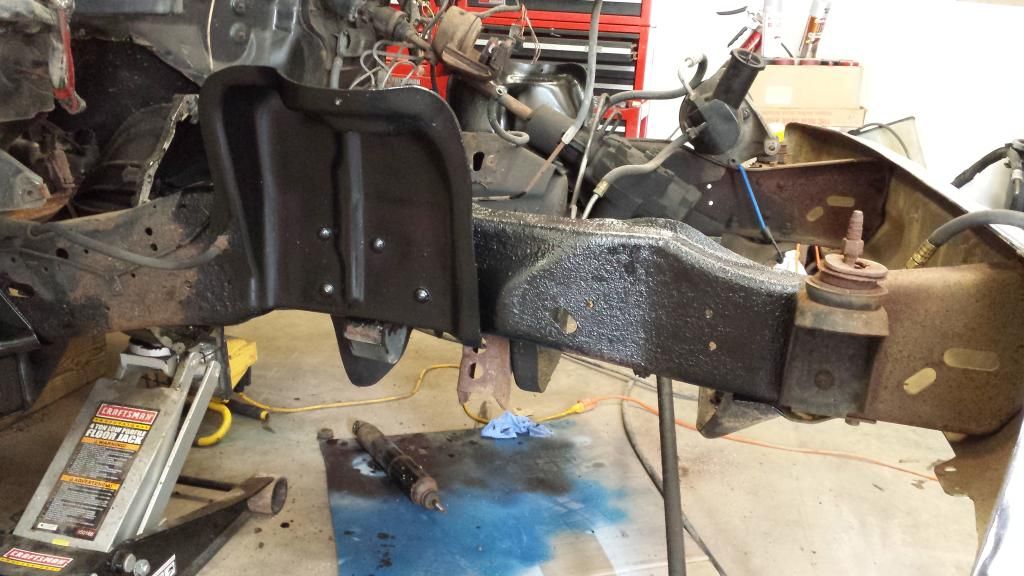
I've been busy this week, got just about everything painted with por-15.
All of the front suspension is done and ready to be installed.

Just finished por'ing the frame, just need to topcoat it.
Some pics of my progress:


I'm pretty impressed with por-15, the only downside is my skin is covered with it too And I discovered that it will stain your skin through your clothing.
All of the front suspension is done and ready to be installed.

Just finished por'ing the frame, just need to topcoat it.
Some pics of my progress:


I'm pretty impressed with por-15, the only downside is my skin is covered with it too
And I discovered that it will stain your skin through your clothing.
#5
08-14-2014, 07:29 PM
Posting Guru
Nice project. I'm looking forward to seeing more of you progress.
#6
08-14-2014, 08:32 PM
Laughing Gas
#7
08-15-2014, 01:14 PM
Ill remember the brake cleaner next time I use por.
Trending Topics
#8
08-16-2014, 06:18 PM
Another update: The front suspension is in minus shocks and the spindle on the drivers side.


There is one possible hang up, when I was putting the coil springs in I realized the spacers under them are different and i could'nt remember which one went on the left or right side.
drivers side:

passenger side:

I took a guess and put them where I thought they went, but I'm not sure that it's right. Does anybody know which way they are suppose to go? I would like to figure this out before I go any further.
#9
08-20-2014, 06:24 PM
Another update: Today I received my order from rock auto, all four tie rods, and new brake pads. Planning on installing that stuff tomorrow.
I'm trying to plan ahead for plumbing in a new fuel system as I'm going a carburetor fuel system to EFI. What I was thinking was going to the in-tank fuel pump with no frame mounted pump that they used in the '90's. Seems like a less complicated system than the 2 pump system used in '86. Is there any issues I may run into if I do this?
I'm trying to plan ahead for plumbing in a new fuel system as I'm going a carburetor fuel system to EFI. What I was thinking was going to the in-tank fuel pump with no frame mounted pump that they used in the '90's. Seems like a less complicated system than the 2 pump system used in '86. Is there any issues I may run into if I do this?
#10
09-10-2016, 10:53 PM
Time for a very long overdue update:
At the time of my last post I was starting my driver training for work at Fedex, and getting ready for our daughter that was born in November, and trying to get this thing driveable before winter came, so I did'nt have much time left over.
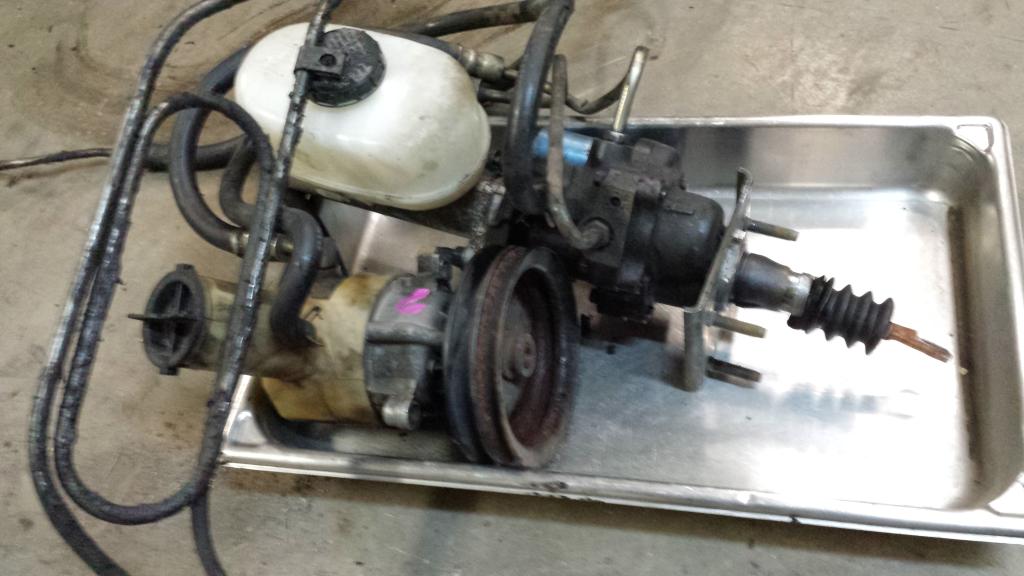
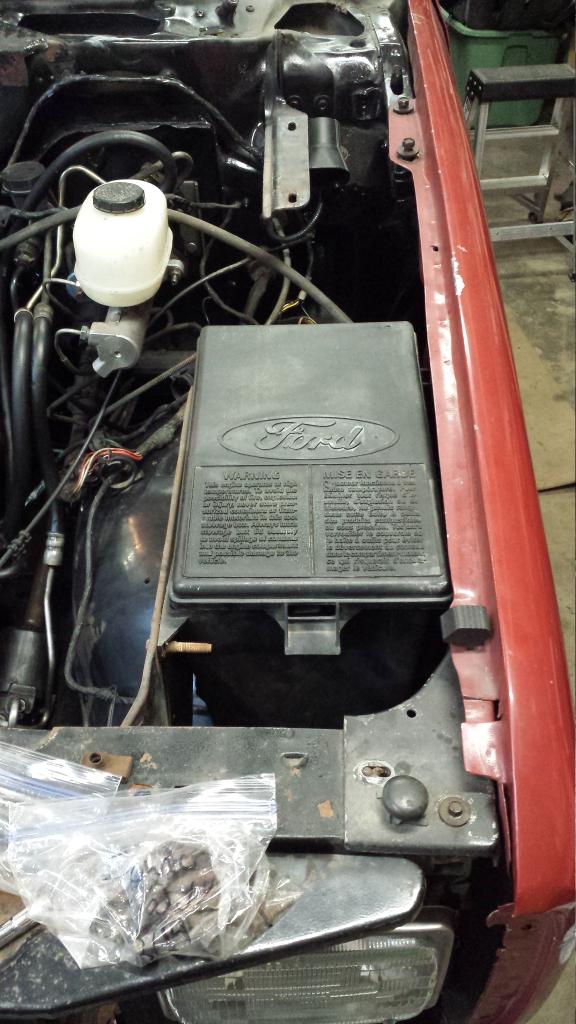
I needed a new gas tank, so I bought one for a mid nineties f150 that used a single in tank fuel pump/ sending unit. I also converted to a hydroboost brakes since I happened to find a f-superduty in the junkyard, got the whole works for $50!!
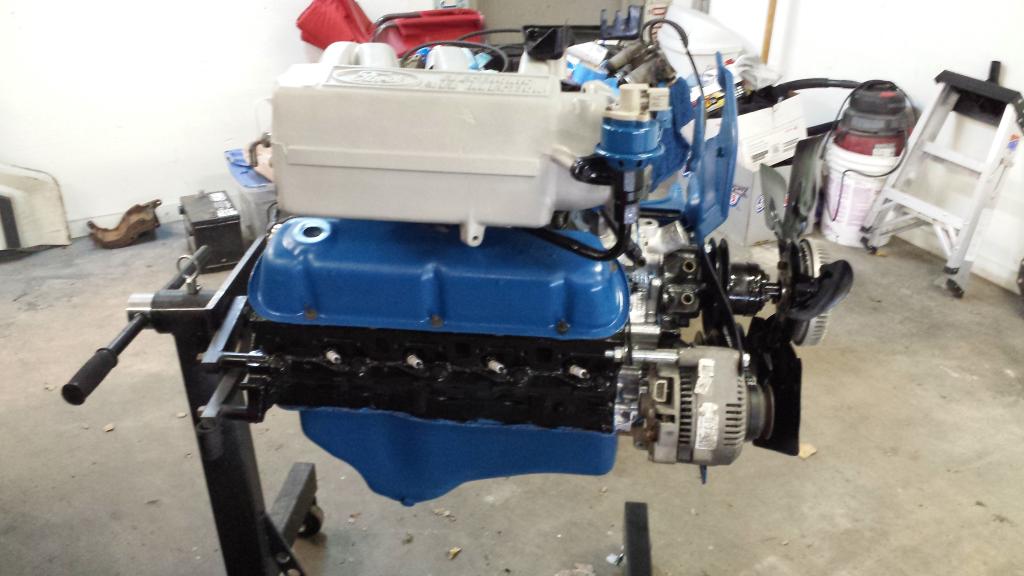
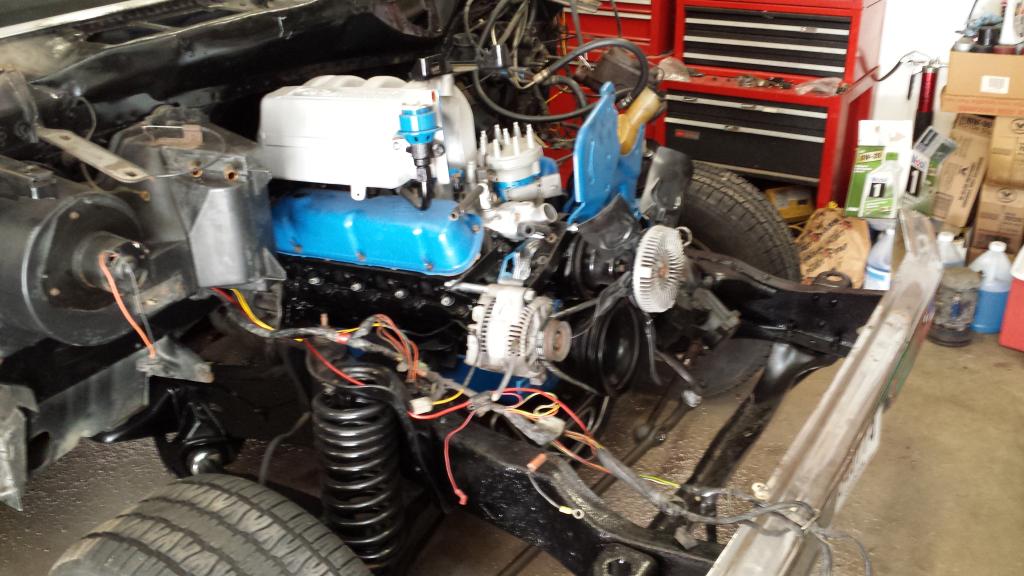
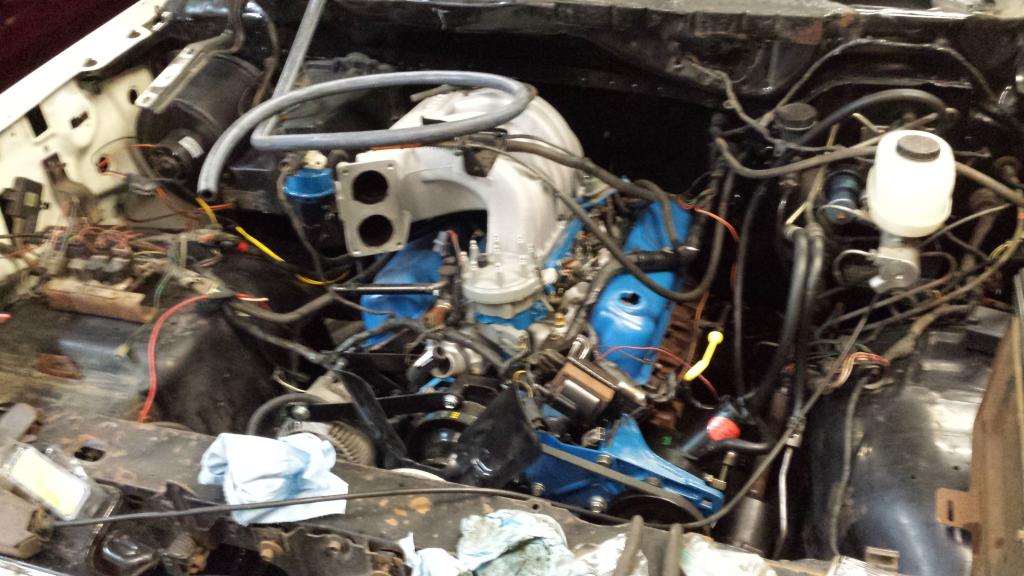
I tore the everything off the engine, had all the brackets, valve covers sandblasted and re-painted, new timing set, oil pump comp cams 31-255-5 cam, new lifters, belts, hoses. Also had the upper and lower intake shot with glass bead, looks new again!!

EDIT: did'nt realize I put the engine pics up already but here they are again!!
At the time of my last post I was starting my driver training for work at Fedex, and getting ready for our daughter that was born in November, and trying to get this thing driveable before winter came, so I did'nt have much time left over.
I needed a new gas tank, so I bought one for a mid nineties f150 that used a single in tank fuel pump/ sending unit. I also converted to a hydroboost brakes since I happened to find a f-superduty in the junkyard, got the whole works for $50!!

I tore the everything off the engine, had all the brackets, valve covers sandblasted and re-painted, new timing set, oil pump comp cams 31-255-5 cam, new lifters, belts, hoses. Also had the upper and lower intake shot with glass bead, looks new again!!
EDIT: did'nt realize I put the engine pics up already but here they are again!!
#11
09-10-2016, 11:18 PM
I rebuilt the whole front end, balljoints, springs tie rods, steering box, radius arm bushings , pivot bushings. then the engine went back in, front clip after that.
hydroboost installed, also this underhood toolbox I scored at the junkyard for $10!!
One issue with this is the pin on the brake pedal is too low, so I moved it and had it welded.
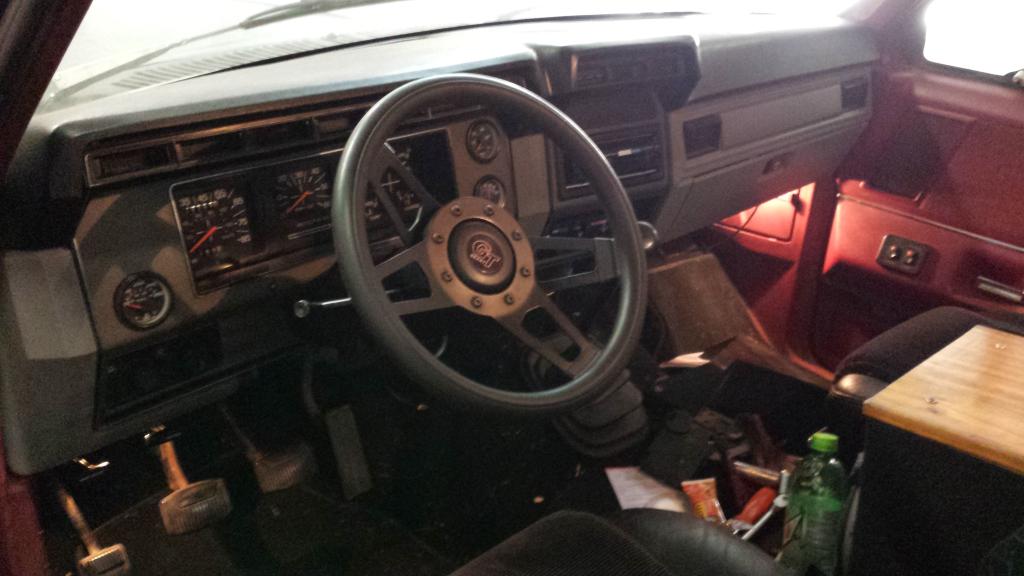
I also replaced the dash with the one from my donor truck, I also have all the trim but only have the dash in, I will change the trim at a later date.


hydroboost installed, also this underhood toolbox I scored at the junkyard for $10!!
One issue with this is the pin on the brake pedal is too low, so I moved it and had it welded.


I also replaced the dash with the one from my donor truck, I also have all the trim but only have the dash in, I will change the trim at a later date.


#12
09-11-2016, 07:40 AM
Mountain Pass
Join Date: Aug 2016
Location: Meridian ID
Posts: 172
Likes: 0
Received 0 Likes
on
0 Posts
#13
09-11-2016, 10:55 AM

Gabe, welcome back funny how life gets in the way don't it.
When I started reading and saw you want to add AC to this truck and it not being a factory AC truck but your parts truck is I want to see how you were going to do this?
Are you still going to install AC and if so how you going to do this under dash AC and duct it to the stock AC vents in the dash?
Because you have the motor and other stuff back on the front I guess you are not going to use the parts truck AC box? If so you know the fire wall is different and wont bolt up with out some work.
My AC swap to a NON-AC truck from AC truck starts on page 9 and ends on page 11
https://www.ford-trucks.com/forums/1...re-side-9.html
I am sure you can cut holes and fill others in the non-ac to fit the AC box a lot easier than how I did it.
Good luck on the rest of the build.
Dave ----
#14
09-11-2016, 11:01 AM
Gabe, welcome back funny how life gets in the way don't it.
When I started reading and saw you want to add AC to this truck and it not being a factory AC truck but your parts truck is I want to see how you were going to do this?
Are you still going to install AC and if so how you going to do this under dash AC and duct it to the stock AC vents in the dash?
Because you have the motor and other stuff back on the front I guess you are not going to use the parts truck AC box? If so you know the fire wall is different and wont bolt up with out some work.
My AC swap to a NON-AC truck from AC truck starts on page 9 and ends on page 11
https://www.ford-trucks.com/forums/1...re-side-9.html
I am sure you can cut holes and fill others in the non-ac to fit the AC box a lot easier than how I did it.
Good luck on the rest of the build.
Dave ----
When I started reading and saw you want to add AC to this truck and it not being a factory AC truck but your parts truck is I want to see how you were going to do this?
Are you still going to install AC and if so how you going to do this under dash AC and duct it to the stock AC vents in the dash?
Because you have the motor and other stuff back on the front I guess you are not going to use the parts truck AC box? If so you know the fire wall is different and wont bolt up with out some work.
My AC swap to a NON-AC truck from AC truck starts on page 9 and ends on page 11
https://www.ford-trucks.com/forums/1...re-side-9.html
I am sure you can cut holes and fill others in the non-ac to fit the AC box a lot easier than how I did it.
Good luck on the rest of the build.
Dave ----
As soon as I took the heater/ac box off I realized the firewalls were different and decided to scrap that part of the project
#15
09-11-2016, 11:38 AM
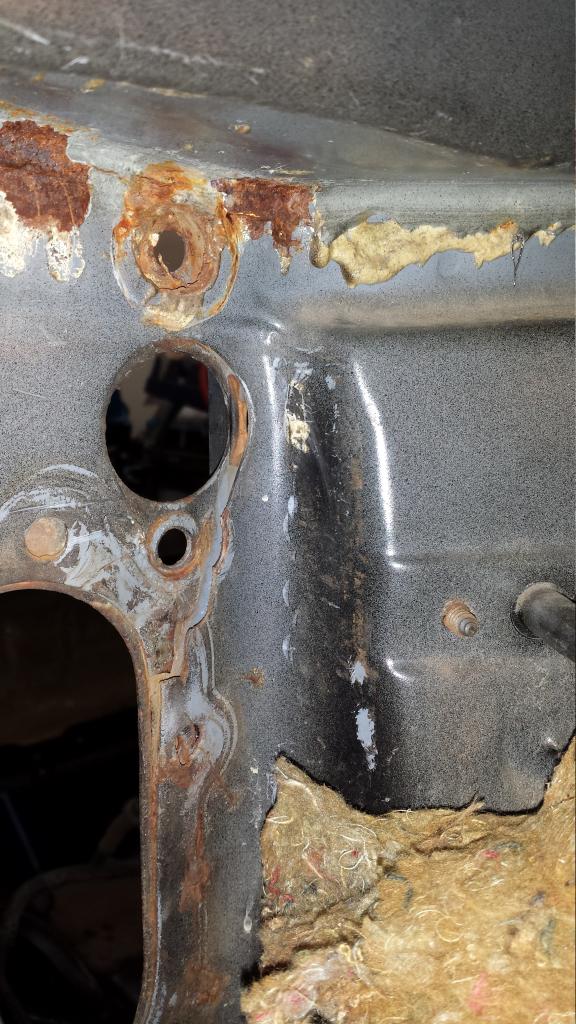
I had discovered that the firewall was cracked while I was in the middle of all the work I was doing. I found the repair plate made by Terrapin and bought one, although expensive it was well worth it!!
here's the carnage I found:
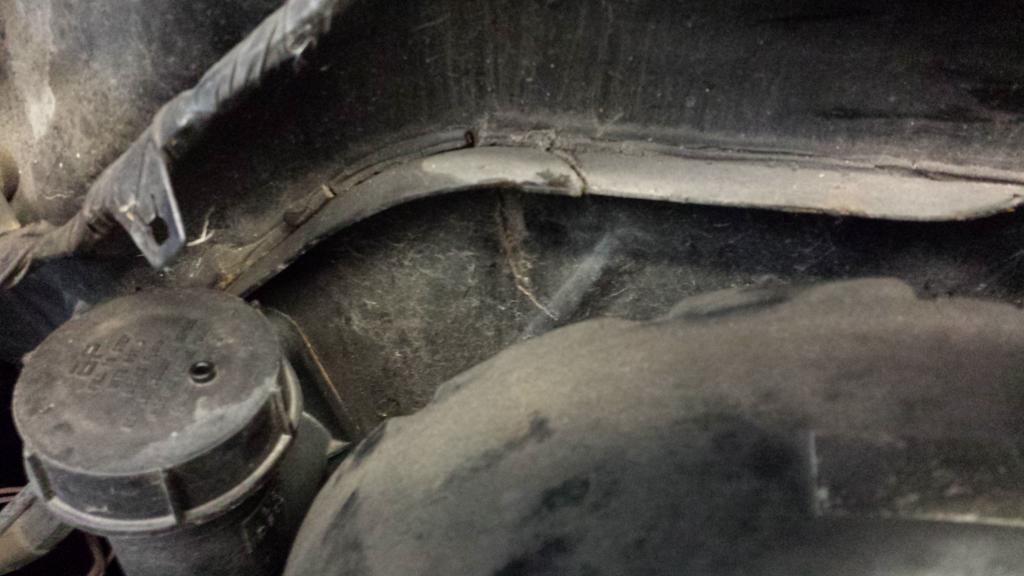
The initial fit was pretty good, but it needed a little adjusting on the upper and side tabs.

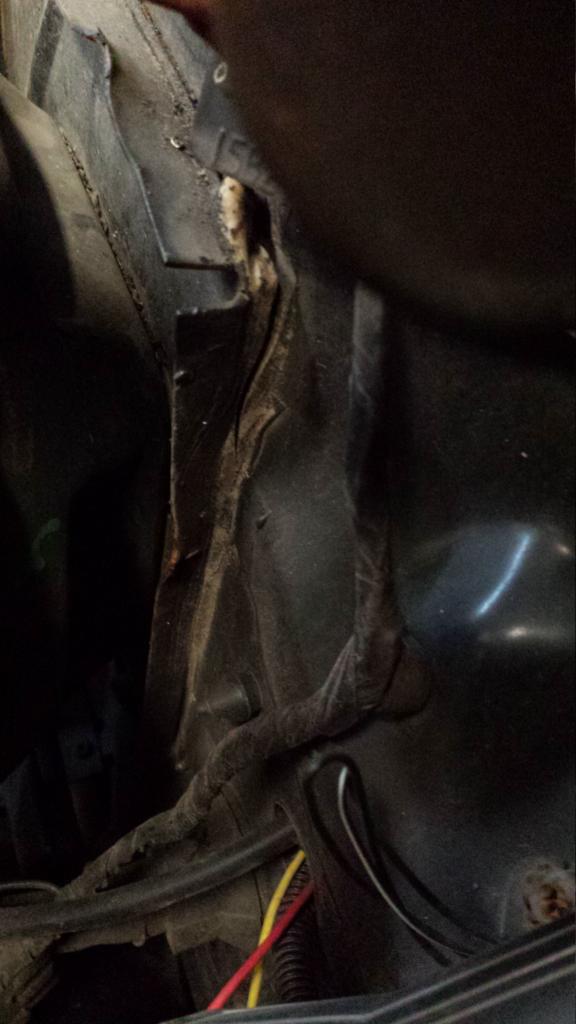
Kinda hard to see but I had to "massage" the area for the side tab to fit better.
Final install:
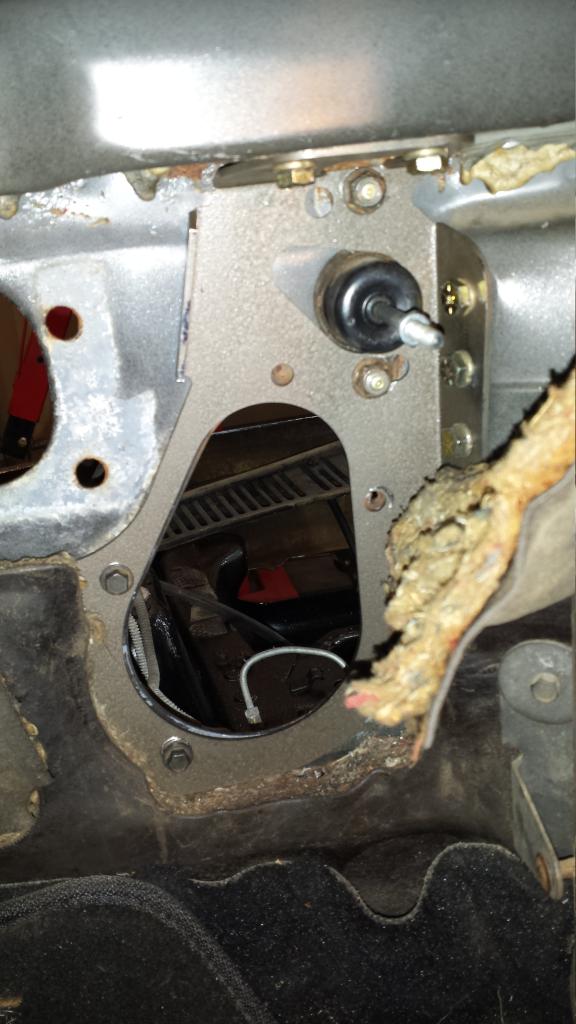
Cowl...I put some rtv on the plate to prevent water leaks
I will say that I had the dash out of the truck which made the job very easy, but could be done with it in.
here's the carnage I found:


The initial fit was pretty good, but it needed a little adjusting on the upper and side tabs.

Kinda hard to see but I had to "massage" the area for the side tab to fit better.

Final install:

Cowl...I put some rtv on the plate to prevent water leaks

I will say that I had the dash out of the truck which made the job very easy, but could be done with it in.