
Exhaust manifold removal is much harder then I anticipated.
#46
 08-08-2014, 06:16 PM

#47
08-08-2014, 11:53 PM

For the 2 broken off below the surface. I would most likely try an eze out first. Center punch in the middle of the stud, pilot or center drill and then drill the proper drill for the eze-out. It is best if the drill for the eze out is a left handed cobalt drill. Don't go too big with the eze out and get it centered as best you can.
For the welder. I have been there with feeding issues. My Millermatic 175 can act up sometimes especially on .023"-.025" wire. Try to get the welder running good on some scrap steel. You can get better penetration on the weld if you preheat the stud and area a little. You don't have much juice there with only a 90 amp welder.
Believe me even with an oxyacetylene torch with a rosebud tip it is going to a while to heat the head up enough to warp it. Aluminum is a heat sucker.
EDIT: Having some issues sourcing a cobalt bit locally. Any ideas?
Found this: http://www.grainger.com/product/CLE-...Code=P2IDP2PCP
At 7 bucks a bit its not cheap, but would be worth it if they have it tomorrow. Did a quick google search and it seems that 5/32 is what people generally start with.
-Also seem to be having trouble finding a center drill locally. Is there a proper term for it? Keep coming up with countersink bits at grainger, and home depot says they dont have any...
And I personally anti seize any bolt that comes off any of my vehicles, including lug nuts, with aluminum based stuff. Any thing that sees heat (like the caliper slider pins, or the manifold studs) gets the copper anti seize. I have yet to try the nickle stuff I admit, but the copper stuff is rated to 1800*F iirc.
#48
08-08-2014, 11:56 PM
#49
08-09-2014, 01:05 AM
FTE Chapter Leader
Thank you very much. This is pretty much what I had in my head, so this gives me confidence. Was able to get a hold of a right angle corded Milwaukee. Not sure how powerfull it is, but I will give it a shot. Going to go pick up a center drill and left handed drill bit in the morning.
EDIT: Having some issues sourcing a cobalt bit locally. Any ideas?
Found this: CLE-LINE Mechanics Drill,LH,Co,5/32,135 Deg - Mechanics Length Drill Bits - 1TPF2|C30510 - Grainger Industrial Supply
At 7 bucks a bit its not cheap, but would be worth it if they have it tomorrow. Did a quick google search and it seems that 5/32 is what people generally start with.
-Also seem to be having trouble finding a center drill locally. Is there a proper term for it? Keep coming up with countersink bits at grainger, and home depot says they dont have any...
And I personally anti seize any bolt that comes off any of my vehicles, including lug nuts, with aluminum based stuff. Any thing that sees heat (like the caliper slider pins, or the manifold studs) gets the copper anti seize. I have yet to try the nickle stuff I admit, but the copper stuff is rated to 1800*F iirc.
so the bit won't wander off that point. In my case Ford specs out the
nickel anti-size for all the exhaust stuff and also inside the turbo.
Also when you do use something like anti-size it will act as a lubricant
and that will effect torque values. Just like dry vs oiled threads.
I broke a bolt off recently and ended up using a high speed burr to get
a good starting point. A Dremel with a cable drive for flexibility comes
in very handy.
Sean
#50
08-09-2014, 12:17 PM
Thank you very much. This is pretty much what I had in my head, so this gives me confidence. Was able to get a hold of a right angle corded Milwaukee. Not sure how powerfull it is, but I will give it a shot. Going to go pick up a center drill and left handed drill bit in the morning.
EDIT: Having some issues sourcing a cobalt bit locally. Any ideas?
Found this: CLE-LINE Mechanics Drill,LH,Co,5/32,135 Deg - Mechanics Length Drill Bits - 1TPF2|C30510 - Grainger Industrial Supply
At 7 bucks a bit its not cheap, but would be worth it if they have it tomorrow. Did a quick google search and it seems that 5/32 is what people generally start with.
-Also seem to be having trouble finding a center drill locally. Is there a proper term for it? Keep coming up with countersink bits at grainger, and home depot says they dont have any...
And I personally anti seize any bolt that comes off any of my vehicles, including lug nuts, with aluminum based stuff. Any thing that sees heat (like the caliper slider pins, or the manifold studs) gets the copper anti seize. I have yet to try the nickle stuff I admit, but the copper stuff is rated to 1800*F iirc.
EDIT: Having some issues sourcing a cobalt bit locally. Any ideas?
Found this: CLE-LINE Mechanics Drill,LH,Co,5/32,135 Deg - Mechanics Length Drill Bits - 1TPF2|C30510 - Grainger Industrial Supply
At 7 bucks a bit its not cheap, but would be worth it if they have it tomorrow. Did a quick google search and it seems that 5/32 is what people generally start with.
-Also seem to be having trouble finding a center drill locally. Is there a proper term for it? Keep coming up with countersink bits at grainger, and home depot says they dont have any...
And I personally anti seize any bolt that comes off any of my vehicles, including lug nuts, with aluminum based stuff. Any thing that sees heat (like the caliper slider pins, or the manifold studs) gets the copper anti seize. I have yet to try the nickle stuff I admit, but the copper stuff is rated to 1800*F iirc.
The "center drills" are also know as combined drill/countersinks. The most common is 60 degrees. You obviously want to center punch the stud before using the center drill.
FYI anti seize is not recommended for on lugs nuts. A little motor oil is what is recommended on them.
#51
08-09-2014, 04:07 PM
I dont know if this is correct, but I ordered 3 different sizes of these left hand drill bits. Found them by searching the part number on the Grainger site. Grainger sells each bit for $7. They are listed here as a 12 pack for $4!
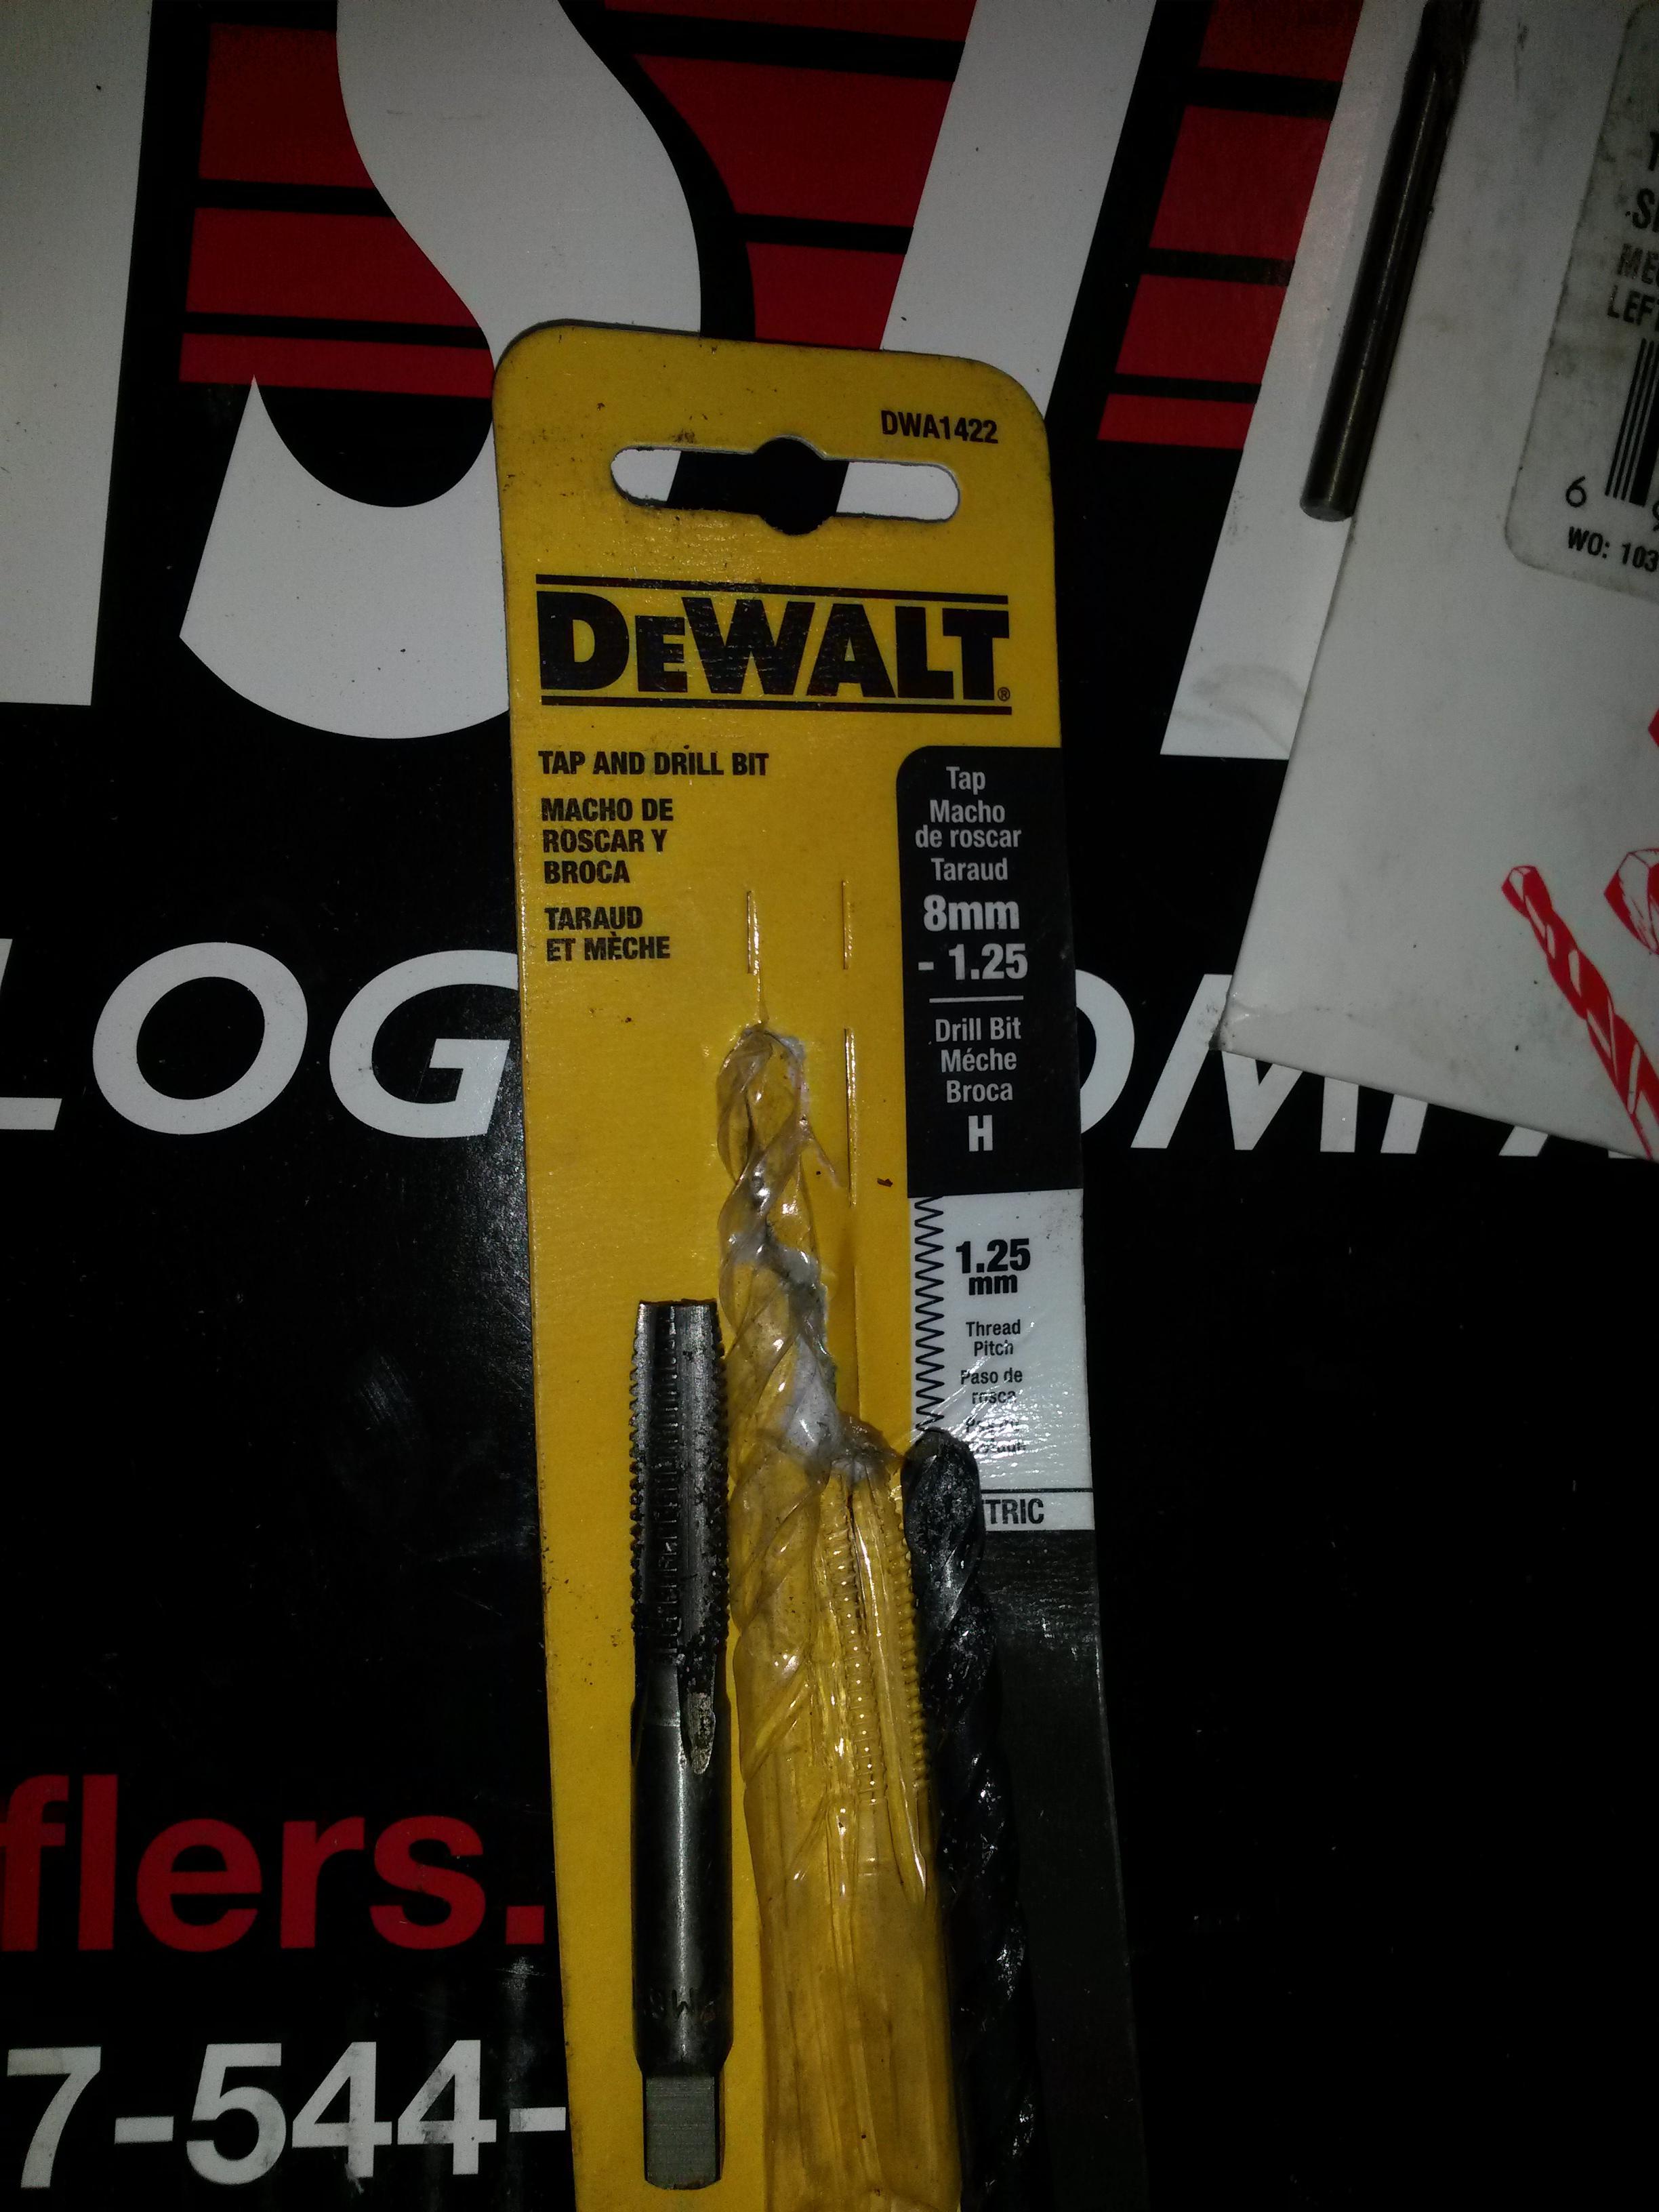
I would not be surprised if that was a misprint, and it only comes with one. These are supposedly some of the best bits you can get. Also got a 8mm by 1.25 tap and bit set for worst case scenario.
I would not be surprised if that was a misprint, and it only comes with one. These are supposedly some of the best bits you can get. Also got a 8mm by 1.25 tap and bit set for worst case scenario.
#52
08-09-2014, 09:13 PM
#53
08-09-2014, 09:21 PM
FTE Chapter Leader
#54
08-12-2014, 07:25 PM
Ok both Gibson headers are installed.
Driver side went on with little issues, except its very difficult to access the bolts. Its a bit of work just to find the right tool to tighten them down, no way you could get a torque wrench on there.
You can also see my brand new brakes and where i used chassis saver on the frame, then topcoated with rustoleum.
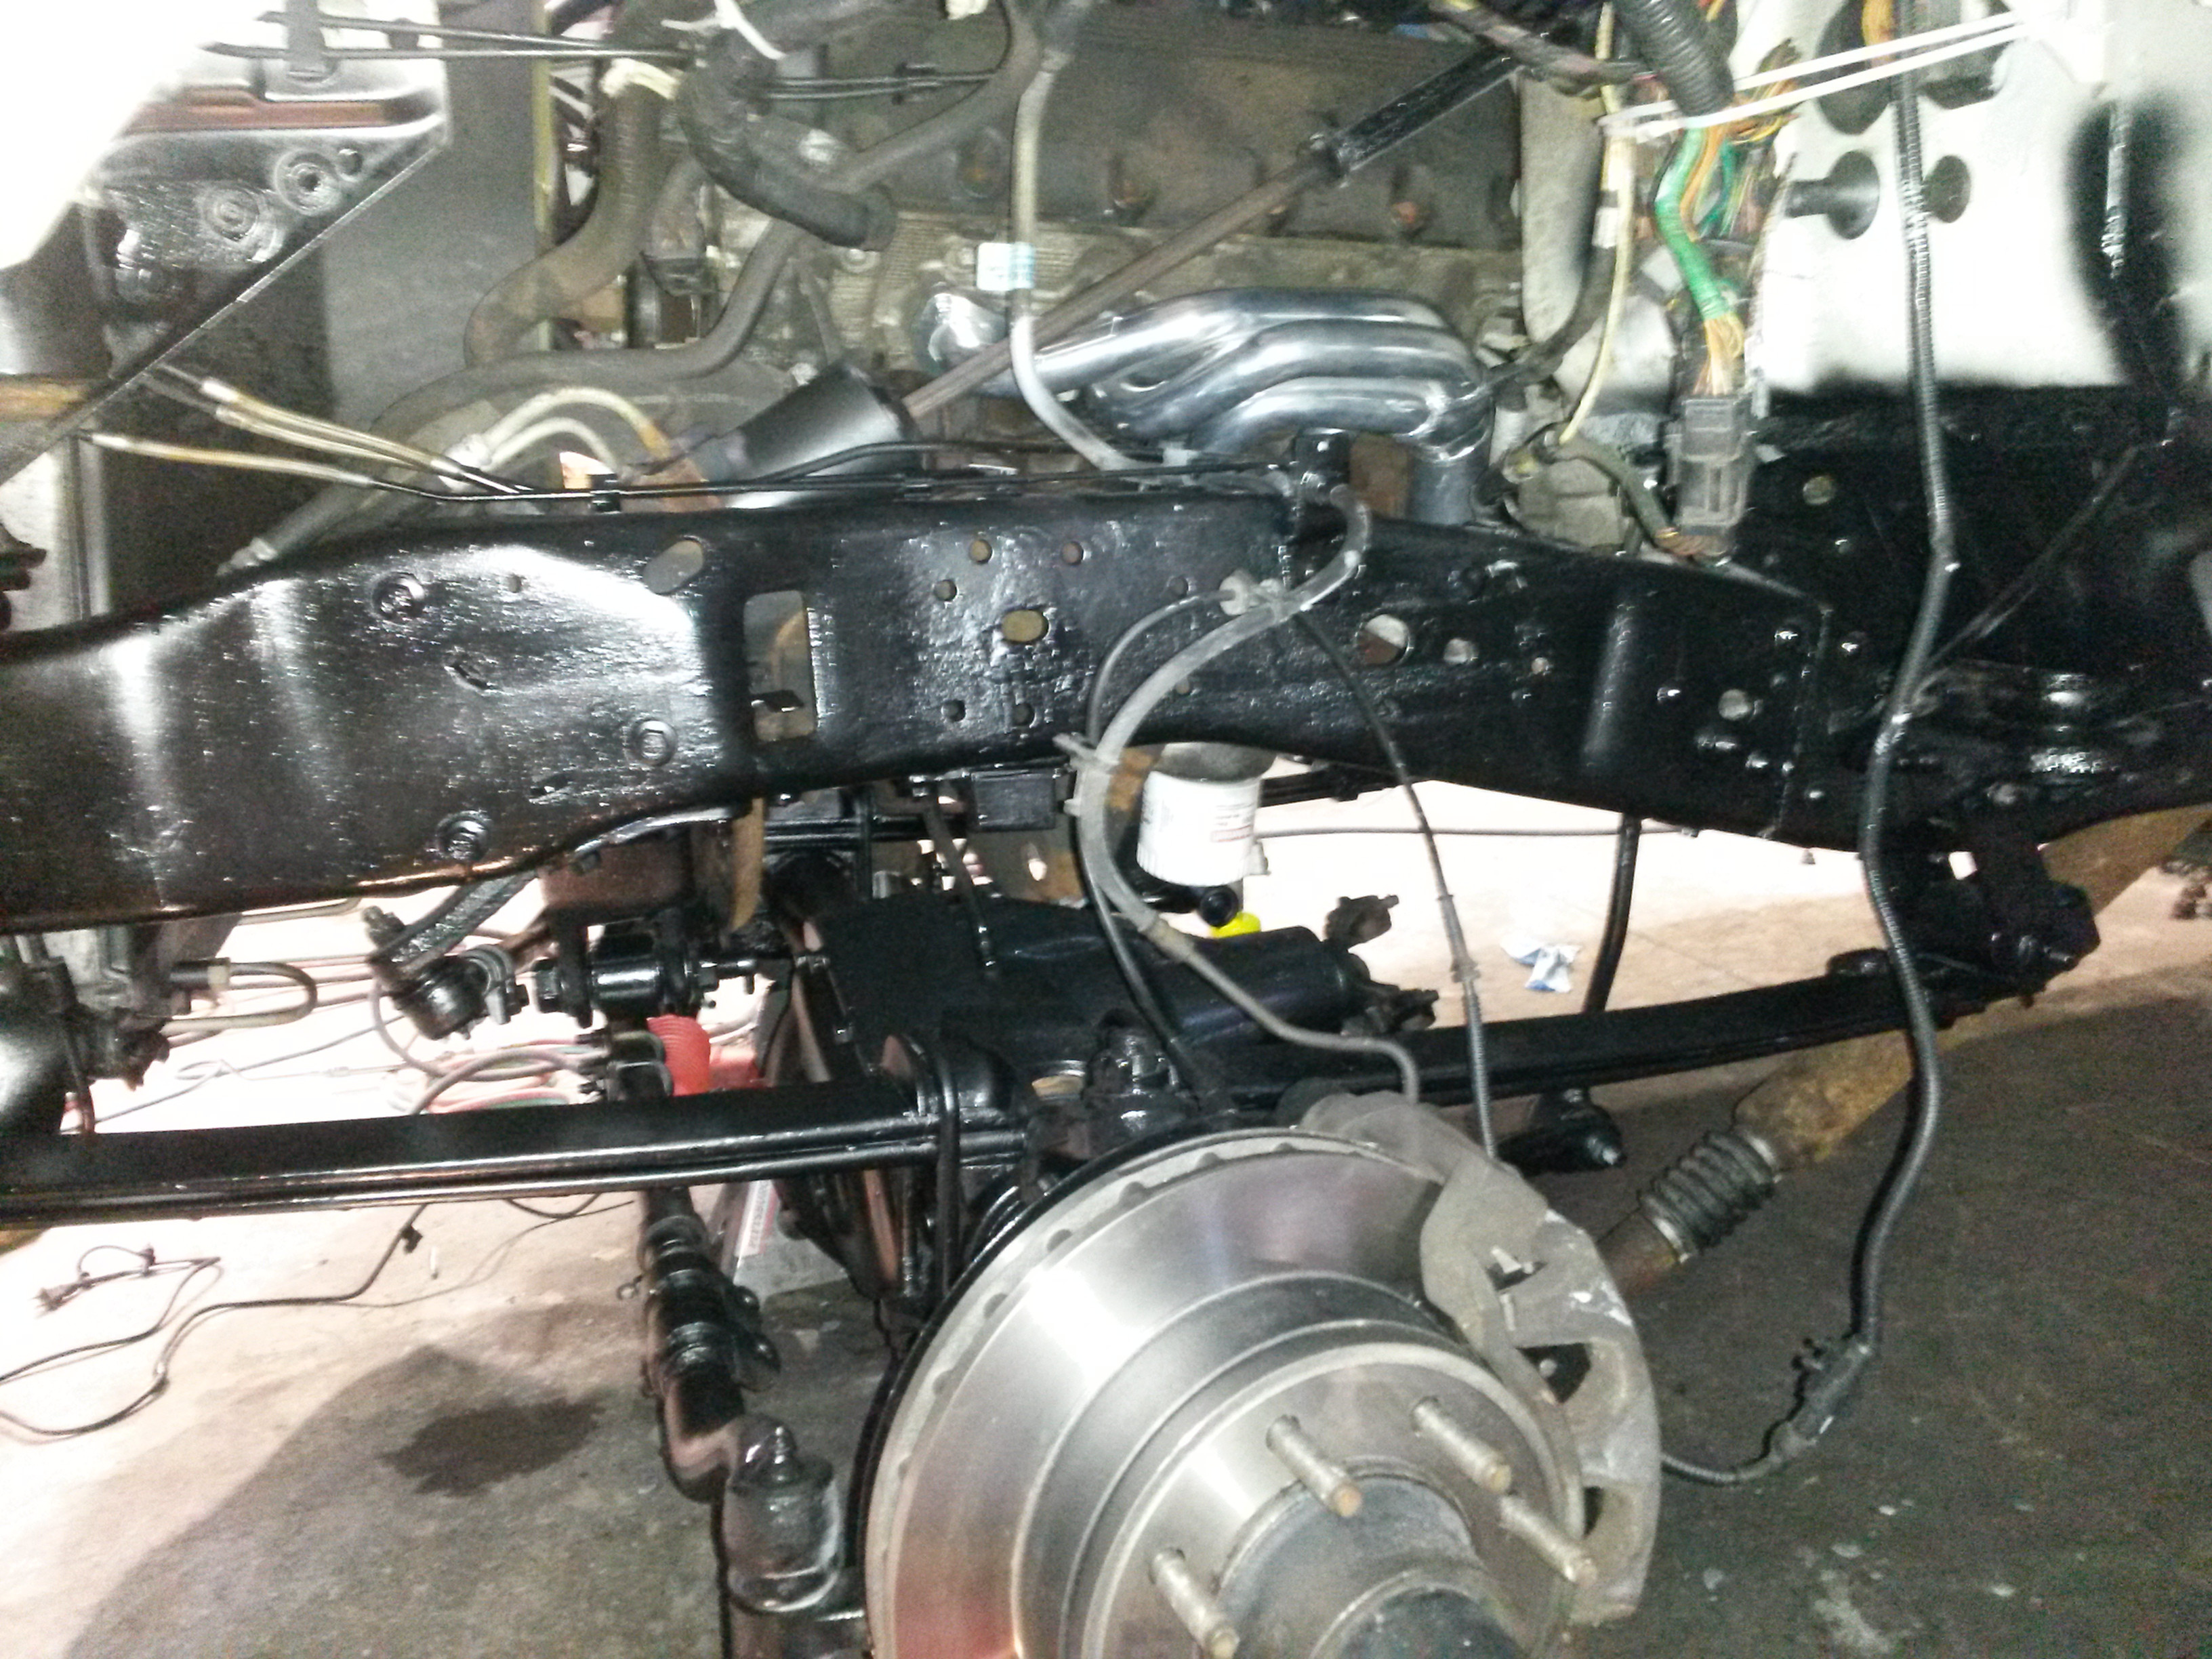
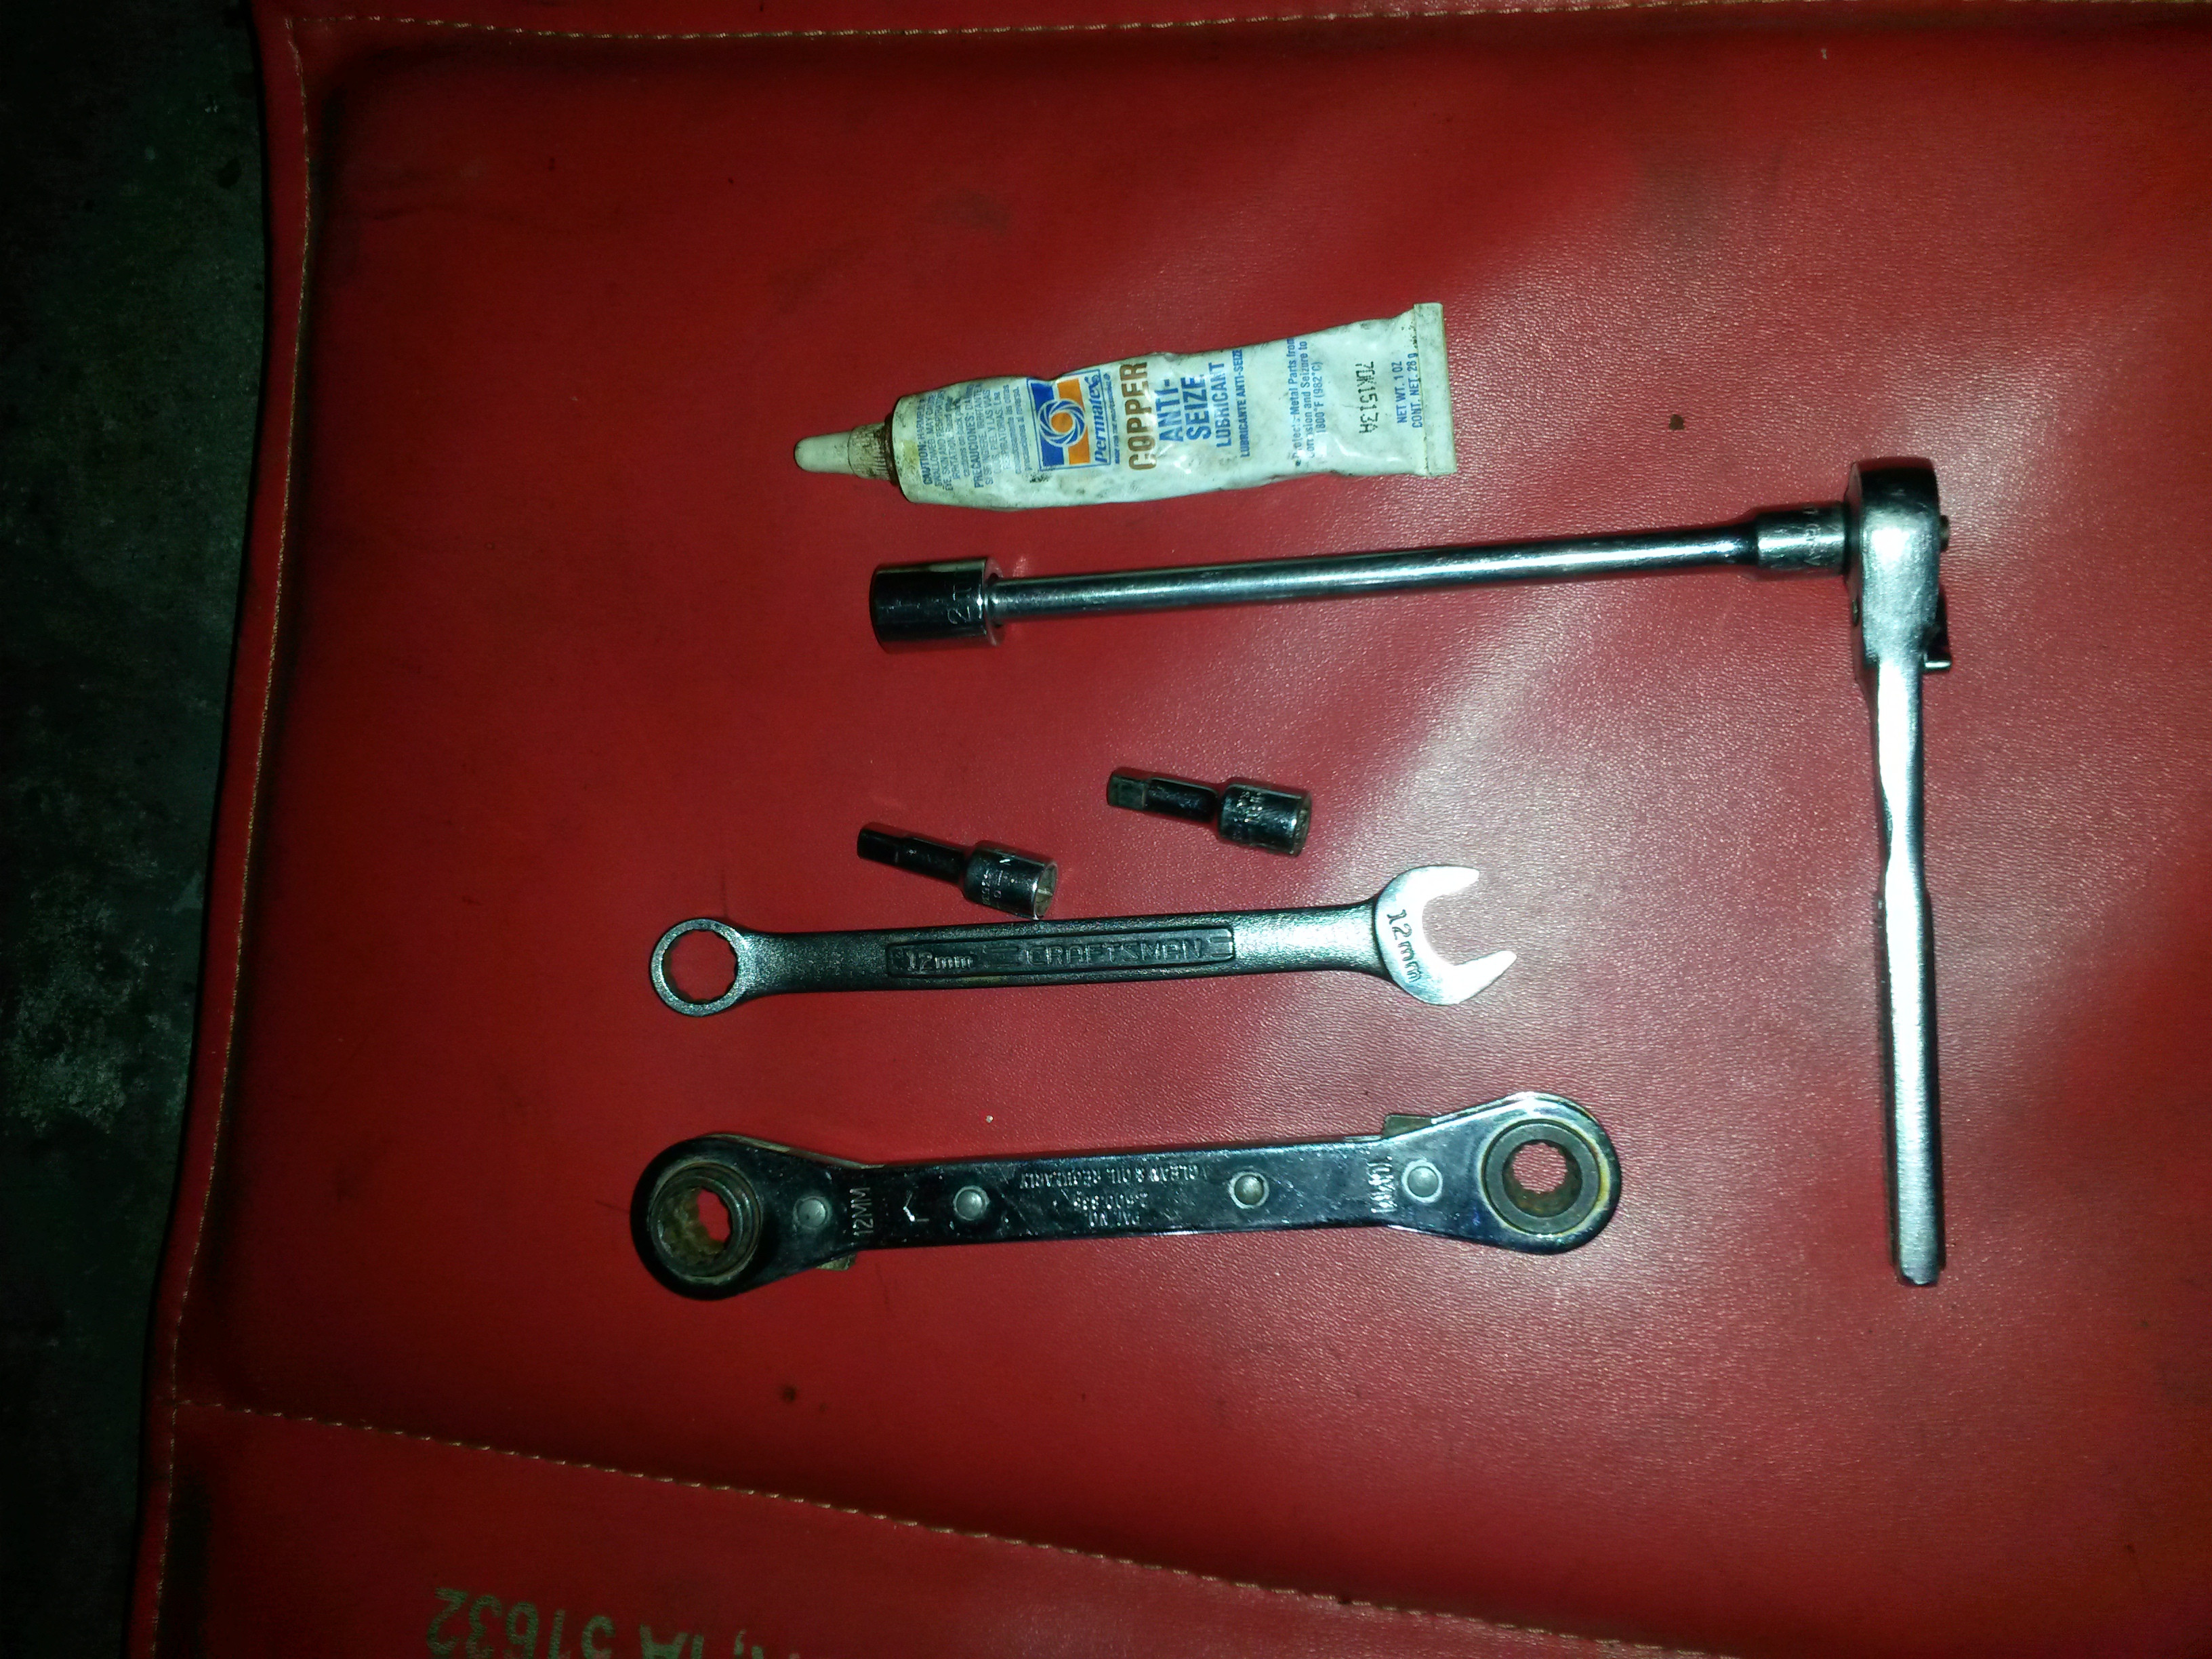
These are basically the tools I used to install each header. I figure as tight as I can get it with these would not be too tight. I hope anyways. New hardware was 12mm.
Driver side went on with little issues, except its very difficult to access the bolts. Its a bit of work just to find the right tool to tighten them down, no way you could get a torque wrench on there.
You can also see my brand new brakes and where i used chassis saver on the frame, then topcoated with rustoleum.
These are basically the tools I used to install each header. I figure as tight as I can get it with these would not be too tight. I hope anyways. New hardware was 12mm.
#55
08-12-2014, 07:36 PM
The passenger side was a real pain and I spent like 5 hours on it today.
These are the tools I used:
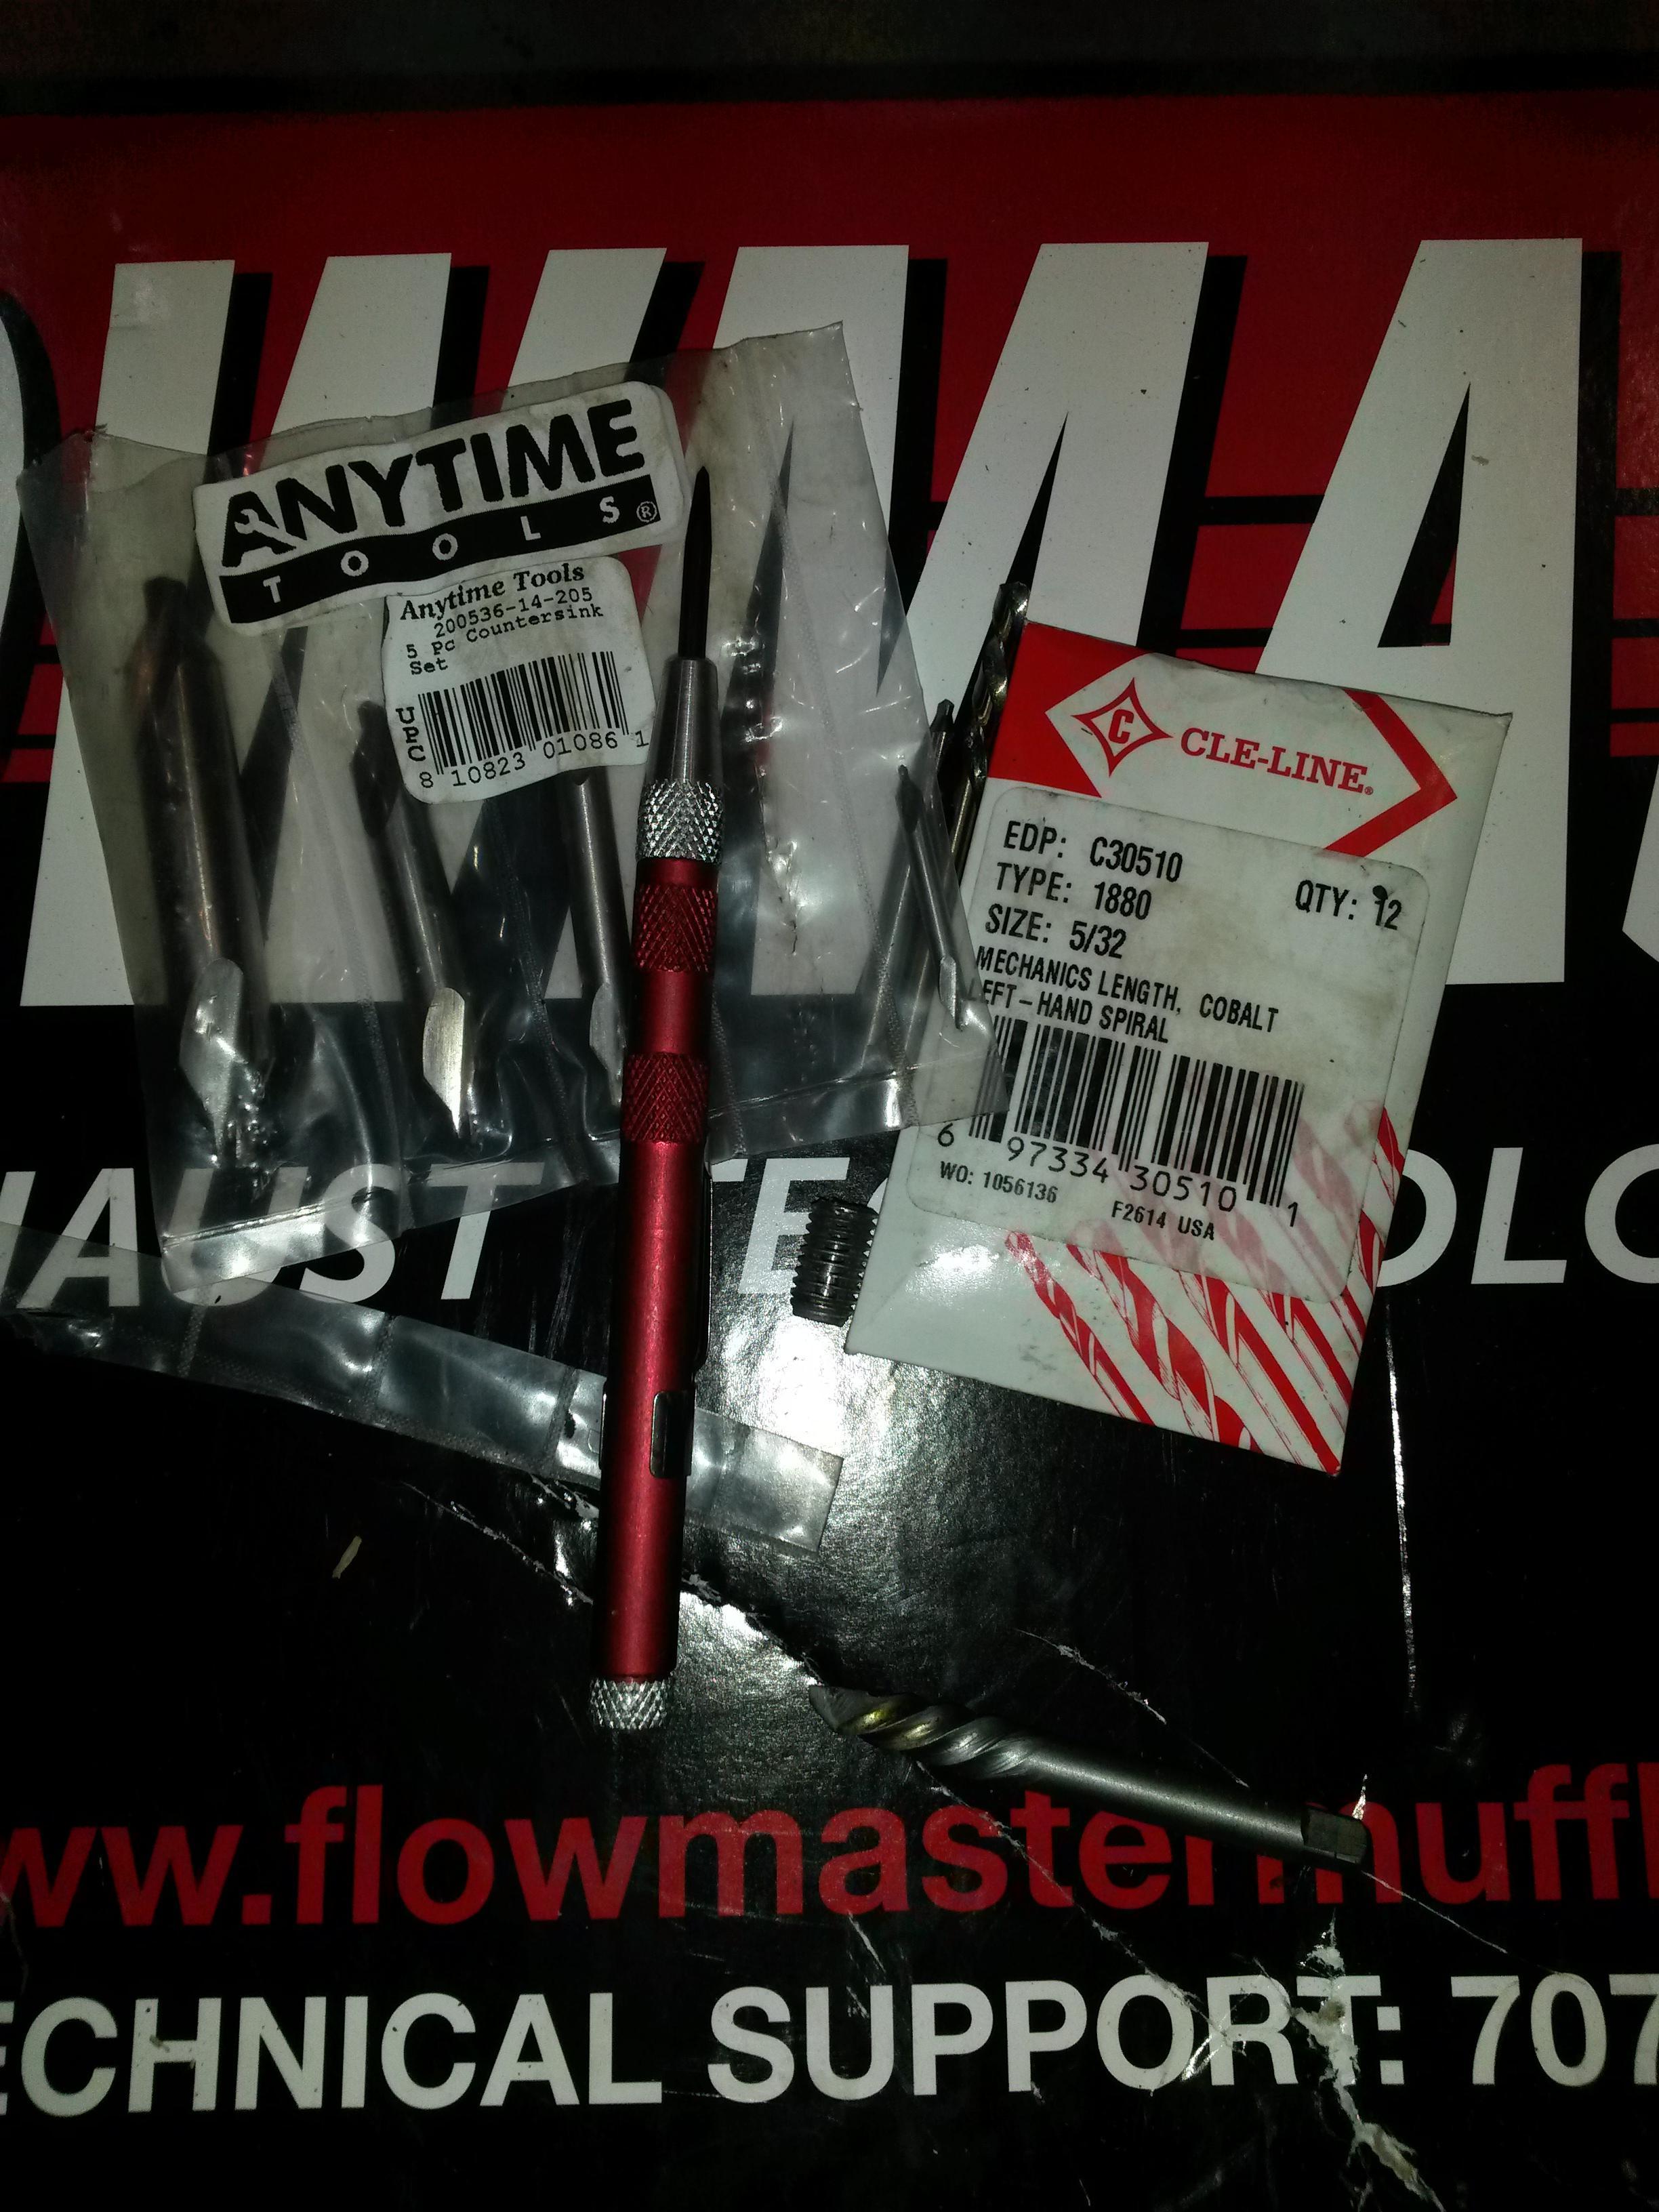
I REALLY recommend these drill bits. Very high quality.
-Wow looks like I got the last pack in stock, now says 2-4 weeks!
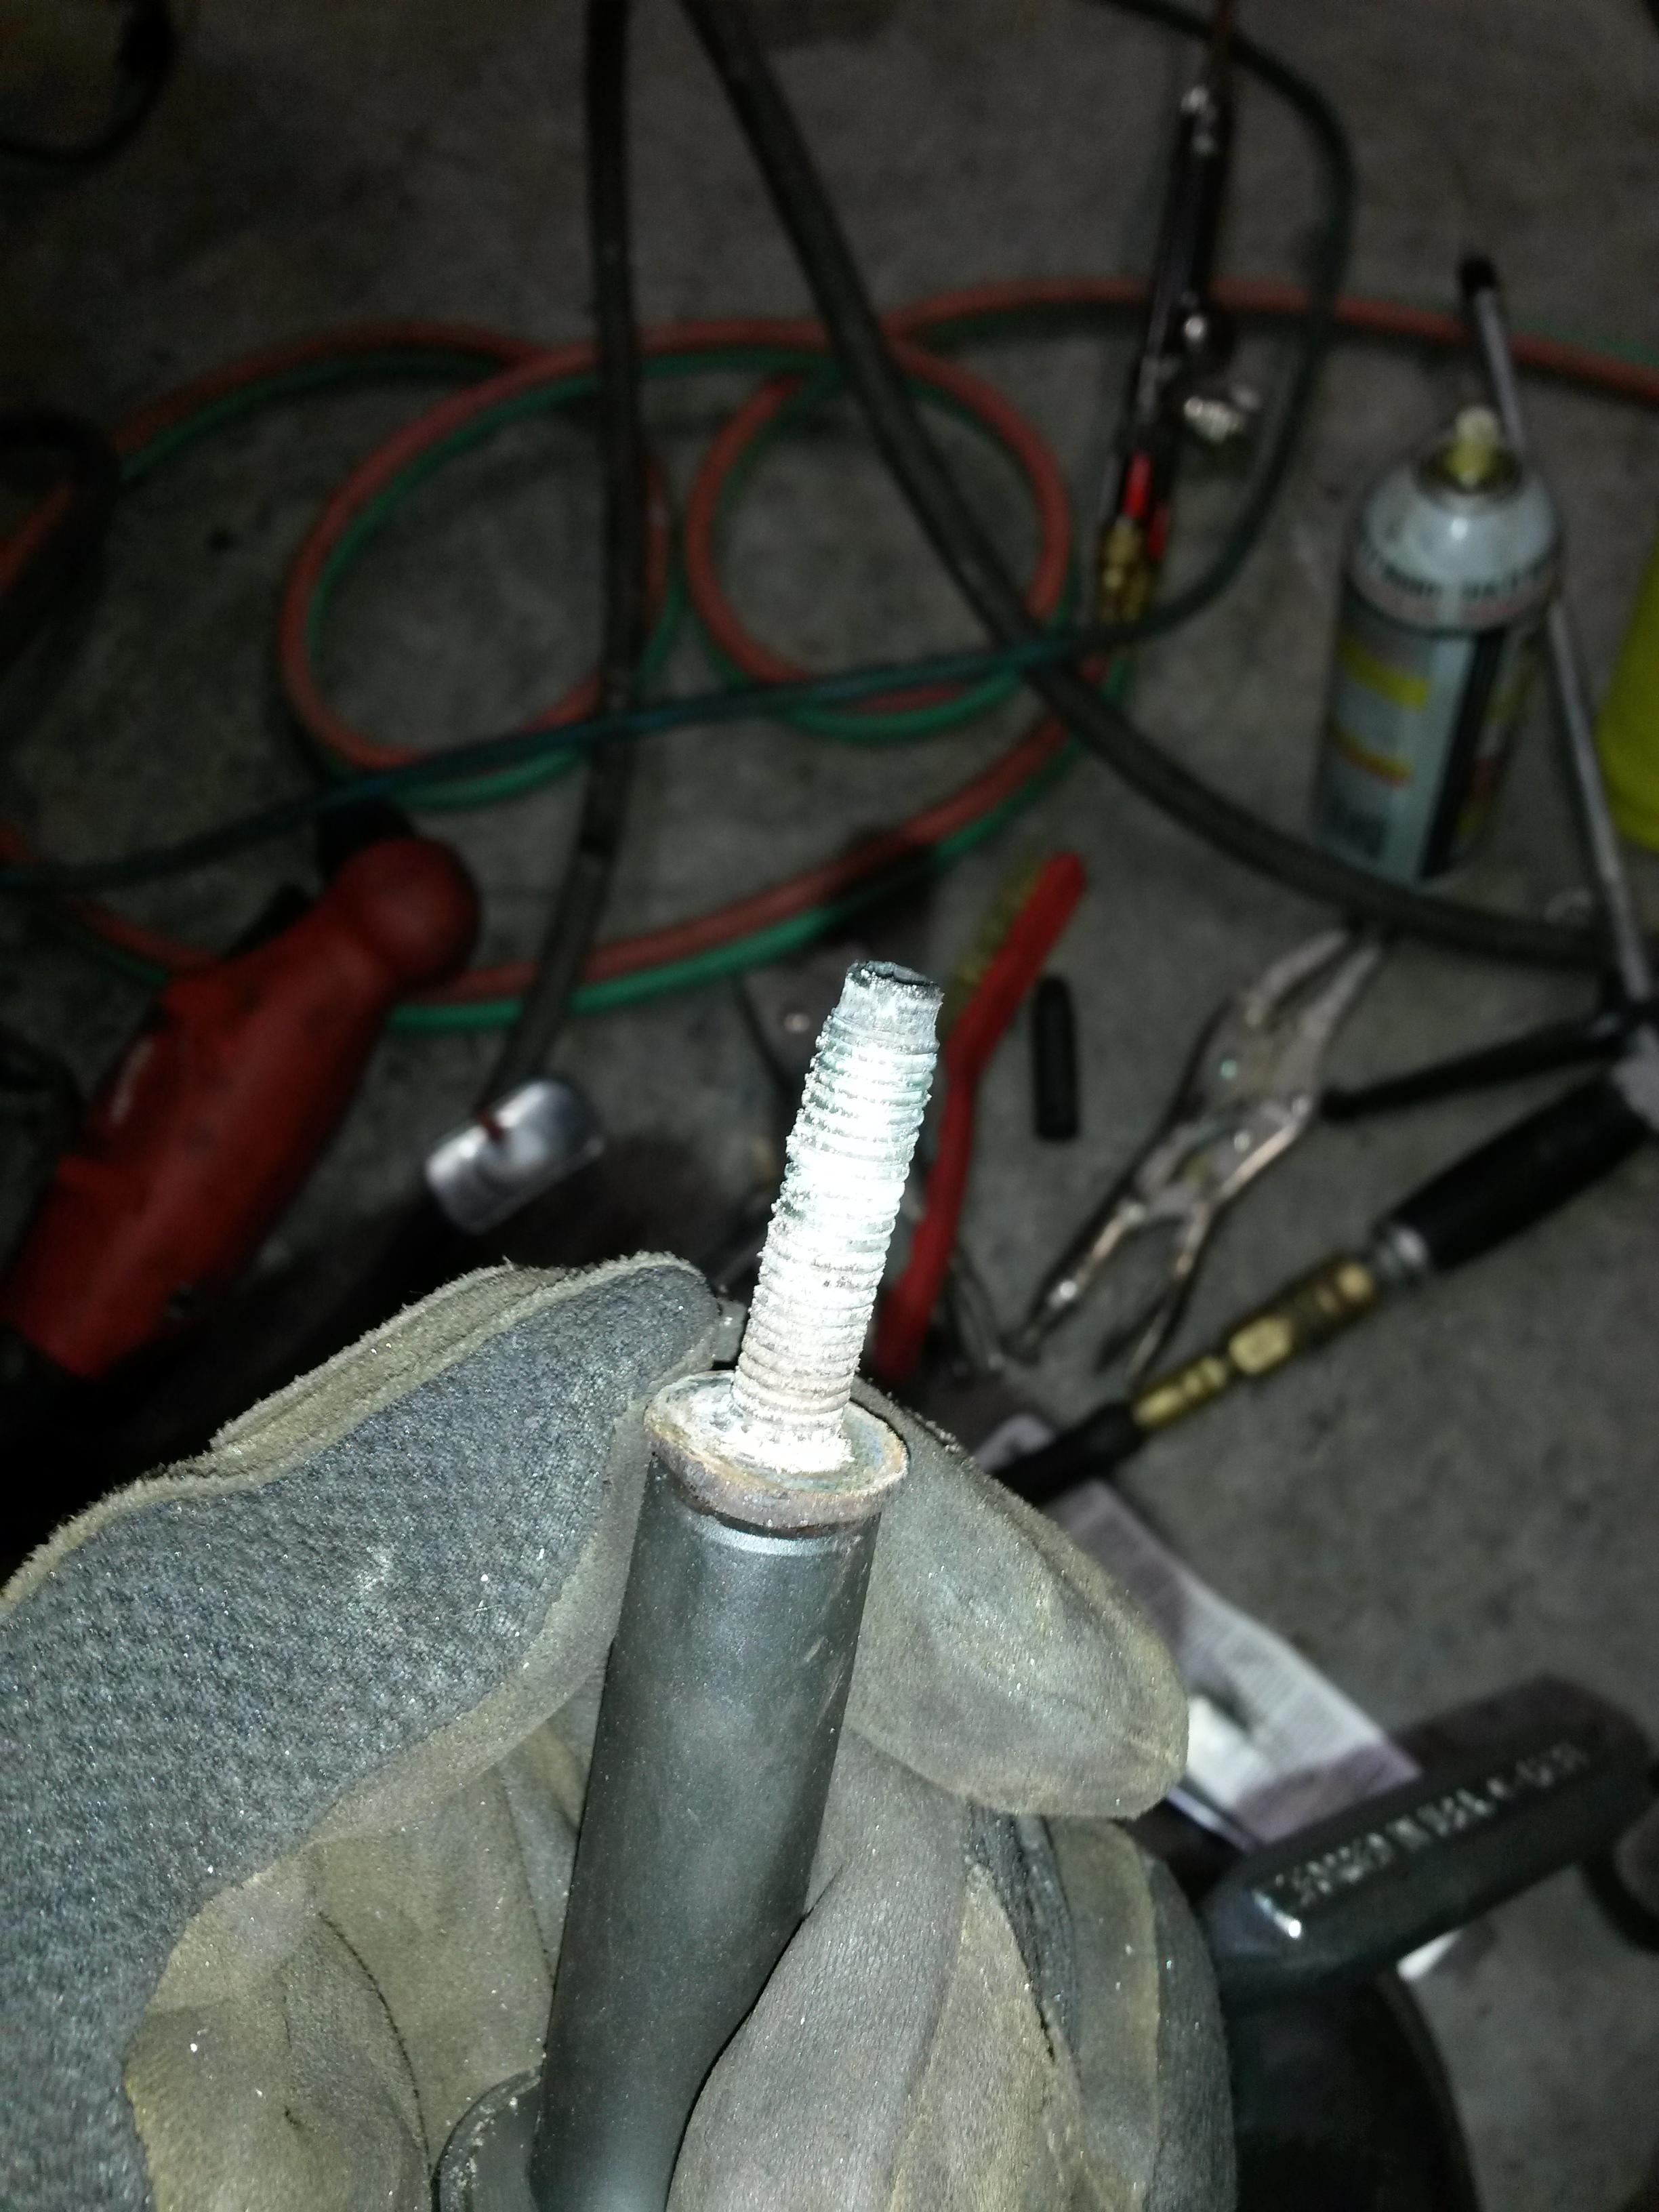
The upper stud came right out with a #3 easy out. I heated it up again after it was drilled, and I think that helped.

The lower bolt would not budge after I drilled it with the 5/32 LH bit. Got it really hot, then broke my easy out. I was lucky enough to knock the chunk out with a punch and hammer. Ended up drilling it out with a 17/64th bit and tapped it to 8mmx1.25.
I ended up being a little off center , and could see some steel still in the hole. I tapped it anyways, and was able to tighten a bolt in the hole. Did not tighten this one as tight as the other as I am afraid of ripping the threads out. If it fails me I will drill and tap the hole to 9mm.
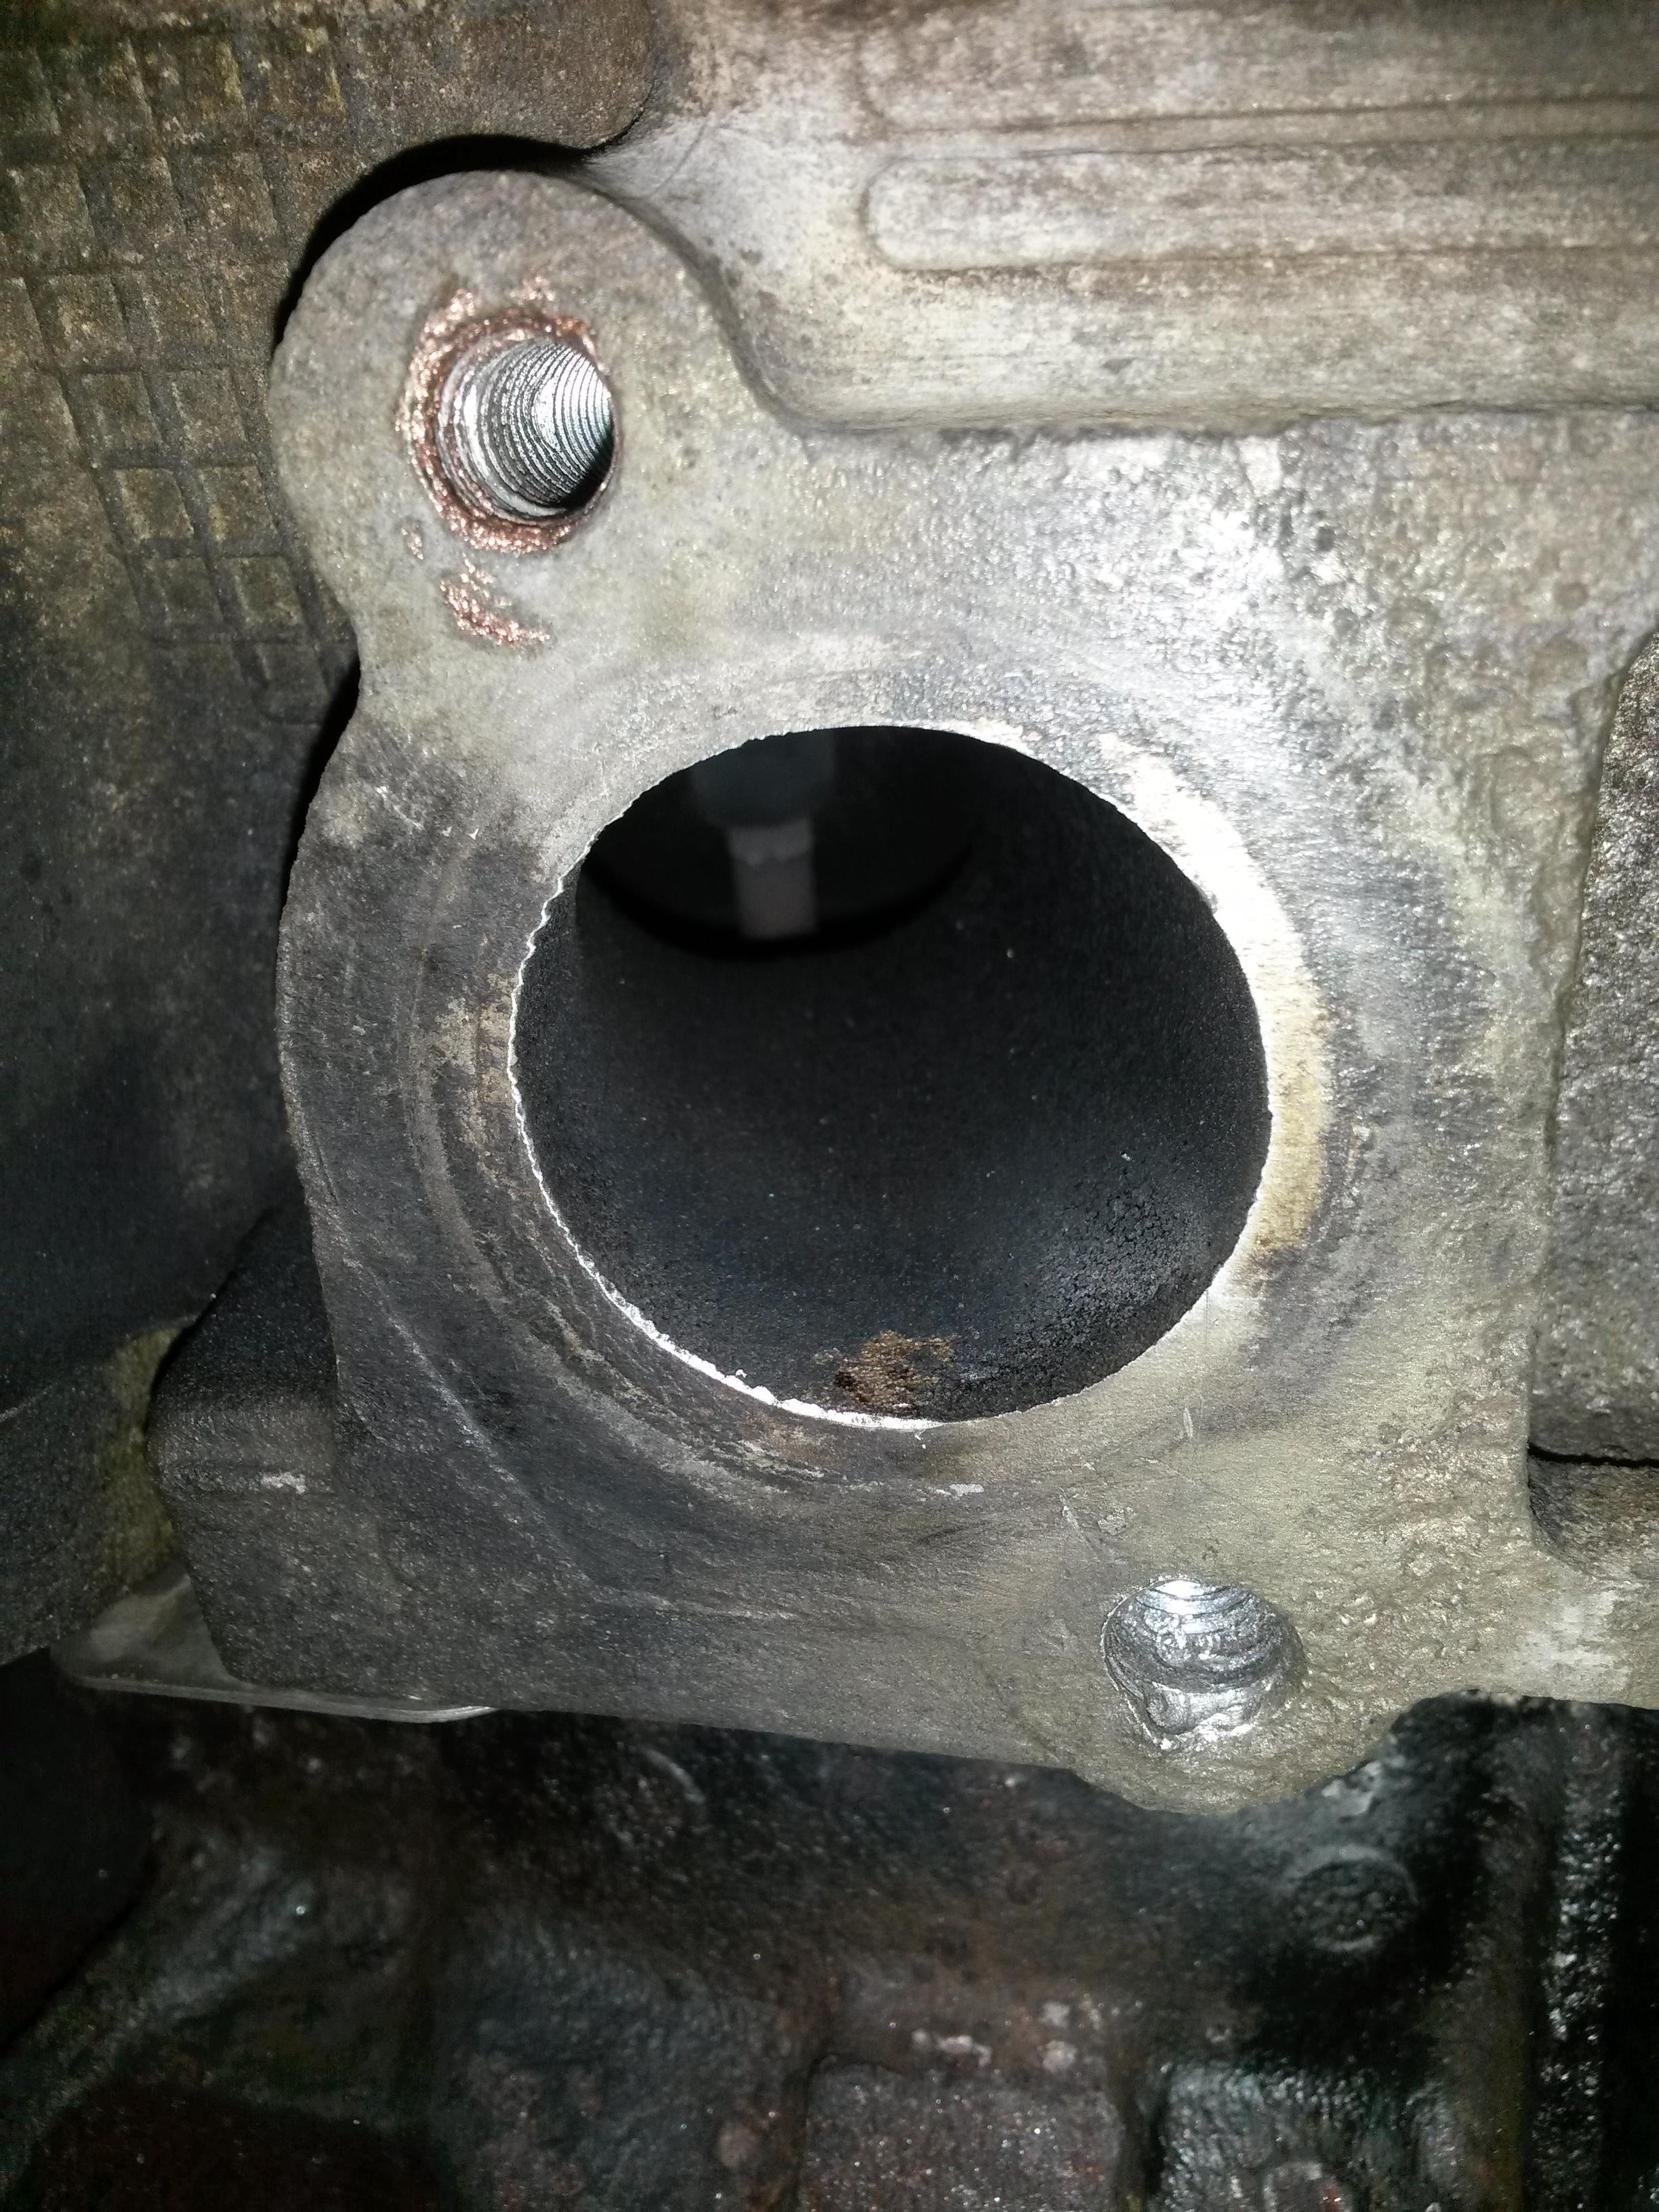
-A brass wire brush worked very well for cleaning the gasket surface. You can see the pitting from where the rusting iron corroded the aluminum. Glad I did not wait much longer.

These are the tools I used:
I REALLY recommend these drill bits. Very high quality.
-Wow looks like I got the last pack in stock, now says 2-4 weeks!
The upper stud came right out with a #3 easy out. I heated it up again after it was drilled, and I think that helped.
The lower bolt would not budge after I drilled it with the 5/32 LH bit. Got it really hot, then broke my easy out. I was lucky enough to knock the chunk out with a punch and hammer. Ended up drilling it out with a 17/64th bit and tapped it to 8mmx1.25.
I ended up being a little off center , and could see some steel still in the hole. I tapped it anyways, and was able to tighten a bolt in the hole. Did not tighten this one as tight as the other as I am afraid of ripping the threads out. If it fails me I will drill and tap the hole to 9mm.
-A brass wire brush worked very well for cleaning the gasket surface. You can see the pitting from where the rusting iron corroded the aluminum. Glad I did not wait much longer.
#56
08-12-2014, 07:39 PM
One last suggestion when doing these would be to pull each one of the starter bolts and put anti seize on them. Mine were very tough to get out, and the top 2 would be even tougher with the manifold installed. They are 10mm
Pretty sure thats the original starter.
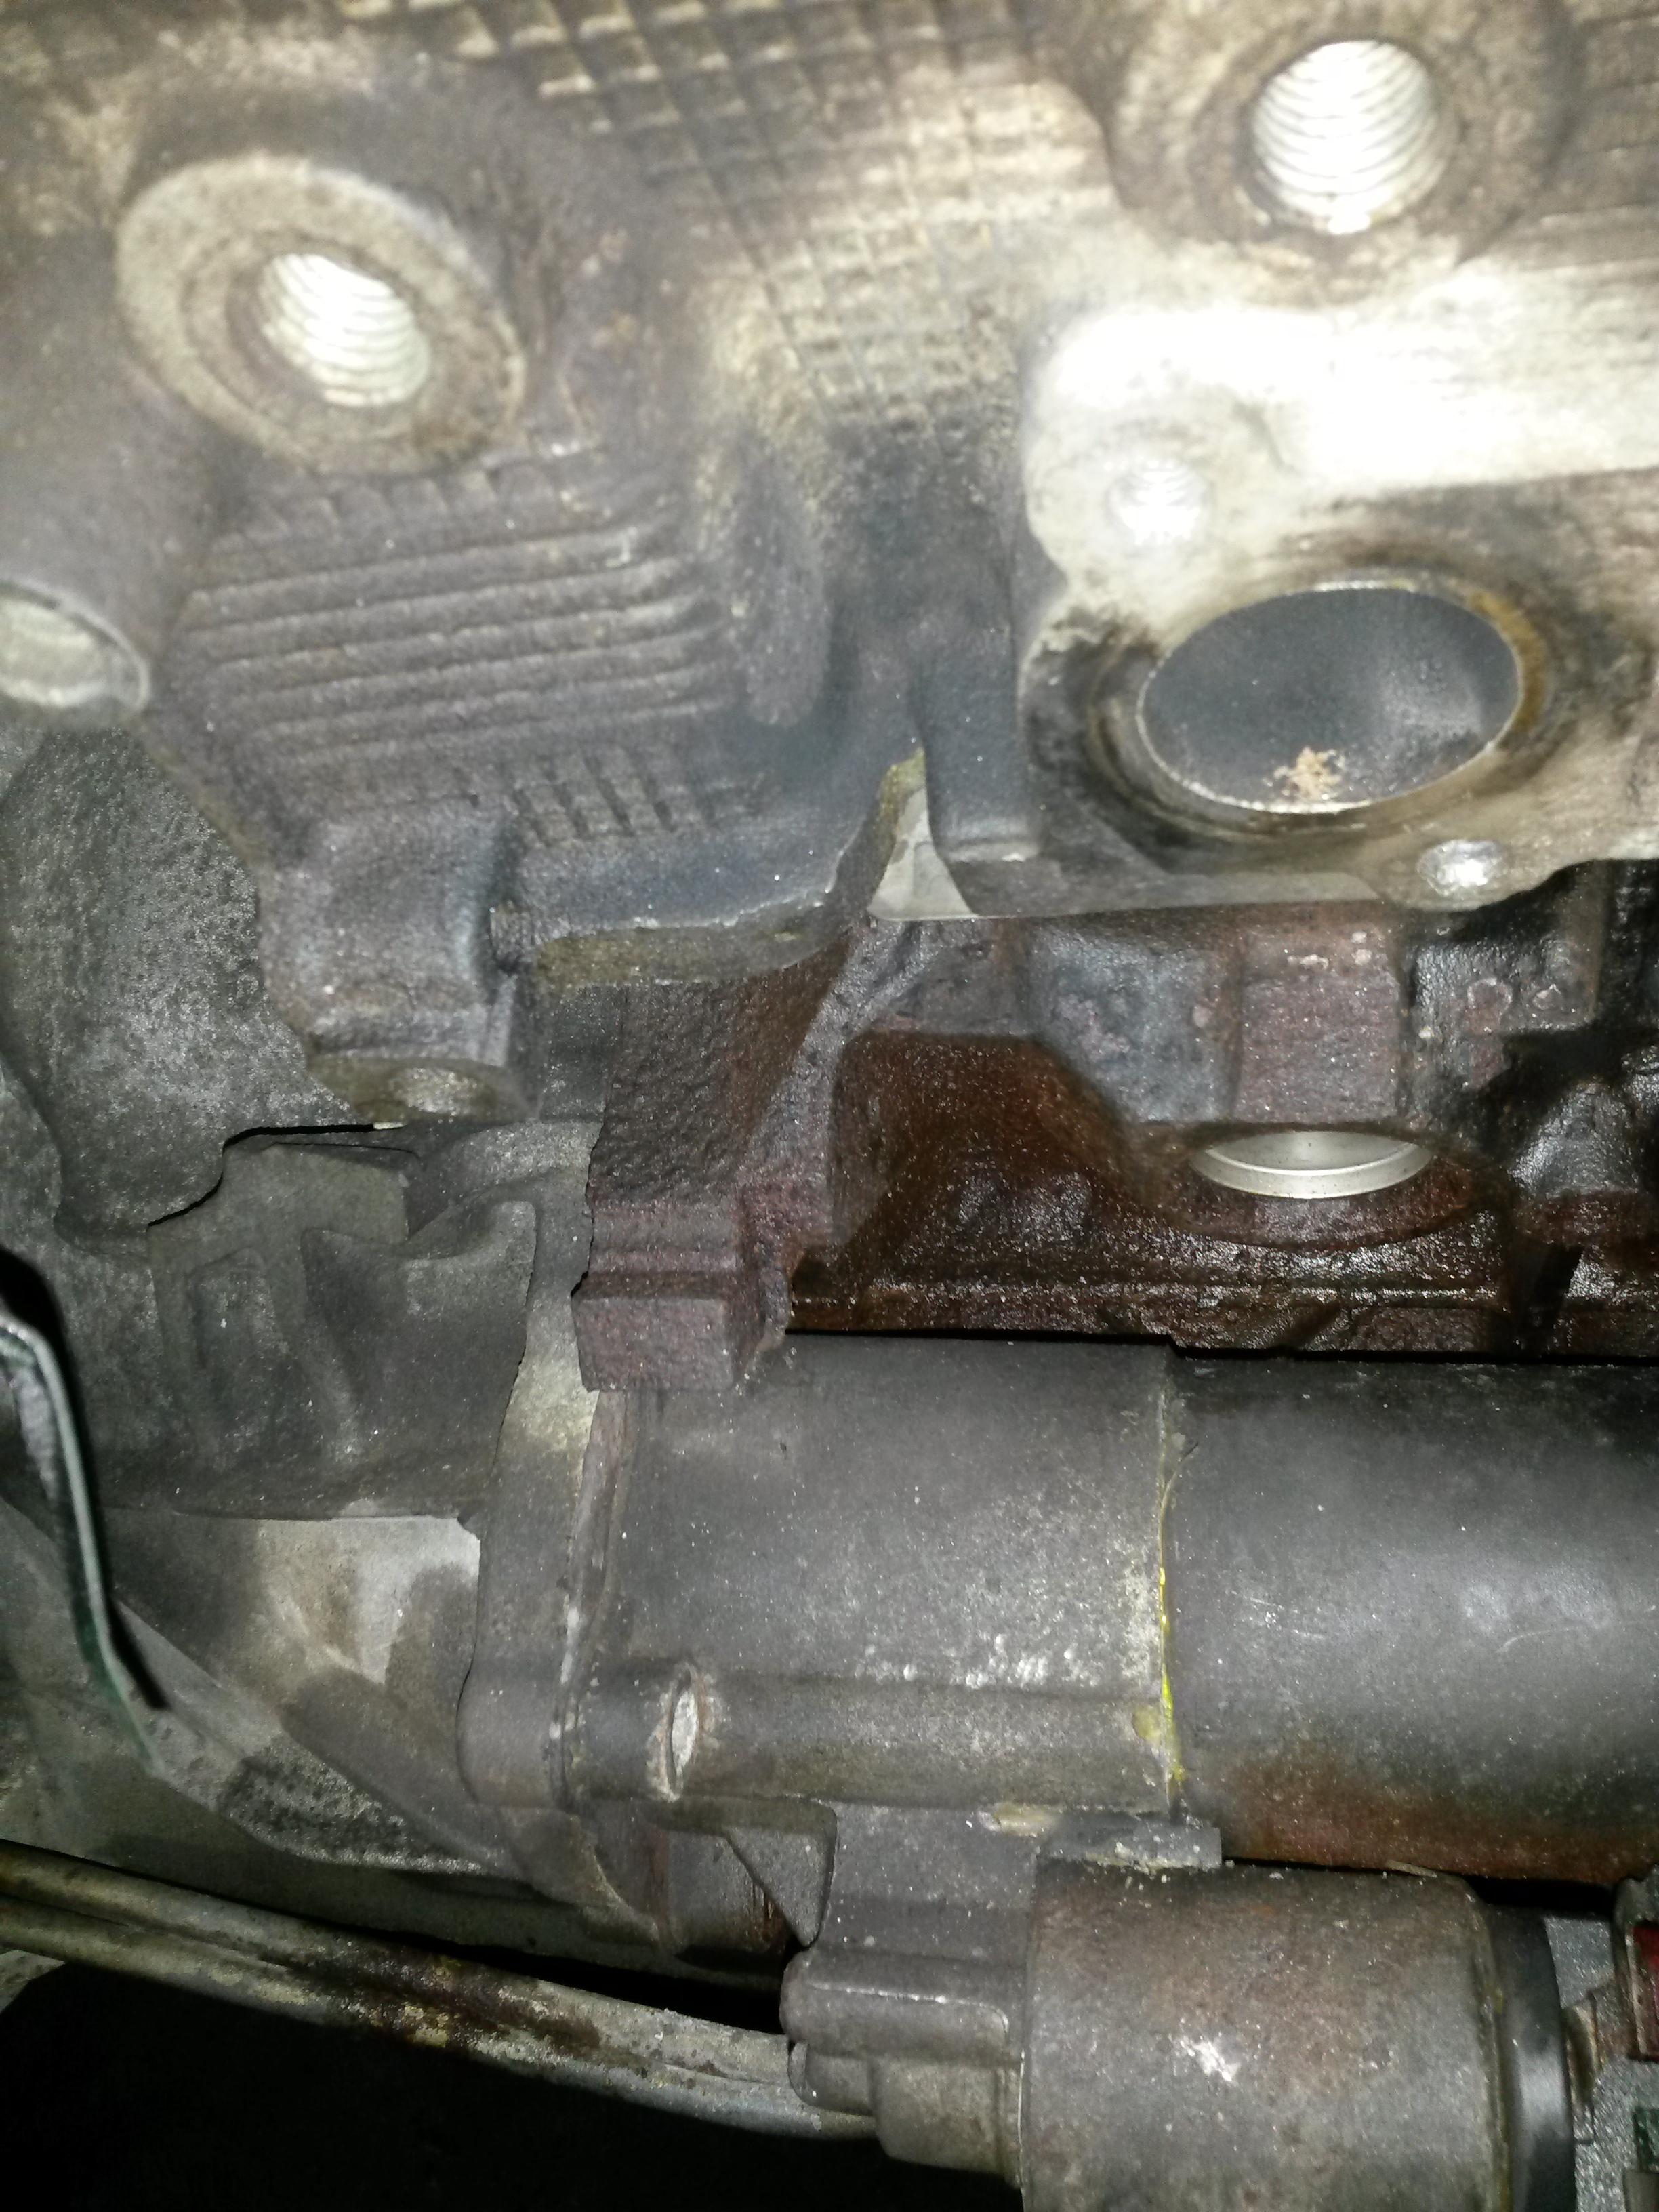
Corrosion on bolt:
I hope this information helps somebody out, because I could not find much on this topic.
Pretty sure thats the original starter.
Corrosion on bolt:
I hope this information helps somebody out, because I could not find much on this topic.
#57
08-12-2014, 11:40 PM
#58
08-13-2014, 12:04 AM
FTE Chapter Leader
Looks to be a paint sealing system to stop rust.
Paint Over Rust to Stop Rust Permanently With Chassis Saver Truck & Auto Underbody Coating
Sean
Paint Over Rust to Stop Rust Permanently With Chassis Saver Truck & Auto Underbody Coating
Sean
#59
08-13-2014, 01:09 AM
Yeah its what Sean linked to. Its VERY sticky stuff and you should wear gloves. I still have grey stains on my upper arm from it, while the rustoleum scrubbed off. I basically used a wire brush, brake cleaner and an air gun to get it as clean as possible. Did the axles and brake shields as well. Was alot of work!
I just stopped working about 30 minutes ago, got the new dipstick in no problem (put anti sieze on the end of it, put it in position, and put downward pressure as you twist it back in forth. popped right in flush). Also got the new stabilizer in, reinstalled the Y pipe and bolted the driveshaft back up. Heading back to school friday, so its crunch time!
Some additional advice, DO NOT SUBSTITUTE SOFT FUEL LINE!! I though I broke the plastic connector on the fuel pump, so I took it off (destroying the hard plastic line in the process). Turns out the connector was fine, so I sqeezed it into some fuel injection rated 5/16 line, pushed the other end over the metal line about a foot back from the filter and added 2 hose clamps. Tight as I could get them and still sprays fuel.
-Going to the dealer tomorrow to get the correct line

#60
08-14-2014, 10:54 PM