
BossFan's '78 F250 build
#151
 09-12-2014, 02:52 PM


Join Date: Jul 2011
Location: Stockholm, NJ
Posts: 609
Likes: 0
Received 0 Likes
on
0 Posts
No man, sorry if we confused you. Absolutely leave the complete axle housing u bolted under the truck unless you are replacing the whole thing with a D60 
Yes is you are going to replace the ball joints...just pull them. You have to, to get the steering knuckle off, to get to the ball joints. The ball joints are what holds the steering knuckle on. And you have to any way to be able to replace the axle u joints.
Yes is you are going to replace the ball joints...just pull them. You have to, to get the steering knuckle off, to get to the ball joints. The ball joints are what holds the steering knuckle on. And you have to any way to be able to replace the axle u joints.
Don't start tempting me with that D60 stuff.
Yes as in I should remove the axles or all those bolts, or both?
#152
09-12-2014, 02:56 PM

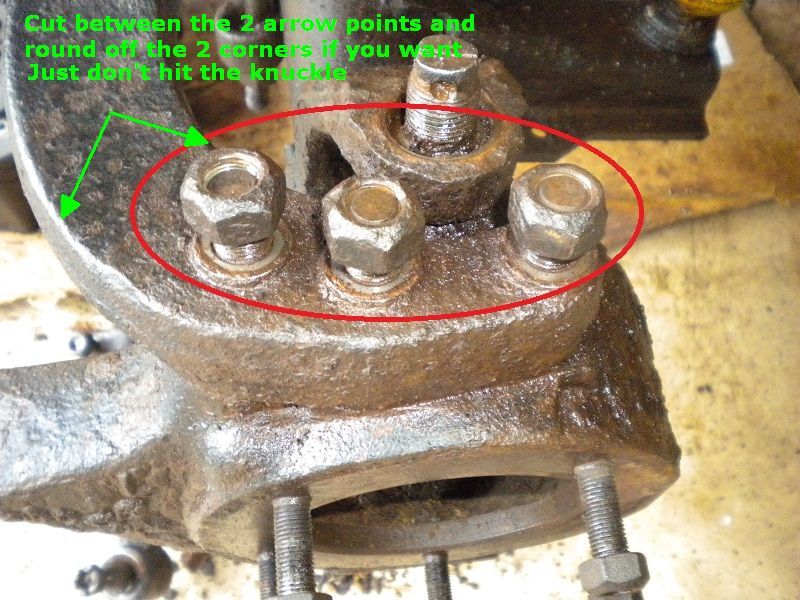
redroad batter up on the cross over bushiness.
I will try...with a cross over the curved arm held on buy the 3 studs will be removed all together. So #6 is a moot point cause the fixed link (#6 is one end) and the other is going to the pitman arm will go away also.
#3, is a tie rod mount bolt, its coming off if you are replacing the tie rod ends (you are right?) so you can remove the old one from the steering knuckle. Time for the tie rod fork, and put the nut on with some slack and BFH it while the fork in there and applying pressure down.
#4 is where the new tie rod end threads in and #4& $5 together is how you adj for the front end aliment....and then tighten both once set.
#153
09-12-2014, 03:04 PM
Ok no D60 stuff...
Ok back to square 1 for a sec, do you at least have a Chilton or a Hanes manual on hand? That will cover the basics of tear down and replacement of common items we are talking about.
1976 - 1986 Ford F100, F150, F250, F350 & Bronco (1978 - 86 only); 2/4 wheel drive, Gas/Diesel Chilton's Total Car Care Manual
Pretty much the same basic manual, some wiring and vacuum diagram are better than others, I have both to back reference each other.
Library for free access and copy what section you need, or buy it at the parts store for maybe $12.00
#154
09-12-2014, 03:05 PM
#155
09-12-2014, 03:14 PM
#156
09-12-2014, 03:18 PM

Freshman User
Join Date: Jan 2008
Location: Apollo Beach
Posts: 32
Likes: 0
Received 0 Likes
on
0 Posts
So I removed the pan tonight and I'm not sure if my rear main is leaking, but it does look like the rear corners of the pain were loaded with RTV gasket maker. I would use a one-piece pan gasket when I put it back together. I'm guessing I should still pull the crank?
You can also see the broken bolt in my crankshaft. Grrr....
You can also see the broken bolt in my crankshaft. Grrr....
#157
09-12-2014, 03:37 PM
I'm still outside jack hammering away on my trench so I'm contributing on my break 
The only time the drivers side knuckle is machined is with high steer .. So in your case that is not something I would add the expense for if your not doing any serious 4 wheelin because it is done to get the linkage up out of the way so not to hit rocks etc. ..
The only time the drivers side knuckle is machined is with high steer .. So in your case that is not something I would add the expense for if your not doing any serious 4 wheelin because it is done to get the linkage up out of the way so not to hit rocks etc. ..
#158
09-12-2014, 03:44 PM
#159
09-12-2014, 06:01 PM
Join Date: Jul 2011
Location: Stockholm, NJ
Posts: 609
Likes: 0
Received 0 Likes
on
0 Posts
Ok no D60 stuff...
Ok back to square 1 for a sec, do you at least have a Chilton or a Hanes manual on hand? That will cover the basics of tear down and replacement of common items we are talking about.
Robot Check
1976 - 1986 Ford F100, F150, F250, F350 & Bronco (1978 - 86 only); 2/4 wheel drive, Gas/Diesel Chilton's Total Car Care Manual
Pretty much the same basic manual, some wiring and vacuum diagram are better than others, I have both to back reference each other.
Library for free access and copy what section you need, or buy it at the parts store for maybe $12.00
I have the Haynes manual as well as a set of 1978 Ford Truck Shop Manuals I bought on eBay. But I like the camaraderie here better.
#160
09-13-2014, 09:56 AM
Join Date: Jul 2011
Location: Stockholm, NJ
Posts: 609
Likes: 0
Received 0 Likes
on
0 Posts
So I got the tie rods loose using a pickle fork. I'm still not sure how to get the arm that sits on top of the knuckle separated from the knuckle. The three bolts are loose. I know those are studs in tapered sleeves. Do I just use more healthy 'persuasion' from underneath?
Also, is the last pic a pitman arm puller? I think it's what I used when I rebuilt the front end on my 1970 GTO Judge (which was a cake walk compared to this truck)
Also, is the last pic a pitman arm puller? I think it's what I used when I rebuilt the front end on my 1970 GTO Judge (which was a cake walk compared to this truck)
#161
09-13-2014, 10:19 AM
"Healthy persuasion from underneath", sounds right to me, but I have not pulled one of them (steering arms) off before. Prying pressure from both sides and a BFH, maybe a puller will fit on there too?
redroad should have the better answer, and what to do about the studs, (cut off)? once you go to crossover steering.
Yes that is a pit man arm puller, a 2 or 3 arm gear puller will work too in a pinch too. The ball joints take a C clamp with different size collars, that should be rentable.
And you should be able to use it on the front axle u-joints too.
#162
09-13-2014, 01:50 PM
Join Date: Jul 2011
Location: Stockholm, NJ
Posts: 609
Likes: 0
Received 0 Likes
on
0 Posts
Thanks. This forum is the best! It took me more than 20 hours to get the driver side apart, but after all the help I got form you guys, I was able to disassemble the passenger side in less than 2 hours! Thanks!
Does anyone know what size the ball joint nut is? I used a 1 1/4 on the driver side, but that was a bit corroded. The passenger one is in better shape, but a 1 1/4 doesn't fit. I clearly need to go buy a bigger socket and want to make sure I buy the right one.
I also made my own little spindle puller.
#163
09-13-2014, 03:07 PM
1 5/16 is next up from 1 1/4?
At least we kept you from pulling your COMPLETE axle housing....
Maybe a good idea on the home made puller, maybe not? Trying to imagine what the end of axle is pushing on as you tighten it down? Spider gears.... Did you just apply light pressure, then use a dead blow hammer to tap the spindle loose?
Looking at other pic of spindle pullers, that look to work the same way, so I'd guess you are ok.
So you getting new complete rotors and hubs or doing just a rotor swap? I remember buying just new rotors once along time ago...$100+ each? I think? Could be wrong.
#164
09-13-2014, 04:56 PM
#165
09-14-2014, 07:53 AM
Join Date: Jul 2011
Location: Stockholm, NJ
Posts: 609
Likes: 0
Received 0 Likes
on
0 Posts
I'm probably going with complete hub/rotor assemblies.