
Fuel Filler neck replacement w/pictures for Dummies
#1
 03-17-2014, 08:44 PM

Fuel Filler neck replacement w/pictures for Dummies
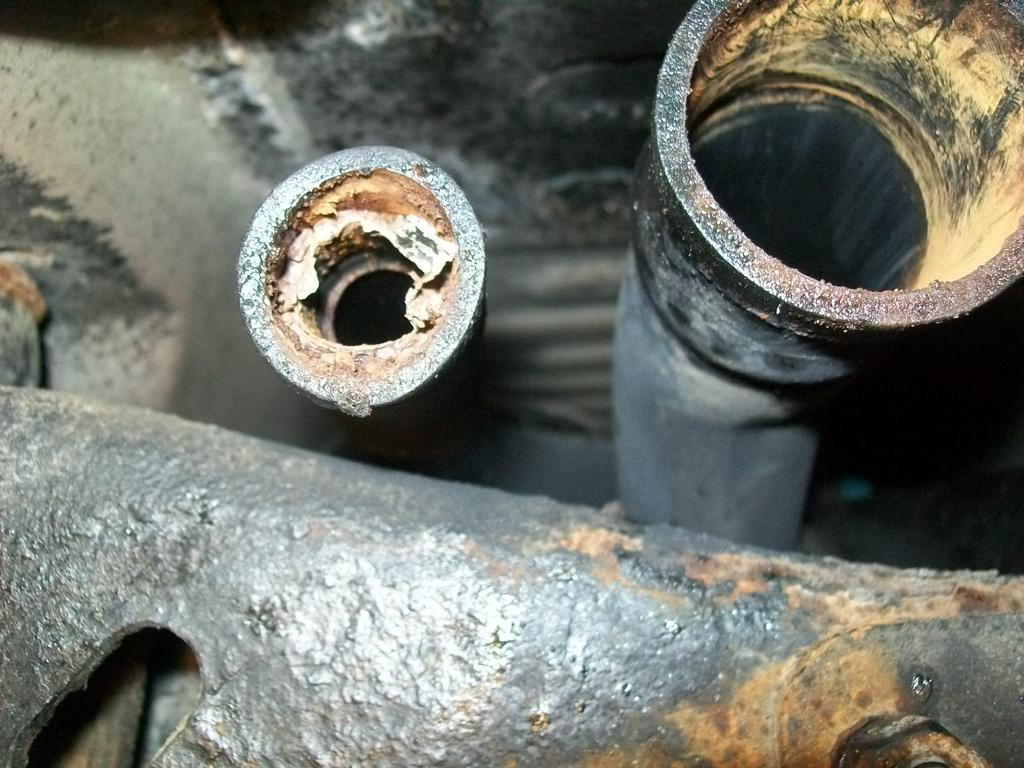
Replacing the fuel filler neck on a 2000 Excursion.
This is where I started, with a pretty good leak when filling my tank and obvious signs of impending metal death on the filler tubes where they connect to the tank hoses.

First I took off the hose clamps.

Then scraped up as much of the dying metal, old paint and rust from where the tubes meet the hoses. Used a flat head screw driver to get in and under the hoses and get out as much gunk as I could.

Then went topside to remove the 3 bolts holding the neck to the fuel filler area. These are 7mm bolts, I gave them a shot of fluid film and first one came off easily.

2nd one not so much....

Its stuck in the hole but been there done that...

and vice grips from the back side and some twisting and it came loose.

Then I took a pry bar and got the upper portion down through the opening giving me more room to twist and turn and free the tubes from the hoses.

Now back to getting the hoses free from the old tubes. You can see all the rust built up around where the metal meets the hoses. This part took a while, scrape scrape scrape, wiggle, twist, pull. Larger hose came free fairly easy and the smaller tube broke, so I took some bolt cutters to that one and cut it free, leaving me with a hunk of jagged metal in the small hose.

Vice grips again and I crushed down the smaller piece to collapse it and most of it came free after some brute force.

Now I'm left with just the end piece stuck in the smaller hose.
Some more cussing and twisting this time with needle nosed vice grips and that final piece relented.

Cleaned all the gunk out of the hoses, and cleaned them up. Then slide the larger tube in first, the rotated it up and wedged it against the outer wall, then wedge the small hose down and made sure both were seated. There is a grove were the lip of the tubes sits about 2" into the hose.

Then back up and reinstall the bolts at the gas cap. I broke one but found one in my piles and piles of bolts I have removed from this truck that worked. Tightened those up and put the cap back on.

Then back down to set the hose clamps and tighten.

Nice and hopefully dry fuel filler neck installed. Took me 90 minutes.

Verdict in the AM when I fill er up.
This is where I started, with a pretty good leak when filling my tank and obvious signs of impending metal death on the filler tubes where they connect to the tank hoses.
First I took off the hose clamps.
Then scraped up as much of the dying metal, old paint and rust from where the tubes meet the hoses. Used a flat head screw driver to get in and under the hoses and get out as much gunk as I could.
Then went topside to remove the 3 bolts holding the neck to the fuel filler area. These are 7mm bolts, I gave them a shot of fluid film and first one came off easily.
2nd one not so much....
Its stuck in the hole but been there done that...
and vice grips from the back side and some twisting and it came loose.
Then I took a pry bar and got the upper portion down through the opening giving me more room to twist and turn and free the tubes from the hoses.
Now back to getting the hoses free from the old tubes. You can see all the rust built up around where the metal meets the hoses. This part took a while, scrape scrape scrape, wiggle, twist, pull. Larger hose came free fairly easy and the smaller tube broke, so I took some bolt cutters to that one and cut it free, leaving me with a hunk of jagged metal in the small hose.
Vice grips again and I crushed down the smaller piece to collapse it and most of it came free after some brute force.
Now I'm left with just the end piece stuck in the smaller hose.
Some more cussing and twisting this time with needle nosed vice grips and that final piece relented.
Cleaned all the gunk out of the hoses, and cleaned them up. Then slide the larger tube in first, the rotated it up and wedged it against the outer wall, then wedge the small hose down and made sure both were seated. There is a grove were the lip of the tubes sits about 2" into the hose.
Then back up and reinstall the bolts at the gas cap. I broke one but found one in my piles and piles of bolts I have removed from this truck that worked. Tightened those up and put the cap back on.
Then back down to set the hose clamps and tighten.
Nice and hopefully dry fuel filler neck installed. Took me 90 minutes.
Verdict in the AM when I fill er up.
#2
03-17-2014, 08:50 PM
More Turbo
Good luck on the fill up, Im sure it'll be fine.
Thanks for the write up and pics, I might be going down that road as well soon.
Fluid film is an awesome product, I sprayed a coat on the entire underside of my EX before the snowfall this year, its still there and doing a great job of protecting the truck from salt
Thanks for the write up and pics, I might be going down that road as well soon.
Fluid film is an awesome product, I sprayed a coat on the entire underside of my EX before the snowfall this year, its still there and doing a great job of protecting the truck from salt
#3
03-17-2014, 09:32 PM
#4
03-17-2014, 10:13 PM

It seems like there is no end to that rust on that truck. I read that there is a one way ball type valve where the neck meets the tank that makes it harder to use a siphon hose. Did you see anything like that? I also heard there is a metal inner fender strap that can be removed to make the job easier.
Thanks for the write-up.
Thanks for the write-up.
#5
03-18-2014, 05:30 AM
Good luck on the fill up, Im sure it'll be fine.
Thanks for the write up and pics, I might be going down that road as well soon.
Fluid film is an awesome product, I sprayed a coat on the entire underside of my EX before the snowfall this year, its still there and doing a great job of protecting the truck from salt
Thanks for the write up and pics, I might be going down that road as well soon.
Fluid film is an awesome product, I sprayed a coat on the entire underside of my EX before the snowfall this year, its still there and doing a great job of protecting the truck from salt
It seems like there is no end to that rust on that truck. I read that there is a one way ball type valve where the neck meets the tank that makes it harder to use a siphon hose. Did you see anything like that? I also heard there is a metal inner fender strap that can be removed to make the job easier.
Thanks for the write-up.
Thanks for the write-up.

#6
03-18-2014, 08:55 AM

Replacing the fuel filler neck on a 2000 Excursion.
This is where I started, with a pretty good leak when filling my tank and obvious signs of impending metal death on the filler tubes where they connect to the tank hoses.
First I took off the hose clamps.
Then scraped up as much of the dying metal, old paint and rust from where the tubes meet the hoses. Used a flat head screw driver to get in and under the hoses and get out as much gunk as I could.
Then went topside to remove the 3 bolts holding the neck to the fuel filler area. These are 7mm bolts, I gave them a shot of fluid film and first one came off easily.
Mine just has a hole there. Always wondered what it was for.
Good job on the repair. Amazing how that just rusts out.
#7
03-18-2014, 09:03 AM

Trending Topics
#8
03-18-2014, 11:40 AM
After sealing mine up or replacing everything underneath it gets a Fluid Film treatment every year, but the filler neck is one thing I didn't replace when I did the rest of the truck. Love Fluid Film, I had to scrub it off when I started working yesterday, it has some holding power. Only place it was gone was right under this hose, where gasoline had been pouring out and washed it away. It did a number on my brake caliper and u-bolt on that side. Will be sealing those up again here shortly.
There were no valves in either hose. The larger one came out fairly easy the small one which I assume is a vent - has the end very rounded but no ball I could find, well unless it's down in my tank now. I hope not. I know the new one had no valves on it. I had just painted over that rust when I did the other truck since I didn't want to "grind down a fuel neck" and man it was bad once that paint started to peel off. Hopefully now it won't take 60 gallons of gas to get 44 in my tank.
There were no valves in either hose. The larger one came out fairly easy the small one which I assume is a vent - has the end very rounded but no ball I could find, well unless it's down in my tank now. I hope not. I know the new one had no valves on it. I had just painted over that rust when I did the other truck since I didn't want to "grind down a fuel neck" and man it was bad once that paint started to peel off. Hopefully now it won't take 60 gallons of gas to get 44 in my tank.
#10
03-18-2014, 01:31 PM


#12
03-18-2014, 03:13 PM
Great Job, somehow I knew this thread would show up…. 
Christina, you really do a terrific job of documenting your projects, I'm always too wrapped up in the (dis)assembly to remember to take pics during..
PM me, when you are ready to do the:
"how to install a 4" MBRP turbo back exhaust on a 6L - for dummies"

Christina, you really do a terrific job of documenting your projects, I'm always too wrapped up in the (dis)assembly to remember to take pics during..
PM me, when you are ready to do the:
"how to install a 4" MBRP turbo back exhaust on a 6L - for dummies"
#13
03-18-2014, 06:06 PM
Great Job, somehow I knew this thread would show up….
Christina, you really do a terrific job of documenting your projects, I'm always too wrapped up in the (dis)assembly to remember to take pics during..
PM me, when you are ready to do the:
"how to install a 4" MBRP turbo back exhaust on a 6L - for dummies"
Christina, you really do a terrific job of documenting your projects, I'm always too wrapped up in the (dis)assembly to remember to take pics during..
PM me, when you are ready to do the:
"how to install a 4" MBRP turbo back exhaust on a 6L - for dummies"
BTW filled it up and got just two drips out of the larger hose, gave the hose clamp one more turn tight, hopefully that fixes it. Really tough to reach and get enough grip to tighten well. Small hands are definitely a plus.
#14
03-18-2014, 06:12 PM
#15
04-16-2014, 11:19 PM
Some Post-Op Advice:
After replacing my rusty filler neck I had to drop the tank and clean out the fuel-pump pre-filter bags. They were full of debris and caused my ex to have fuel starvation under load symptoms. fuel pressure measured at idle before cleanout = 28psi, after = 30psi and the truck runs like never before - responsive, great passing power on the freeway. Before the cleanout I would floor the throttle and lose power. Now... ;-)
After replacing my rusty filler neck I had to drop the tank and clean out the fuel-pump pre-filter bags. They were full of debris and caused my ex to have fuel starvation under load symptoms. fuel pressure measured at idle before cleanout = 28psi, after = 30psi and the truck runs like never before - responsive, great passing power on the freeway. Before the cleanout I would floor the throttle and lose power. Now... ;-)