New Garage/Shop
#391
 11-08-2014, 07:18 PM


Inspector is going to want to see studs beneath each joist if you only have a single top plate.
There is a reason for double top plates, besides interlocking the corners.
Another reason for following 16oc. so there is always a load path to the foundation, and sheet goods land on studs..
There's no reason for a 3/4" floor unless you REALLY intend to load the heck out of it.
All sheathing carries a span rating.
7/16" OSB is more than enough for this application at 16 oc.
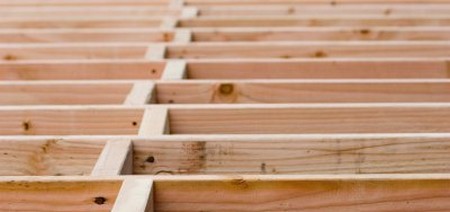
At the "shell" side you must have solid blocking to prevent rotation.
This is requisite, so the joists cannot fold like a stack of dominoes.
Measure 8' back from the 'cover'(band)joist and snap a chalk line.
Cut your blocking 14 1/2-" long for 16oc and since you are nailing by hand, stagger the blocks to the line so you can swing a hammer and nail them straight through the ends.
Most inspectors around here would be okay with that, since it's not occupied space and does not require sheathing joints to be glued/nailed to solid support on all edges.
There is a reason for double top plates, besides interlocking the corners.
Another reason for following 16oc. so there is always a load path to the foundation, and sheet goods land on studs..
There's no reason for a 3/4" floor unless you REALLY intend to load the heck out of it.
All sheathing carries a span rating.
7/16" OSB is more than enough for this application at 16 oc.
At the "shell" side you must have solid blocking to prevent rotation.
This is requisite, so the joists cannot fold like a stack of dominoes.
Measure 8' back from the 'cover'(band)joist and snap a chalk line.
Cut your blocking 14 1/2-" long for 16oc and since you are nailing by hand, stagger the blocks to the line so you can swing a hammer and nail them straight through the ends.
Most inspectors around here would be okay with that, since it's not occupied space and does not require sheathing joints to be glued/nailed to solid support on all edges.
#392
11-25-2014, 02:43 PM
Hadn't done much between weather and my first kidney stone. I did some more today, finishing a portion of the front wall outside which involved figuring the best way to cut the 4X8 sheets of plywood then cutting, fitting and installing the horizontal 2X6s for the joints. Office end of the wall starts with 2 4' high sections which bring it over the walk-in door. I cut a small filler section over the door as the next piece will be an 8' vertical and it would be over 4' wide to the first roll-up door opening. The remainder of the lower pieces will be 8' high. Then comes the fun of fitting the curved pieces, the angles won't be quite as bad once I am above the curved ends.
#393
11-25-2014, 10:22 PM
Posting Legend
Looks like a complex problem, but one step at a time and you are getting there. But is this next storm going to slow you down again?
Kidney stone? Ouch!! I've not had one but have been with people who have and that appears to be VERY painful. Hope it has passed and you are pain-free again - or as pain free as an old man can be. (I'm feeling my age tonight as I went pheasant hunting today, after having had the flu two days ago. Exhausted doesn't come close.)
Kidney stone? Ouch!! I've not had one but have been with people who have and that appears to be VERY painful. Hope it has passed and you are pain-free again - or as pain free as an old man can be. (I'm feeling my age tonight as I went pheasant hunting today, after having had the flu two days ago. Exhausted doesn't come close.)
#394
11-26-2014, 06:52 AM
Yes, it is. The curved sections have to be fitted essentially in-place, then taken down and cut as marked. Once I am above them the angled sections can be measured and cut "on the ground". One issue will arise around and over the 10' door, panels are 4X8, so I have 2' extra going up on the sides of that door, once I am above that it will become more straight forward. After the plywood is on, I will install Tyvek, then I can reinstall the flanges with foam seals. The siding can be slid under the flanges.
#395
11-26-2014, 07:17 AM
Posting Legend
#396
11-26-2014, 08:41 AM
Bill,
Typically we sheath right over the top of door and window openings. (then cut it out in place)
Tying the header and jack studs together with the rest of the wall.
The code and inspectors call for that.
As for your curves.
Is there any to get the plywood in place in one piece?
Or is the overhang too great?
When I have to deal with that kind of situation I will get a can of spraypaint and give it a quick shot from the back side.
This leaves me a perfect scribe and I can cut to -or and distance from- the line.
Since your building is mill finish, silver paint might not leave a dirty looking edge like black would.
You just need to get enough on that you can see where the edge is, not really make it opaque.
Otherwise I think I'd use a piece of cardboard and a razor knife to make a template.
#397
11-26-2014, 09:57 AM
Jim, if I put it over my door openings (no windows) it would waste a tremendous amount of plywood, not to mention the fact that I would have to use a board stretcher to get an 8' panel to go over 12'. As for the curves, if I can pick a good reference point I can use the curved flanges to provide a pattern, remember they will be covering the edges anyway.
I do have a question, any tricks for lifting a 4X8 sheet of 1/2" plywood up a ladder for the higher sections? Up to where I am, I was able to wrestle the second sheet in place.
I do have a question, any tricks for lifting a 4X8 sheet of 1/2" plywood up a ladder for the higher sections? Up to where I am, I was able to wrestle the second sheet in place.
#398
11-26-2014, 12:34 PM
You could overlap the header a couple of feet each side and add a 8' strip in the middle.
At least this alleviates the hinged header.
But then, this wall is just there to keep the weather out and hold up that massive door, the plywood is not really acting as a shear panel.
If sheathing a tall wall I'll set my ladder just below the seam and push the sheet ahead of me.
If it's not too cupped you can get it set on the edge of the sheet below.
I do have a 4"ViseGrip swivel jaw C-clamp that I welded a 2" ring onto.
By clamping one corner of a sheet I can hoist plywood up onto a roof by myself.
But usually I just put it over my shoulder and head up the ladder if I have a place to land it.
#399
12-02-2014, 03:41 PM
Ok, got some more done, weather yesterday was great, not as nice today. Following Jim's recommendation, I cut and installed cross braces between the joists. I then went back to work on the wall, it is closed in now up to 8'. Next issue is getting the pieces for the curved ends done. First portion of that was to add one more upright in the area of the electrical panel then cut and install the cross pieces 4' up from the last set.
#400
12-05-2014, 03:42 PM
#401
12-05-2014, 03:56 PM
Posting Legend
#403
12-06-2014, 04:49 PM
Before the rain you guys out west sent arrived I was able to finish closing in the left end up to the edge of the 10' door. After the rain arrived (thanks Gary) I worked on my tractor collection, fixed a flat right rear on the Ford and started installing the safety switches that were missing on the Craftsman GTV16.
#404
12-06-2014, 04:58 PM
Posting Legend
#405
12-06-2014, 07:18 PM
Gary, I've been looking for the switches since I first acquired that tractor. The clutch one was bypassed because the spring that works it was broken. The PTO one apparently just froze up, and someone, how far back is unknown, cut the wires and twisted them together and taped them up. I found the actuating spring searching some updated parts lists, and then found a seller on eBay with some NOS Indak plunger switches that almost everybody used. Now I just have to get them adjusted and the PTO wiring repaired.