2014 F250 Lariat Subwoofer Upgrade
#1
 09-30-2013, 02:34 PM

2014 F250 Lariat Subwoofer Upgrade
Below are some pics and info on how to replace the factory sub while retaining the rest of the stock system.
I am not sure if all speakers are driven with the factory amp mounted to the plastic sub box, but if disconnected there is no sound from any speaker.
Step 1 – Remove back seat and determine where to mount sub and amps. Remove molded carpet on back cab wall to see what will be in the way. Measure for box, determine what needs to be hacked up or removed.
I have a 10” Rockford shallow P3D2-10 that needs 0.5 cu. Ft. Driver displacement is 0.074 so internal volume needs to be 0.574 for a Q of 0.707 (critically damped). My truck has the power rear window so I had 2 options:
- Left side. ‘L’ shaped box. Need to move jack tools and cut carpet.
- Right side. Wide, short box to fit under window motor. Need to move jack and cut carpet. Would have to make provisions to mount existing factory amp on box as the wires are short.
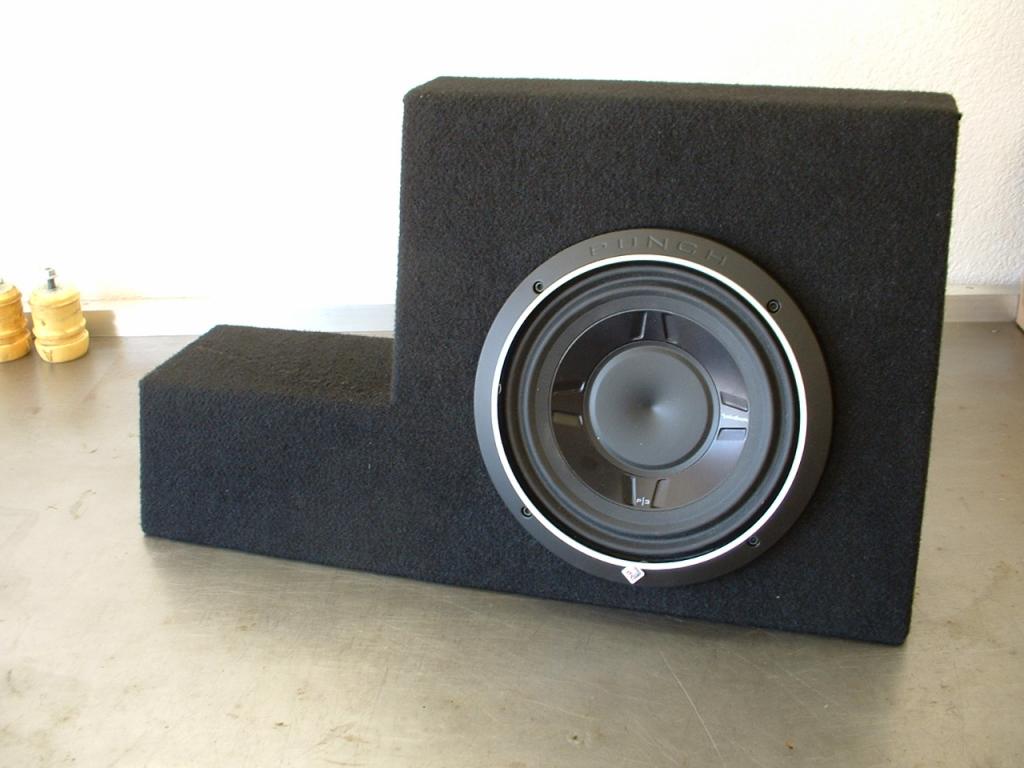
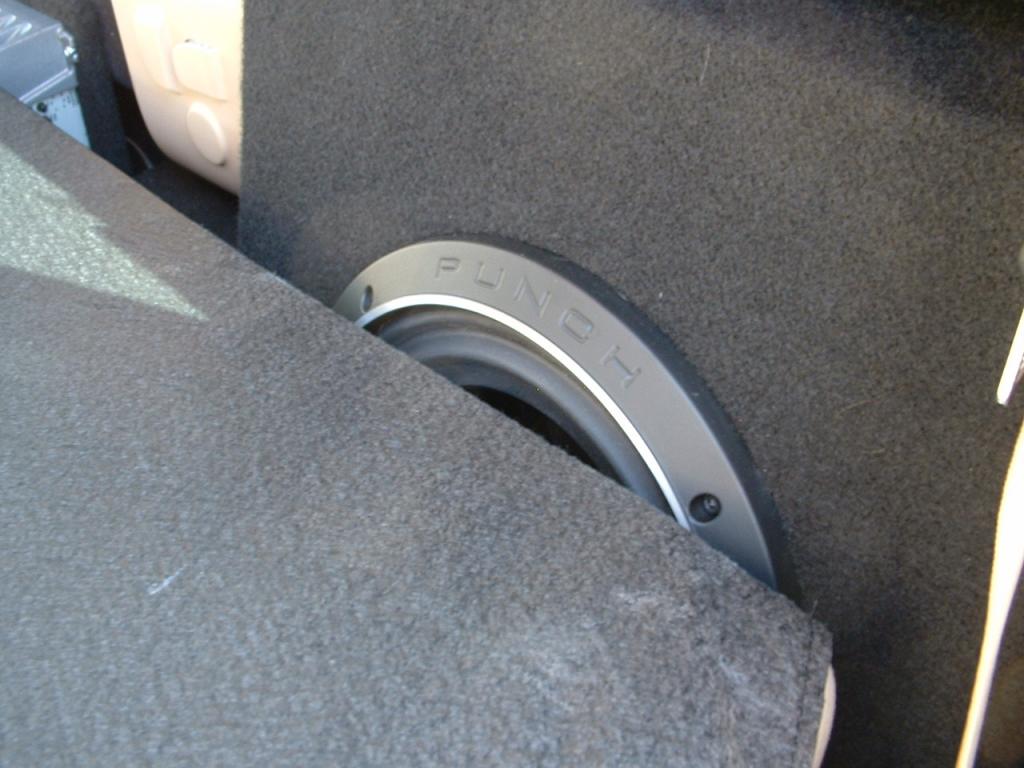
I went with the left side. Exterior measurements are 7” deep(bottom) / 3” (top), 15” tall, 28” wide. Cutout for seatbelt is 10” x 10”. Box is lightly stuffed with fiberglass. The foam gaskets on the terminal cup and driver don’t seal well to dry MDF, so I applied a few layers of silicon to the mounting surfaces.
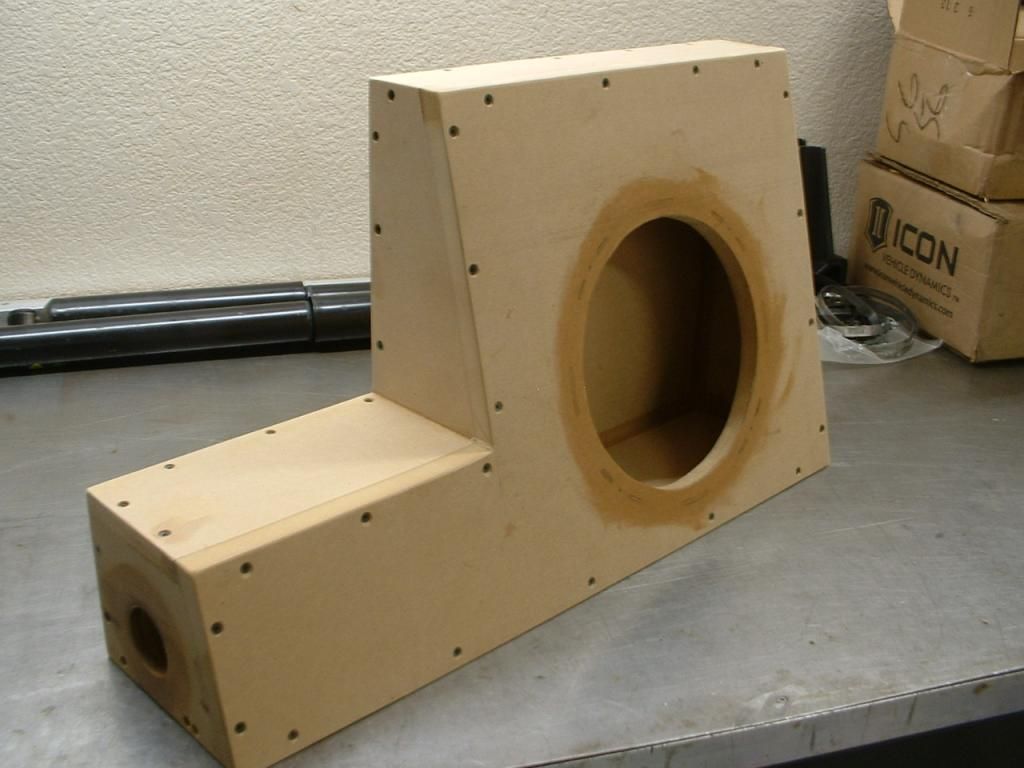
Finished box ready to install
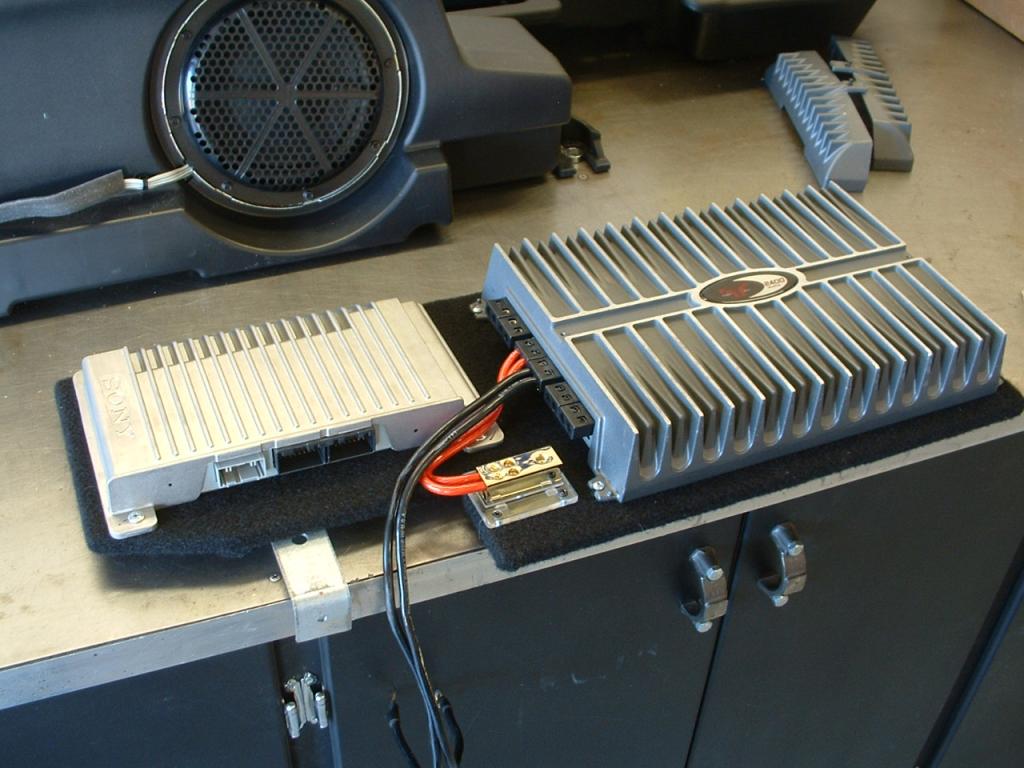
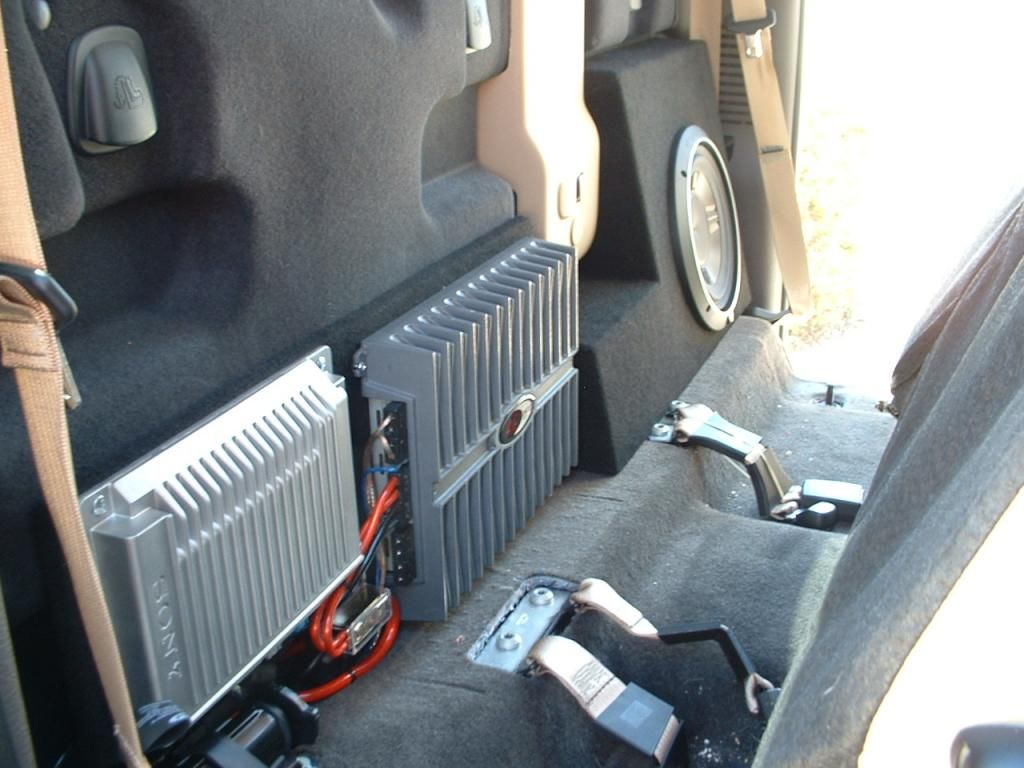
The amps are mounted to a piece of wood covered in carpet. The amp rack is secured to the floor using a custom made ‘L’ bracket to one of the bolts that was used for the factory subwoofer mounting bracket (jack to box plate).
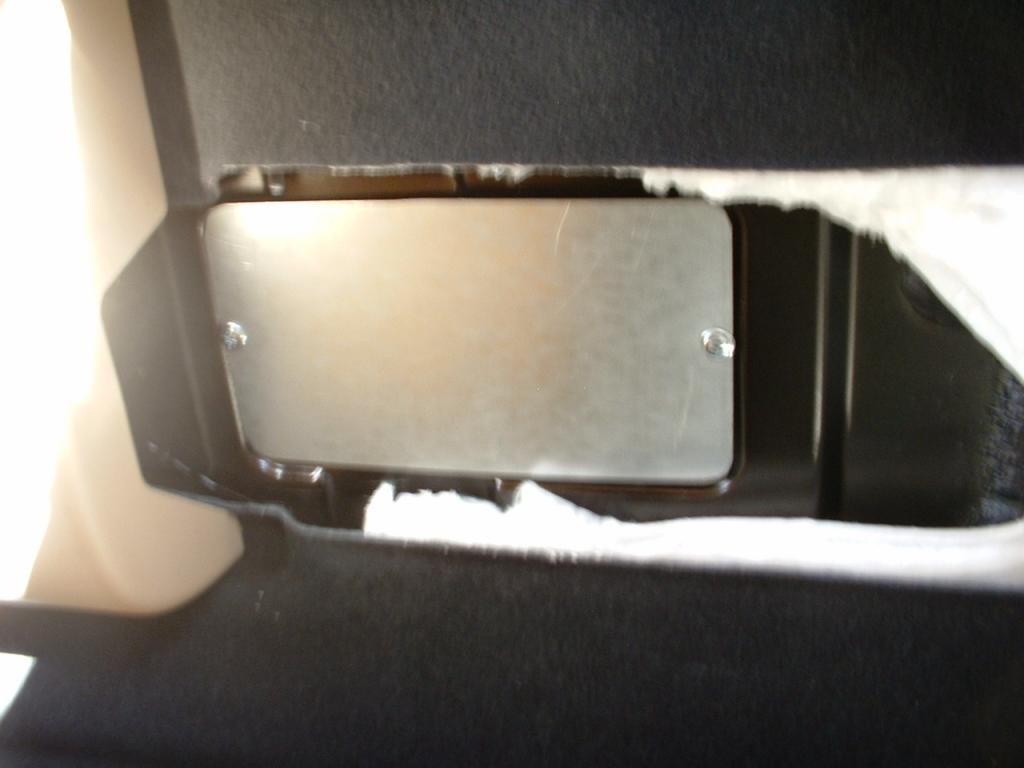
After trimming the carpet bulge for the vent, the vent on the rear of the cab needs to be removed for clearance. Twist and pull it back through the hole into the cab. The hole needs to be sealed. I made a sheet metal cover and sealed with a fat bead of silicon.
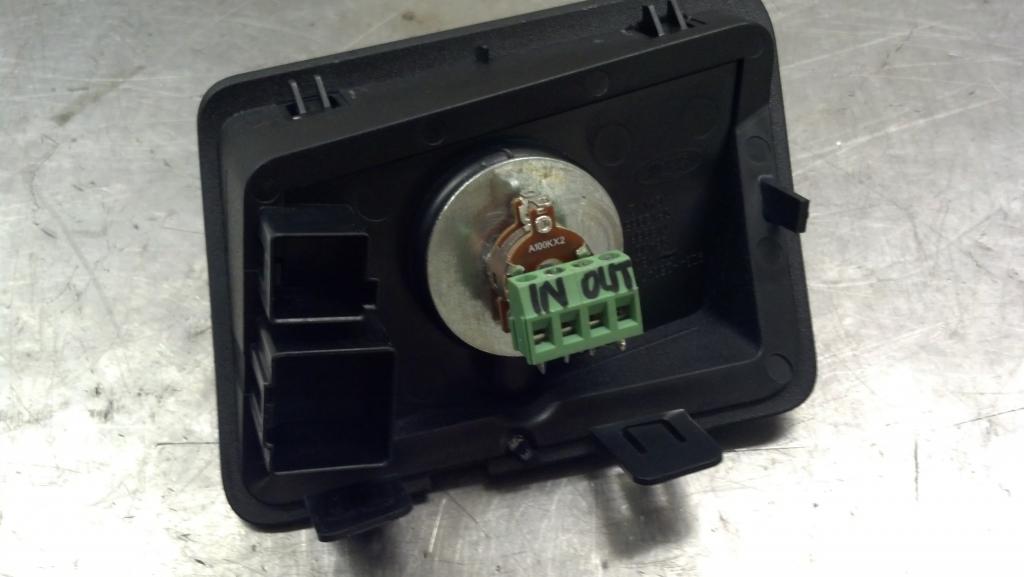
The factory amp doesn't’t have an analog on/off wire. I think it uses a CAN bus for messaging. For the sub amp’s remote, I ran a wire to this labeled bundle next to the e-brake. White/blue is identified as ACC/RUN. These are perfect for connections as they are meant to be interfaced to aftermarket equipment. I also noticed one labeled PTO RPM.
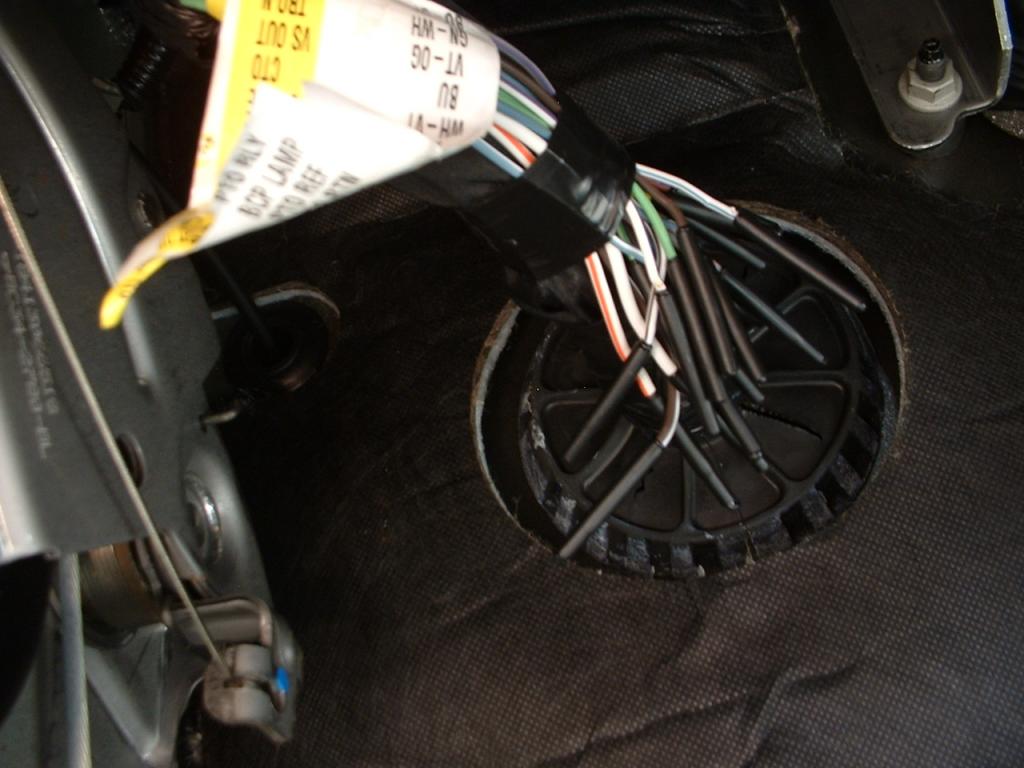
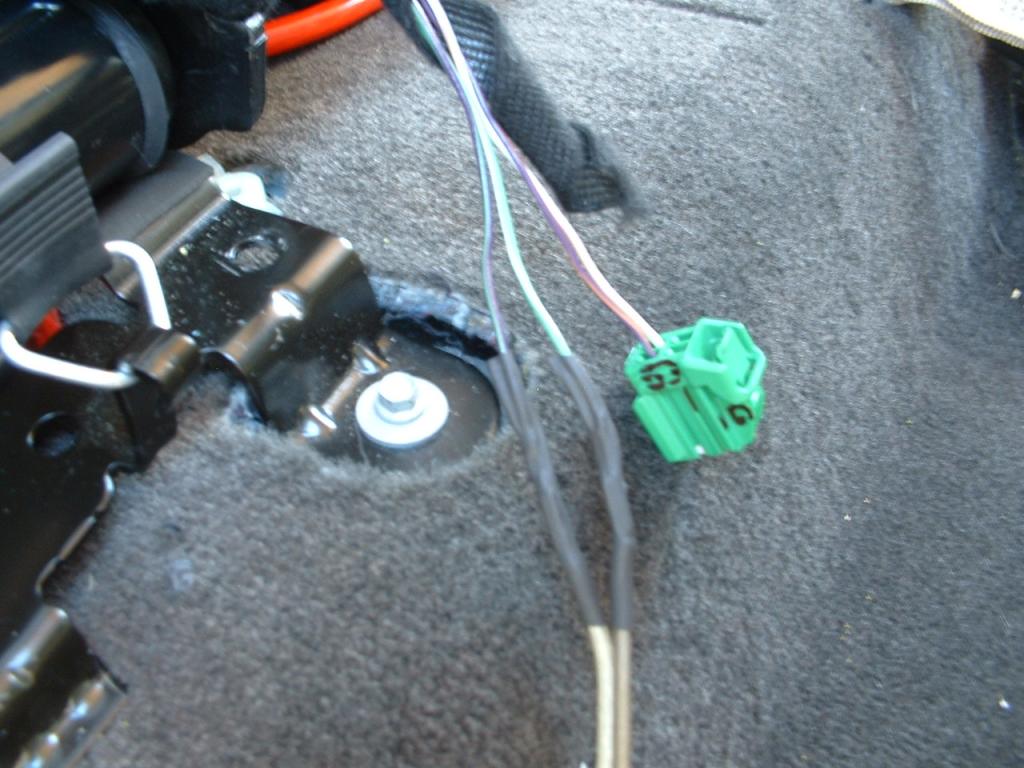
For the audio signal wires I just used the high level sub output of one coil. The factory subwoofer has dual 2 ohm coils. I chose the purple/green set. The connector can be disassembled and the female terminals removed. To do this first remove the white retainer on the front of the connector, then use a small screw driver to release the pins. I tined some wire that would fit inside the pins and covered in shrink to secure. I used the high level inputs on the older Rockford amp. Only 2 of the 4 channels are used, 500 watts bridged into 4 ohms (sub's 2 ohm coils in series)
I ran a 4 gauge wire (copper not coated aluminum, pay attention to what you buy…) from the right battery to the amp rack where it enters a distribution block.
Equipment installed
Seat just clears when folding. Some interference but OK
<o Overall I am reasonably happy with the result. It doesn't sound as good as my old truck which the same amp/sub came out of, but defiantly better that the factory sub (and for free*). A subwoofer level adjustment would be nice and I guess I could make one if I get motivated enough.</o<o
 </o
</o
I am not sure if all speakers are driven with the factory amp mounted to the plastic sub box, but if disconnected there is no sound from any speaker.
Step 1 – Remove back seat and determine where to mount sub and amps. Remove molded carpet on back cab wall to see what will be in the way. Measure for box, determine what needs to be hacked up or removed.
I have a 10” Rockford shallow P3D2-10 that needs 0.5 cu. Ft. Driver displacement is 0.074 so internal volume needs to be 0.574 for a Q of 0.707 (critically damped). My truck has the power rear window so I had 2 options:
- Left side. ‘L’ shaped box. Need to move jack tools and cut carpet.
- Right side. Wide, short box to fit under window motor. Need to move jack and cut carpet. Would have to make provisions to mount existing factory amp on box as the wires are short.
I went with the left side. Exterior measurements are 7” deep(bottom) / 3” (top), 15” tall, 28” wide. Cutout for seatbelt is 10” x 10”. Box is lightly stuffed with fiberglass. The foam gaskets on the terminal cup and driver don’t seal well to dry MDF, so I applied a few layers of silicon to the mounting surfaces.

Finished box ready to install

The amps are mounted to a piece of wood covered in carpet. The amp rack is secured to the floor using a custom made ‘L’ bracket to one of the bolts that was used for the factory subwoofer mounting bracket (jack to box plate).

After trimming the carpet bulge for the vent, the vent on the rear of the cab needs to be removed for clearance. Twist and pull it back through the hole into the cab. The hole needs to be sealed. I made a sheet metal cover and sealed with a fat bead of silicon.

The factory amp doesn't’t have an analog on/off wire. I think it uses a CAN bus for messaging. For the sub amp’s remote, I ran a wire to this labeled bundle next to the e-brake. White/blue is identified as ACC/RUN. These are perfect for connections as they are meant to be interfaced to aftermarket equipment. I also noticed one labeled PTO RPM.

For the audio signal wires I just used the high level sub output of one coil. The factory subwoofer has dual 2 ohm coils. I chose the purple/green set. The connector can be disassembled and the female terminals removed. To do this first remove the white retainer on the front of the connector, then use a small screw driver to release the pins. I tined some wire that would fit inside the pins and covered in shrink to secure. I used the high level inputs on the older Rockford amp. Only 2 of the 4 channels are used, 500 watts bridged into 4 ohms (sub's 2 ohm coils in series)

I ran a 4 gauge wire (copper not coated aluminum, pay attention to what you buy…) from the right battery to the amp rack where it enters a distribution block.
Equipment installed

Seat just clears when folding. Some interference but OK

<o
Overall I am reasonably happy with the result. It doesn't sound as good as my old truck which the same amp/sub came out of, but defiantly better that the factory sub (and for free*). A subwoofer level adjustment would be nice and I guess I could make one if I get motivated enough.</o<o</o

#3
09-30-2013, 03:18 PM
#4
09-30-2013, 10:33 PM
Elder User
#5
11-01-2013, 03:10 PM
Subwoofer level control
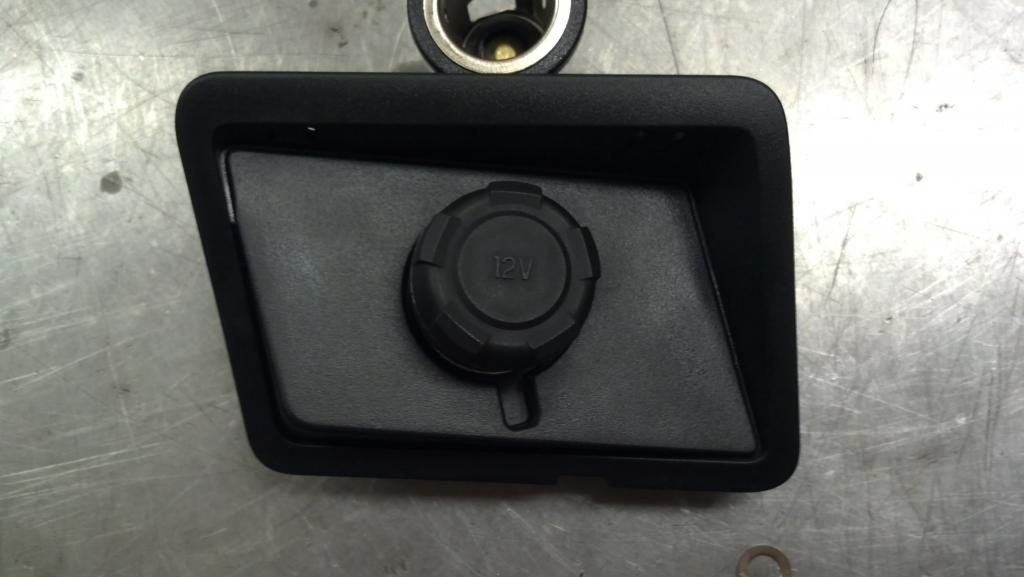
Finally added a sub woofer level control. I used a pot and a resistor to make a voltage divider. I had a 100k pot from another project, but the input impedance of my RF amp was below 100k ohms so I had to switch to a 10k pot (radio shack). Attenuation range is 0 to -12db. I mounted the pot in place of the driver side +12V cigar jack. The rubber cigar jack cap fit perfecly over the plactic **** that attaches to the 1/4" shaft.
I used 2 fender washers to mount pot in the large cigar jack hole. Connections are done with a screw/clamp header
Looks just like before but know its a ****
I used 2 fender washers to mount pot in the large cigar jack hole. Connections are done with a screw/clamp header

Looks just like before but know its a ****

#7
03-01-2015, 12:29 AM

Trending Topics
#9
03-01-2015, 06:08 AM
Lead Foot User
Join Date: Nov 2008
Location: Saskatchewan, Canada
Posts: 773
Likes: 0
Received 0 Likes
on
0 Posts
I just recently did this same install on my truck, works slick with great sound. I opted for 2 10" subs and it has a real nice thump to it. For those looking for a box, just go to Custom Subwoofer Box and Enclosure | SuperCrewSound | Speakers You'd barely be able to build a box for what they charge and you can choose between 1 or 2 subs. They fit perfect and are built to spec with the exact air volume needed for best performance. Cheers


 )
)
#12
03-01-2015, 07:34 PM
Justin, nice job. I did the exact same thing on my 2008 and 2011 trucks but I built two wedges and had two 10" speakers back there.
I'm afraid to do it on my 2015 truck because of the factory set up. Like you said, if I remove the factory sub and amp assembly, there's no audio at all.
How did you figure this out?
I was thinking, since all the audio signal for all the speakers is behind the rear seat, I could use my own amp and have amped sound for all the speakers? Problem is, how do I figure out which wires do what? I have no idea how to do this and I'm frustrated.
Is it possible to feed the sound for all the speakers through my own amp, and, feed my sub amp for the two 10" subs behind the rear seats?
Thanks for any advice you've got. My wedges from my 2011 truck are just sitting in my garage.
#13
03-01-2015, 09:08 PM
Senior User
Join Date: Oct 2013
Location: Eunice, La
Posts: 243
Likes: 0
Received 0 Likes
on
0 Posts
Justin, nice job. I did the exact same thing on my 2008 and 2011 trucks but I built two wedges and had two 10" speakers back there.
I'm afraid to do it on my 2015 truck because of the factory set up. Like you said, if I remove the factory sub and amp assembly, there's no audio at all.
How did you figure this out?
I was thinking, since all the audio signal for all the speakers is behind the rear seat, I could use my own amp and have amped sound for all the speakers? Problem is, how do I figure out which wires do what? I have no idea how to do this and I'm frustrated.
Is it possible to feed the sound for all the speakers through my own amp, and, feed my sub amp for the two 10" subs behind the rear seats?
Thanks for any advice you've got. My wedges from my 2011 truck are just sitting in my garage.
I'm afraid to do it on my 2015 truck because of the factory set up. Like you said, if I remove the factory sub and amp assembly, there's no audio at all.
How did you figure this out?
I was thinking, since all the audio signal for all the speakers is behind the rear seat, I could use my own amp and have amped sound for all the speakers? Problem is, how do I figure out which wires do what? I have no idea how to do this and I'm frustrated.
Is it possible to feed the sound for all the speakers through my own amp, and, feed my sub amp for the two 10" subs behind the rear seats?
Thanks for any advice you've got. My wedges from my 2011 truck are just sitting in my garage.
I did my 2015 with no trouble. I will get take some pics and post. My 2013 I installed two 10" subs. This time in my 2015 I decided to go with two 8" subs. By doing this with the amount or room behind the seat to me I achieved much better high and low bass.
#14
03-02-2015, 02:13 PM
Exterior measurements are 7� deep(bottom) / 3� (top), 15� tall, 28� wide. Cutout for seatbelt is 10� x 10�.
The dimensions in the OP are enough to calculate all dimensions of all the pieces. There are many ways to construct based on what overlaps what. The angled baffle adds 2x the complexity, with murphy's law dictating that at least one piece will be cut too small. If you need help send me a PM.
The dimensions in the OP are enough to calculate all dimensions of all the pieces. There are many ways to construct based on what overlaps what. The angled baffle adds 2x the complexity, with murphy's law dictating that at least one piece will be cut too small. If you need help send me a PM.
#15
03-02-2015, 02:40 PM
Justin, nice job. I did the exact same thing on my 2008 and 2011 trucks but I built two wedges and had two 10" speakers back there.
I'm afraid to do it on my 2015 truck because of the factory set up. Like you said, if I remove the factory sub and amp assembly, there's no audio at all.
How did you figure this out?
I was thinking, since all the audio signal for all the speakers is behind the rear seat, I could use my own amp and have amped sound for all the speakers? Problem is, how do I figure out which wires do what? I have no idea how to do this and I'm frustrated.
Is it possible to feed the sound for all the speakers through my own amp, and, feed my sub amp for the two 10" subs behind the rear seats?
Thanks for any advice you've got. My wedges from my 2011 truck are just sitting in my garage.
I'm afraid to do it on my 2015 truck because of the factory set up. Like you said, if I remove the factory sub and amp assembly, there's no audio at all.
How did you figure this out?
I was thinking, since all the audio signal for all the speakers is behind the rear seat, I could use my own amp and have amped sound for all the speakers? Problem is, how do I figure out which wires do what? I have no idea how to do this and I'm frustrated.
Is it possible to feed the sound for all the speakers through my own amp, and, feed my sub amp for the two 10" subs behind the rear seats?
Thanks for any advice you've got. My wedges from my 2011 truck are just sitting in my garage.
-Stage 1 - upgrade subwoofer/sub amp only. The factory system isn't that bad, lack sub output is main drawback. Should be loud enough for 95% of people. Will overpower wind noise w/ windows down at 55mph. There are issues/limitaions to this that I will explain in another post...
-Stage 2 - Stage 1 + speaker upgrade. Replace (8) door (+ center channel) speakers.
-Stage 3 - Stage 2 + Aftermarket amp(s). Not much benefit here.
-Stage 4 - Stage 3 + 'system intergration DSP'. Combine all audio signals into one composite source and use DSP to EQ/filter/distribute to aftermarket amps. Rockford 3sixty is an example.
-Stage 5 - Stage 4 + active x-over between mid/tweet (need at least 10 amp channels to do this right). Tune system with RTA (real time audio analyzer).
You can get wiring diagrams of the system here on FTE, or buy from EBay. Send me a PM if you have specific questions about your truck.