Leather seat repair, no more worn sides
#1
 09-26-2013, 10:24 PM

Join Date: Jul 2010
Location: los angeles, ca
Posts: 33
Likes: 0
Received 0 Likes
on
0 Posts
Leather seat repair, no more worn sides
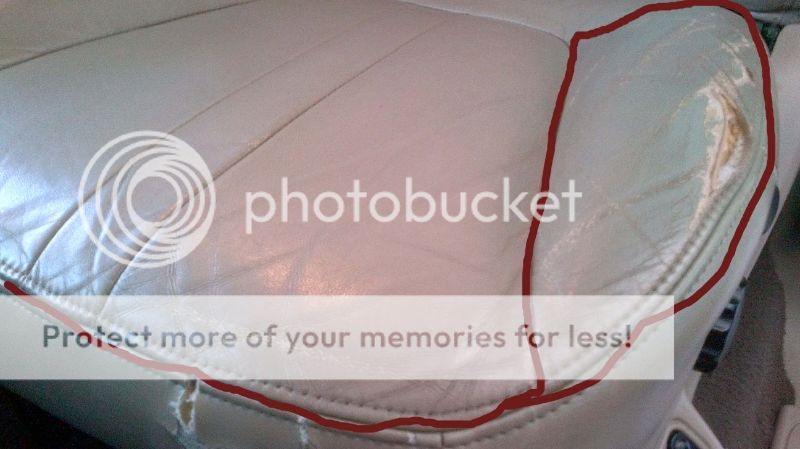
So he just made 200K and is running as strong as ever. However, after 13 years the leather on the drivers seat bottom is just shot. My leather on all seats look great except for the drivers and I just got tired of seeing it. Replacements on ebay run 200 and I just did not want to pay that considering the area around the tear has aged well. So I purchased my own Medium Parchment material for $15 dollars along with a stiffer foam pad and had it repaired. The great thing about Ford's material pattern is that there are seams everywhere. You can just take out the bad parts and replace them without having to buy an entirely new cover.
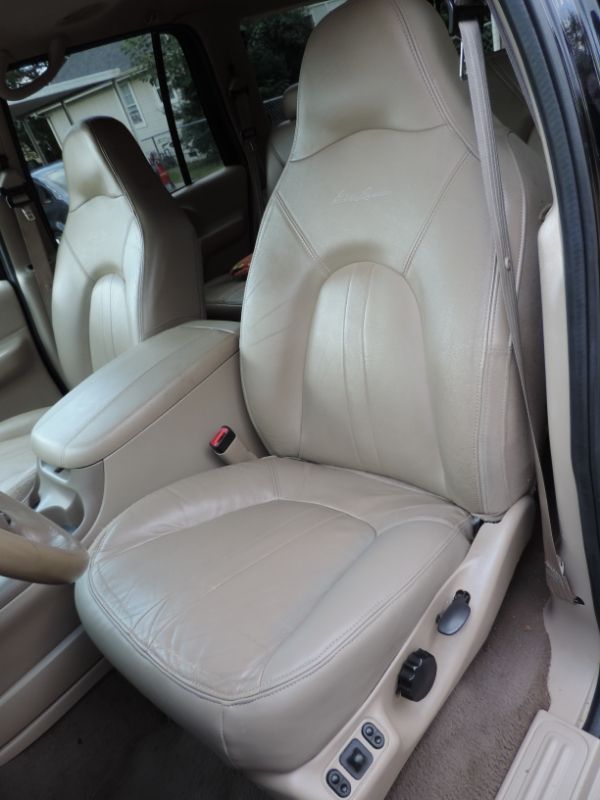
Here is the before and after.

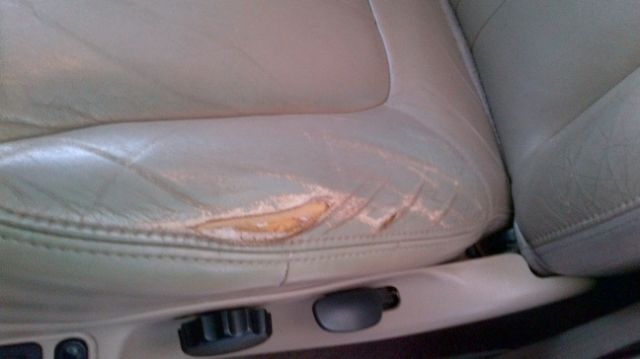
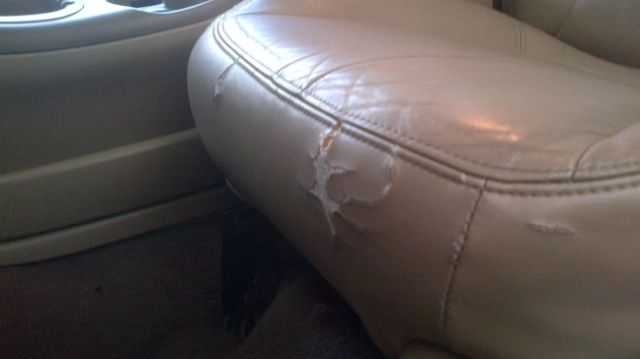
After repair
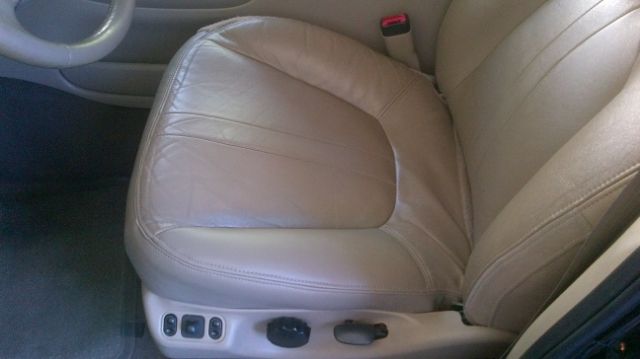
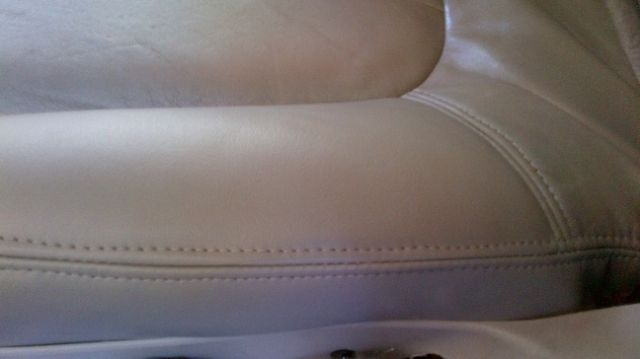

Here is the before and after.
After repair
#3
09-27-2013, 12:01 AM
Join Date: Jul 2010
Location: los angeles, ca
Posts: 33
Likes: 0
Received 0 Likes
on
0 Posts
Well I won't be able to help much with the actual sewing of the seat. I can tell you how to take off the seat cover and stuff like that. Ford uses a French stitch which is incredibly strong BUT takes someone that knows what they are doing to do it right. My neighbor does this for a living and she is the one that completed the actual repair. I wouldn't know how to even thread the needle..lol
I got all material from my local upholstery shop once I researched it online (no shipping cost and quicker turn around_) Every shop should have a sample book with this stuff in it. It is a very very popular color and manufacture.
There are two Medium Parchment options.
BoltaSoft(R) Transportation Aftermarket Upholstery - G-Grain
G-Grain medium parchment which is factory match right down to the grain.
adding (I didn't know expeditions came with different color tan, so make sure you choose the correct color.)
Medium Parchment (color code OGGR7221)
Medium Prairie Tan (color code OGGR7167)

BoltaSoft(R) Transportation Aftermarket Upholstery - Milled Pebble
Milled Pebble in medium parchment is of course factory match color, but its more of a pebble grain and it looks like it was meant for a more luxurious car. Maybe Navigators had pebble grain.

This stuff also has an adhesive promoter on the back. When you get your foam you can put your seat adhesive on it and the material will stick to the foam like it did from the factory. Of course you just cut your foam to match your factory seat foam. I did it by hand and on the first try.
Next, you pick your foam.. I really wanted a firmer seat. This isn't my daily driver so I really only use it for outdoor excursions and/or towing so I went for CF-45 foam and its wonderful.
Here is the grid rating
CF-NT Extra Soft Seats for infants, cover for stiffer material, bedding applications
CF-40 Very Soft Seats for children, cover for stiffer material
CF-42 Soft Seats for 115 lb. person 3"-4" seat pad
CF-45 Firm Seats for 170 lb. person 3"-4" seat pad
CF-47 Very Firm Seats for 200+ lb. person, or seat in hot-humid environment for 170 lb. person.
Again, just go into the local shop and try out the foam that you like the most.
The stiff foam ended up being blue.

I actually cut the foam to have a deeper bucket feel and high bolsters on the side. It's just more comfortable to me, and I like the feel of more thigh support. You can see on the pic below how its deeper than normal. I just wanted to customize it more to me since I never plan on selling the truck.
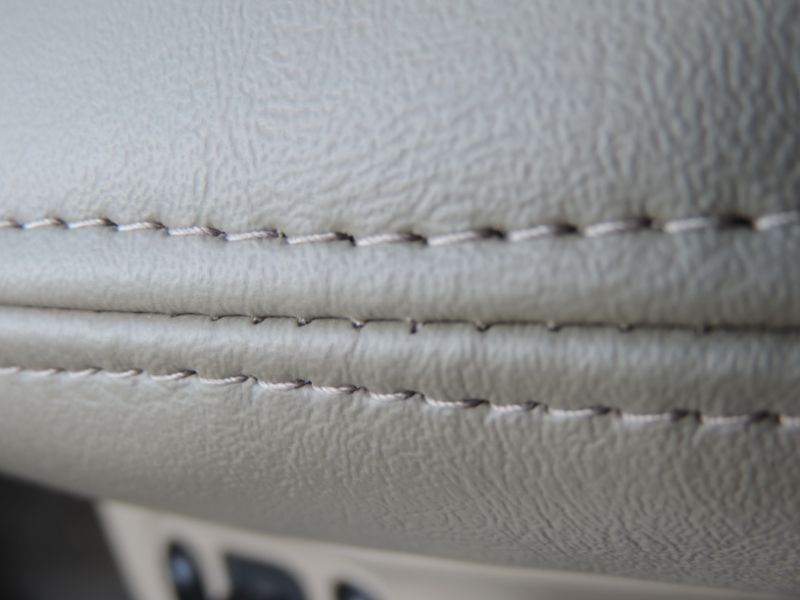
Pertaining to the actual seat. As I said the seat cover has so many seams that you simply take off, or remove the stitching, from the area you don't want. Your save the piece of leather/vinyl you removed, create a copy of the pattern and then apply the copy to the existing cover via french stitch using heavy duty tread.
Here is what needed to be removed and copied on my Expy.
I got all material from my local upholstery shop once I researched it online (no shipping cost and quicker turn around_) Every shop should have a sample book with this stuff in it. It is a very very popular color and manufacture.
There are two Medium Parchment options.
BoltaSoft(R) Transportation Aftermarket Upholstery - G-Grain
G-Grain medium parchment which is factory match right down to the grain.
adding (I didn't know expeditions came with different color tan, so make sure you choose the correct color.)
Medium Parchment (color code OGGR7221)
Medium Prairie Tan (color code OGGR7167)
BoltaSoft(R) Transportation Aftermarket Upholstery - Milled Pebble
Milled Pebble in medium parchment is of course factory match color, but its more of a pebble grain and it looks like it was meant for a more luxurious car. Maybe Navigators had pebble grain.
This stuff also has an adhesive promoter on the back. When you get your foam you can put your seat adhesive on it and the material will stick to the foam like it did from the factory. Of course you just cut your foam to match your factory seat foam. I did it by hand and on the first try.
Next, you pick your foam.. I really wanted a firmer seat. This isn't my daily driver so I really only use it for outdoor excursions and/or towing so I went for CF-45 foam and its wonderful.
Here is the grid rating
CF-NT Extra Soft Seats for infants, cover for stiffer material, bedding applications
CF-40 Very Soft Seats for children, cover for stiffer material
CF-42 Soft Seats for 115 lb. person 3"-4" seat pad
CF-45 Firm Seats for 170 lb. person 3"-4" seat pad
CF-47 Very Firm Seats for 200+ lb. person, or seat in hot-humid environment for 170 lb. person.
Again, just go into the local shop and try out the foam that you like the most.
The stiff foam ended up being blue.
I actually cut the foam to have a deeper bucket feel and high bolsters on the side. It's just more comfortable to me, and I like the feel of more thigh support. You can see on the pic below how its deeper than normal. I just wanted to customize it more to me since I never plan on selling the truck.
Pertaining to the actual seat. As I said the seat cover has so many seams that you simply take off, or remove the stitching, from the area you don't want. Your save the piece of leather/vinyl you removed, create a copy of the pattern and then apply the copy to the existing cover via french stitch using heavy duty tread.
Here is what needed to be removed and copied on my Expy.
#4
09-27-2013, 11:50 AM


#5
09-27-2013, 12:04 PM

#7
09-27-2013, 04:10 PM
Trending Topics
#8
09-27-2013, 04:44 PM
We just had both front leather seats, bottom only and new foam padding, for $250. He even threw in the center console arm rest for free. Our seats looked just like the pics at the top. I'm taking it in so he can do the backs so they match the new bottoms, another $250.
#10
09-28-2013, 04:14 PM
Join Date: Jul 2010
Location: los angeles, ca
Posts: 33
Likes: 0
Received 0 Likes
on
0 Posts
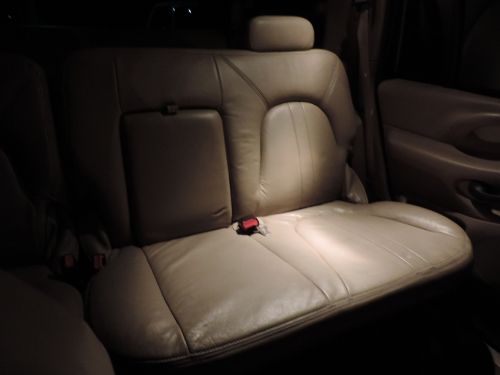
Here is an updated pick in better light. Today was so nice that I did a full clean and condition. Didn't take too long, I had a helper< and I never do the 3rd seat.
Thanks guys for all the support!!
#11
12-18-2013, 02:10 AM
Join Date: Jul 2010
Location: los angeles, ca
Posts: 33
Likes: 0
Received 0 Likes
on
0 Posts
2nd row seat fixed
Did a little bit more interior work today. Wanted to get this done before the holiday because we have road trip coming up.
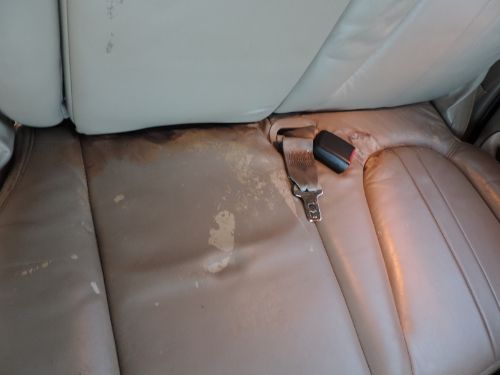
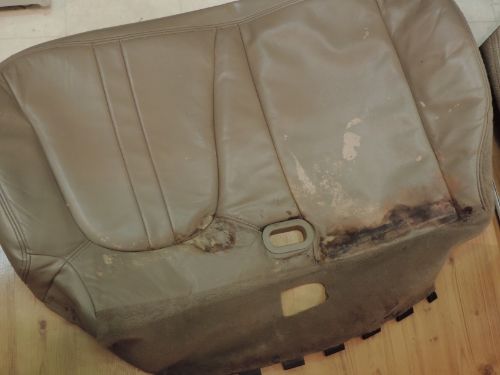
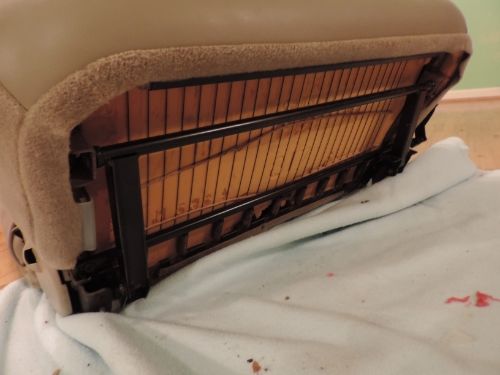
The leather on the 2nd row seat had had some very hot liquid spilled on it and consequently it ruined the leather in that area. I went to a junk yard, got a seat out of a crashed expy. Paid 75 dollars for the entire seat, but I only needed the bottom. Took off the leather cover from the sourced seat and applied it to my truck. I'm glad it's done, that bothered me for awhile, and I always wanted to change it.. I cleaned the seat belt too..
old cover
New cover and installed
#12
12-10-2017, 02:35 PM

Hello 4x4EX,
Would really, really, really appreciate if you could help me. I have spent almost the whole year looking for a way to either fix my 2002 Ford Expedition's Front Seats which are all worn out all the way to the foam. Ford has discontinued the foam and cover replacement parts, so I am really at a loss how to proceed. I am not a car/truck guy, per se. Any direction and or guidance would be truly appreciated.
I saw on your timeline, that you were able to get a foam. Where did you get the foam?
Also, for the cover, could you make one for me and I will pay? LOL!
Thanks,
Yoda
#13
12-10-2017, 02:53 PM
Hello there,
Would really appreciate if you could help me get my seats for my 2002 Ford Expedition.
Would really appreciate if you could help me get my seats for my 2002 Ford Expedition.
Well I won't be able to help much with the actual sewing of the seat. I can tell you how to take off the seat cover and stuff like that. Ford uses a French stitch which is incredibly strong BUT takes someone that knows what they are doing to do it right. My neighbor does this for a living and she is the one that completed the actual repair. I wouldn't know how to even thread the needle..lol
I got all material from my local upholstery shop once I researched it online (no shipping cost and quicker turn around_) Every shop should have a sample book with this stuff in it. It is a very very popular color and manufacture.
There are two Medium Parchment options.
BoltaSoft(R) Transportation Aftermarket Upholstery - G-Grain
G-Grain medium parchment which is factory match right down to the grain.
adding (I didn't know expeditions came with different color tan, so make sure you choose the correct color.)
Medium Parchment (color code OGGR7221)
Medium Prairie Tan (color code OGGR7167)
BoltaSoft(R) Transportation Aftermarket Upholstery - Milled Pebble
Milled Pebble in medium parchment is of course factory match color, but its more of a pebble grain and it looks like it was meant for a more luxurious car. Maybe Navigators had pebble grain.
This stuff also has an adhesive promoter on the back. When you get your foam you can put your seat adhesive on it and the material will stick to the foam like it did from the factory. Of course you just cut your foam to match your factory seat foam. I did it by hand and on the first try.
Next, you pick your foam.. I really wanted a firmer seat. This isn't my daily driver so I really only use it for outdoor excursions and/or towing so I went for CF-45 foam and its wonderful.
Here is the grid rating
CF-NT Extra Soft Seats for infants, cover for stiffer material, bedding applications
CF-40 Very Soft Seats for children, cover for stiffer material
CF-42 Soft Seats for 115 lb. person 3"-4" seat pad
CF-45 Firm Seats for 170 lb. person 3"-4" seat pad
CF-47 Very Firm Seats for 200+ lb. person, or seat in hot-humid environment for 170 lb. person.
Again, just go into the local shop and try out the foam that you like the most.
The stiff foam ended up being blue.
I actually cut the foam to have a deeper bucket feel and high bolsters on the side. It's just more comfortable to me, and I like the feel of more thigh support. You can see on the pic below how its deeper than normal. I just wanted to customize it more to me since I never plan on selling the truck.

Pertaining to the actual seat. As I said the seat cover has so many seams that you simply take off, or remove the stitching, from the area you don't want. Your save the piece of leather/vinyl you removed, create a copy of the pattern and then apply the copy to the existing cover via french stitch using heavy duty tread.
Here is what needed to be removed and copied on my Expy.

I got all material from my local upholstery shop once I researched it online (no shipping cost and quicker turn around_) Every shop should have a sample book with this stuff in it. It is a very very popular color and manufacture.
There are two Medium Parchment options.
BoltaSoft(R) Transportation Aftermarket Upholstery - G-Grain
G-Grain medium parchment which is factory match right down to the grain.
adding (I didn't know expeditions came with different color tan, so make sure you choose the correct color.)
Medium Parchment (color code OGGR7221)
Medium Prairie Tan (color code OGGR7167)
BoltaSoft(R) Transportation Aftermarket Upholstery - Milled Pebble
Milled Pebble in medium parchment is of course factory match color, but its more of a pebble grain and it looks like it was meant for a more luxurious car. Maybe Navigators had pebble grain.
This stuff also has an adhesive promoter on the back. When you get your foam you can put your seat adhesive on it and the material will stick to the foam like it did from the factory. Of course you just cut your foam to match your factory seat foam. I did it by hand and on the first try.
Next, you pick your foam.. I really wanted a firmer seat. This isn't my daily driver so I really only use it for outdoor excursions and/or towing so I went for CF-45 foam and its wonderful.
Here is the grid rating
CF-NT Extra Soft Seats for infants, cover for stiffer material, bedding applications
CF-40 Very Soft Seats for children, cover for stiffer material
CF-42 Soft Seats for 115 lb. person 3"-4" seat pad
CF-45 Firm Seats for 170 lb. person 3"-4" seat pad
CF-47 Very Firm Seats for 200+ lb. person, or seat in hot-humid environment for 170 lb. person.
Again, just go into the local shop and try out the foam that you like the most.
The stiff foam ended up being blue.
I actually cut the foam to have a deeper bucket feel and high bolsters on the side. It's just more comfortable to me, and I like the feel of more thigh support. You can see on the pic below how its deeper than normal. I just wanted to customize it more to me since I never plan on selling the truck.
Pertaining to the actual seat. As I said the seat cover has so many seams that you simply take off, or remove the stitching, from the area you don't want. Your save the piece of leather/vinyl you removed, create a copy of the pattern and then apply the copy to the existing cover via french stitch using heavy duty tread.
Here is what needed to be removed and copied on my Expy.

Thread
Thread Starter
Forum
Replies
Last Post
jimcar-9
1948 - 1956 F1, F100 & Larger F-Series Trucks
42
12-19-2011 04:53 PM