My 400 build
#76
 10-18-2014, 02:04 AM


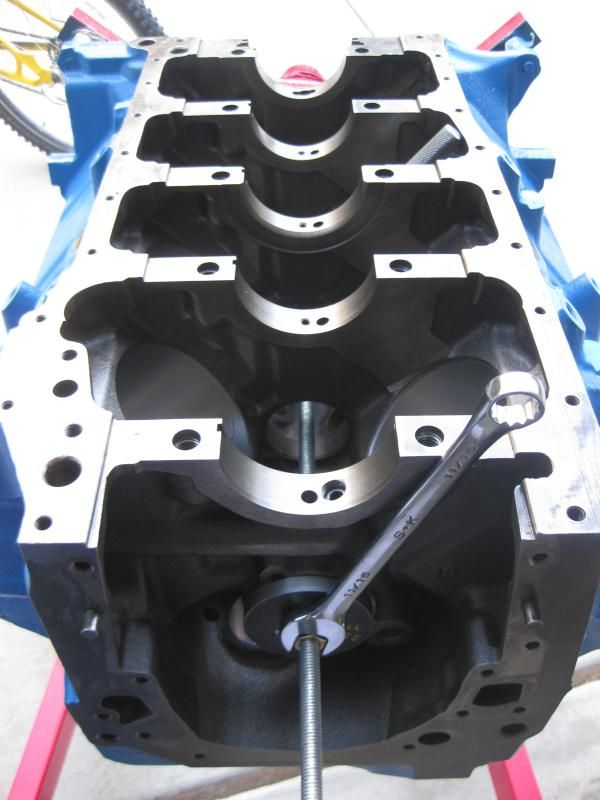
Pulling in the cam bearings, you can see in this picture I put the plug in the no.1 main several threads deeper than I intended! Oops! The drilling out of the smaller passage and installation of the restrictor kit went well though. I did drill out the restrictors to 3/32" from the 1/16" as they came from Moroso.
The bottom end. Progress! Here you can also see I did get the new oil filter adapter from Tim Meyer (a couple actually!). I like the smooth interior better than the hex key I've seen other places. It just looks like it would flow better. I did some very minor smoothing of the sharp corner underneath the fitting and passage next to it.
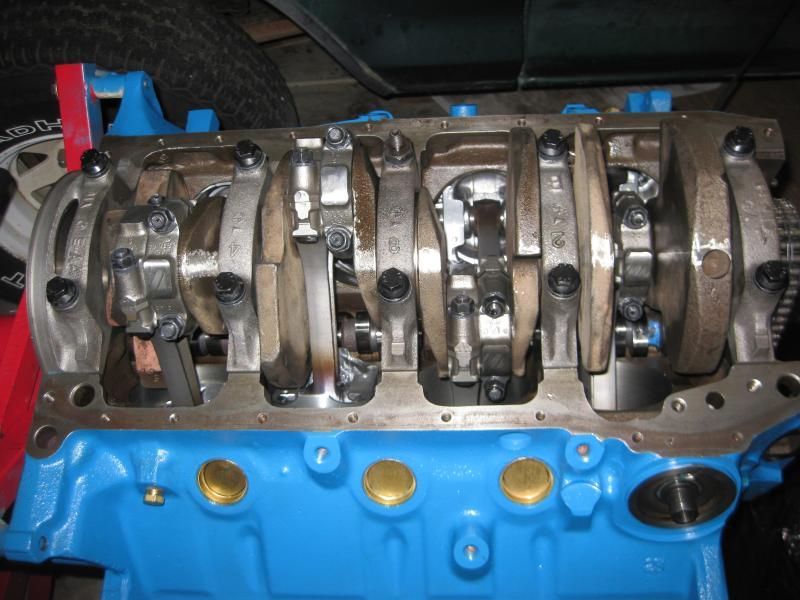
ARP oil pump drive shaft. Cheap insurance if there ever was!
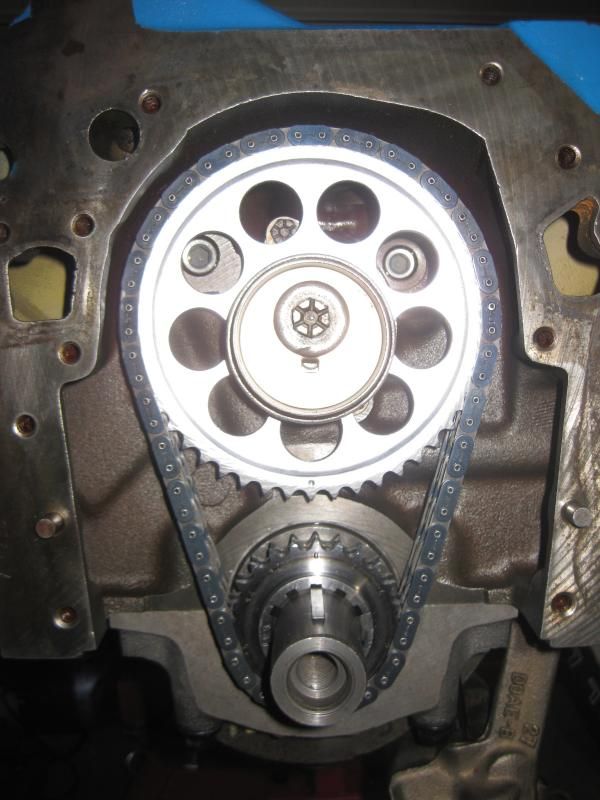
Crane double roller timing chain set. This is a JP Performance re-branded set. I think the gears are of very good quality, but chain just okay (Rolon). I did have to remove some small burrs from around the camshaft locating pin. ALWAYS be on the lookout for that stuff!
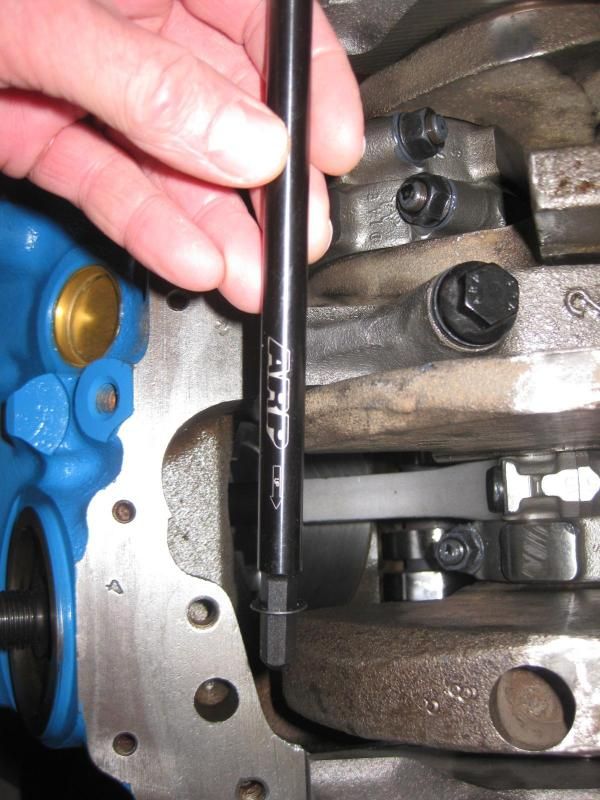
Front of the engine had this hole largely covered on both sides...

A carbide burr on the Dremel took care of that. I don't need any overheating issues!

#77
10-18-2014, 07:29 AM
Posting Legend
#78
10-18-2014, 09:21 AM
Gary,
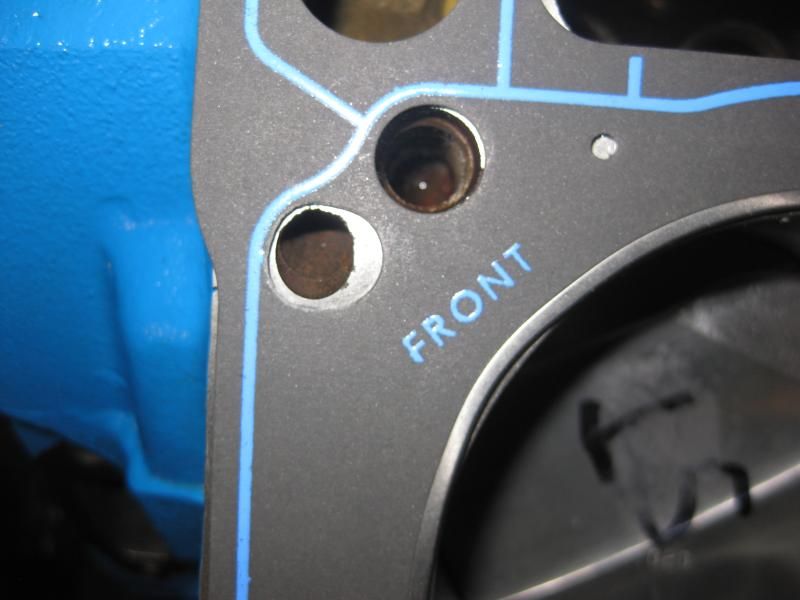
Yes they are a Fel-Pro no. 1013 performance gasket, they have a wire ring around each cylinder that is supposed to improve sealing. I suspect it's the same layout as any other Fel-Pro for a 351C, probably just a variation in my block.
I also started checking for pushrod length and ran into a possible snag. I'm using Scorpion rocker arms and shimmed them to improve the geometry. I contacted Scorpion to see if they offered a slightly taller base and they immediately offered send a sample for a BBF, I guess they are slightly longer? Same ratio though. Talk about customer service! I wasn't even complaining! I'll use which ever gives me the best geometry, but both will probably need a shim or two, at least those are really cheap!
#79
10-19-2014, 03:50 PM
Gary,
Yes they are a Fel-Pro no. 1013 performance gasket, they have a wire ring around each cylinder that is supposed to improve sealing. I suspect it's the same layout as any other Fel-Pro for a 351C, probably just a variation in my block.
I also started checking for pushrod length and ran into a possible snag. I'm using Scorpion rocker arms and shimmed them to improve the geometry. I contacted Scorpion to see if they offered a slightly taller base and they immediately offered send a sample for a BBF, I guess they are slightly longer? Same ratio though. Talk about customer service! I wasn't even complaining! I'll use which ever gives me the best geometry, but both will probably need a shim or two, at least those are really cheap!
#80
10-20-2014, 07:40 AM
Posting Legend
#81
11-28-2014, 10:45 PM
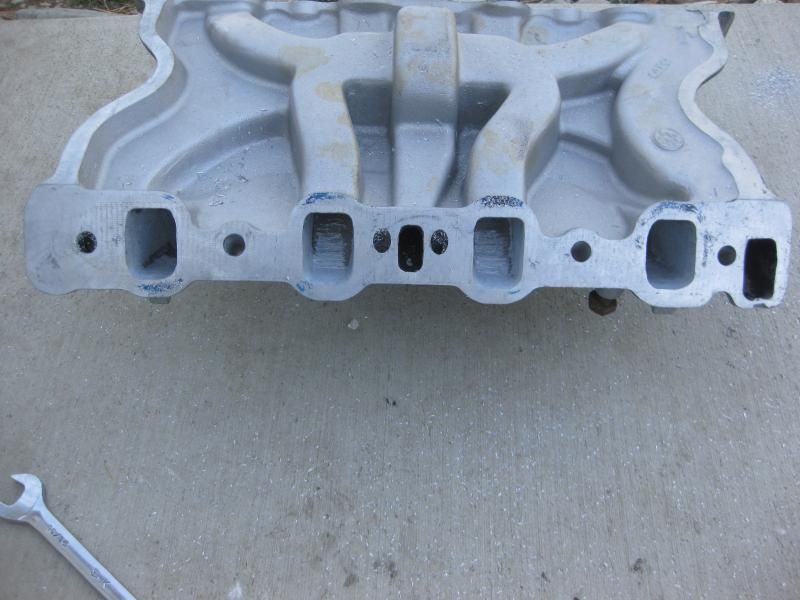
The stock Edelbrock Perrformer 400.
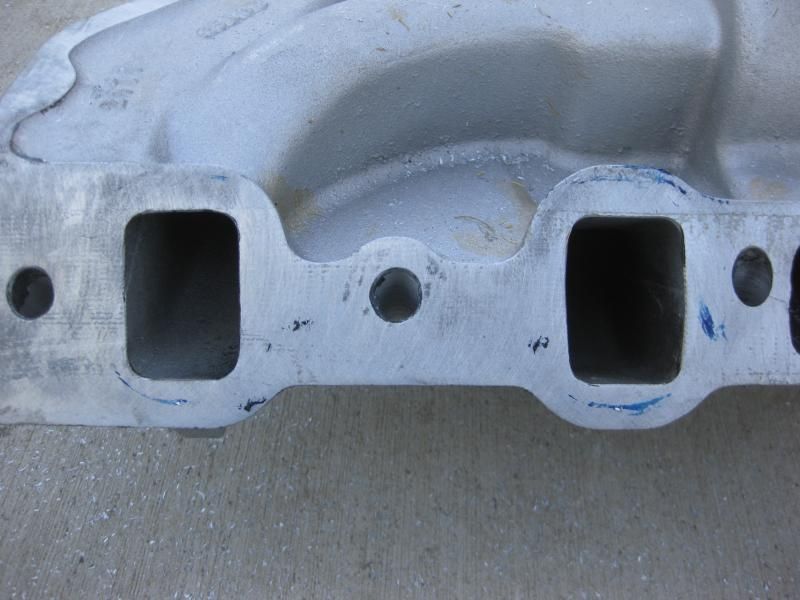
After opening up the roof and the sides just a bit. There is no way these ports are ever going to match the stock ports so I was just trying to keep the flow biased towards the roof.
Almost ready to drop in! I couldn't resist putting the fancy valve covers on - even though I removed them before putting the engine in. Hats off to Scorpion Performance! I tried the slightly longer rocker arms, but it pushed the roller too far to the outside, so I shimmed the rocker arms .090" and went with Trick FLow 9.050" long pushrods.
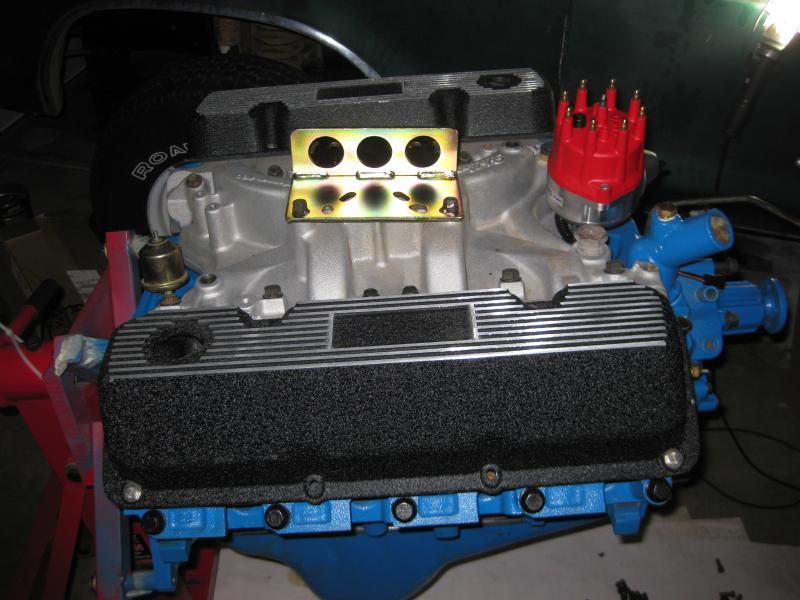
And in it goes! My eldest son gave me a hand for all of 15 or 20 minutes and it dropped right in! I'm still bolting up headers so I know where to best place the Moroso crankcase evacuation system. Said eldest son has a blower motor going out so we're replacing that in his '78 F-150 this weekend. Once I get the holes properly drilled for the crancase evac. system I'll at least get a quote on having the headers ceramic coated, locally.

The biggest remaining issue really is getting the MSD digital 6AL located in a good place and wired up! Oh, and I guess I still have to get a carburetor and air cleaner ordered!
After opening up the roof and the sides just a bit. There is no way these ports are ever going to match the stock ports so I was just trying to keep the flow biased towards the roof.
Almost ready to drop in! I couldn't resist putting the fancy valve covers on - even though I removed them before putting the engine in. Hats off to Scorpion Performance! I tried the slightly longer rocker arms, but it pushed the roller too far to the outside, so I shimmed the rocker arms .090" and went with Trick FLow 9.050" long pushrods.
And in it goes! My eldest son gave me a hand for all of 15 or 20 minutes and it dropped right in! I'm still bolting up headers so I know where to best place the Moroso crankcase evacuation system. Said eldest son has a blower motor going out so we're replacing that in his '78 F-150 this weekend. Once I get the holes properly drilled for the crancase evac. system I'll at least get a quote on having the headers ceramic coated, locally.
The biggest remaining issue really is getting the MSD digital 6AL located in a good place and wired up! Oh, and I guess I still have to get a carburetor and air cleaner ordered!
#82
11-29-2014, 07:29 AM
Posting Legend
#83
11-29-2014, 01:20 PM
The stock Edelbrock Perrformer 400.
After opening up the roof and the sides just a bit. There is no way these ports are ever going to match the stock ports so I was just trying to keep the flow biased towards the roof.
Almost ready to drop in! I couldn't resist putting the fancy valve covers on - even though I removed them before putting the engine in. Hats off to Scorpion Performance! I tried the slightly longer rocker arms, but it pushed the roller too far to the outside, so I shimmed the rocker arms .090" and went with Trick FLow 9.050" long pushrods.
And in it goes! My eldest son gave me a hand for all of 15 or 20 minutes and it dropped right in! I'm still bolting up headers so I know where to best place the Moroso crankcase evacuation system. Said eldest son has a blower motor going out so we're replacing that in his '78 F-150 this weekend. Once I get the holes properly drilled for the crancase evac. system I'll at least get a quote on having the headers ceramic coated, locally.
The biggest remaining issue really is getting the MSD digital 6AL located in a good place and wired up! Oh, and I guess I still have to get a carburetor and air cleaner ordered!
#84
11-29-2014, 07:59 PM
Thanks dimora!
It does look good, especially for a Bronco engine! One other thing I need to change is the distributor gear. I recently read that 79Silverstreak ate his distributor gear, so I ordered a bronze one from MSD. It arrived yesterday. Sure Howards states you can use the factory cast gear, but I'm not chancing it. A bronze gear is compatible with everything, it just has a shorter life span. At least that's my understanding.
I have lots of room in the engine bay for mounting the MSD, I'd kind of like to put it right where the factory ignition box was (driver's side), but it probably makes more sense on the passenger's side. I removed the factory jack and mounts that were on the driver's side, since they are next to worthless anyway.
#85
11-30-2014, 05:48 AM

. Instead of changing the gasket hole, I would have 'adjusted' the coolant hole in the iron block to fit the gasket hole and any subsequent gaskets...
. Also, champfer the oil return holes in the heads, if needed...
. Are you going to be carrying some other type of jack somewhere's? I have the jack, but haven't been carrying a spare lately... haven't been driving it very far... need to rig up another spare and improve the spare carrier... also need to add some kind of a big base to the jack so it doesn't keep tipping over when turning the jack handle... and a thicker jack base to compensate for the taller tires...
.
#86
11-30-2014, 07:47 PM

BuzzLOL,
Yes, I actually should have modified the block, but since I was actually putting things together - the gasket got modified. I don't like having "special" parts that get replaced like that. The next person may have no idea, or I might even forget! I did chamfer the oil drain back holes in the heads early on.
As for a jack - I have a nice Hi-Lift from when I owned a 77 Bronco. I'll need a way to mount it, but that's what I'll carry. Those things are a great tool!
Of course I WAS going to replace my distrinutor gear only to discover the bronze one from MSD is only half drilled and at a different location than the one on my Pro Billet distributor. A "generic" gear that fits other things too I suppose. Since I do not trust myself in drilling it out at the correct height to match the current setup, I'll try a new machine shop for this simple task.
Gary Lewis,
As for a carburetor, I'm thinking a Quick Fuel 680 CFM Dlack Diamond with vacuum secondaries. They don't come with a Ford kick-down so I'll have to add that myself. I've heard good things about these carbs and I like the idea of annular discharge venturies. I'll be running a 1" open carb spacer to start off with too.
#87
12-01-2014, 08:14 AM
Posting Legend
#88
12-01-2014, 09:49 AM
. Chevy's have ALWAYS had OHV's... from their first 4-bangers to the 1917 V8's... Ford can't claim originating that very best of "good ideas"... LOL!
. Chevy could have used any valve size and because they sold so many SBC's, it would have become the "common sizes"...
. I would definitely go with a 750 CFM carb. for your planned 400+ HP engine... in this dyno test, they even found the 750 CFM stronger on a wimpy little 327" engine:
#89
12-01-2014, 10:38 AM
Posting Legend
Picking the right sized carb is dependent on what you want to do with the engine. If you want max HP and intend to wind it up to 5500 or 6000 then go for 750 CFM. If you never plan to wind it that much and are looking for max low-end torque and good MPG go with something smaller.
Note that both of those statements assume you will be using a carb with the primaries roughly the same size as the secondaries, which includes most Holleys and their derivatives like QF's. That's because if you get a carb large enough to give the engine all of the CFM it wants at full-tilt the primaries are large enough to hurt the part-throttle response and MPG. But, there are other carbs available that provide small primaries and huge secondaries such that part-throttle and MPG is maximized and yet the carb can still fuel the engine at full-tilt. Carbs like that would include the QJet, the ThermoQuad, and the new Street Demon.
The latter is what I'm going with, and the one I got is a 750 that Tim dyno'd on a 400. It has the plastic bowl so there's no heat transfer from the engine to the fuel. And, with its small primaries and triple-stack boosters it should have very crisp throttle response, good MPG, and still give the engine enough fuel to make lots of power. But, when the engine goes to the dyno I'll take a 750 Holley 4150 against which to compare.
#90
12-01-2014, 01:31 PM
. I suspect the main reason Holley 750 double pumpers always seem to work slightly better on magazine dyno articles is because Holley pays contingency money... although sometimes lately Edelbrock has paid... and car magazines are mainly infomercials for products... as they have to be... I mean, I enjoy some of the articles as much as the next person, though...
. Since a 400" engine can make 500 HP by 5,000 RPMs... a 750 CFM carb. can be needed long before 6,000 RPMs...
. Since a 400" engine can make 500 HP by 5,000 RPMs... a 750 CFM carb. can be needed long before 6,000 RPMs...