
Blower Motor and Resistor R&R with pics...
#1
 09-19-2013, 11:22 PM


Blower Motor and Resistor R&R with pics...
Symptoms include losing all air out of the dash intermittently, completely or just losing some of your fan speeds. Some lose the higher speeds, some lose the lower speeds. If you get an intermittent (works today, but not yesterday) airflow out of your vents, it will usually be the blower motor. If you lose the lower speeds, but still have full blast or vice versa, it will usually be your blower motor resistor. If you are still running your original blower motor and resistor, your time is coming! Mine came due this past week. The air would blow out the vents one day, and not work at all the next day. Sometimes, I could hit a bump and it would start working again. This is the blower motor internal parts being worn and out of tolerance. So, I ordered the parts and went ahead and replaced both parts today so I wouldn't have to go back in later for the resistor when it fails. I did this for $56 after using the coupons at Advance Auto. Everything was in stock there for a quick fix today. The dealership would have cost me $300 or more for parts and labor. Time for the repair was 1.5 hours.
Blower motor part number is Ford 18527 (Factory Air #35016)
Front Blower Motor Resistor is Ford 18591 (BWD #RU1138)
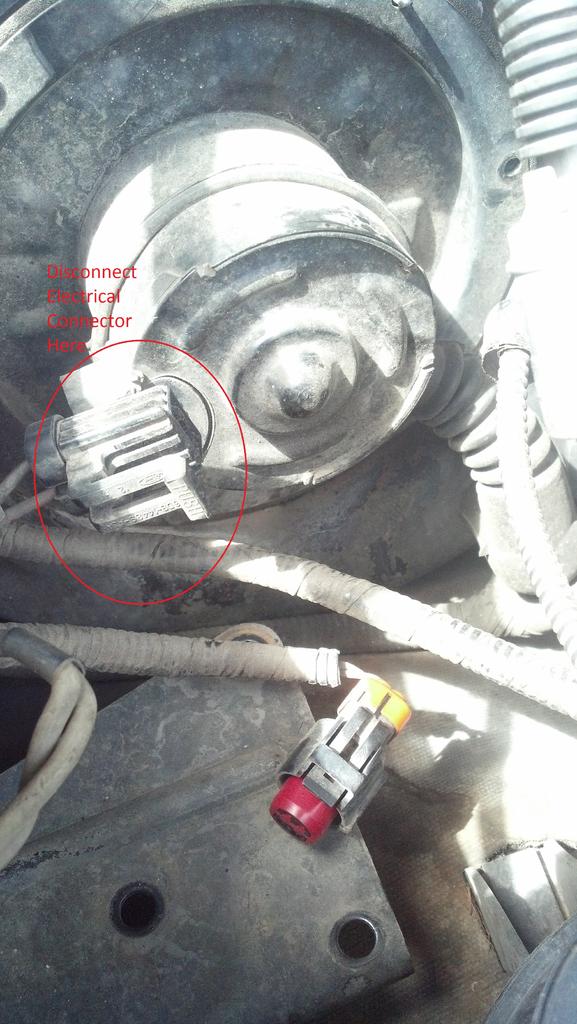
To start with, remove the vacuum pump from its mount. To do this, grasp it firmly and pull upwards. The three rubber isolators that hold it in the bracket will pop out of their holes and free the pump. Set it off to the side after disconnecting the electrical connector. There is a black vacuum line that runs from the pump to the firewall. There is a spot where the two lines are joined right above the blower motor. Pull them apart right there, and you should hear the vacuum that was built up release. If you don't, well you have other problems (vacuum leak!).
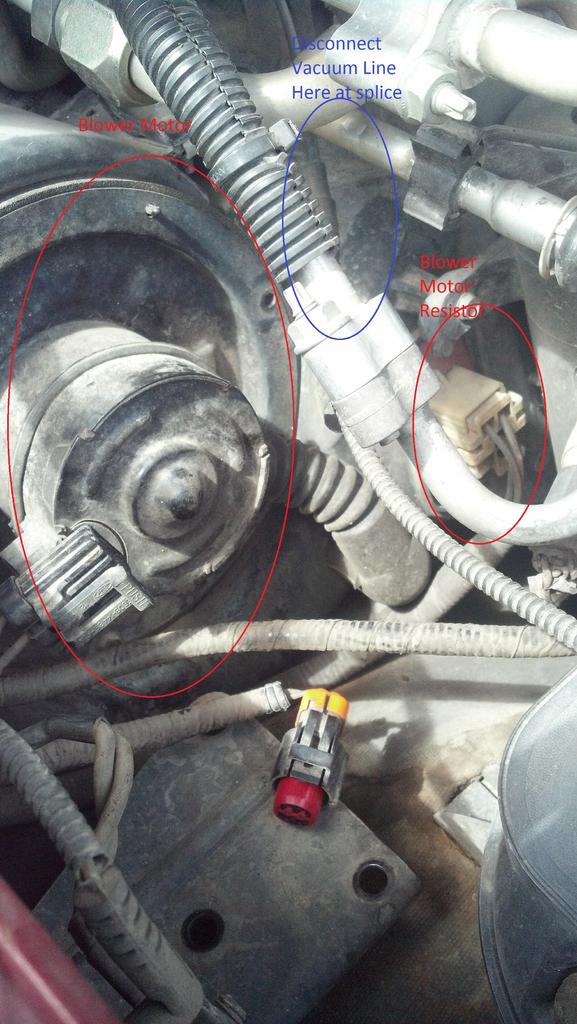
Next, remove the three screws (8mm) holding the blower motor onto the plastic molding that is your A/C vent system. Disconnect the connector for the motor. Carefully remove the blower motor and attached fan from the cavity they occupy. It is a tight fit getting it out, but not difficult. You will have to push the A/C orifice tube back a little with your off hand to make the necessary room to pull it out. Make sure you keep the foam gasket that comes off with the blower motor. Your new motor may not come with one.
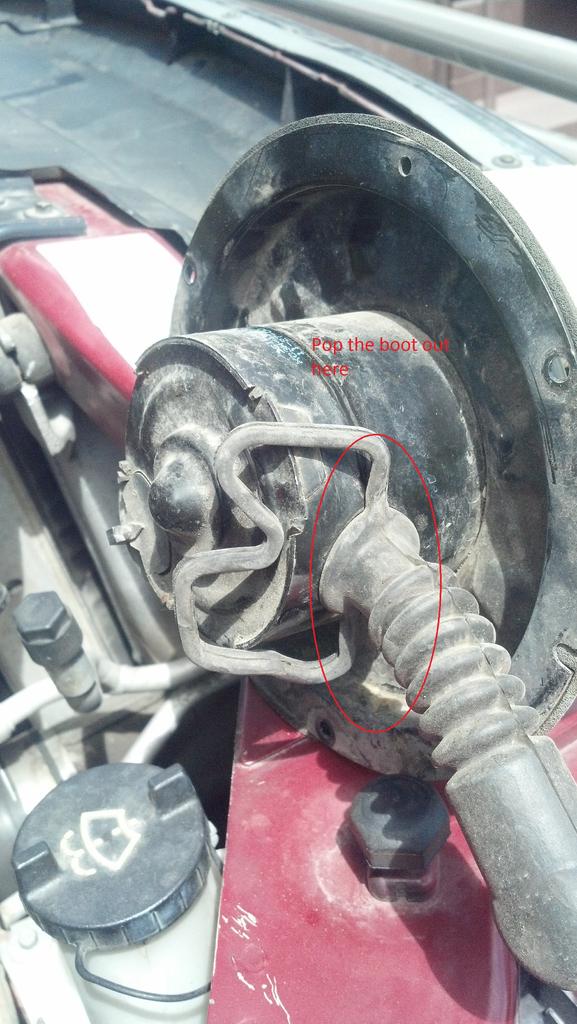
With the motor out, remove the rubber motor cooling duct from the old motor. Don't mess it up, because this part is only available at Ford and they want $$$$ for it! That funny shaped piece stretches over the motor housing to hold it firmly in the hole.
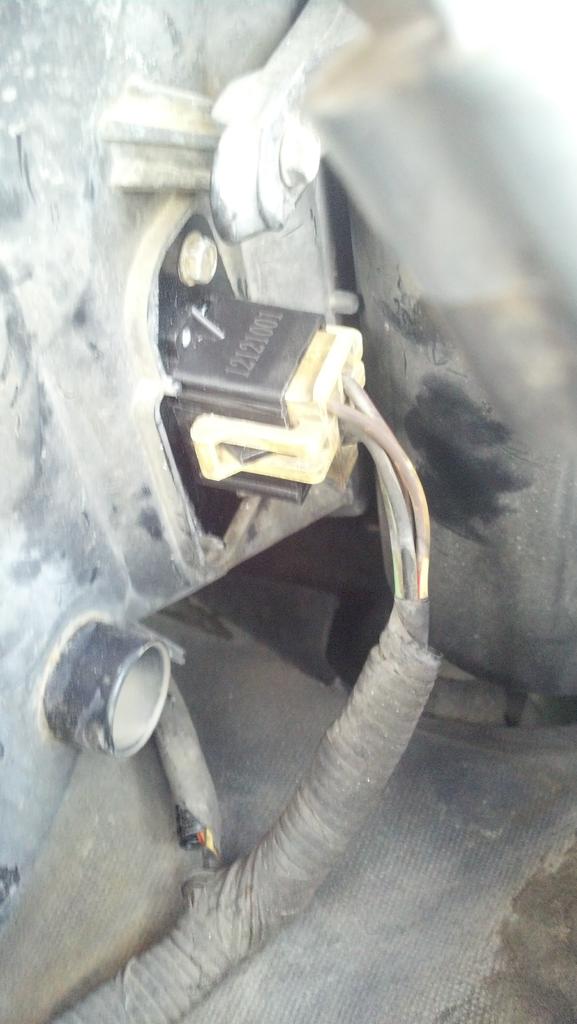
Once you have the blower motor out, you will have easier access to the Resistor. Leave the plug attached, and remove the two screws holding it in (8mm). Once you have the screws out, pull the old resistor out. Grab a pair of pliers. You will see on the plug that it has catches on both sides. Impossible to get this plug off without three hands. Take the pliers and break the tabs off on the old resistor male side of the plug. Break them as far down as you can. Then, get a small flat blade screwdriver and take your time prying the plug off the old resistor. It took me about 10 minutes going back and forth between the two sides to get it to pop off.
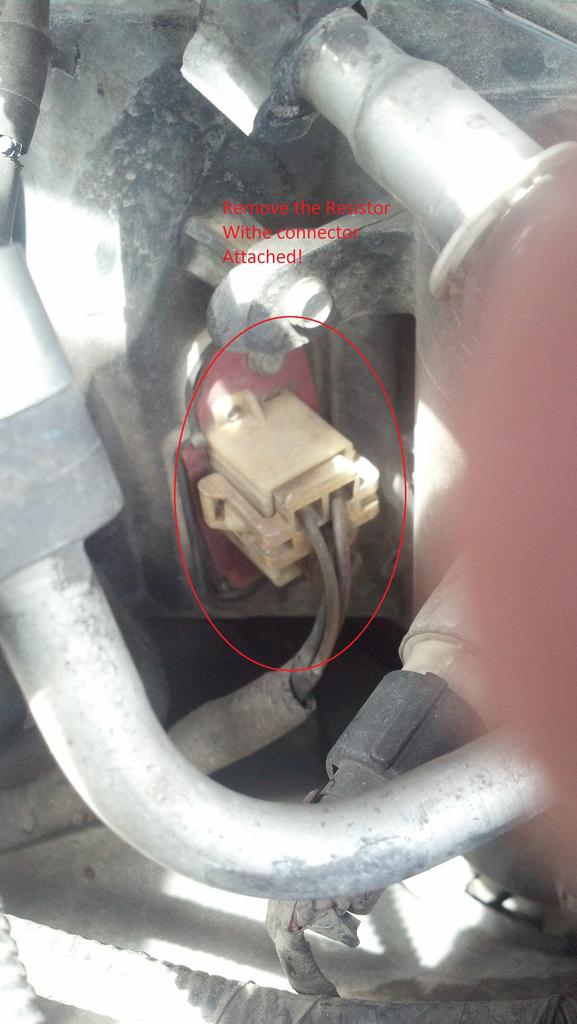
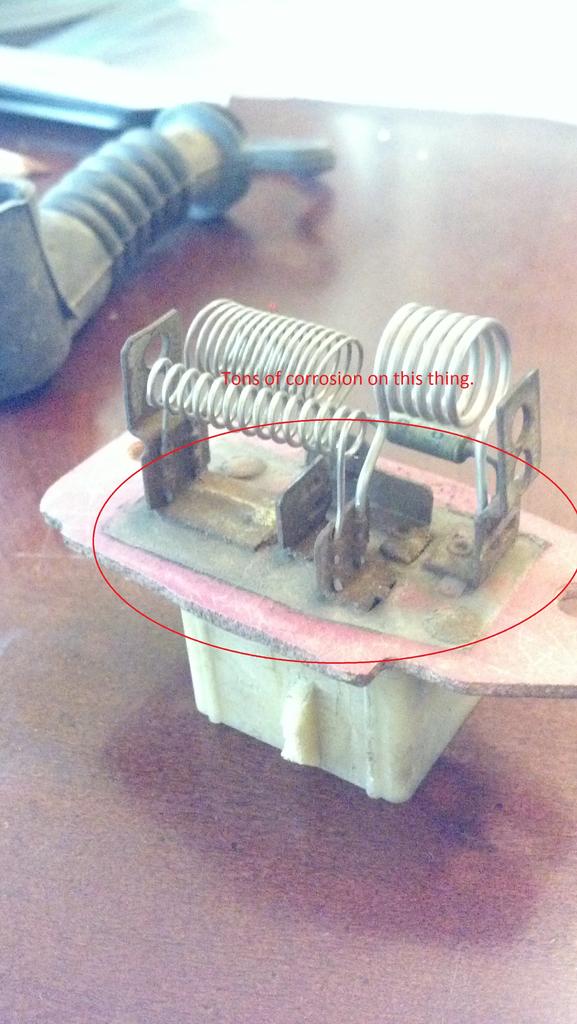
Now that you have the old resistor in your hand, you will see all the corrosion on it. It is mounted right next to the evaporator coils, so I am sure that may be part of the cause for the corrosion. You can see the tabs I broke to get the plug off. Also, the inside of the plug on the terminals had some rust.

Continued in next post...
Blower motor part number is Ford 18527 (Factory Air #35016)
Front Blower Motor Resistor is Ford 18591 (BWD #RU1138)
To start with, remove the vacuum pump from its mount. To do this, grasp it firmly and pull upwards. The three rubber isolators that hold it in the bracket will pop out of their holes and free the pump. Set it off to the side after disconnecting the electrical connector. There is a black vacuum line that runs from the pump to the firewall. There is a spot where the two lines are joined right above the blower motor. Pull them apart right there, and you should hear the vacuum that was built up release. If you don't, well you have other problems (vacuum leak!).
Next, remove the three screws (8mm) holding the blower motor onto the plastic molding that is your A/C vent system. Disconnect the connector for the motor. Carefully remove the blower motor and attached fan from the cavity they occupy. It is a tight fit getting it out, but not difficult. You will have to push the A/C orifice tube back a little with your off hand to make the necessary room to pull it out. Make sure you keep the foam gasket that comes off with the blower motor. Your new motor may not come with one.
With the motor out, remove the rubber motor cooling duct from the old motor. Don't mess it up, because this part is only available at Ford and they want $$$$ for it! That funny shaped piece stretches over the motor housing to hold it firmly in the hole.
Once you have the blower motor out, you will have easier access to the Resistor. Leave the plug attached, and remove the two screws holding it in (8mm). Once you have the screws out, pull the old resistor out. Grab a pair of pliers. You will see on the plug that it has catches on both sides. Impossible to get this plug off without three hands. Take the pliers and break the tabs off on the old resistor male side of the plug. Break them as far down as you can. Then, get a small flat blade screwdriver and take your time prying the plug off the old resistor. It took me about 10 minutes going back and forth between the two sides to get it to pop off.
Now that you have the old resistor in your hand, you will see all the corrosion on it. It is mounted right next to the evaporator coils, so I am sure that may be part of the cause for the corrosion. You can see the tabs I broke to get the plug off. Also, the inside of the plug on the terminals had some rust.
Continued in next post...
#2
09-19-2013, 11:47 PM
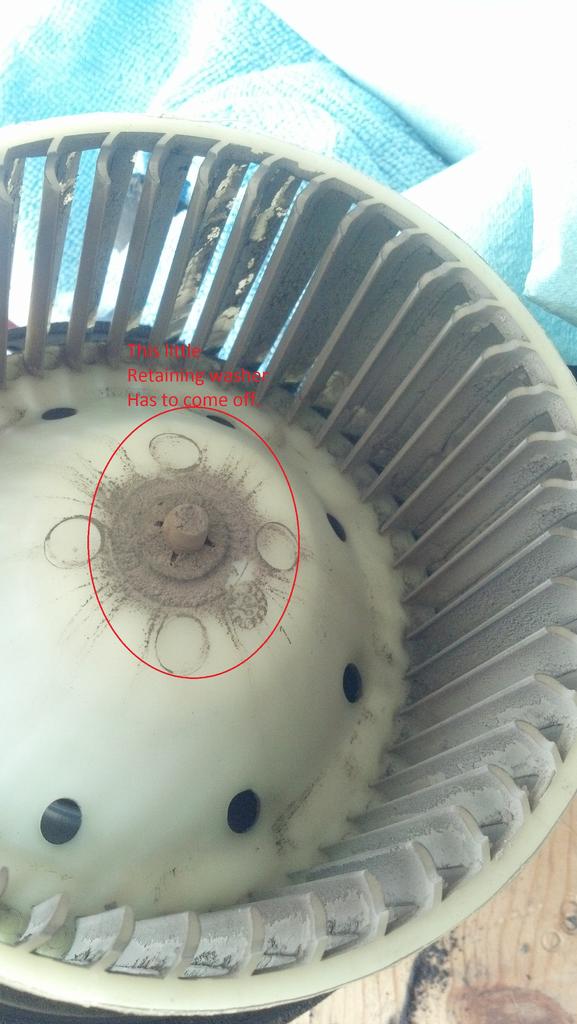
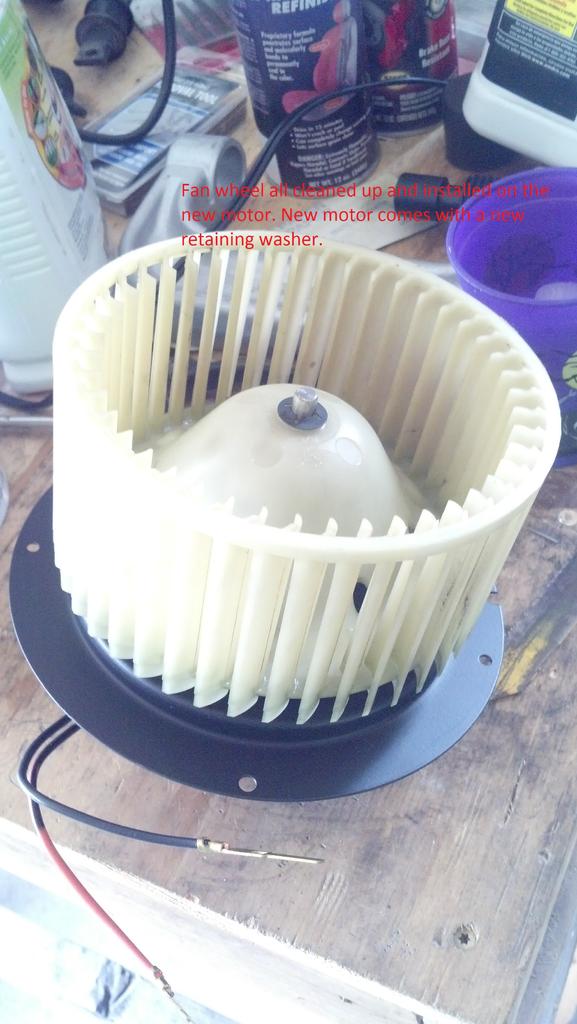
Now you can move your old fan over to the new motor. That is, unless your new motor came with one. Some do, some don't. Mine did not. You will find a small retaining washer under all the dust and dirt on your fan. Notice how EXTREMELY dirty my fan was. That crap was going into my truck every time I turned on the fan or A/C. Yuck....
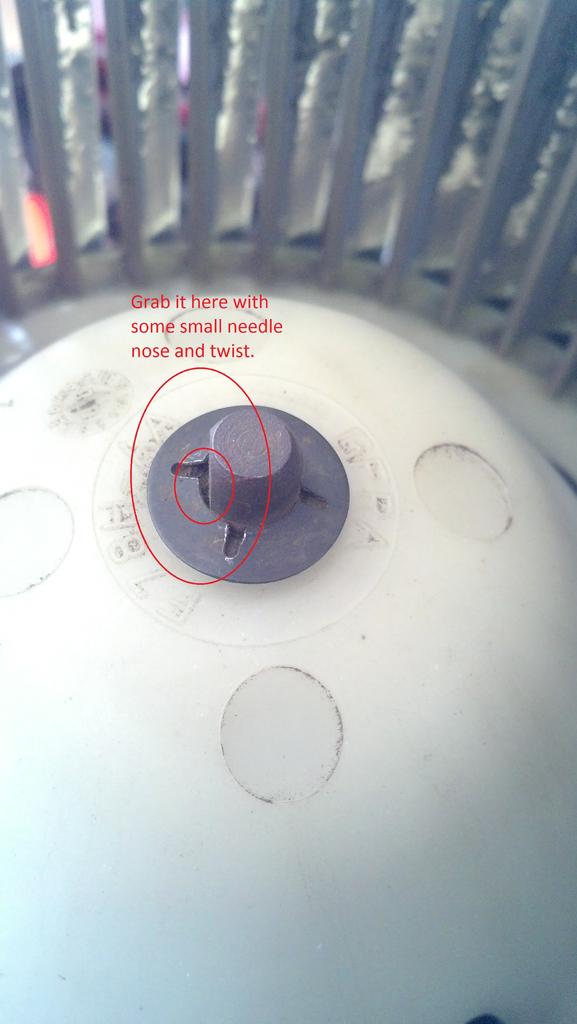
You can see the HUGE difference after I cleaned up the fan and put it on the new motor. Getting it off required me to heat the plastic that rides on the shaft with a heat gun, and then have my 10 year old hang on the motor end while I wiggled the fan off. It wasn't hard at all. The new motor comes with a new washer.
Next, install your new resistor in its hole, and plug it in. Put the 8mm screws back in their spots keeping in mind they screw into plastic.
Reinstall your fan being careful not to damage the fan cage. You will notice there are two alignment pins protruding from the hole the fan goes in. Put your gasket on those pins first, and line up the holes for the three screws. Then slide your fan assembly in there and put the three screws back in. Orient the hole for the rubber vent toward the engine. Once the screws are in, put the rubber vent back on, and stretch the retaining strap over the motor housing.
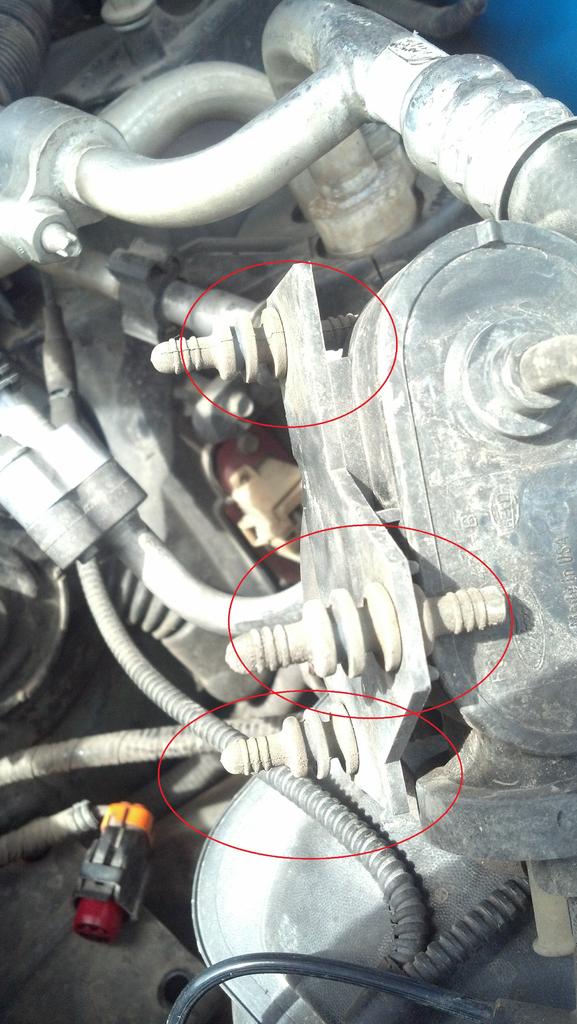
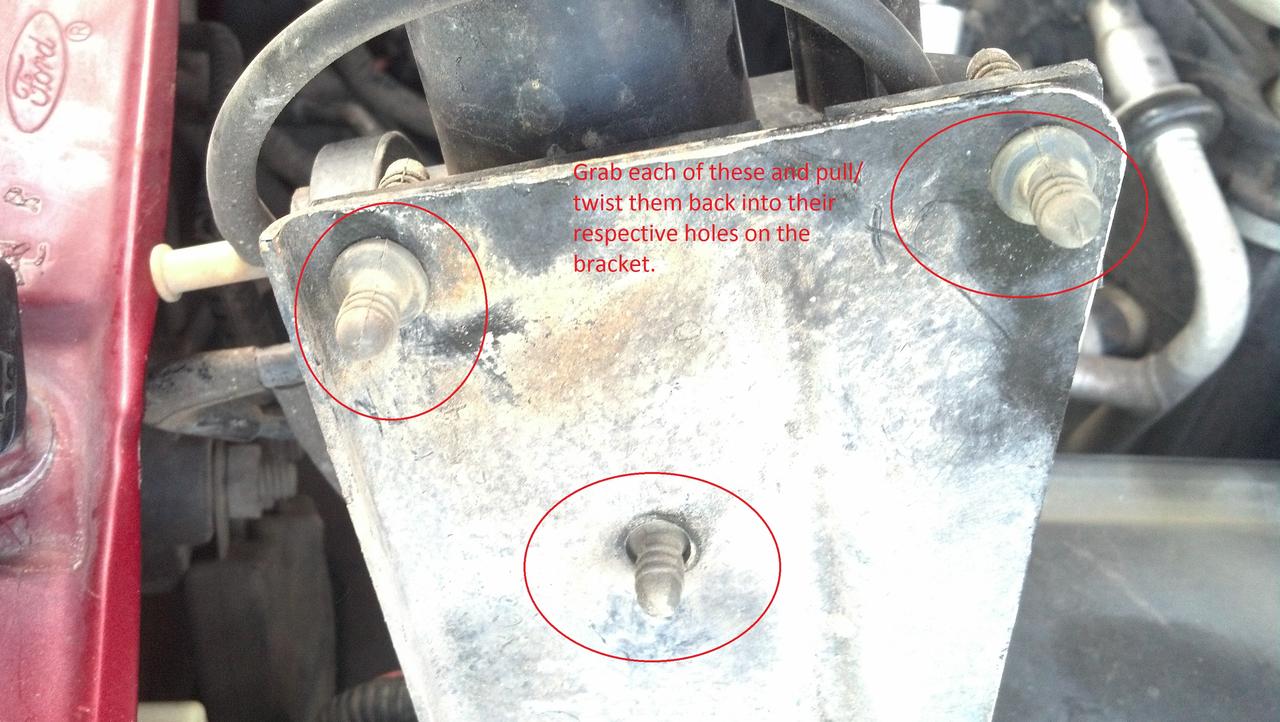
Now we need to reinstall the vacuum motor. Use a 10mm socket or wrench to remove the bracket. There are two bolts holding it on. Once your have the bracket off, put the rubber mounts back in their holes. To do this, grab them and twist/pull them through the holes. Then remount the bracket to the truck. The starter solenoid is right there, so be careful or disconnect the batteries!!!! You can see in the photo what I mean...
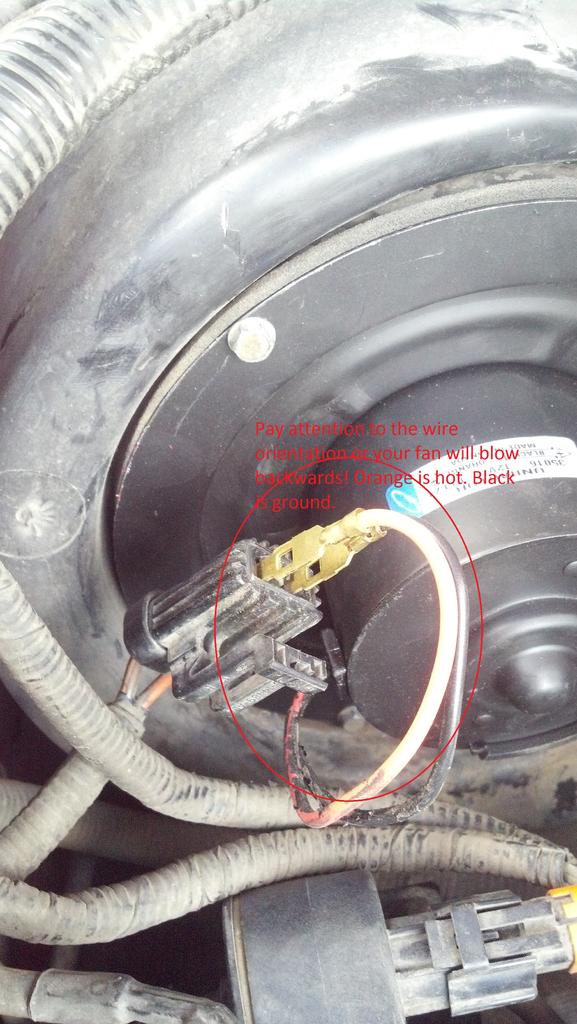
All that is left now is to connect power to your new fan. If you went aftermarket, you will find the plug is not in the fan housing. It has two wires that need to be installed into a provided female plug. There is a positive (orange) and negative (black) wire coming out of the fan. You will need to either use my photos or figure out which slot they go in. You can do this by simply placing them into the slots for the existing male end and turn the ignition to accessory. Turn on the fan and see if it blows out the vents. If it doesn't, you have them backwards. Switch them and retry. Once you have them right, insert the spades into the female plug and seat them (they snap in). Then plug your fan in, and reconnect the vacuum line you disconnected in the beginning.
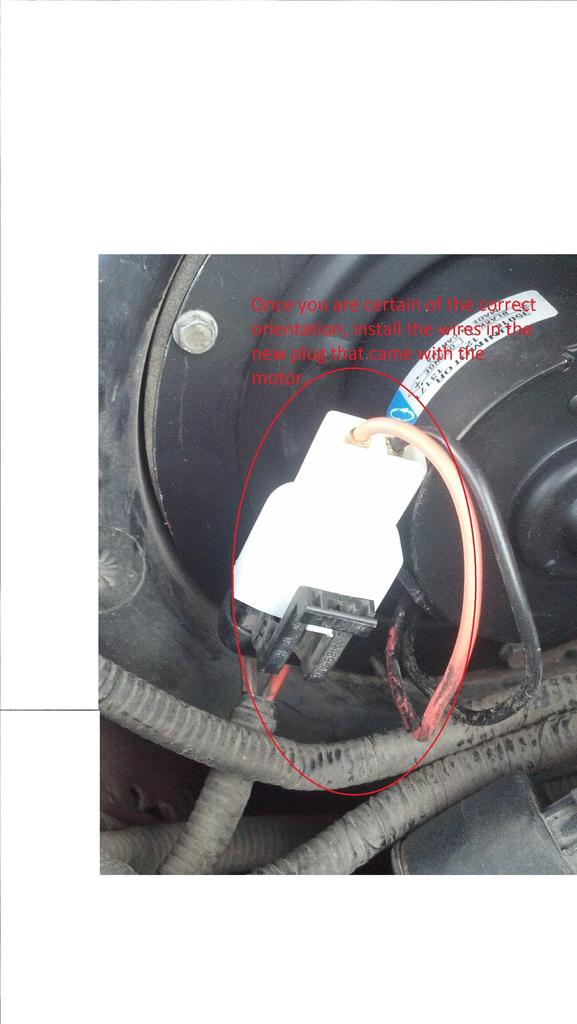
My fan blows much harder than it has since I bought the EX 21 months ago. I had no idea how weak the old one was...or how dirty it was!!
You can see the HUGE difference after I cleaned up the fan and put it on the new motor. Getting it off required me to heat the plastic that rides on the shaft with a heat gun, and then have my 10 year old hang on the motor end while I wiggled the fan off. It wasn't hard at all. The new motor comes with a new washer.
Next, install your new resistor in its hole, and plug it in. Put the 8mm screws back in their spots keeping in mind they screw into plastic.
Reinstall your fan being careful not to damage the fan cage. You will notice there are two alignment pins protruding from the hole the fan goes in. Put your gasket on those pins first, and line up the holes for the three screws. Then slide your fan assembly in there and put the three screws back in. Orient the hole for the rubber vent toward the engine. Once the screws are in, put the rubber vent back on, and stretch the retaining strap over the motor housing.
Now we need to reinstall the vacuum motor. Use a 10mm socket or wrench to remove the bracket. There are two bolts holding it on. Once your have the bracket off, put the rubber mounts back in their holes. To do this, grab them and twist/pull them through the holes. Then remount the bracket to the truck. The starter solenoid is right there, so be careful or disconnect the batteries!!!! You can see in the photo what I mean...
All that is left now is to connect power to your new fan. If you went aftermarket, you will find the plug is not in the fan housing. It has two wires that need to be installed into a provided female plug. There is a positive (orange) and negative (black) wire coming out of the fan. You will need to either use my photos or figure out which slot they go in. You can do this by simply placing them into the slots for the existing male end and turn the ignition to accessory. Turn on the fan and see if it blows out the vents. If it doesn't, you have them backwards. Switch them and retry. Once you have them right, insert the spades into the female plug and seat them (they snap in). Then plug your fan in, and reconnect the vacuum line you disconnected in the beginning.
My fan blows much harder than it has since I bought the EX 21 months ago. I had no idea how weak the old one was...or how dirty it was!!

#5
09-20-2013, 01:19 AM
#7
09-20-2013, 05:55 AM
Postmaster
Trending Topics
#9
09-20-2013, 09:32 AM

Tuned
Join Date: Aug 2013
Location: Phoenix, AZ
Posts: 339
Likes: 0
Received 0 Likes
on
0 Posts
#10
09-20-2013, 11:36 AM
#12
09-20-2013, 12:58 PM
For posterity, the blower motor resistor in the back is a totally different part number. It is smaller than the one for the front blower, and it has a different plug shape. The motor in the back is the same as the front. Both components in the back are super easy to access without taking anything besides the storage compartment door off. If you can do the front, you can do the rear blindfolded.
#13
09-20-2013, 09:42 PM
I just let curiosity get the better of me, and I pulled the blower motor out of the rear. I found it was just as worn, if not more worn than the front motor. Copper dust and metal particles that look like steel wool were in abundance inside the motor housing. When I went to check the resistor, I found it was in OK condition, and not nearly as bad as the front had been. However, I found the evaporator coils 50% clogged with dog hair! This is an issue that carried over from the PO. My dog doesn't ride in the X unless she is going to the vet once a year, and she is a grey Italian Mastiff.
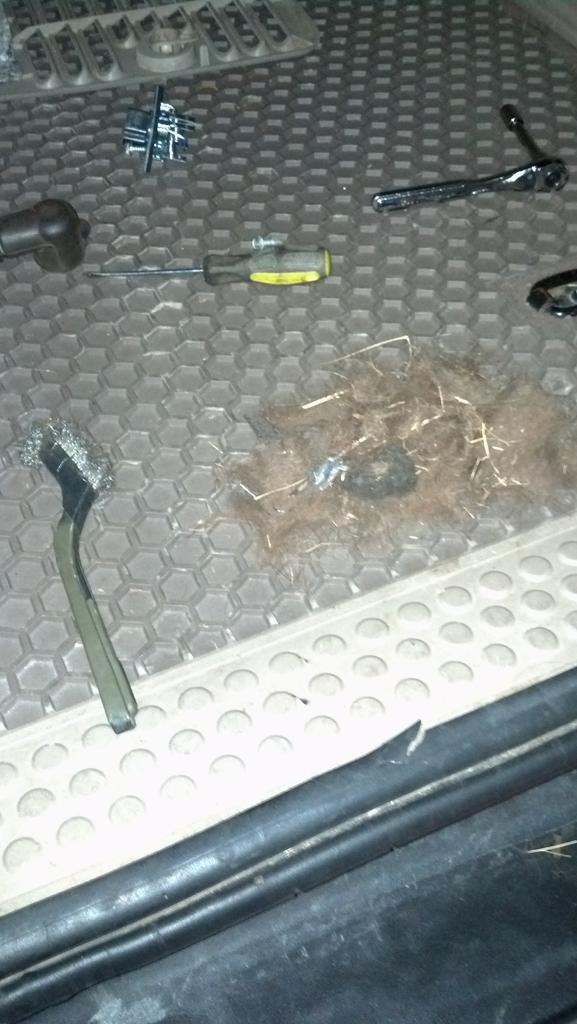
Somewhere, a chow-chow is missing its fur coat. I used a small wire brush to gather all the hair, and it worked great. It should be noted that, unlike the front A/C system, the rear can only draw air from inside the vehicle. So, whatever you have in the back is going to get sucked into that blower motor and fed right back to you in your face. Be careful what you put in the back, and vacuum up after the dog!
So, I went on down to Advance and grabbed another motor and resistor coil. The rear resistor coil is BWD part # RU1076. Here are a couple of comparison photos of the brushes and commutators in the old and new motor. You should be able to tell the difference between the new and old without me pointing it out. Photos for your enjoyment:
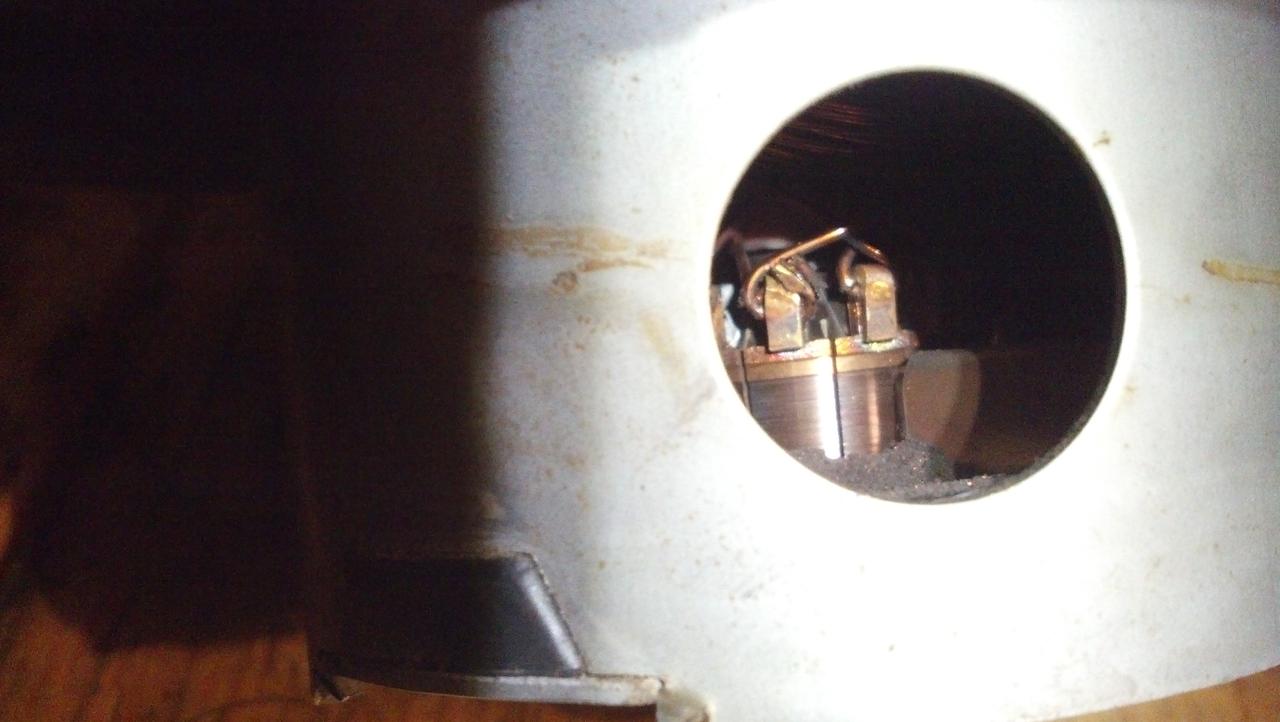
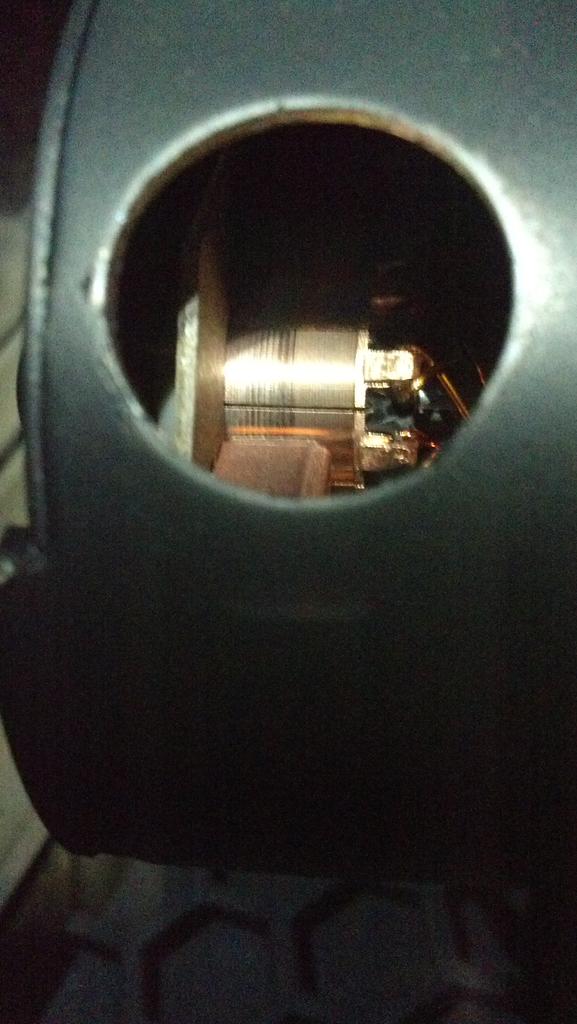
This motor's days were numbered, so I am glad I succumbed to my curiosity rather than waiting till next month. The air is blowing MUCH stronger in the back now, just like the front after changing that motor. Part of the reduced flow in the rear was the blockage in the evaporator coils, though.
Only tools needed for the rear are an 8mm socket with 3 inch extension. This job for both parts takes 30 minutes to complete, and the upside is huge! $60 for parts, since the resistor in the rear is an extra $5 over the front.
Wife is even happier...
Somewhere, a chow-chow is missing its fur coat. I used a small wire brush to gather all the hair, and it worked great. It should be noted that, unlike the front A/C system, the rear can only draw air from inside the vehicle. So, whatever you have in the back is going to get sucked into that blower motor and fed right back to you in your face. Be careful what you put in the back, and vacuum up after the dog!
So, I went on down to Advance and grabbed another motor and resistor coil. The rear resistor coil is BWD part # RU1076. Here are a couple of comparison photos of the brushes and commutators in the old and new motor. You should be able to tell the difference between the new and old without me pointing it out. Photos for your enjoyment:
This motor's days were numbered, so I am glad I succumbed to my curiosity rather than waiting till next month. The air is blowing MUCH stronger in the back now, just like the front after changing that motor. Part of the reduced flow in the rear was the blockage in the evaporator coils, though.
Only tools needed for the rear are an 8mm socket with 3 inch extension. This job for both parts takes 30 minutes to complete, and the upside is huge! $60 for parts, since the resistor in the rear is an extra $5 over the front.
Wife is even happier...
#15
09-20-2013, 10:01 PM