Newbie 85 f250 frame off resto (Image Heavy)

#77
 10-16-2013, 02:13 PM
Join Date: Sep 2013
Location: New Hampshire
Posts: 429
Likes: 0
Received 0 Likes
on
0 Posts


#78
11-19-2013, 01:56 PM
Join Date: Sep 2013
Location: New Hampshire
Posts: 429
Likes: 0
Received 0 Likes
on
0 Posts
Update time!
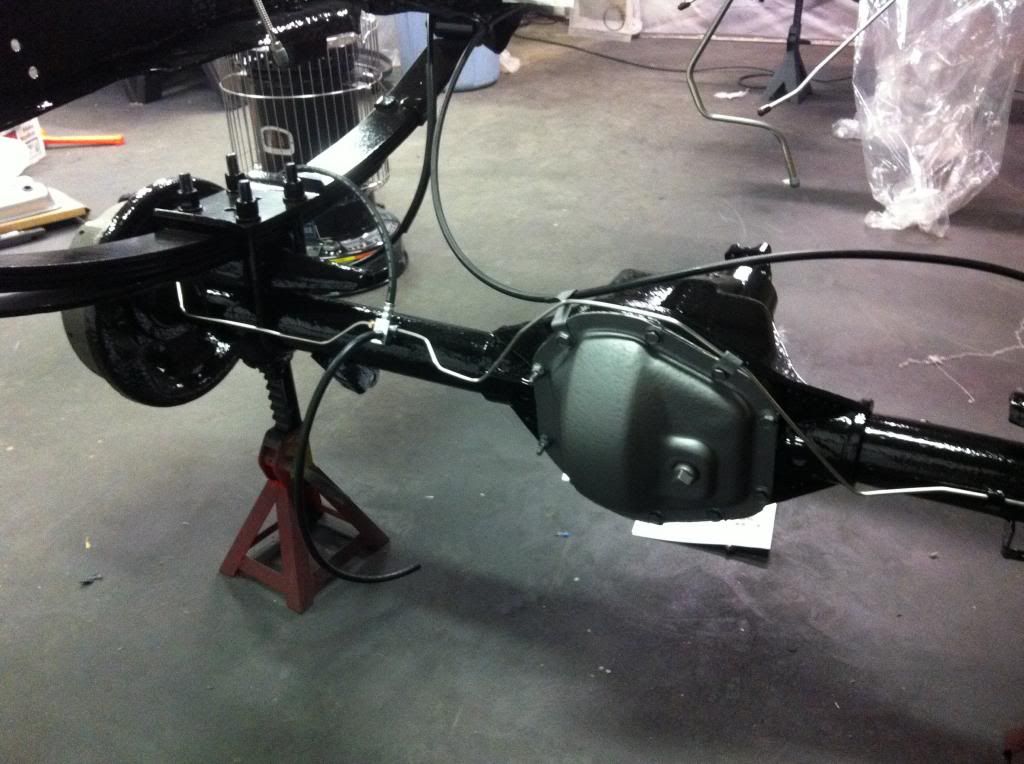
The paint seems to be fine. I've done a little here and there, but progress has been slow.
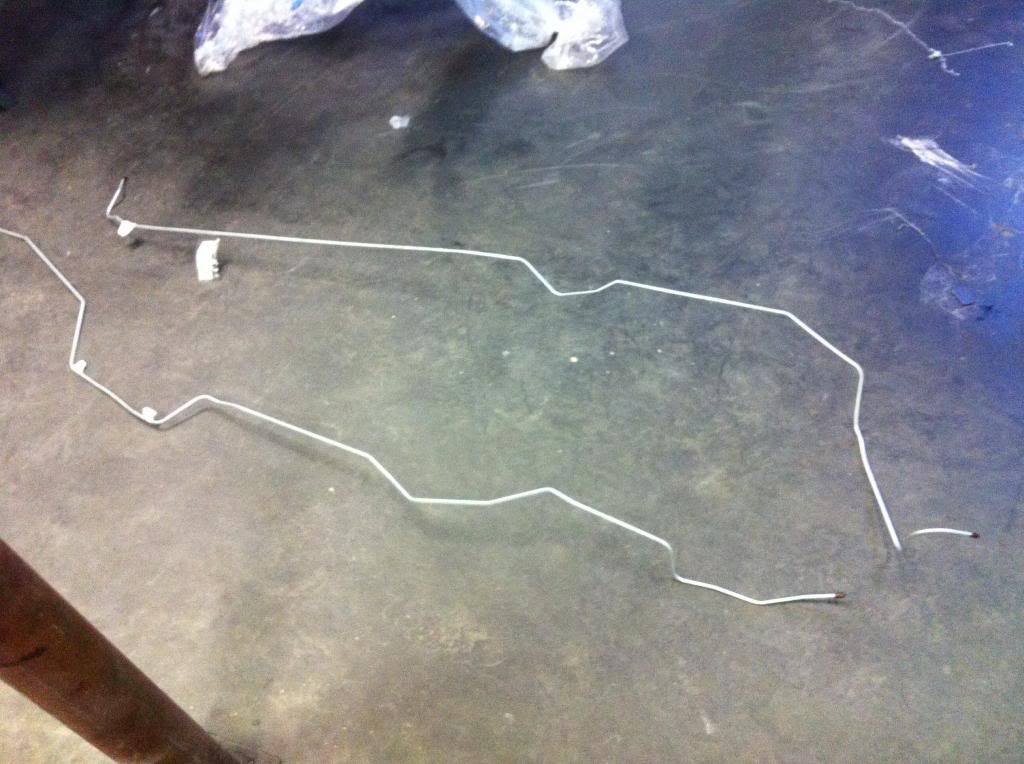
I've started to run the brake lines and fuel lines, but I'm having some trouble with the pre bent fuel lines and vent lines, so I put that on hold to think about how they go.

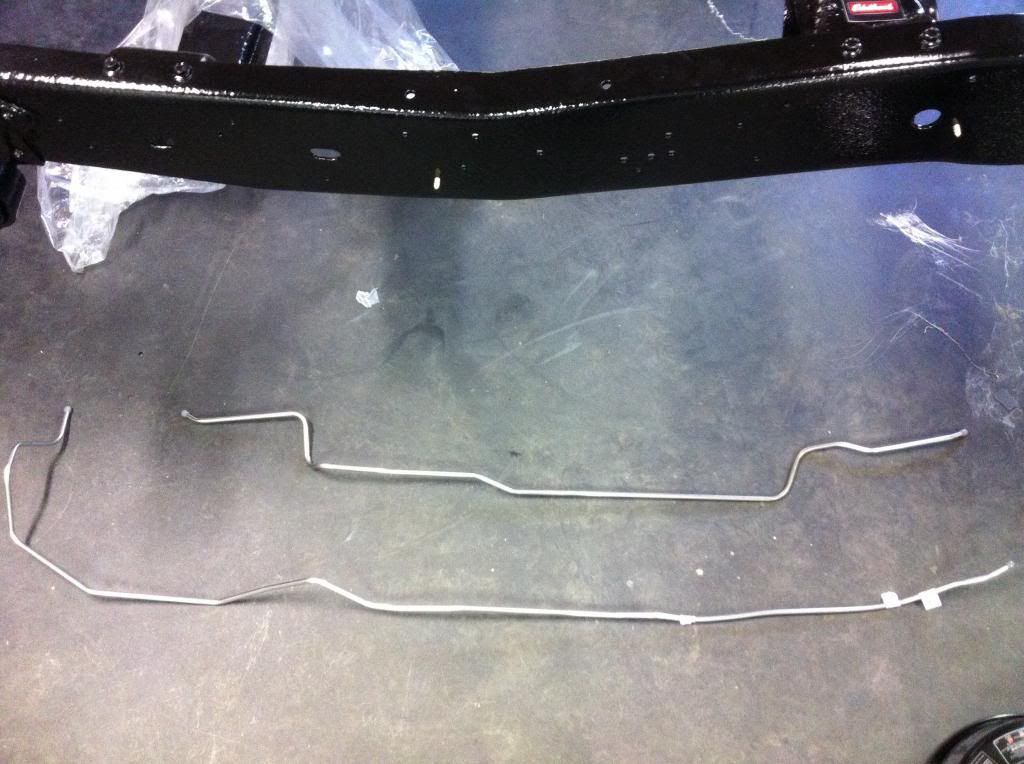
These are the 3/8" SS fuel lines that I can't figure out
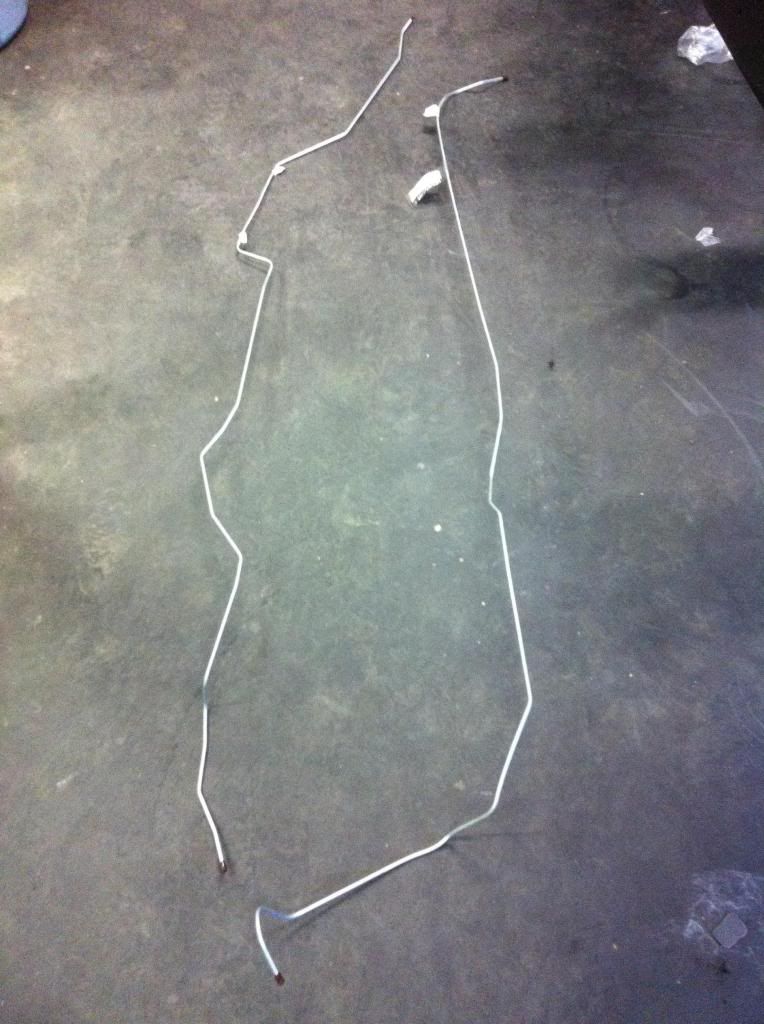
And these are the vent lines. Same two lines in each pic just different pics
The original dust shields are discontinued for the 85 f250 and for the 89 f350 (which is the truck I got the front axle from) so I ordered some that are for a 94-97 f350 I think. The part #'s ordered are F5TZ-2K005-A and F5TZ-2K005-B. Turns out they are both driver side shields, but are slightly different
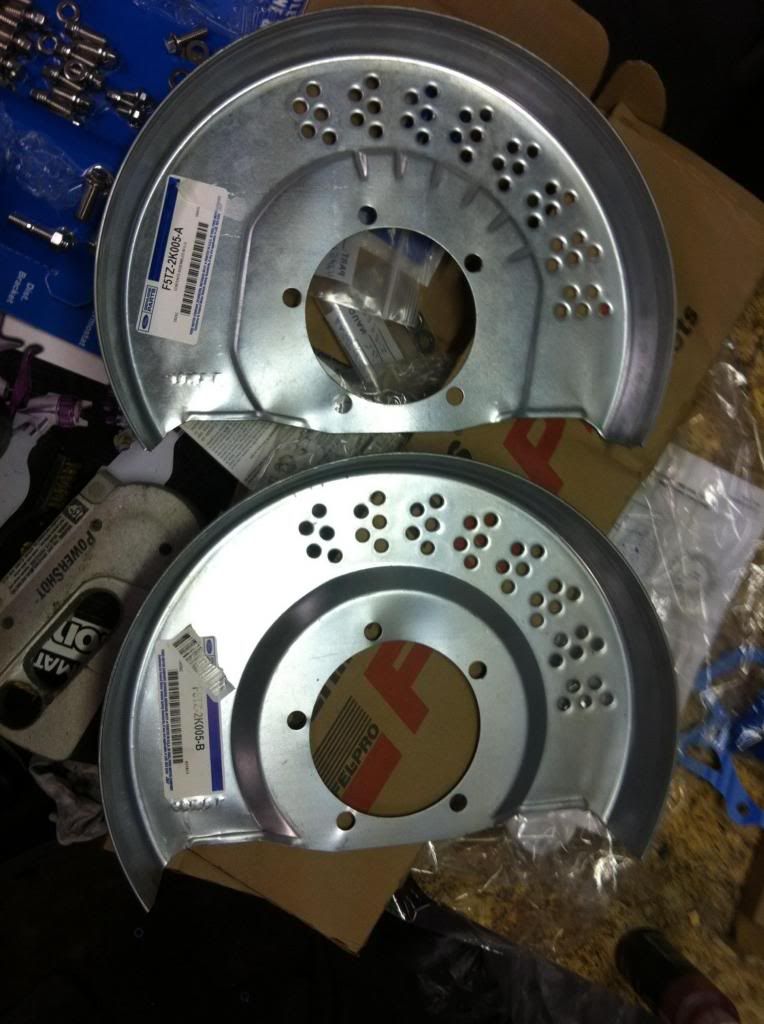
By looking at what's left of the original shield the top one in the pic is the closest match, but I'll still have to modify it a little to get it to work with the Kingpin caliper bracket and I have to find out what the part# is for the passenger side that matches the F5TZ-2K005-A. Does anyone know this part#? Another thing I'm not sure about is where the shield is supposed to go.
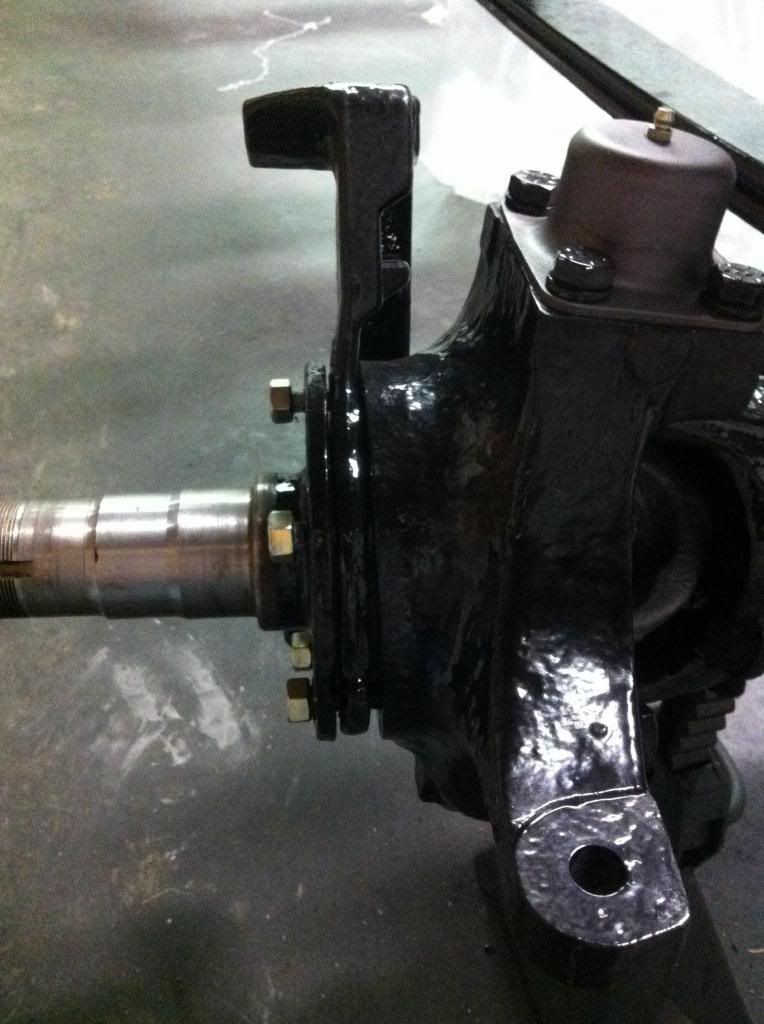
I don't know if it goes: dust shield, caliper bracket, spindle or if it goes: caliper bracket, dust shield, spindle
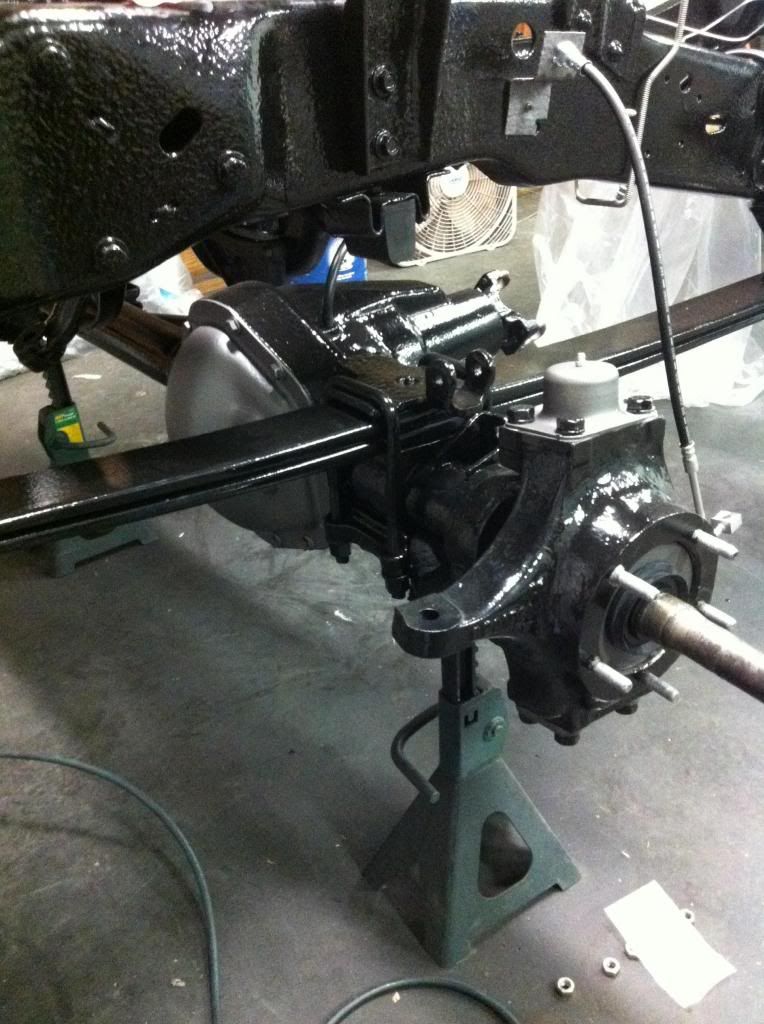
The knuckle and caliper bracket is cast into a single piece on the old TTB so here are some pics to get a better idea of what I'm talking about if people are not familiar with the dana 60

I know this would probably be answered in 87-96 forum but I've posted questions there and don't seem to get many responses.
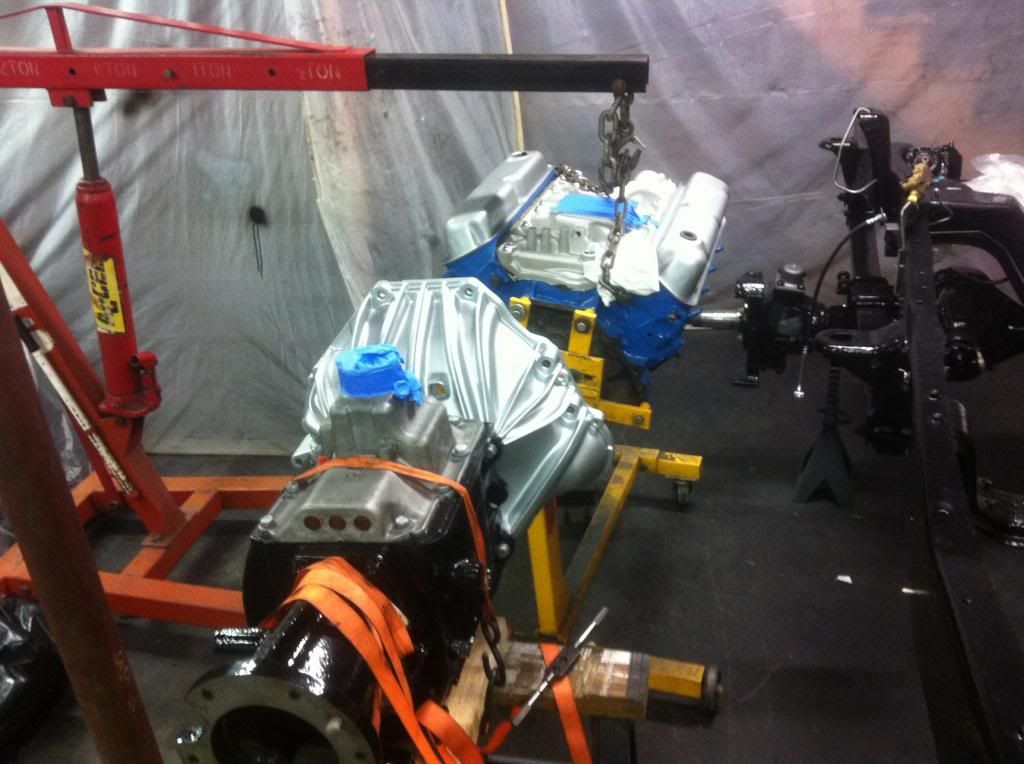
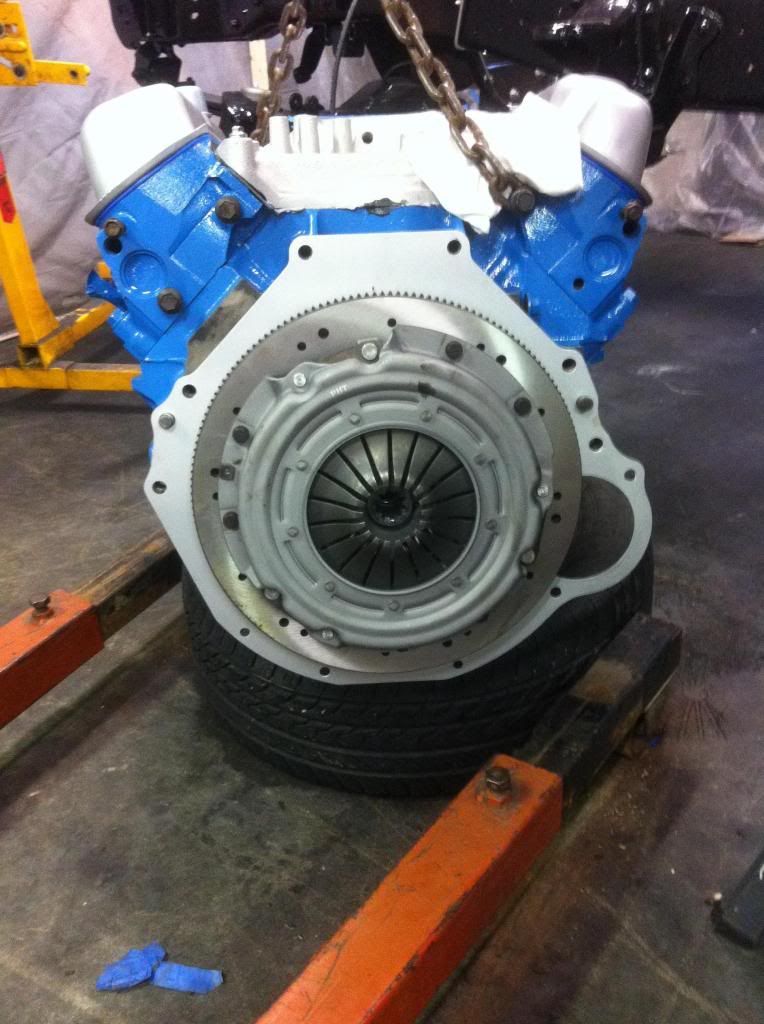
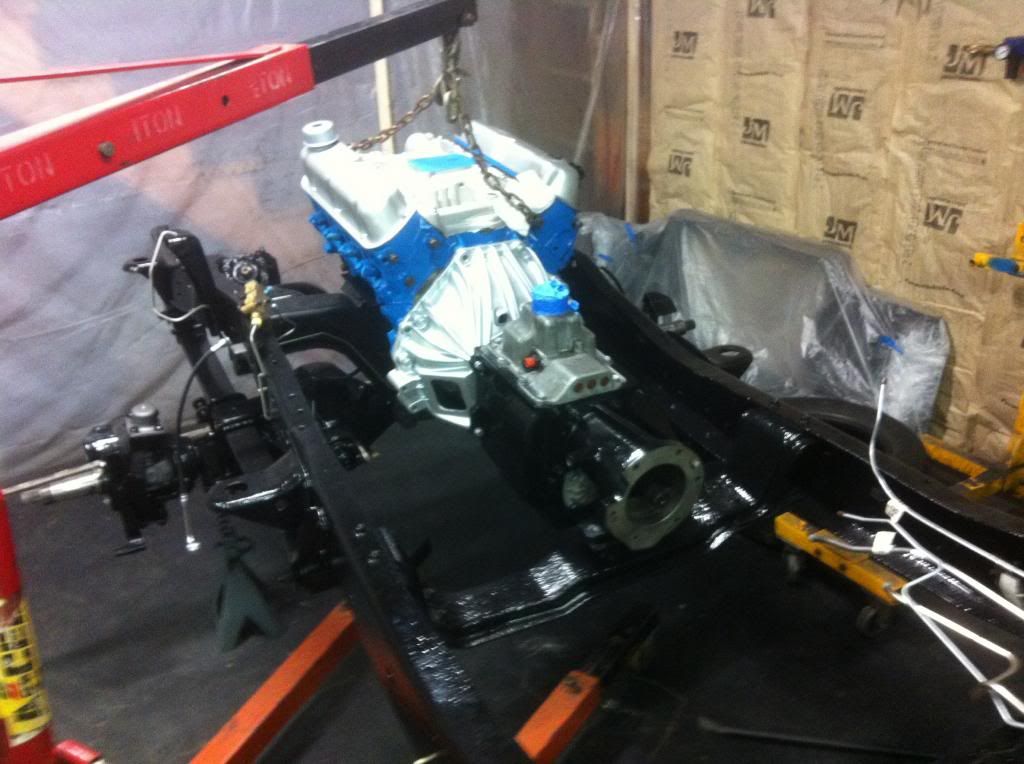
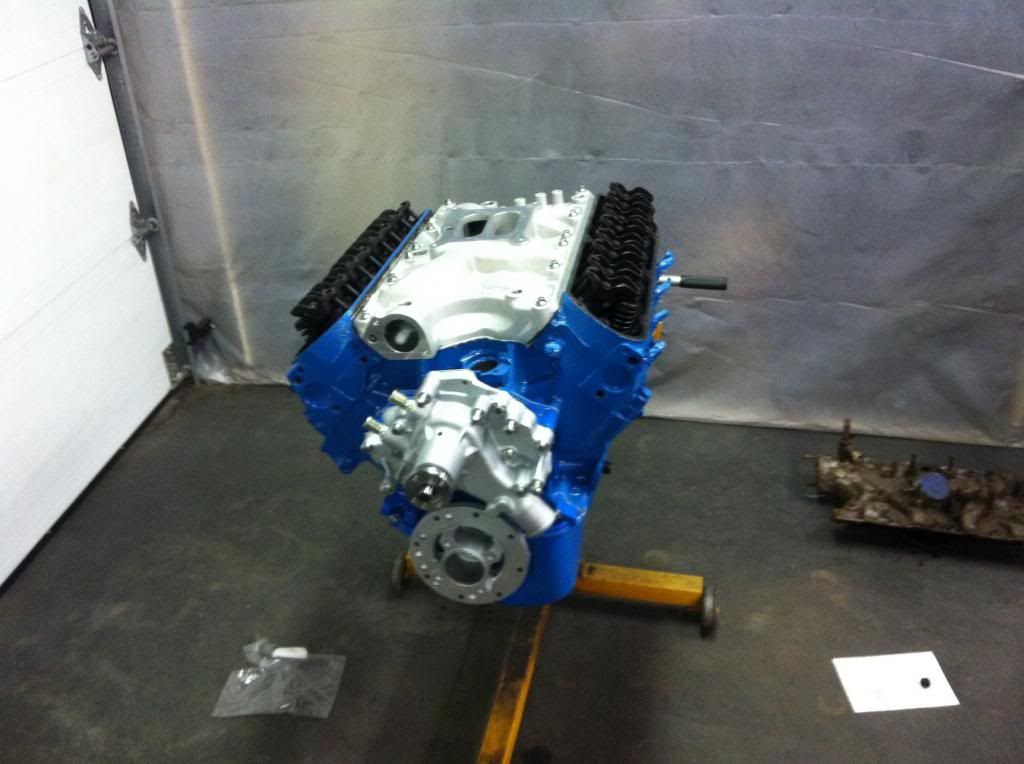
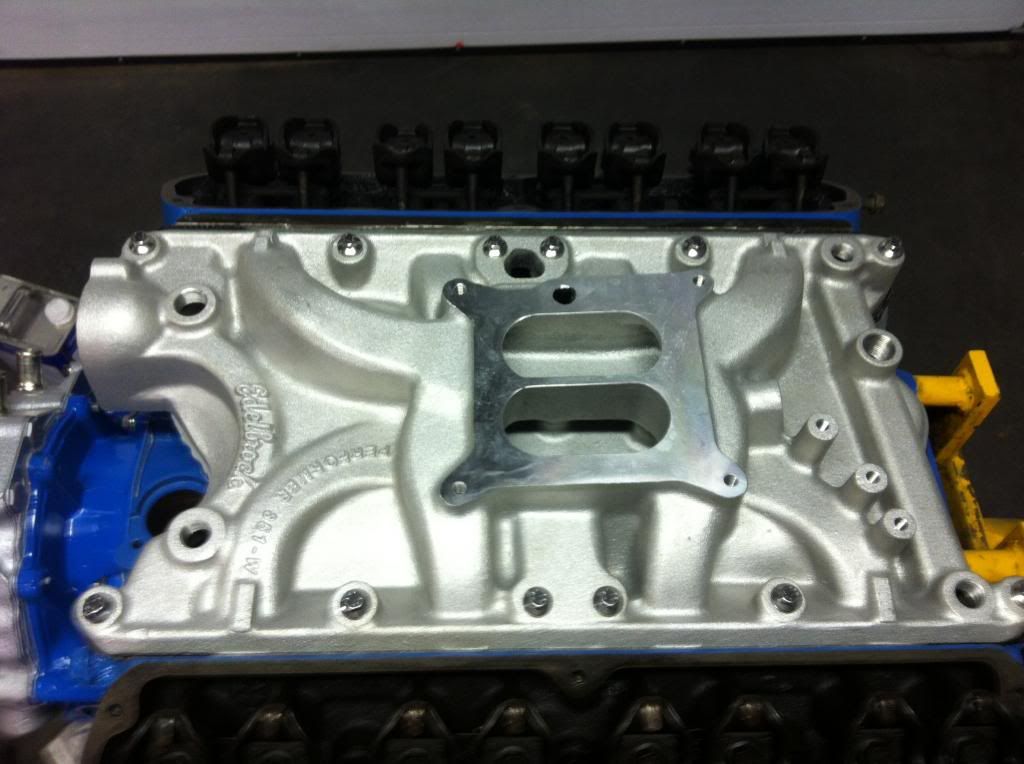
The engine was going together while I waited for the dust shields to come so I can keep going on the front end. I haven't done anything internal to the motor but new parts include Edelbrock timing chain set, Edelbrock performer intake, Bosch water pump, ARP bolt set, and freeze plugs. The valve covers have been tightened to much by someone and don't sit flat on the heads, I really don't want to put too much money into the motor because in a few years I might take it out and put a crate motor in and am not sure which motor that will be so I'm going to try and tap the dimples out.
The plan for the transfer case was to wire wheel and polish it up. It was going good then I used a marine aluminum cleaner to get in the crevices and it ruined the look of it. It was extremely hard to get the shine back so I ended up priming and painting it aluminum color. These pics are the TC before I used the cleaner

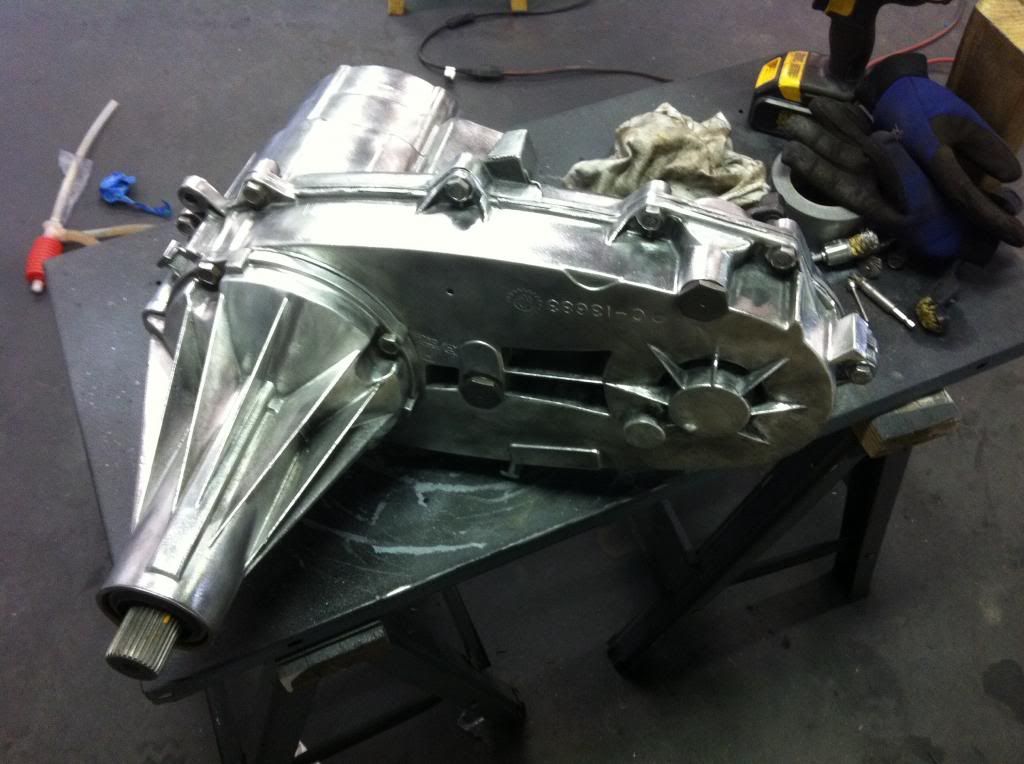
This is it after painting

The paint seems to be fine. I've done a little here and there, but progress has been slow.
I've started to run the brake lines and fuel lines, but I'm having some trouble with the pre bent fuel lines and vent lines, so I put that on hold to think about how they go.
These are the 3/8" SS fuel lines that I can't figure out
And these are the vent lines. Same two lines in each pic just different pics
The original dust shields are discontinued for the 85 f250 and for the 89 f350 (which is the truck I got the front axle from) so I ordered some that are for a 94-97 f350 I think. The part #'s ordered are F5TZ-2K005-A and F5TZ-2K005-B. Turns out they are both driver side shields, but are slightly different
By looking at what's left of the original shield the top one in the pic is the closest match, but I'll still have to modify it a little to get it to work with the Kingpin caliper bracket and I have to find out what the part# is for the passenger side that matches the F5TZ-2K005-A. Does anyone know this part#? Another thing I'm not sure about is where the shield is supposed to go.
I don't know if it goes: dust shield, caliper bracket, spindle or if it goes: caliper bracket, dust shield, spindle
The knuckle and caliper bracket is cast into a single piece on the old TTB so here are some pics to get a better idea of what I'm talking about if people are not familiar with the dana 60
I know this would probably be answered in 87-96 forum but I've posted questions there and don't seem to get many responses.
The engine was going together while I waited for the dust shields to come so I can keep going on the front end. I haven't done anything internal to the motor but new parts include Edelbrock timing chain set, Edelbrock performer intake, Bosch water pump, ARP bolt set, and freeze plugs. The valve covers have been tightened to much by someone and don't sit flat on the heads, I really don't want to put too much money into the motor because in a few years I might take it out and put a crate motor in and am not sure which motor that will be so I'm going to try and tap the dimples out.
The plan for the transfer case was to wire wheel and polish it up. It was going good then I used a marine aluminum cleaner to get in the crevices and it ruined the look of it. It was extremely hard to get the shine back so I ended up priming and painting it aluminum color. These pics are the TC before I used the cleaner
This is it after painting
#79
11-19-2013, 02:33 PM
Join Date: Sep 2013
Location: New Hampshire
Posts: 429
Likes: 0
Received 0 Likes
on
0 Posts
#80
11-19-2013, 10:52 PM
Posting Legend
#81
01-16-2014, 01:30 PM
Join Date: Sep 2013
Location: New Hampshire
Posts: 429
Likes: 0
Received 0 Likes
on
0 Posts
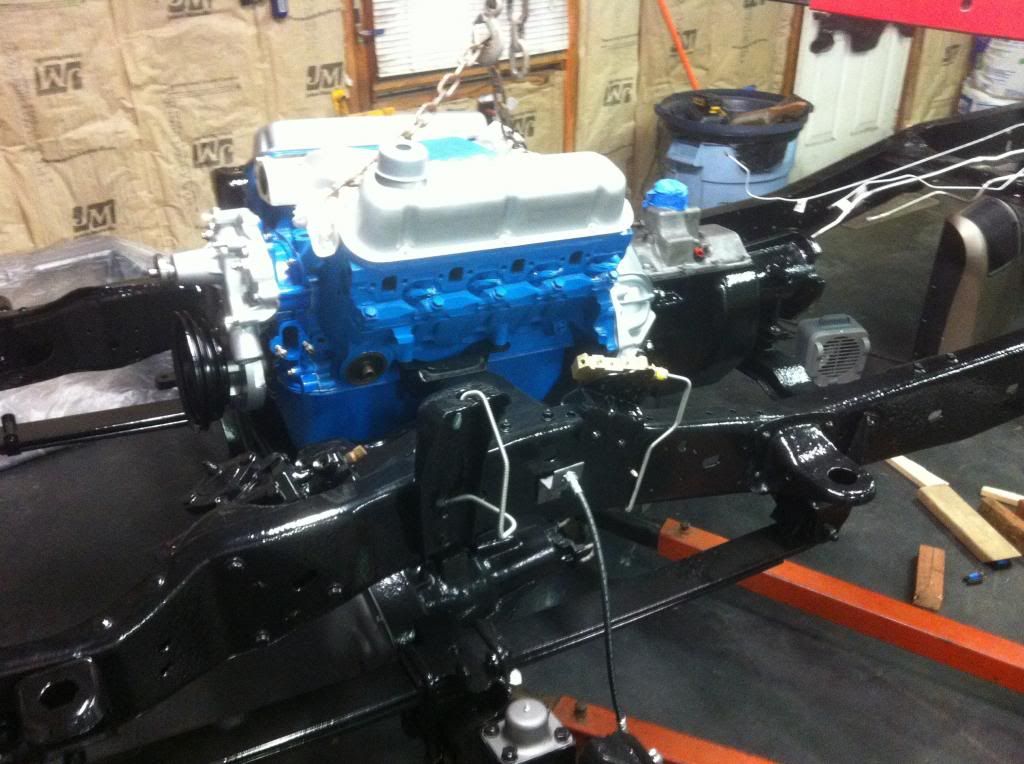
I took some time off and went on vacation for a few weeks, but now I'm back! Ive put the motor and trans in and now I'm working on putting the harmonic balancer on. I picked up a harmonic balancer installer and I'm having trouble with it. The opening of the balancer is 2" deep and when I thread the tool into the crank and put the pressure bearing and large nut on the tool the nut is to far in to get a wrench on it.
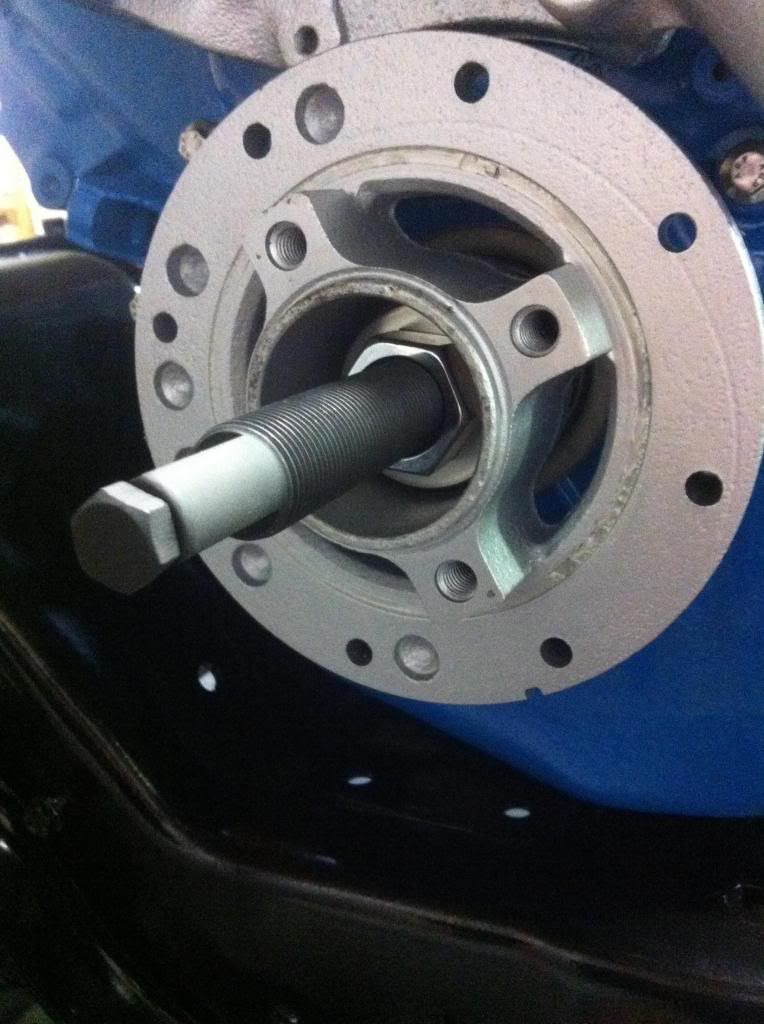
I would say I could use a stack of washers but I don't feel like buying them. Does anyone have an idea of something else that would work.
I would say I could use a stack of washers but I don't feel like buying them. Does anyone have an idea of something else that would work.
#82
01-17-2014, 08:27 AM

#83
01-17-2014, 11:13 AM
Senior User
Join Date: Nov 2013
Location: Birmingham
Posts: 115
Likes: 0
Received 0 Likes
on
0 Posts
Great build thread. I only joined the forum after your last post, so this is a new find for me. Great attention to detail, it's going to be one of those brand new 'old' trucks that I've seen on here. Your thread has made me reconsider doing the frame myself, it was my intention, but the guy I'm looking at for a paintjob, said $500 for the frame. Sounds like you have about half that in yours? And please keep posting updates!
Oh, and sorry, can't give advice on the balancer being a complete novice myself!
Oh, and sorry, can't give advice on the balancer being a complete novice myself!
#84
01-17-2014, 12:28 PM
Elder User
Join Date: Jan 2012
Location: Corvallis, OR
Posts: 582
Likes: 0
Received 0 Likes
on
0 Posts
You could try a different balancer installer - the one I use has a "plate" or flange that would have covered your recessed hole completely so that both nuts remained outside where you could reach them. It is an
.
On the other hand, using the crank bolt also works like Lariat just mentioned. You just have to keep the pistons from moving. If the oil pan hasn't been sealed you can drop it and stick a big screwdriver between one of the crank counterbalances and the block. Or if you did already seal it, thread some rope down the spark plug hole of one of your pistons until you fill the cylinder. As you tighten the bolt the engine will want to turn but the rope will prevent the cylinder from going up.
On the other hand, using the crank bolt also works like Lariat just mentioned. You just have to keep the pistons from moving. If the oil pan hasn't been sealed you can drop it and stick a big screwdriver between one of the crank counterbalances and the block. Or if you did already seal it, thread some rope down the spark plug hole of one of your pistons until you fill the cylinder. As you tighten the bolt the engine will want to turn but the rope will prevent the cylinder from going up.
#85
01-17-2014, 01:00 PM
Logistics Pro
#86
01-19-2014, 04:14 PM
I've had the same issue with using the installer tool on small block Fords. My solution: spacers. Screw the nut back almost to the outer end of the tool and install some kind of spacer between the bearing and balancer itself. This will place the large nut on the tool out toward the end farther so you can use a wrench on it. I use two large nuts stacked on top of each other for spacers but even a short piece of pipe would work. I don't like using the crank bolt to pull them on, I stripped the threads doing that once.
#87
01-19-2014, 06:07 PM
Logistics Pro
#88
01-19-2014, 07:06 PM
That happened to be on a small block Chevy which uses 7/16" threads in the crank snout, much smaller than Fords. Its possible someone else mangled the threads before, but when I tried pulling the balancer on with the crank bolt it pulled the threads right out of the crank. One of the main reasons I decided to buy the installation tool, never had any problems since.
#89
01-21-2014, 08:00 AM
Join Date: Sep 2013
Location: New Hampshire
Posts: 429
Likes: 0
Received 0 Likes
on
0 Posts
You could try a different balancer installer - the one I use has a "plate" or flange that would have covered your recessed hole completely so that both nuts remained outside where you could reach them. It is an OTC 4531.
On the other hand, using the crank bolt also works like Lariat just mentioned. You just have to keep the pistons from moving. If the oil pan hasn't been sealed you can drop it and stick a big screwdriver between one of the crank counterbalances and the block. Or if you did already seal it, thread some rope down the spark plug hole of one of your pistons until you fill the cylinder. As you tighten the bolt the engine will want to turn but the rope will prevent the cylinder from going up.
On the other hand, using the crank bolt also works like Lariat just mentioned. You just have to keep the pistons from moving. If the oil pan hasn't been sealed you can drop it and stick a big screwdriver between one of the crank counterbalances and the block. Or if you did already seal it, thread some rope down the spark plug hole of one of your pistons until you fill the cylinder. As you tighten the bolt the engine will want to turn but the rope will prevent the cylinder from going up.
#90
01-21-2014, 12:50 PM
Join Date: Sep 2013
Location: New Hampshire
Posts: 429
Likes: 0
Received 0 Likes
on
0 Posts