
Pulled the trigger on an AirLift system
#1
 08-13-2013, 01:49 AM

Pulled the trigger on an AirLift system
Waiting for the LoadLifter 5000 Ultimate and the Wireless One kit to arrive. Wish they offered the Wireless One with the upgraded compressor, but the wimpy model will do for the short term.
Also eyeing 2.5 gal 200 psi tank and compressor kit for later...might be nice to tie in the AirLift bags to the tank...
Has anyone done this...tied in air bags with a tank system instead of the compressor?
Also eyeing 2.5 gal 200 psi tank and compressor kit for later...might be nice to tie in the AirLift bags to the tank...
Has anyone done this...tied in air bags with a tank system instead of the compressor?
#2
08-13-2013, 12:12 PM

Waiting for the LoadLifter 5000 Ultimate and the Wireless One kit to arrive. Wish they offered the Wireless One with the upgraded compressor, but the wimpy model will do for the short term.
Also eyeing 2.5 gal 200 psi tank and compressor kit for later...might be nice to tie in the AirLift bags to the tank...
Has anyone done this...tied in air bags with a tank system instead of the compressor?
Also eyeing 2.5 gal 200 psi tank and compressor kit for later...might be nice to tie in the AirLift bags to the tank...
Has anyone done this...tied in air bags with a tank system instead of the compressor?
#4
08-13-2013, 01:22 PM
New User
Join Date: Aug 2013
Location: South Louisiana
Posts: 13
Likes: 0
Received 0 Likes
on
0 Posts
Only if the bags are isolated from one another. Usually on a compressor setup they are tied together so it may actually be worst off.
#5
08-13-2013, 01:38 PM
The kit I'm ordering doesn't have a tank - it is directly driven from the compressor. That being said, I will be installing a tank later to hopefully run both the bags and an air horn/air for the tires.
I had an AirLift system on my Expedition (the air bags inside the coil springs) and the tiny compressor actually fit up above the center of the spare tire...but considering the Excursions have the spare inside (to make room for that monster 44gal tank), I'll do what most others did and mount the compressor on the frame rail, probably inside if I can find a good spot with no interference from fuel/ac lines. I did see some mounted them outside of the frame rail as well, so I'm not ruling that out.
The point I'm getting at is that we have TONS of room to work with, it's just figuring out the mounting bracket, etc. I'm not a fan of drilling through the frame unless I have to, so I'm working on a method to use plate aluminum to tie into existing frame holes. It will be a little bit more expensive in parts, but not having to drill new holes makes me happy (yes, OCD is kicking in here).

The wireless controller I'm not sure of yet. Both of AirLift's models can be clipped to your visor, so that will be where it lives for the first few days while I figure out where to put it. I have a Kuda dash mount that holds my GPS/Cell phone. I don't usually like to plug products unless asked, but they are GREAT mounts.
I didn't like how low the mount was (the GPS blocked the view of the stereo), so I made an aluminum plate to raise it up some and also allow me to connect more to the dash mount...
(this was before I relocated the mic cable to the overhead console)
I may just fab up another small plate and velcro it near the GPS...I really just need to get it in my hands and see how big it really is.
#6
08-13-2013, 01:46 PM
So while they are on the same line and connected - that's a pretty small line, so say you are coming off the street into a parking lot and hit that weird angle where the axle twists from the frame, that's a lot of air to try to move through a tiny pipeline in a very short amount of time.
I had a set of bags that went inside of the springs on my Expedition (straight axle, not the newer independent rear suspensions), and I never noticed a difference on the 'worse' side after installing them...if anything, it almost acted like a dampener - not quite as good as a beefier sway bar, but it definitely added a little anti-roll on those turn-ins from a street.
Thing to remember though...too stiff on situations like that and the frame tries to mirror the axle, can't (since it doesn't really twist all that much), so it - in my wife's wonderful vernacular - throws the passengers around like seeds in a maraca.
In guy terms, it rides like a truck...in wife terms, it causes whiplash...but that's why she drives a Jetta and I drive an Excursion.
So yes, it won't prevent body roll as well as a sway bar, but I wouldn't say it would make body roll worse...it would take a much larger diameter line to move enough air fast enough to make it lag behind the forces of the sway bar.
I haven't seen anyone complain (so far) that went this route. If you wanted zero air transfer, you could spring the extra $80 or so and get the multi-path kit and route the bags independent of one another...that would definitely stiffen up the roll even more...but you might get too stiff - great for long drives, but not good for daily city driving.
#7
08-13-2013, 01:50 PM
Sway bars in essence 'split the difference' between the angle of the axle when compared to the angle of the frame..."pulling down" 1/2 of the force and "pushing up" the other half.
Air bags inflated cause positive pressure on both sides to eliminate the 'sag'...so the "pushing up" is all up pressure, and the opposite side isn't pulling down, it's just pushing less. They give you lift ability, and that's different than the effect of a sway bar pushing up and pulling down at the same time.
If you don't like the body roll, add a 2nd sway bar or get a stiffer sway bar. If you don't like the sag when towing, add air bags or RAS.
Trending Topics
#8
08-13-2013, 02:27 PM

New User
Join Date: Apr 2012
Location: Marinette, WI
Posts: 11
Likes: 0
Received 0 Likes
on
0 Posts
I just finished installing my airlift kit and the single path compressor last week. Bags were easy to install. The hardest part was getting the old rusted bump stops off the frame.
I ended up mounting the compressor in the little jack compartment in the back cargo area. I also used 2 check valves to keep the bags independent. It makes for a slightly more compicated install, but it works. Im sure this would be bit more complex with the wireless set-up (mine is the manual version).
I would not think the cheap "standard" duty compressor would hold up to filling a tank. It has a very small duty cycle (like 15 seconds on, then 15 second off if i remember right).
#9
08-13-2013, 02:44 PM
In my plans though, the compressor will be part of something like a Vair kit...maybe the constant duty kit, then just tie off of that to the sensor. I just need to figure out if the sensor will limit incoming air if the tank is over what the bag line is.
...so say I want the bags at 50 and the tank is at 150, does the sensor block have two sensors - inbound and outbound - or just the outbound.
#10
08-13-2013, 05:56 PM
Post Fiend
Hi Robert, my new to me Ex has the rear airbags on a single compressor with gauge and remote inside my center console, looks like a really nice setup.
PO also installed a separate compressor with huge tank on drivers side inner frame. He welded custom made brackets for both the compressor and the tank to run the train horn. I just added an air chuck to it and ran the chuck to the location where the jack is.
I guess my point is there's plenty of room under or Ex's to mount as many of these things as you want. I do like the air bags separate from all else, and if that compressor fails I can always manually fill the air bags with the other compressor/tank system.
Good news is I have mine set at 25lbs and have not needed to add any air since my ownership.
#11
08-13-2013, 06:27 PM
...even after that, I'm guessing I'll still have plenty of room under there!

#12
08-19-2013, 12:15 AM
Awww yea!!!
Wrapped up the install, no real drama at all. Our rigs are so big the instructions really have you do some excess steps (mainly with lifting it up/removing the tires like it has in the pics in the manual).
Keep in mind I did the V/Modded B install (stock blocks).
Assembly of the bags are simple...the bottom mount plate (mounts to the arm that comes out of the stock block) mounts to the bellows with the bottom bellows "dish" in between with 2 bolts/washers. The top mount is the same but you add a carriage bolt (bolts to the frame):

I used the stock jack on two 4x4 blocks to raise the truck by the frame maybe 2 inches (till the jack was at full extension). Removed the stock jounce bumpers.
A note here...the jounce bumpers have a 'pin' in the top to keep it from spinning...when you remove the top nut, it's as if it has some kind of lock tite or something on it...as I loosened the nut the bumper started spinning, and at the weird angle I had a hard time getting both hands up there and gripping the bumper.
Once I got it off, I could see the pin:

So the key is to keep the bumper pressed up against the frame so the pin stays seated. The passenger side came off with ease knowing about the pin.
Removed the brake line retainer on the driver side, leave the bolt in...
With the frame up only 2" and the wheels still on, there was plenty of room to get the assembled bag and brackets in...they are easy to compress with your hands, so you compress it and fit it into position. It's a little tricky to get that top carriage bolt to line up with the hole in the frame (where the jounce bumper was) since you can't see it, so you have to put one hand up to line up the bolt, the other hand has to wiggle the assembly into place.
Seat the washer and nut on the top mount bolt...keep it VERY loose. Wiggle the kit around to get the top bolt to line up with the hole on the top bracket...this will take more wiggling.
I worked on one side at a time since I only had one jack...you then lower the rig so the bottom plate touches the block. Align the tab to "hook" on to the end of the block...you may want to have a small hammer and flat-head screwdriver handy to tap it into place. Late model rigs you need to "splay" the legs since apparently the arms are wider...you'll see how later that could be tricky.
Once you get the top and bottom of the bellows to line up, you can hard down the two top bolts (side of the frame and through the former jounce bumper hole) to 15 ft.lbs.
Once you have it clipped on, you use vice grips or c clamps and you drill a hole through the arm on the block.
A NOTE: Make sure you leave enough room before drilling to get the bolt and nut on...if you situate the mount too "deep", you may not be able to actually get the head of the bolt past the U bolts.
Best to drill through from the outside instead of trying to drill straight through. Once drilled you run the provided bolt through:

Driver side is the same...lift the frame 2 inches, remove the jounce bumper, situate the bellows kit, align, lower the frame, align the bottom, hard down the top bolts, drill the bottom and mount the bottom.
I then found spots for the compressor and manifold. IMPORTANT: use the wiring harness to figure out placement - if you mount the manifold too far from the compressor, you'll need to splice in additional wire.
NOTE: The "baby" compressor that comes with the WirelessOne kit and others (it's the small black compressor) fits EXACTLY between the first two driver side running board mounts...I mean EXACTLY. So well it actually held itself in place while I ran the self tapping screws in. I'll have to go back before the rainy season and add some kind of thin metal shield to keep too much water from entering the compressor.
I mounted the compressor right under the driver side seat, and the manifold just behind it:


From there you run your tubing...they include a small section of protective sheilding...make sure you slip that on to the tube you use on the passenger side...the hose will run very close to the exhaust pipe. (sorry, no pic of this)
I ran both bellows to the drive side and mounted a T fitting there (they give you two T fittings). This fitting is right around the 2nd row seats rear mounting bolts. The bubbles are from me testing for leaks (took the pics after everything was assembled):

NOTE: I ran the tubing up against the body and slid it between the frame and body...that weird anti-vibration weight was handy to zip tie the tubing to - makes a nice angle that keeps the tubing at a good distance from the tailpipe on the passenger side.
I decided to add in a schrader valve in case the compressor was to fail. They give you a single run of tubing with two schrader valves, so you don't have to mount the valve to the tubing. I debated a bit on where to mount the valve...popular spots are the lic plate bolts, near the gas cap and in the wheel well.
I can't really get to the lic plate bolts (the bottom two are blocked by LEDs, the top two are such that I couldn't get up there to mount them). I have a locking gas cap cover, so didn't want to have to fish the key out to add/remove air. Finally, I've seen some of the pics of rear tire blowouts...so I didn't want to risk runing a large section of tubing by mounting a valve in the wheelwell.
I saw someone had added an air fitting on their running board to access their on board air tank, and I thought that might work well.
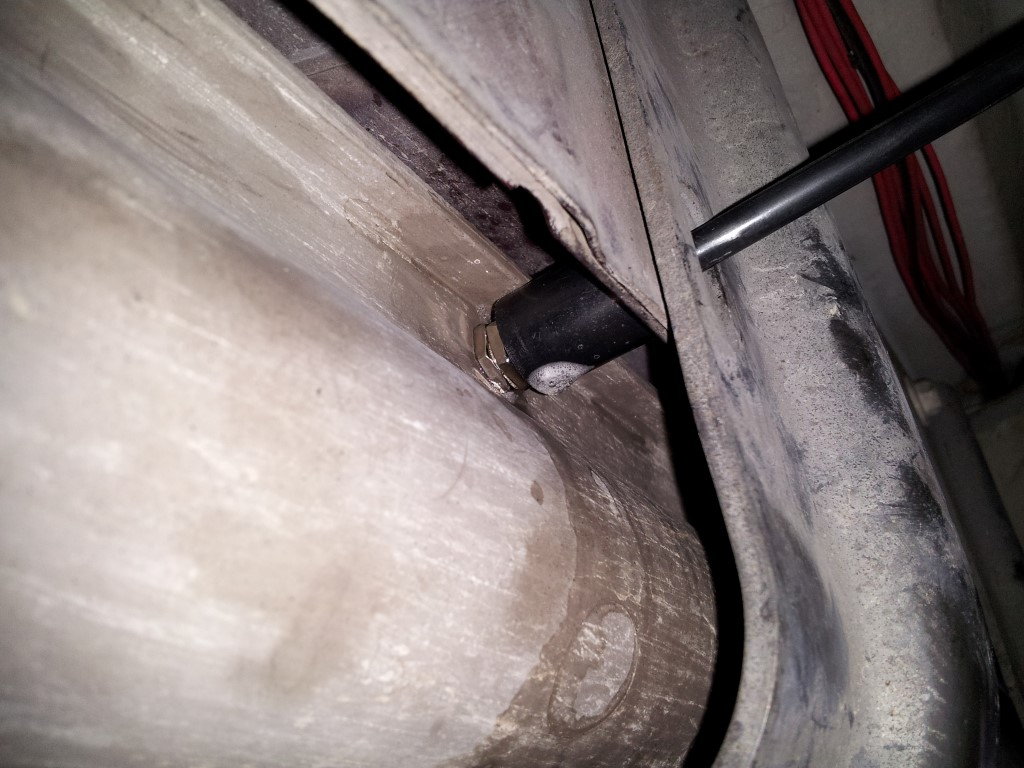
I looked under the truck and found I could access through the running board. There was an unused hole from the running board mounts in the perfect place:

It wasn't centered on the truck, but I wasn't really worried about that...it's so far under the door you can't really see it unless you kneel, and when you open the back door it's far enough forward to be out of the way and not kicked:


The trick was to add something behind it so when you added air it wouldn't just buckle back. I dug through the garage and found some nylon spacers (I think from a flat screen wall mount)...it was the perfect inside diameter, just needed a little bit drilled out to keep the valve from sticking out too far:

Slid the spacer on the tube, routed it through the hole in the running board (from behind) and it was golden:
Added in a T fitting, ran the tube to the manifold then to the compressor (check the diagram, the fittings are specific):

Plugged in the wiring, connected it to a heavy duty relay under the dash, and viola, it was done.
Before ride height at the hitch:

23.5 inches.
Bags max out at 100 psi...with 50 psi here was the new ride height at the hitch:

25.5 INCHES!!!
I added the bags to take away the 1" or so of sag I get when towing...if at 50 psi I get 2" of lift, these are going to work perfect.
NOTE: I drove around a little at 50 psi... DON'T use the air bags alone for lift. It felt like we were driving around on giant bubble tires...the bellows don't act like springs, they bounce instead of being really solid.
I'm running mine at the 50 psi for towing, 5psi daily driving. You notice just a touch of stiffness at 5psi - barely noticable, but there - and not harsh at all. It just feels like an extra 100 or 200 lbs of stiffness on the springs.
We'll see how it feels when I tow next, and I'll give a report with pics.
Day 1 review = 5 stars
Wrapped up the install, no real drama at all. Our rigs are so big the instructions really have you do some excess steps (mainly with lifting it up/removing the tires like it has in the pics in the manual).
Keep in mind I did the V/Modded B install (stock blocks).
Assembly of the bags are simple...the bottom mount plate (mounts to the arm that comes out of the stock block) mounts to the bellows with the bottom bellows "dish" in between with 2 bolts/washers. The top mount is the same but you add a carriage bolt (bolts to the frame):
I used the stock jack on two 4x4 blocks to raise the truck by the frame maybe 2 inches (till the jack was at full extension). Removed the stock jounce bumpers.
A note here...the jounce bumpers have a 'pin' in the top to keep it from spinning...when you remove the top nut, it's as if it has some kind of lock tite or something on it...as I loosened the nut the bumper started spinning, and at the weird angle I had a hard time getting both hands up there and gripping the bumper.
Once I got it off, I could see the pin:
So the key is to keep the bumper pressed up against the frame so the pin stays seated. The passenger side came off with ease knowing about the pin.
Removed the brake line retainer on the driver side, leave the bolt in...
With the frame up only 2" and the wheels still on, there was plenty of room to get the assembled bag and brackets in...they are easy to compress with your hands, so you compress it and fit it into position. It's a little tricky to get that top carriage bolt to line up with the hole in the frame (where the jounce bumper was) since you can't see it, so you have to put one hand up to line up the bolt, the other hand has to wiggle the assembly into place.
Seat the washer and nut on the top mount bolt...keep it VERY loose. Wiggle the kit around to get the top bolt to line up with the hole on the top bracket...this will take more wiggling.
I worked on one side at a time since I only had one jack...you then lower the rig so the bottom plate touches the block. Align the tab to "hook" on to the end of the block...you may want to have a small hammer and flat-head screwdriver handy to tap it into place. Late model rigs you need to "splay" the legs since apparently the arms are wider...you'll see how later that could be tricky.
Once you get the top and bottom of the bellows to line up, you can hard down the two top bolts (side of the frame and through the former jounce bumper hole) to 15 ft.lbs.
Once you have it clipped on, you use vice grips or c clamps and you drill a hole through the arm on the block.
A NOTE: Make sure you leave enough room before drilling to get the bolt and nut on...if you situate the mount too "deep", you may not be able to actually get the head of the bolt past the U bolts.
Best to drill through from the outside instead of trying to drill straight through. Once drilled you run the provided bolt through:
Driver side is the same...lift the frame 2 inches, remove the jounce bumper, situate the bellows kit, align, lower the frame, align the bottom, hard down the top bolts, drill the bottom and mount the bottom.
I then found spots for the compressor and manifold. IMPORTANT: use the wiring harness to figure out placement - if you mount the manifold too far from the compressor, you'll need to splice in additional wire.
NOTE: The "baby" compressor that comes with the WirelessOne kit and others (it's the small black compressor) fits EXACTLY between the first two driver side running board mounts...I mean EXACTLY. So well it actually held itself in place while I ran the self tapping screws in. I'll have to go back before the rainy season and add some kind of thin metal shield to keep too much water from entering the compressor.
I mounted the compressor right under the driver side seat, and the manifold just behind it:
From there you run your tubing...they include a small section of protective sheilding...make sure you slip that on to the tube you use on the passenger side...the hose will run very close to the exhaust pipe. (sorry, no pic of this)
I ran both bellows to the drive side and mounted a T fitting there (they give you two T fittings). This fitting is right around the 2nd row seats rear mounting bolts. The bubbles are from me testing for leaks (took the pics after everything was assembled):
NOTE: I ran the tubing up against the body and slid it between the frame and body...that weird anti-vibration weight was handy to zip tie the tubing to - makes a nice angle that keeps the tubing at a good distance from the tailpipe on the passenger side.
I decided to add in a schrader valve in case the compressor was to fail. They give you a single run of tubing with two schrader valves, so you don't have to mount the valve to the tubing. I debated a bit on where to mount the valve...popular spots are the lic plate bolts, near the gas cap and in the wheel well.
I can't really get to the lic plate bolts (the bottom two are blocked by LEDs, the top two are such that I couldn't get up there to mount them). I have a locking gas cap cover, so didn't want to have to fish the key out to add/remove air. Finally, I've seen some of the pics of rear tire blowouts...so I didn't want to risk runing a large section of tubing by mounting a valve in the wheelwell.
I saw someone had added an air fitting on their running board to access their on board air tank, and I thought that might work well.
I looked under the truck and found I could access through the running board. There was an unused hole from the running board mounts in the perfect place:
It wasn't centered on the truck, but I wasn't really worried about that...it's so far under the door you can't really see it unless you kneel, and when you open the back door it's far enough forward to be out of the way and not kicked:
The trick was to add something behind it so when you added air it wouldn't just buckle back. I dug through the garage and found some nylon spacers (I think from a flat screen wall mount)...it was the perfect inside diameter, just needed a little bit drilled out to keep the valve from sticking out too far:
Slid the spacer on the tube, routed it through the hole in the running board (from behind) and it was golden:
Added in a T fitting, ran the tube to the manifold then to the compressor (check the diagram, the fittings are specific):
Plugged in the wiring, connected it to a heavy duty relay under the dash, and viola, it was done.
Before ride height at the hitch:
23.5 inches.
Bags max out at 100 psi...with 50 psi here was the new ride height at the hitch:
25.5 INCHES!!!
I added the bags to take away the 1" or so of sag I get when towing...if at 50 psi I get 2" of lift, these are going to work perfect.
NOTE: I drove around a little at 50 psi... DON'T use the air bags alone for lift. It felt like we were driving around on giant bubble tires...the bellows don't act like springs, they bounce instead of being really solid.
I'm running mine at the 50 psi for towing, 5psi daily driving. You notice just a touch of stiffness at 5psi - barely noticable, but there - and not harsh at all. It just feels like an extra 100 or 200 lbs of stiffness on the springs.
We'll see how it feels when I tow next, and I'll give a report with pics.
Day 1 review = 5 stars
#14
08-19-2013, 07:20 AM
FTE Legend
Join Date: Mar 2009
Location: North Bay Ont Canada
Posts: 161,148
Received 5,158 Likes
on
1,689 Posts