New problem??
#16
 05-16-2013, 11:26 PM

Dark sooty (or wet) plugs would suggest flooding and support the idea that debris is caught in the needle valve, holding it open, and causing flooding. But if it hasn't run very much the plugs may not yet be fouled.
Black exhaust would also suggest over rich / flooding.
Don't ask me why I'm thinking this way (what do I know?) but if I were a metal shaving that's where I'd be and that's what I'd do.
I'm hoping its something silly and simple though, like the filter.
Black exhaust would also suggest over rich / flooding.
Don't ask me why I'm thinking this way (what do I know?) but if I were a metal shaving that's where I'd be and that's what I'd do.
I'm hoping its something silly and simple though, like the filter.
#18
05-17-2013, 09:22 PM

Join Date: Mar 2013
Location: SF Bay Area
Posts: 67
Likes: 0
Received 0 Likes
on
0 Posts
Forgot to check the plugs and exhaust. Will do that tomorrow. Spent some time on the fuel line after work today. Seems like plenty of pressure to me...a fountain of gas comes out of disconnected fuel line when cranking engine (thru filter). Removed Dorman fitting and found some metal filings. Thought I was careful enough with that but guess not. May be some in carb. Anyway carb is still leaking somewhere near back side of fitting. May not be fitting itself. Apparently there are no replacement carbs that will work for California (???) per other FTE posts. Canadian truck but not sure how that works. Trying to figure out options now.
#19
05-18-2013, 12:36 AM
If I recall correctly you've got an '86 460, and if it's the same as mine the carb is a Holley 4180. All the identifying numbers should be stamped on driver side front of the carb air horn (the part that sticks up and has the choke flapper in it). If you want to take one on, a rebuildable carb from the j-yard (yours has buggered threads on the front float bowl housing) might be $50.00 to $100.00, plus a kit, and some time. They're actually fairly simple.
Proceed at own risk: Assuming it is a 4180, you can try removing the fuel level site plugs on the passenger sides of the front and rear float bowls (do this test one at a time).
Remove the big round flat tip screw on the passenger side of the float bowl (don't lose the washer / gasket!). The fuel level within the float bowl is supposed to be right at the level of the witness hole. If just a little dribbles out that's okay, but if a bunch of fuel comes pouring out when you remove the screw, or when you crank the motor, you either have a sunk float or fuel is getting past the inlet needle valve.
If the fuel levels in the front and rear float bowls are correct then my flooding hunch is wrong.
If fuel does come pouring out of the witness hole when cranking it is possible to pull the front and rear inlet needle valves from the tops of the float bowls (to inspect and clean) without removing the carb, but you've got to get them back in without damaging the O-rings (grease the O-ring before re-installing the needle valve) and adjusted so that the fuel level within the float bowls (with the fuel system pressurized) is right at (or slightly below) the witness holes.
Anyway, just guessing and thinking out loud here. Good luck.
#20
05-18-2013, 02:24 PM
Join Date: Mar 2013
Location: SF Bay Area
Posts: 67
Likes: 0
Received 0 Likes
on
0 Posts
Right underneath the fuel inlet, on the bottom of the front float bowl, is the accelerator pump. The pump diaphragm or housing gasket can also leak and if it is, you'll need to pull the carb to fix it.
If I recall correctly you've got an '86 460, and if it's the same as mine the carb is a Holley 4180. All the identifying numbers should be stamped on driver side front of the carb air horn (the part that sticks up and has the choke flapper in it). If you want to take one on, a rebuildable carb from the j-yard (yours has buggered threads on the front float bowl housing) might be $50.00 to $100.00, plus a kit, and some time. They're actually fairly simple.
Proceed at own risk: Assuming it is a 4180, you can try removing the fuel level site plugs on the passenger sides of the front and rear float bowls (do this test one at a time).
Remove the big round flat tip screw on the passenger side of the float bowl (don't lose the washer / gasket!). The fuel level within the float bowl is supposed to be right at the level of the witness hole. If just a little dribbles out that's okay, but if a bunch of fuel comes pouring out when you remove the screw, or when you crank the motor, you either have a sunk float or fuel is getting past the inlet needle valve.
If the fuel levels in the front and rear float bowls are correct then my flooding hunch is wrong.
If fuel does come pouring out of the witness hole when cranking it is possible to pull the front and rear inlet needle valves from the tops of the float bowls (to inspect and clean) without removing the carb, but you've got to get them back in without damaging the O-rings (grease the O-ring before re-installing the needle valve) and adjusted so that the fuel level within the float bowls (with the fuel system pressurized) is right at (or slightly below) the witness holes.
Anyway, just guessing and thinking out loud here. Good luck.
1) What should I watch out for when looking for a rebuildable carb besides a stripped inlet...anything? Might just rebuild my own if able to get replacement front float bowl from an FTE member who offered.
2) Anything to look for in a rebuild kit? Any place in particular I should get it from?
3) How hard will it be to make fuel/air adjustments afterwards. (Did this once before but it was 30 yrs ago...don't remember much.)
4) Any special tools needed? Read another post on a carb problem and it looks like a vacuum gauge would come in handy (?) Also read something about the secondaries side having a plate with 6 unique screws holding on a plate ... need a special bit or screwdrive for these?
5) Transfer is a little bent at front of carb. Haven't seen it leak. Assume I can bend this straight with no problem?


Last edited by AlanMac; 05-18-2013 at 02:50 PM. Reason: Add another question/pics
#21
05-18-2013, 03:53 PM


Appreciate the suggestions. Looks like the rebuild route is the way to go. Decided to stop trying to rush it. Going to arrange alternative transportation so I can take my time on this. Won't be able to get to it for little while but have a few questions for when I do.
1) What should I watch out for when looking for a rebuildable carb besides a stripped inlet...anything? Might just rebuild my own if able to get replacement front float bowl from an FTE member who offered.
2) Anything to look for in a rebuild kit? Any place in particular I should get it from?
3) How hard will it be to make fuel/air adjustments afterwards. (Did this once before but it was 30 yrs ago...don't remember much.)
4) Any special tools needed? Read another post on a carb problem and it looks like a vacuum gauge would come in handy (?) Also read something about the secondaries side having a plate with 6 unique screws holding on a plate ... need a special bit or screwdrive for these?
5) Transfer is a little bent at front of carb. Haven't seen it leak. Assume I can bend this straight with no problem?
You don't want to have to bush these.
Also check that the base is FLAT! With a surface plate or a piece of plate glass.
Too many gorilla's reef on these things trying to get the EGR plate to seal.
2) Get the Genuine 3-1346 Holley rebuild kit. You do not need any more headaches, and it is around $50 online.
http://www.holley.com/data/Products/...9R10060rev.pdf
3) Once you pull the plugs covering the idle mixture screws in the base flange it is simple enough to adjust the mixture.
(yes a vacuum gauge is best, short of a wideband A/F meter with a weld in bung)
One of those flex/spring tools with the sliding hexagonal handle makes it much easier to get in there.
4) They are clutch drive (butterfly) screws. Oddly it seems a #1 is too small and #2 is too big.
Maybe Holley uses a proprietary size?
(also see above
 )
)5) Buy a new tube, or ask the member who is parting out their carb bowl.
Sometimes they are a PITA to seal even when they're straight.
Regular Vaseline works well to lube those seals and stick gaskets and check ***** in place while assembling.
It dissolves entirely on contact with gasoline.
Hope this helps.
#22
05-18-2013, 04:28 PM
Join Date: Mar 2013
Location: SF Bay Area
Posts: 67
Likes: 0
Received 0 Likes
on
0 Posts
I like the vaseline suggestion. And I like the straight-forward advice on just replacing the transfer tube and using only the Holley kit - it helps when there's no hemming and hawing. Thanks.
#23
05-18-2013, 04:41 PM
This is mine
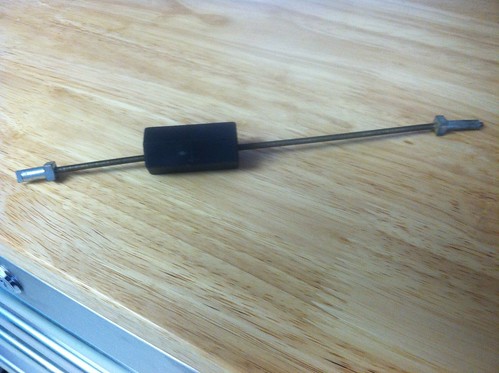
I think I got it from the Lisle or KD rack at one of my local auto part stores.
It has one end slotted and the other end is a tiny hex.
The handle slides to either end and turns the spring by driving the square section.
I see some others that look like a screwdriver with a spring for a shank, but I don't know what size tip it needs.
I just know that mine works...
(EDIT to add; I see that Amazon -itself- no longer stocks that Renew kit. it used to be ~$47 with free shipping)
#25
05-18-2013, 04:57 PM
#26
05-18-2013, 04:57 PM

#27
05-18-2013, 04:59 PM
#30
05-18-2013, 06:43 PM
Lots of good advice from the gang here already.
About all I can add is that I got a Holley "renew" kit from the local speed shop here and it included a new power valve. BUT it didn't include new floats, and on a 26 year old carb you may want to replace those too. It also didn't include a new fuel inlet filter, EGR base gasket, and EGR gasket...
That and some carb cleaner, rubber gloves, and an assortment of wire brushes and you should be in business.
Oh yeah, a square bit for the square drive deck screws fit my clutch (or "butterfly") screws well enough.
Here's a link to a multi-bit carb adjustment tool at Autozone. I think mine was 7 or 8 bucks. The 3/32 hex bit is the one you'll need for the idle mixture adjustment.
OEM/Carburetor adjusting tool (25062) | Carburetor Tool | AutoZone.com_