Underside intake heat. Finally...
#1
 04-08-2013, 09:47 AM


Underside intake heat. Finally...
Well! I finally got some heat to the underside of my intake.
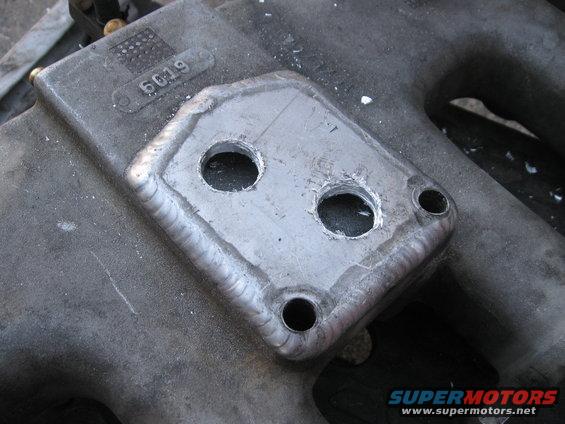
As some of you know, I first did my 4 bbl conversion about 5 years ago (actually, just looked it up and it was March 22, 2009). I've never had any heat to the underside of the intake because I bought my intake used and the previous owner thought that since he wasn't going to have the exhaust bolted to it, he needed to have it welded shut. Because of that, I've never been able to bolt a heat plate to it.
I've never really had the downtime on the Bronco to dive into any other alternatives until recently. Usually, when it's apart, I need to get it back together as soon as possible so I can drive it, as it's my daily driver.
Well, after five years, the department I was in at work was disbanded, so myself and a few others are out of a job, so I have some spare time on my hands.
I decided to see if there was a cavity below the surface that I could tap into. (The two holes that are already drilled were the original holes. I drilled them through to use them to mount my homemade throttle cable bracket.)

I measured the bottom of the floor of the intake and noticed it was about an inch from the plate, so there was some room to drill and test. I put a small hole through it and quickly could see there was space underneath.
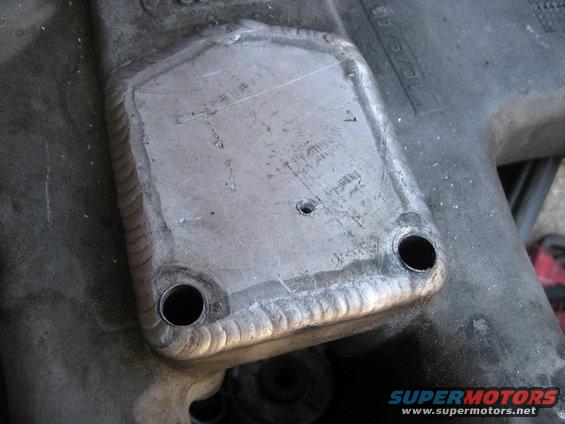
That quickly told me the project was a go, so I started planning where the holes would be.

Drilled them out with a bigger drill bit and saw that there was a good sized cavity underneath.
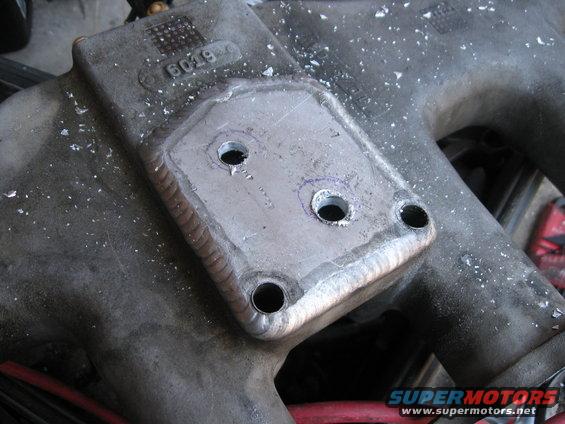
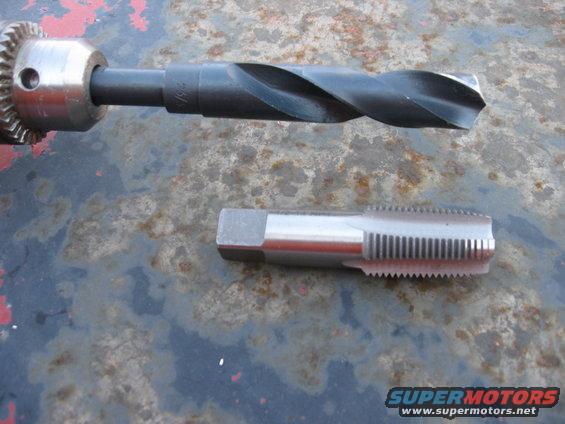
Went up to the largest drill size I had, but it still wasn't big enough for some pipes.
I had to special order the proper drill bit for the tap I bought, which was a 23/32". Found it on Amazon for $9 and it showed up 2 days later. No one locally had it. (Home Depot had a 3/4" and it was $20).
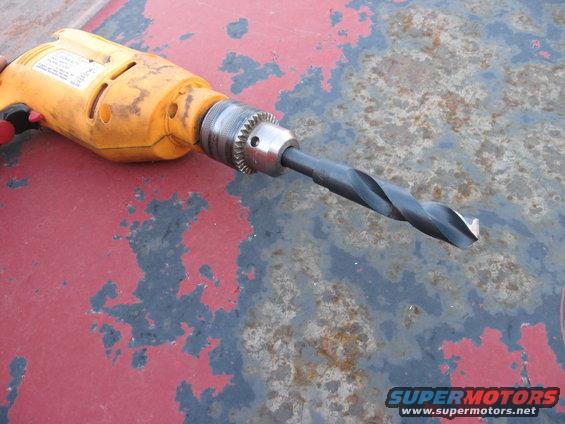
The drill bit had a 1/2" shank, which was too big for my regular drill, so fortunately, the drill I found on the side of the road last year was able to take it.
Here's the 1/2" pipe tap that I bought. $15.
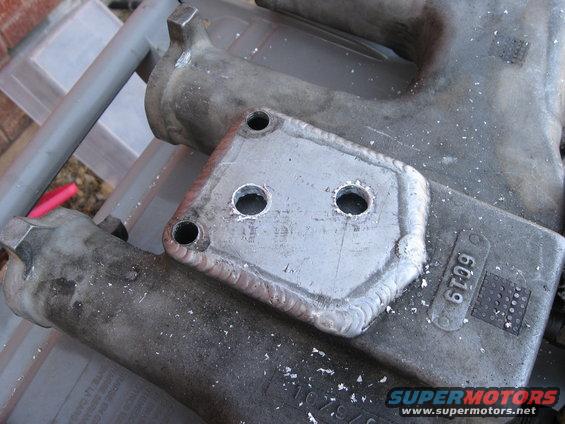
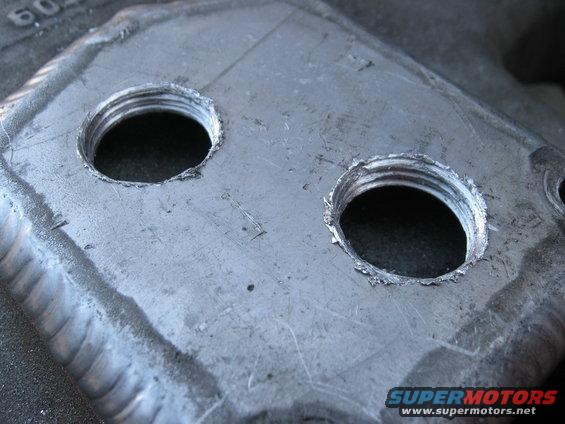
Drilled out the holes the rest of the way.
Tapped the holes. They didn't end up as straight as I would have liked, but with the metal only being 1/4" thick, it wasn't a big deal.
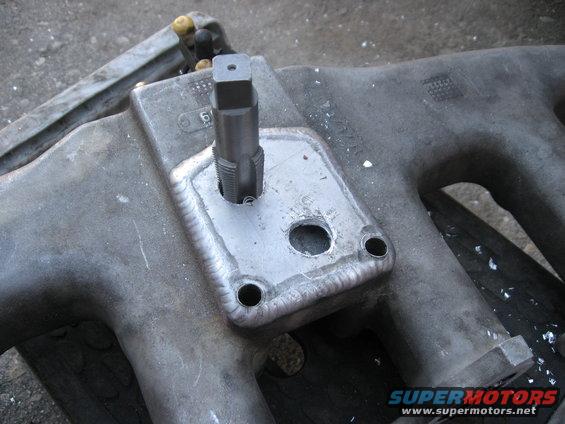
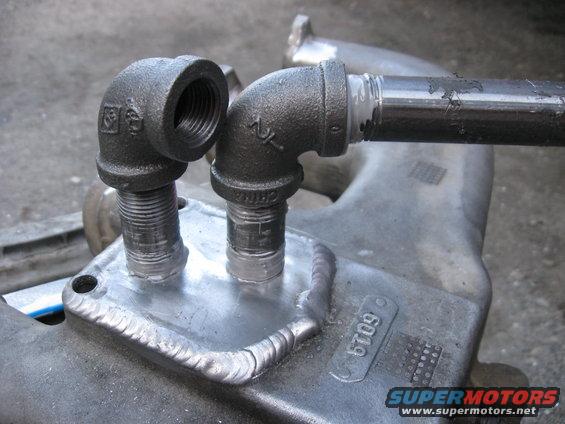
When I made my first heat plate, these pipes were cheap and effective, so I duplicated my design. The place also had some thread sealer that was about $3 a tube and it worked very well. Unfortunately, I didn't think it through and the holes were a little too close together. The elbows hit when I rotated the second one to tighten it.
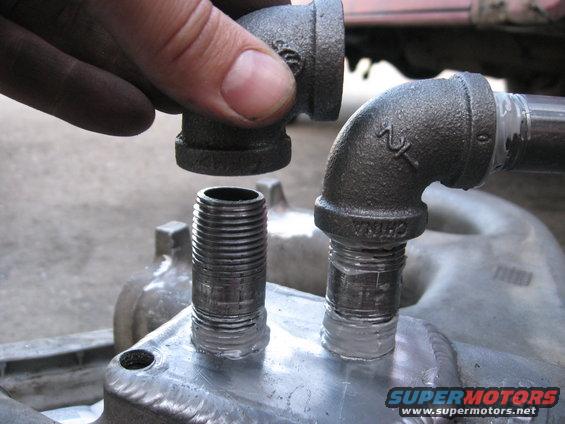
Figured a longer pipe would fix it. This is where down time has come in really handy. 2 days waiting on the drill bit, and now another where I have to go get different pipes.
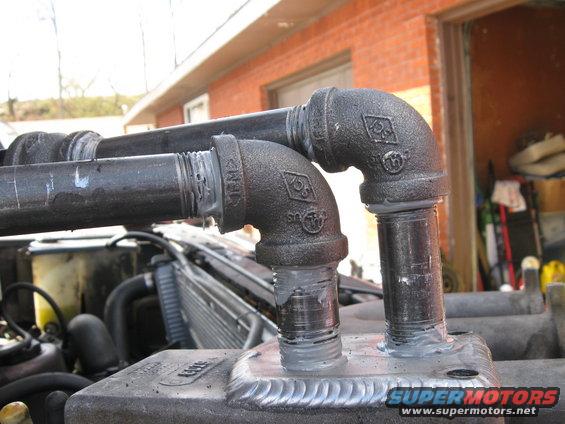
A half inch longer pipe and the project is finished:
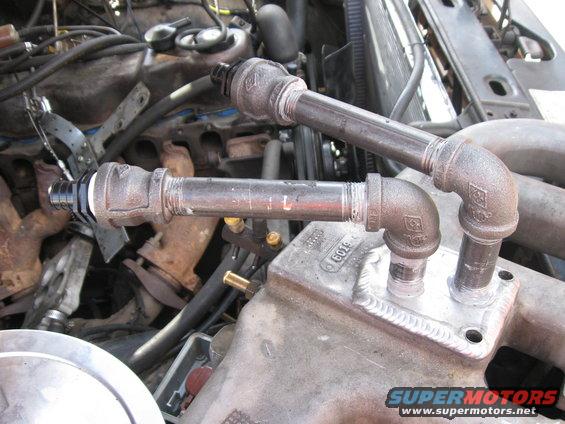
My biggest concern was the pipes actually going down too far and making contact with the intake floor, which would seriously impede flow (the tap bottomed out, so it was likely). I put a hose to it and checked for flow through and it flowed great.

Lastly, I put it inline in my other Bronco to see how it would be once pressurized. It heated up great and not a drop, so now it's installed and ready to go. Time to finally be able to tune my carb. Can't believe it took me five years to get around to this.
As some of you know, I first did my 4 bbl conversion about 5 years ago (actually, just looked it up and it was March 22, 2009). I've never had any heat to the underside of the intake because I bought my intake used and the previous owner thought that since he wasn't going to have the exhaust bolted to it, he needed to have it welded shut. Because of that, I've never been able to bolt a heat plate to it.
I've never really had the downtime on the Bronco to dive into any other alternatives until recently. Usually, when it's apart, I need to get it back together as soon as possible so I can drive it, as it's my daily driver.
Well, after five years, the department I was in at work was disbanded, so myself and a few others are out of a job, so I have some spare time on my hands.
I decided to see if there was a cavity below the surface that I could tap into. (The two holes that are already drilled were the original holes. I drilled them through to use them to mount my homemade throttle cable bracket.)
I measured the bottom of the floor of the intake and noticed it was about an inch from the plate, so there was some room to drill and test. I put a small hole through it and quickly could see there was space underneath.
That quickly told me the project was a go, so I started planning where the holes would be.
Drilled them out with a bigger drill bit and saw that there was a good sized cavity underneath.
Went up to the largest drill size I had, but it still wasn't big enough for some pipes.
I had to special order the proper drill bit for the tap I bought, which was a 23/32". Found it on Amazon for $9 and it showed up 2 days later. No one locally had it. (Home Depot had a 3/4" and it was $20).
The drill bit had a 1/2" shank, which was too big for my regular drill, so fortunately, the drill I found on the side of the road last year was able to take it.
Here's the 1/2" pipe tap that I bought. $15.
Drilled out the holes the rest of the way.
Tapped the holes. They didn't end up as straight as I would have liked, but with the metal only being 1/4" thick, it wasn't a big deal.
When I made my first heat plate, these pipes were cheap and effective, so I duplicated my design. The place also had some thread sealer that was about $3 a tube and it worked very well. Unfortunately, I didn't think it through and the holes were a little too close together. The elbows hit when I rotated the second one to tighten it.
Figured a longer pipe would fix it. This is where down time has come in really handy. 2 days waiting on the drill bit, and now another where I have to go get different pipes.
A half inch longer pipe and the project is finished:
My biggest concern was the pipes actually going down too far and making contact with the intake floor, which would seriously impede flow (the tap bottomed out, so it was likely). I put a hose to it and checked for flow through and it flowed great.
Lastly, I put it inline in my other Bronco to see how it would be once pressurized. It heated up great and not a drop, so now it's installed and ready to go. Time to finally be able to tune my carb. Can't believe it took me five years to get around to this.


#4
04-08-2013, 08:14 PM


#7
04-09-2013, 02:41 PM


Trending Topics
#8
04-09-2013, 07:31 PM
"The nice part about it? There's no gasket like a traditional heating plate!  I think it looks better as well." I agree and +2 on the long tubes. That might actually a very viable option to a bolt-up plate. Drill and tap the holes, attach the plumbing and weld to the manifold...no bolts to mess with.
I think it looks better as well." I agree and +2 on the long tubes. That might actually a very viable option to a bolt-up plate. Drill and tap the holes, attach the plumbing and weld to the manifold...no bolts to mess with.
#9
04-09-2013, 09:49 PM

#10
04-10-2013, 09:52 AM
Hi all,
Thanks for the compliments. I love having it done! And I agree, whoever did the welds was a craftsman, they're beautiful.
About the only leak I've had was somewhat my own fault, but it's also something I can fix. I drilled the holes out way back when so I could bolt my throttle linkage setup to my intake. The bolt holes nicked the space underneath the plate, so a few drips of coolant get around the bolts and out. When I get back to it, I'll dry it all out and run a cotton swab of JB weld up the bolt hole or something. Oh well.
So far, it's working great though, and it's nice knowing I don't have a gasket to worry about! The long pipes also great for keeping the hoses away from the heat. I might make them about 1" shorter though, since they do squeeze the hoses up against the fender. No biggie, I got them in a position where there's no kinking, but it'd be nice to not have to worry about it.
Joe_C, I like those hose ends you have on your plate. I didn't see anything like that available or I'd have probably grabbed some. Those are nice.
So far, I dropped my accel squirter down from a 37 to a 31 and it seems to have a nicer, crisp acceleration. There's still a bog ocassionally when I get moving from a standstill, but I haven't played around with it much more than that. Might try a few different cams and different sizes. Can't seem to find my 32 and 33 squirters, so might have to order a few.
I'll keep you all posted.
#11
04-10-2013, 11:29 AM
What I'm really interested in hearing is whether or not the gas mileage improves. I'm betting it does.
Don't forget you'll have to hook the old vacuum gauge up to it and re-set your idle mixtures and such now. It'll run a lot better at idle now, I imagine. You'll also be able to dial in the timing where it'll really like it.
Don't forget you'll have to hook the old vacuum gauge up to it and re-set your idle mixtures and such now. It'll run a lot better at idle now, I imagine. You'll also be able to dial in the timing where it'll really like it.
#12
04-10-2013, 03:31 PM
Joe_C, I like those hose ends you have on your plate. I didn't see anything like that available or I'd have probably grabbed some. Those are nice.
So far, I dropped my accel squirter down from a 37 to a 31 and it seems to have a nicer, crisp acceleration. There's still a bog occasionally when I get moving from a standstill, but I haven't played around with it much more than that. Might try a few different cams and different sizes. Can't seem to find my 32 and 33 squirters, so might have to order a few.
I'll keep you all posted.
My current setup is green cam, 25 w/solid screw, original secondary spring, 51 jet, but i haven't started on tuning yet. busy doing wiring on it.
Engine is a 85 non smog, all stock internaly, with efi manifolds, Offy DP, Holley 390, DUI dist.
and the fittings came from Princess Auto lol
1/2 in. Galvanized Insert Pipe Fitting | Princess Auto
its not the right size, but I'm hoping i can fudge it to work
#13
04-10-2013, 07:13 PM
I use a blue cam in the #1 hole, a 37 squirter and a green or purple (same thing) vac secondary spring. That spring is right in the middle of the range. I tried everything from the lightest (yellow?) to heaviest (black) and found no appreciable difference with my engine. BUT, your results may differ.
#14
04-10-2013, 07:43 PM
I use a blue cam in the #1 hole, a 37 squirter and a green or purple (same thing) vac secondary spring. That spring is right in the middle of the range. I tried everything from the lightest (yellow?) to heaviest (black) and found no appreciable difference with my engine. BUT, your results may differ.
Vehicle gearing and weight will have a big impact on what the pump gets set up to.
and i noticed i didn't say the screw hole for the green cam its on #2