Project: F'nstein
#31
 03-31-2013, 07:16 AM

Join Date: Jan 2013
Location: Kingston, Pa. 18704
Posts: 479
Likes: 0
Received 0 Likes
on
0 Posts
It was a beautiful day yesterday and I took a trip to two local junkyards in search of an F500-F700 cluster and bezel. The other yards that I wanted to go to were not open and I'll have to wait till Monday to visit them.
I only managed to find one truck of the 500-700 class in one yard and as luck would have it, the ONLY thing that was missing off of the truck (and the only thing worth taking) was the cluster/bezel. Although it did have a nice black vinyl seat. I'm going with custom leather buckets, so it wasn't worth me taking.
I did happen to find 2 more (F100 - F250) though, and I grabbed both of their clusters and bezels for $21 each. I may end up using one of these for now. One of them was out of an old U Haul and has a clamp around the speedo cable that I'll have to cut off with a grinding wheel. I guess it's there to prevent tampering. The plan is to sand blast the steel bezel and use it with the full cluster until I can find the one that I really want.
I also scored a set of Flowmaster Super 40's off of a guy from Craigslist with only about 4,000 miles on them for $40. He opted to go with a 4" single exhaust and a Thush Turbo.
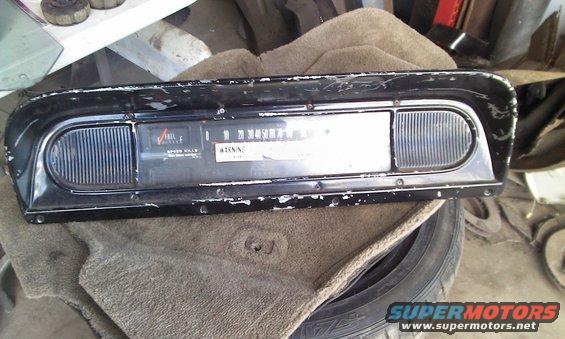
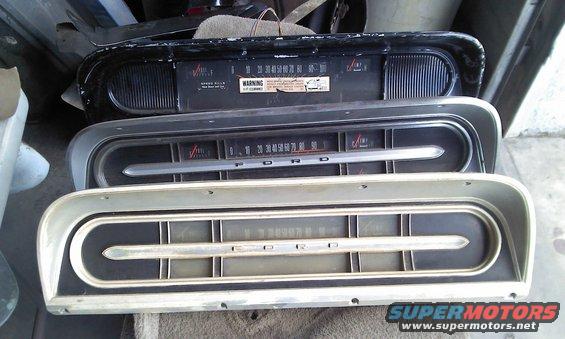
Anyway, more pics. First one is the one out of the U Haul with a steel bezel, second one shows the one that came with my truck and the other one that I grabbed with the extra oil and ammeter gauges.

I only managed to find one truck of the 500-700 class in one yard and as luck would have it, the ONLY thing that was missing off of the truck (and the only thing worth taking) was the cluster/bezel. Although it did have a nice black vinyl seat. I'm going with custom leather buckets, so it wasn't worth me taking.
I did happen to find 2 more (F100 - F250) though, and I grabbed both of their clusters and bezels for $21 each. I may end up using one of these for now. One of them was out of an old U Haul and has a clamp around the speedo cable that I'll have to cut off with a grinding wheel. I guess it's there to prevent tampering. The plan is to sand blast the steel bezel and use it with the full cluster until I can find the one that I really want.
I also scored a set of Flowmaster Super 40's off of a guy from Craigslist with only about 4,000 miles on them for $40. He opted to go with a 4" single exhaust and a Thush Turbo.
Anyway, more pics. First one is the one out of the U Haul with a steel bezel, second one shows the one that came with my truck and the other one that I grabbed with the extra oil and ammeter gauges.
#32
04-15-2013, 07:37 AM
Join Date: Jan 2013
Location: Kingston, Pa. 18704
Posts: 479
Likes: 0
Received 0 Likes
on
0 Posts
I took a break from working on replacing my floors and got some work done on my dash yesterday.
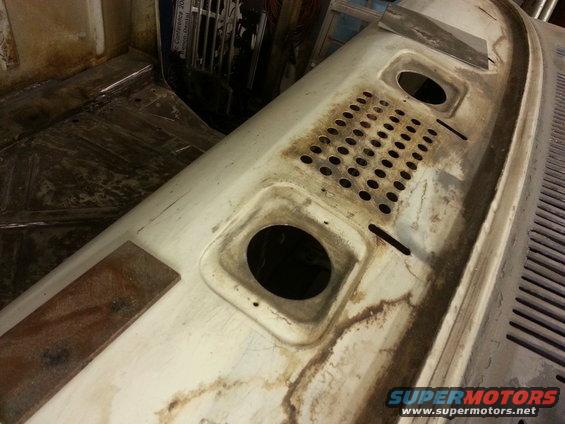
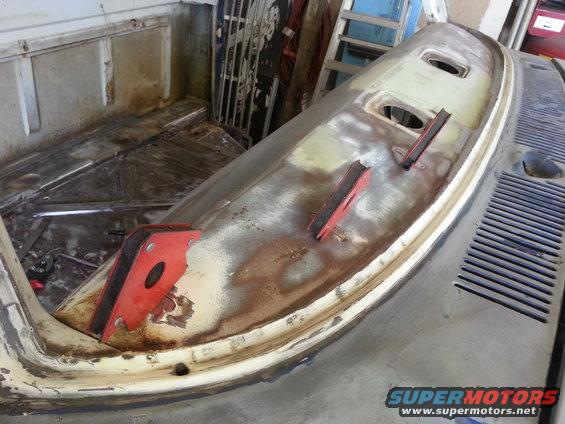
I'm leaving the dash pad off for a more retro look and have to fill in all of the holes from the mounting studs. I also had to fill in a huge hole from the PO where they hacked the ***** out of the radio hole.
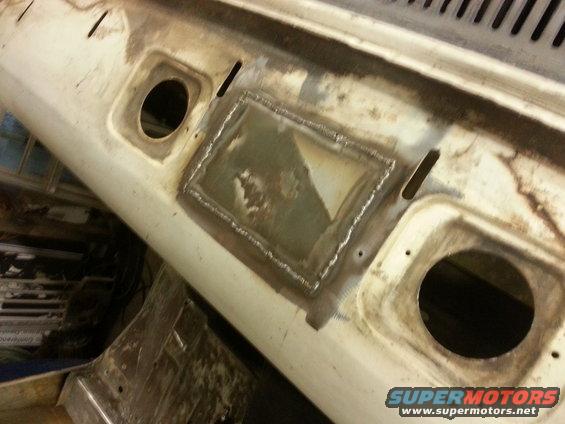
Pics show before and after welding in a filler panel and the mounting holes. I still need to knock down a couple of high spots and put a second coat of filler on the panel.


I'm leaving the dash pad off for a more retro look and have to fill in all of the holes from the mounting studs. I also had to fill in a huge hole from the PO where they hacked the ***** out of the radio hole.
Pics show before and after welding in a filler panel and the mounting holes. I still need to knock down a couple of high spots and put a second coat of filler on the panel.
#33
04-15-2013, 07:45 AM
Join Date: Jan 2013
Location: Kingston, Pa. 18704
Posts: 479
Likes: 0
Received 0 Likes
on
0 Posts
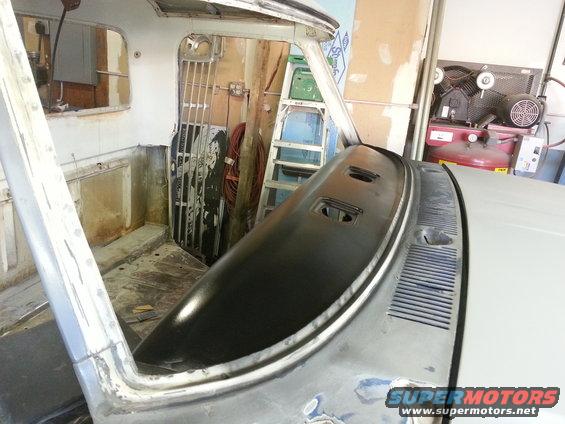
I was going to cut a DIN size hole in the new panel, but decided to leave it smooth and will put the head unit in a custom center console.
I have about 2000 watts of high end Alpine and Infinity components that will be going in the truck. The center console will house the 10" subwoofer and head unit.
Will have to see where the shifter for the Tremec 5 speed comes through the floor before I can start the console though. I may end up swapping out the tail section for one off of an S10 to move the shifter forward.
Custom speaker pods will also be made to replace the OEM floor vent panels. I'm putting in a set of 3 way component speakers in the kick panels for optimum staging.
More pics later today......
#34
04-15-2013, 06:29 PM
Hotshot
Good job on the dash! Looks like the perfect place for either an old school Ford emblem.....or little Calvin urinating on a bow tie. LOL! I am looking forward to seeing pics of how you do the kick panels. Because of the swing of the park brake pedal I chose to build some boxes and mount them under the front of the seat facing forward and up. They sound OK, But direct mids/tweets sound better than in-direct.
#35
04-15-2013, 06:34 PM
Hotshot
#36
04-15-2013, 06:46 PM
Join Date: Jan 2013
Location: Kingston, Pa. 18704
Posts: 479
Likes: 0
Received 0 Likes
on
0 Posts
I am not reusing the OEM parking brake so that won't be an issue . I'll be installing a hand brake in between the bucket seats.
For optimum staging you want all 3 speakers as close as possible , not mounted up high like most new cars are,
Kick panels are ideal . They put the speakers as close to equidistant as possible from your ears .
For optimum staging you want all 3 speakers as close as possible , not mounted up high like most new cars are,
Kick panels are ideal . They put the speakers as close to equidistant as possible from your ears .
#37
04-16-2013, 04:11 PM
Hotshot
Ohh, I believe you. I know building home speakers on the side, the optimum distance for woofer to mid is the length of that woofer. Center to center. Then the same for mid to tweet. I had put the tweets up there to raise my soundstage. I am glad I don't have a headliner yet. While that did raise the stage, you are correct. Even though mine are poining at the dash rather than the cab's airspace they do sound better now that I put the tweets down with the mids. I'm just keeping everything out of sight.
#38
04-16-2013, 04:50 PM
Join Date: Jan 2013
Location: Kingston, Pa. 18704
Posts: 479
Likes: 0
Received 0 Likes
on
0 Posts
Daily update:
As I said in a previous post, I'm leaving the dash pad off for two reasons:
1) I'm not paying what they want for a reproduction
2) I like the Old School look of a painted metal dash
With that said, I got some progress done today on filling the holes and slots from the OEM dash pad and the center speaker hole.
Pics of course...... LOL

#40
04-16-2013, 09:48 PM
Logistics Pro
#41
04-16-2013, 11:45 PM
New User
Join Date: Jan 2013
Location: Denver, CO
Posts: 22
Likes: 0
Received 0 Likes
on
0 Posts
I presume that you have already realized this, but the metal grilles that you will want to cover the heater/defrost ducts are buried inside your old foam dash cover. If you cut them out, you will find metal grilles that were designed to cover a bare dash, including countersunk screw holes to match those in the dash. It takes some work to get the glued-on foam off of them, but this was a welcome discovery for me several weeks ago when I ripped the cheap-looking plastic after-market dash cover and old dash pad off of my '68.
The irony of the fact that these gems are designed for an exposed metal dash, yet ended up buried in foam is an enigma to me as I have never heard of or seen a 67-72 Ford that came from the factory this way.
The irony of the fact that these gems are designed for an exposed metal dash, yet ended up buried in foam is an enigma to me as I have never heard of or seen a 67-72 Ford that came from the factory this way.
#42
04-17-2013, 07:50 AM
Join Date: Jan 2013
Location: Kingston, Pa. 18704
Posts: 479
Likes: 0
Received 0 Likes
on
0 Posts
I did not know that about the bezels.
The PO really tore up the OEM dash pad and it was FUBAR. I've already chucked it in the dumpster weeks ago.
Does anyone have an old beat up pad that I can get the bezels out of?
There are one or two bumps in the junkyard that I know of and it'll save me the trouble of ripping them out.
Thanks for that info.
#43
04-17-2013, 11:45 AM
 for 26 bucks to my door!
#44
04-17-2013, 11:51 AM
Hotshot
I did not know that about the bezels.
The PO really tore up the OEM dash pad and it was FUBAR. I've already chucked it in the dumpster weeks ago.
Does anyone have an old beat up pad that I can get the bezels out of?
There are one or two bumps in the junkyard that I know of and it'll save me the trouble of ripping them out.
Thanks for that info.
#45
04-17-2013, 06:47 PM
Join Date: Jan 2013
Location: Kingston, Pa. 18704
Posts: 479
Likes: 0
Received 0 Likes
on
0 Posts
Made some more progress today and I'm one step closer to crossing one project off of my list.
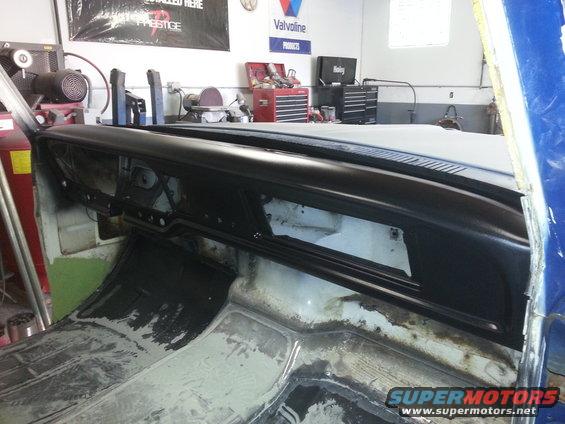
I finished filling in all of the slots and holes from the OEM dash pad. I took some pics of how I did it in case anyone else dares to do the same thing. I'll tell you, my fingers are KILLING me from sanding all of the nooks and crannies in the dash panel.
After welding in some strips and using a big chunk of copper as a backer to fill in the holes in the front of the dash, I put 2 thin coats of RAGE polyester filler on, sanded it with 80 and then 220 and finally finished it off with 2 coats of Epoxy Primer.
There are a couple of small imperfections (low spots) in the polyester, but after shooting a couple of coats of 2K Primer on the dash panel tomorrow, I will fill them in with spot putty.
I know you guys like pics. Here you go: