My build thread
#91
 07-25-2013, 09:52 PM

My pedal mount also doubles the firewall and attached to the bottom edge of the dash. No flex.

The bracket is upside down, the brake MC mount backer is on the left pointed up, the brace is pointed towards me next to the left wrench.

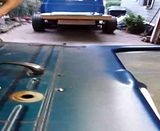
here it is installed looking up under the dash, the brace is the triangular piece to the right of the brake pedal. There is a second identical brace on the outside the clutch pedal.
The bracket is upside down, the brake MC mount backer is on the left pointed up, the brace is pointed towards me next to the left wrench.
here it is installed looking up under the dash, the brace is the triangular piece to the right of the brake pedal. There is a second identical brace on the outside the clutch pedal.
#93
03-09-2014, 05:20 PM
Haven't posted for a while, way too busy with work for the last 7 months! Since then I did brace the firewall mounted MC like Ax suggested and it is solid now. I just finished the 3 point seat belts and finally got a driveshaft. Here are a couple of pics of the finished Juliano belts: I took 3/16" plate and curved and twisted to make a mounting plate, added the 1/8" plate with grade 8 nut welded to it and welded it to the pillar and the rear window frame. Grade 8 bolts through the double channel on the floor with a rectangular plate underneath from Juliano's for the middle cab bolts, and the same for the one by the door which is also bolted to the bottom of the factory pillar triangle brace. It should be strong enough to keep me in the seat incase of an accident. The last picture is Kilroy hanging over the back window - for all you who hate seeing the headrests in the back window 


#95
03-09-2014, 08:31 PM

#96
03-09-2014, 09:38 PM
Thanks Bobby and Tinman. I should have taken pics while I was fabricating, but I get wrapped up and always forget. My daughter told me I needed to post some pictures or I might have forgotten even then.
Still working on the doors, but having trouble getting all the parts from Classic Haulers/Mid Fifty. They backordered the glass channel because they got some bad ones from their supplier. Finally sent me some but it is going back. The SS bead will not slide like is supposed to when you try and bend it. I think I am going to get some channel that doesn't have the SS bead. I am installing single glass, eliminating the wing windows. Too hot here in Houston and I am installing AC. Also shaving the handles, installing door poppers, and electric windows. An amazing amount of work in the doors and I haven't even painted them yet. I did repair the rusted corners though, almost a year ago.
Still working on the doors, but having trouble getting all the parts from Classic Haulers/Mid Fifty. They backordered the glass channel because they got some bad ones from their supplier. Finally sent me some but it is going back. The SS bead will not slide like is supposed to when you try and bend it. I think I am going to get some channel that doesn't have the SS bead. I am installing single glass, eliminating the wing windows. Too hot here in Houston and I am installing AC. Also shaving the handles, installing door poppers, and electric windows. An amazing amount of work in the doors and I haven't even painted them yet. I did repair the rusted corners though, almost a year ago.
#97
03-09-2014, 10:47 PM
Elder User
Thanks Bobby and Tinman. I should have taken pics while I was fabricating, but I get wrapped up and always forget. My daughter told me I needed to post some pictures or I might have forgotten even then.
Still working on the doors, but having trouble getting all the parts from Classic Haulers/Mid Fifty. They backordered the glass channel because they got some bad ones from their supplier. Finally sent me some but it is going back. The SS bead will not slide like is supposed to when you try and bend it. I think I am going to get some channel that doesn't have the SS bead. I am installing single glass, eliminating the wing windows. Too hot here in Houston and I am installing AC. Also shaving the handles, installing door poppers, and electric windows. An amazing amount of work in the doors and I haven't even painted them yet. I did repair the rusted corners though, almost a year ago.
Still working on the doors, but having trouble getting all the parts from Classic Haulers/Mid Fifty. They backordered the glass channel because they got some bad ones from their supplier. Finally sent me some but it is going back. The SS bead will not slide like is supposed to when you try and bend it. I think I am going to get some channel that doesn't have the SS bead. I am installing single glass, eliminating the wing windows. Too hot here in Houston and I am installing AC. Also shaving the handles, installing door poppers, and electric windows. An amazing amount of work in the doors and I haven't even painted them yet. I did repair the rusted corners though, almost a year ago.
I am interested in the mid fifties one piece glass mod for my 55 but they want a bit more than I want to spend right now. It looks like a well engineered kit and saw a nice photo shoot of it in classic trucks a few months ago.
Isn't it fun cramming in all the modern stuff into a 60 yo door,,,hehehe.
#98
03-09-2014, 10:52 PM
You have made some great progress for a working guy. I have been swamped too at work so have only been piddling around on the new dash panel for my crown vic instrument cluster, but haven't taken the time to take any photo's yet either, Just keep forgetting.
I am interested in the mid fifties one piece glass mod for my 55 but they want a bit more than I want to spend right now. It looks like a well engineered kit and saw a nice photo shoot of it in classic trucks a few months ago.
Isn't it fun cramming in all the modern stuff into a 60 yo door,,,hehehe.

#99
03-09-2014, 10:56 PM
Still working on the doors, but having trouble getting all the parts from Classic Haulers/Mid Fifty. They backordered the glass channel because they got some bad ones from their supplier. Finally sent me some but it is going back. The SS bead will not slide like is supposed to when you try and bend it. I think I am going to get some channel that doesn't have the SS bead.
#100
03-10-2014, 07:08 AM
Good, glad to get that feedback! Nice to know that I am not the only one. When I first started looking for it I could only find it in either 100' or 500' rolls. I finally found 96" sticks which I am waiting to get.
#101
03-10-2014, 08:46 AM

Thanks Bobby and Tinman. I should have taken pics while I was fabricating, but I get wrapped up and always forget. My daughter told me I needed to post some pictures or I might have forgotten even then.
Still working on the doors, but having trouble getting all the parts from Classic Haulers/Mid Fifty. They backordered the glass channel because they got some bad ones from their supplier. Finally sent me some but it is going back. The SS bead will not slide like is supposed to when you try and bend it. I think I am going to get some channel that doesn't have the SS bead. I am installing single glass, eliminating the wing windows. Too hot here in Houston and I am installing AC. Also shaving the handles, installing door poppers, and electric windows. An amazing amount of work in the doors and I haven't even painted them yet. I did repair the rusted corners though, almost a year ago.
Still working on the doors, but having trouble getting all the parts from Classic Haulers/Mid Fifty. They backordered the glass channel because they got some bad ones from their supplier. Finally sent me some but it is going back. The SS bead will not slide like is supposed to when you try and bend it. I think I am going to get some channel that doesn't have the SS bead. I am installing single glass, eliminating the wing windows. Too hot here in Houston and I am installing AC. Also shaving the handles, installing door poppers, and electric windows. An amazing amount of work in the doors and I haven't even painted them yet. I did repair the rusted corners though, almost a year ago.
As a heads up, one of the surprises I had was I had set up a SS flexible conduit in each door to carry wires a couple years ago. When I recently counted up the number of wires in each door (more in the drivers door), it was too many wires for one conduit per door. I recently purchased a second pair of flexible conduits. The collars on the second set that you see in the door jam were about .050" thicker than the first ones I bought. The second set were "Keep it Clean" brand. I had to disassemble the conduit into 3 pieces to chuck the threaded aluminum collars up in my metal lathe and turn about .050" off the face of each collar. The reason is the gap in the door jam at least on the bonus built trucks is quite tight. The door would not fully close with the new ones installed. I am sure all bonusbuilts will be the same. On the fixed end where the flex conduit is firmly attached to the collar (as opposed to the one that the ss conduit slides through) I had to separate the 2 pieces. It turns out that they are epoxied together. By twisting while pulling I separated the two. After machining, I re epoxied the joint.

#103
03-10-2014, 11:57 AM
I am going through the same process right now. I am not doing the one piece window or shaving handles but the doors have power windows, power door locks and speakers.
As a heads up, one of the surprises I had was I had set up a SS flexible conduit in each door to carry wires a couple years ago. When I recently counted up the number of wires in each door (more in the drivers door), it was too many wires for one conduit per door. I recently purchased a second pair of flexible conduits. The collars on the second set that you see in the door jam were about .050" thicker than the first ones I bought. The second set were "Keep it Clean" brand. I had to disassemble the conduit into 3 pieces to chuck the threaded aluminum collars up in my metal lathe and turn about .050" off the face of each collar. The reason is the gap in the door jam at least on the bonus built trucks is quite tight. The door would not fully close with the new ones installed. I am sure all bonusbuilts will be the same. On the fixed end where the flex conduit is firmly attached to the collar (as opposed to the one that the ss conduit slides through) I had to separate the 2 pieces. It turns out that they are epoxied together. By twisting while pulling I separated the two. After machining, I re epoxied the joint.
As a heads up, one of the surprises I had was I had set up a SS flexible conduit in each door to carry wires a couple years ago. When I recently counted up the number of wires in each door (more in the drivers door), it was too many wires for one conduit per door. I recently purchased a second pair of flexible conduits. The collars on the second set that you see in the door jam were about .050" thicker than the first ones I bought. The second set were "Keep it Clean" brand. I had to disassemble the conduit into 3 pieces to chuck the threaded aluminum collars up in my metal lathe and turn about .050" off the face of each collar. The reason is the gap in the door jam at least on the bonus built trucks is quite tight. The door would not fully close with the new ones installed. I am sure all bonusbuilts will be the same. On the fixed end where the flex conduit is firmly attached to the collar (as opposed to the one that the ss conduit slides through) I had to separate the 2 pieces. It turns out that they are epoxied together. By twisting while pulling I separated the two. After machining, I re epoxied the joint.

#104
03-10-2014, 12:00 PM
#105
03-30-2014, 08:41 AM