
Ugly Betty: Frame-Up Rebuild w/ a Donor
#1
 12-16-2012, 10:03 AM

Join Date: Dec 2010
Location: Carlisle
Posts: 221
Likes: 0
Received 0 Likes
on
0 Posts
Ugly Betty: Frame-Up Rebuild w/ a Donor
Before we get into the details I want to thank all of you out there using the site- by reading your posts and seeing your projects you made it possible for me to get my own project off the ground! I work in an office and consider myself really handy but have no experience with a project like this. So, for anyone out there wondering how you might possibly be able to do this, read on, ‘cause you’ll see how I did it without much of a clue. For the ‘gurus’, please take pitty when I’m doing something stupid because I have no clue.
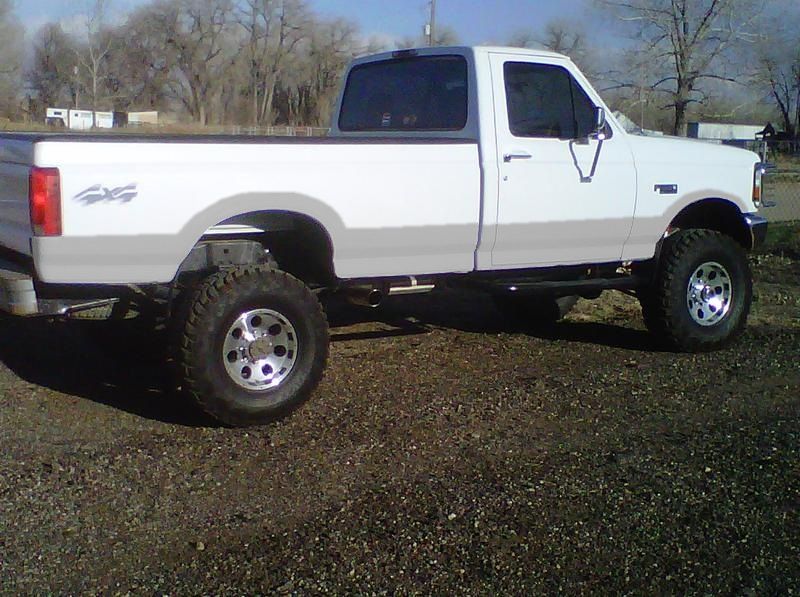
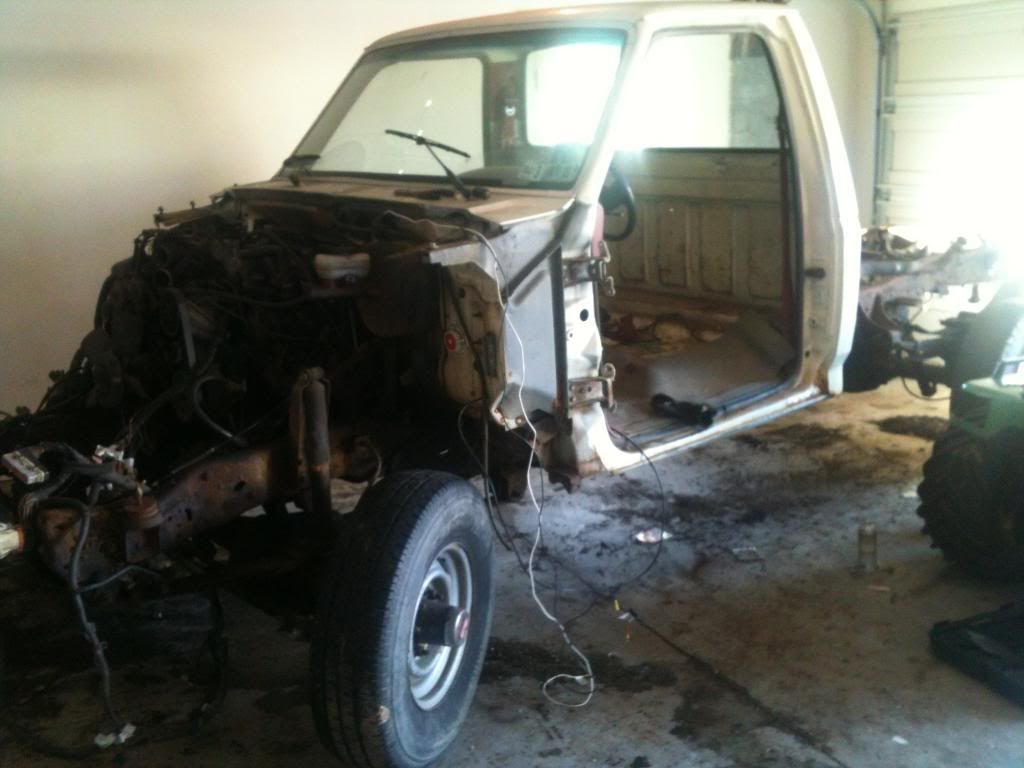
So, here’s the background… In late 1989 while my dad was in the Navy and I was in High School we lived in Okinawa Japan. My dad needed a truck to move some horses (his passion) when we got back to the states and take care of the many ‘projects’ he and I always seem to have underway. The two of us spent weeks pouring over the Ford truck options and spec sheets carefully considering each package and option. The result was a 1990 Ford F250 HD that was deliberately and painstakingly configured, that we now refer to as Ugly Betty (or UB because I’m a lazy typer). Here’s a pic of her shortly after I got the truck from my Dad last year.

She’s seen over 120K miles in the last 23 years and while she was well maintained, 120k miles and two decades on a truck residing in southern New Hampshire (white winters either from snow or it’s New England counterpart, salt) is a major accomplishment. She still runs and drives, though you can tell the end is clearly in sight… And that’s when I started dreaming of a frame-up restoration. At least at first I called it a restoration, but I started wanting to upgrade too many things and my current vision is FAR from a ‘factory new’ restoration…
My guiding principles are pretty straight forward-
1) Make sure it still looks like Ugly Betty
2) Pick some different/better options from the 1990 spec sheets
3) Fix her up to be ready for service
Guiding Principal 1- I want to be able to clearly recognize the truck we originally built, option by option. That means I won’t change any of the following:
a. A friend of mine summed it up best, “Diesel just makes me horny.” BUT the 351W gas engine won’t change even though I’d pick a 7.3l Diesel today (assuming 1990 options). The 351 idle and starter have pretty distinct sounds that would be gone with a 7.6l gasser or 7.3l. Besides, to be honest, I’m not towing or hauling on a regular basis and a 351 is probably overkill for my weekend warrior activities. I’ve got a few peppy ideas in mind to help with some extra torque and horsepower as described in my thread here:
https://www.ford-trucks.com/forums/1...time-mine.html
b. Front clip to a 92-96, which I think looks a bit better. In general I want to maintain the visual appearance of the truck, so things like changing the mirrors and adding other after-market items isn’t really on the list of possibilities.
c. ZF5 manual transmission- I love shifting and driving the truck, even if it means lower towing capacity. The ZF5 makes a distinct ‘ratchety’ sound when it’s bogged down a bit, especially when starting in second gear, which we do often since it’s got a bunch of high ratios on the gears.
d. Color- she was Colonial White leaving the factory in Canada, she’ll be Colonial White when it’s all done. I’ll use both small spray can touchup and bulk supply while I’m doing most of the work. At the end of the build I might have a pro paint job applied, but it might take a few years to get there… Here’s a picture showing the vision for what I’m looking to do, except this is a little high off the ground and it’s a 9th generation (1992-1996: Ugly Betty is an 8th generation, 1987-1991). For the grey trim I plan to use herculiner.
Guiding Principle 2- Continue selecting “options” for the rebuild that I would/should have picked in 1989, if they were available:
a. 4WD! Can’t tell you how many times my Dad and I have wished we went for the 4x4 option. But after reading around a whole lot, I’m a big fan of the Dana 60 in the F350 opposed to the Twin Traction Beam (TTB) in the F150 and F250. I started a thread a while back as I was researching:
https://www.ford-trucks.com/forums/1...le-donors.html
b. 4.10 axle ratio for better low end torque. It’s not a huge deal, but I like a lot of low end torque, and 4.10 should get me better bottom performance than the 3.55 ratio that she’s got now.
Guiding Principle 3 - Restore the truck to full functioning and be ready for full service. It’s a truck and I intend to use the crap out of it for another 20 years and much more! Included here is a complete restoration of the body, with some new tweaks:
a. Coat all exposed underside and hidden faces/panels with a super-tough materials (base coat of POR15 and then Herculiner using a roller and appropriate spray gun) to provide maximum protection from rust. Yeah, this is heavy duty protection, but the bed, wheel wells, floor boards and such shouldn’t rust out for 50 years!
b. Put a gray ‘trim’ coat of Herculiner around the lower outside areas, including above the wheel wells where she’ll likely develop rust. The picture above shows the general concept for trim. I might change my mind on that, so if folks have opinions, let me know…
c. Might change some of the trim options here and there and go for non-chrome or chrome where it didn’t originally exist.
d. The one original exterior characteristic that I am changing is the wheels. 1988 through 1991 2WD models had very distinctive wheel covers that will be gone because I’m upgrading to 4x4 wheels and tires; something like the stock 4x4 wheels shown above
After doing a TON or reading on the forums I know it’s going to take a lot of time and energy from start to finish. I also discovered from my research that I will need a LOT of replacement and upgrade parts; so many parts and pieces that it warrants using the ‘donor’ method using an existing similar truck that has all the parts and pieces I need. After all the initial research I did I ended up finding the perfect a donor-F350 to supply many of the required parts. Besty (no joke, that’s what they called her) is an ’89 F350 4WD with a 351W, ZF5 and 4.10 axles- scary how that worked out to be everything I was looking for…

And, of course, I had to ask y'all what you thought made the most sense…
https://www.ford-trucks.com/forums/1...-f250-2wd.html
Originally I was going to rebuild it in two phases, the first is a functioning rebuild where I’ll fix what’s broken here and there and do some heavy maintenance and, once my immediate needs were taken care of I’d start the ‘non-functioning’ frame up rebuild where the truck will be systematically dismantled, piece by piece, restored and then rebuilt. Starting with a functioning rebuild would have given me time to learn the systems and existing components in great detail and then research how I want the rebuild to work- turns out I couldn’t wait to get my hands dirty.
Before I start on the tear down pics though, here’s some info on the compression test I did along the way this year…
So, here’s the background… In late 1989 while my dad was in the Navy and I was in High School we lived in Okinawa Japan. My dad needed a truck to move some horses (his passion) when we got back to the states and take care of the many ‘projects’ he and I always seem to have underway. The two of us spent weeks pouring over the Ford truck options and spec sheets carefully considering each package and option. The result was a 1990 Ford F250 HD that was deliberately and painstakingly configured, that we now refer to as Ugly Betty (or UB because I’m a lazy typer). Here’s a pic of her shortly after I got the truck from my Dad last year.
She’s seen over 120K miles in the last 23 years and while she was well maintained, 120k miles and two decades on a truck residing in southern New Hampshire (white winters either from snow or it’s New England counterpart, salt) is a major accomplishment. She still runs and drives, though you can tell the end is clearly in sight… And that’s when I started dreaming of a frame-up restoration. At least at first I called it a restoration, but I started wanting to upgrade too many things and my current vision is FAR from a ‘factory new’ restoration…
My guiding principles are pretty straight forward-
1) Make sure it still looks like Ugly Betty
2) Pick some different/better options from the 1990 spec sheets
3) Fix her up to be ready for service
Guiding Principal 1- I want to be able to clearly recognize the truck we originally built, option by option. That means I won’t change any of the following:
a. A friend of mine summed it up best, “Diesel just makes me horny.” BUT the 351W gas engine won’t change even though I’d pick a 7.3l Diesel today (assuming 1990 options). The 351 idle and starter have pretty distinct sounds that would be gone with a 7.6l gasser or 7.3l. Besides, to be honest, I’m not towing or hauling on a regular basis and a 351 is probably overkill for my weekend warrior activities. I’ve got a few peppy ideas in mind to help with some extra torque and horsepower as described in my thread here:
https://www.ford-trucks.com/forums/1...time-mine.html
b. Front clip to a 92-96, which I think looks a bit better. In general I want to maintain the visual appearance of the truck, so things like changing the mirrors and adding other after-market items isn’t really on the list of possibilities.
c. ZF5 manual transmission- I love shifting and driving the truck, even if it means lower towing capacity. The ZF5 makes a distinct ‘ratchety’ sound when it’s bogged down a bit, especially when starting in second gear, which we do often since it’s got a bunch of high ratios on the gears.
d. Color- she was Colonial White leaving the factory in Canada, she’ll be Colonial White when it’s all done. I’ll use both small spray can touchup and bulk supply while I’m doing most of the work. At the end of the build I might have a pro paint job applied, but it might take a few years to get there… Here’s a picture showing the vision for what I’m looking to do, except this is a little high off the ground and it’s a 9th generation (1992-1996: Ugly Betty is an 8th generation, 1987-1991). For the grey trim I plan to use herculiner.
Guiding Principle 2- Continue selecting “options” for the rebuild that I would/should have picked in 1989, if they were available:
a. 4WD! Can’t tell you how many times my Dad and I have wished we went for the 4x4 option. But after reading around a whole lot, I’m a big fan of the Dana 60 in the F350 opposed to the Twin Traction Beam (TTB) in the F150 and F250. I started a thread a while back as I was researching:
https://www.ford-trucks.com/forums/1...le-donors.html
b. 4.10 axle ratio for better low end torque. It’s not a huge deal, but I like a lot of low end torque, and 4.10 should get me better bottom performance than the 3.55 ratio that she’s got now.
Guiding Principle 3 - Restore the truck to full functioning and be ready for full service. It’s a truck and I intend to use the crap out of it for another 20 years and much more! Included here is a complete restoration of the body, with some new tweaks:
a. Coat all exposed underside and hidden faces/panels with a super-tough materials (base coat of POR15 and then Herculiner using a roller and appropriate spray gun) to provide maximum protection from rust. Yeah, this is heavy duty protection, but the bed, wheel wells, floor boards and such shouldn’t rust out for 50 years!
b. Put a gray ‘trim’ coat of Herculiner around the lower outside areas, including above the wheel wells where she’ll likely develop rust. The picture above shows the general concept for trim. I might change my mind on that, so if folks have opinions, let me know…
c. Might change some of the trim options here and there and go for non-chrome or chrome where it didn’t originally exist.
d. The one original exterior characteristic that I am changing is the wheels. 1988 through 1991 2WD models had very distinctive wheel covers that will be gone because I’m upgrading to 4x4 wheels and tires; something like the stock 4x4 wheels shown above
After doing a TON or reading on the forums I know it’s going to take a lot of time and energy from start to finish. I also discovered from my research that I will need a LOT of replacement and upgrade parts; so many parts and pieces that it warrants using the ‘donor’ method using an existing similar truck that has all the parts and pieces I need. After all the initial research I did I ended up finding the perfect a donor-F350 to supply many of the required parts. Besty (no joke, that’s what they called her) is an ’89 F350 4WD with a 351W, ZF5 and 4.10 axles- scary how that worked out to be everything I was looking for…
And, of course, I had to ask y'all what you thought made the most sense…
https://www.ford-trucks.com/forums/1...-f250-2wd.html
Originally I was going to rebuild it in two phases, the first is a functioning rebuild where I’ll fix what’s broken here and there and do some heavy maintenance and, once my immediate needs were taken care of I’d start the ‘non-functioning’ frame up rebuild where the truck will be systematically dismantled, piece by piece, restored and then rebuilt. Starting with a functioning rebuild would have given me time to learn the systems and existing components in great detail and then research how I want the rebuild to work- turns out I couldn’t wait to get my hands dirty.
Before I start on the tear down pics though, here’s some info on the compression test I did along the way this year…
#2
12-16-2012, 10:14 AM
Join Date: Dec 2010
Location: Carlisle
Posts: 221
Likes: 0
Received 0 Likes
on
0 Posts
A while back I had some extra injector cleaner in the garage, so I threw it into UBs front fuel tank since she�s getting on in years and showing the general signs of wear. While I know injector cleaner usually helps ailing engines improve I was a bit startled with how much it settled the engine and improved power and response. The really troubling part was that the improvements lasted exactly as long as the tank of gas. Once the injector cleaner was used up the engine went back to a less powerful state- a clear sign that the engine is having ignition issues. Of course there could be several causes for lack of ignition- limited gas supply (injectors), bad air flow, bad spark or all of the above. So off I went to inspect the ignition systems.
At first glance the area surrounding the spark plugs was, uh, dirty (duh). There was quite a bit of loose debris that seemed to be a mix of rust, dirt, gravel, and oil. Before I removed the plug wires I got the compressor out and blew some of the garbage out, then took the plug wires off and blew the area out again with the plugs still in to get all the junk out of the spark plug hole before the plugs come out- don�t want anything falling into the cylinder (considered by most experts and novices alike to be �not good�).
So out came the plugs and, viola!
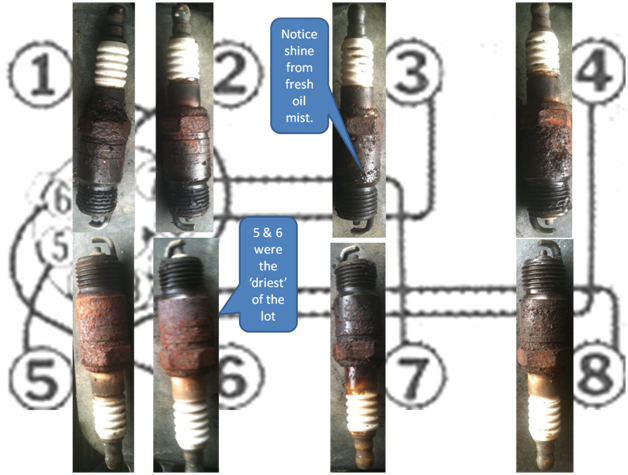
Plug #1 (front passenger side, top left in pic) came out pretty easily. What I saw when I got it out made me wonder why I wasn�t having more issues- lot�s of carbon and white power. Neither is great, but easily fixed by changing the plug. Plug #2 & #3 were absolute bitches to get out- the hoses for the smog pump made it really tough. #3 was the most alarming of all the plugs- it was noticeably moist with oil, not dripping, but the outside surrounding of the hole was more oily and the underside of the plug itself was misted with oil. Surprisingly #8 on the back drivers side was the most difficult to get out- it seemed that the plug was pointing back to the driver, but this was probably mostly due to the reach it took to get to it.
As you can see from the pictures of the plugs, replacements were clearly needed. Besides the full out replacement though, I think there are two interesting signs from the plugs (using my handy Haynes Repair Manual as a guide).
1) The oily deposits on plug 1-4 is suggestive of poor oil control. I�ll need to do a compression tests to get more information, but the possibilities include leaky valves (worn seats) or leaky piston rings. Either one (and even both) are possible given the mileage on her�
2) The white deposits on 5-7 suggest the engine is running hot. I�m not sure if this was due to the injector cleaner (strong possibility) or poor coolant (which I doubt), sticking valves, or ignition timing.
Before doing the compression test I got new plugs (can�t remember exactly what I go, but mid-line price point) gaped them and threw them in for a few weeks of light use. I figured it would be helpful to get some fresh data to see how bad some of the initial observations might really be. I also threw in a new distributor rotor but didn�t go too nuts since I knew I�m going to rebuild the engine pretty soon. All in all it did improve things a little, but there were still noticeable issues. The power was low, the engine burned oil under load and sounded �loose�. I�m guessing the mileage and leaky/hissing sounds are suggestive of serious wear on the valves, particularly the exhaust, and gaskets. As another excuse to get my hands dirty and do some digging I did a compression test on each cylinder. I�m hopeful you all don�t see any major issues below (e.g. cracked pistons).
Here�s some background for anyone like myself who is new to compression tests�
*********************
Testing the compression within each cylinder provides valuable information about the health of upper half of the engine, namely the cylinder heads [valves, value seats, valve springs, rocker arms], pistons [pistons, piston rings, cylinder wall wear] and associated gaskets. The general range of the compression pressure for a 351W engine, in PSI, is expected to fall between 150 and 120. The exact values don�t seem to be of particular importance however as long as the lowest compression value is greater than 75% of the highest.
It�s important to note that the engine should be at normal operating temperature for the test- in other words, it needs to be hot, and the battery needs to be FULLY charged since I�ll be doing a lot of cranking. All in all this means a great deal of fun while unscrewing sparkplugs, screwing in the compression tool and hopefully NOT burning my hands raw on the exhaust manifolds or other engine parts.
One note of honesty- I did get the engine up to temp and started doing the tests, but when I got to cylinder 2 & 3 (pain in the ***) I got so pissed between trying to get the farkin socket on the spark plugs and burning my hands/arms on the exhaust manifold that I let the engine cool down a bit. So, while the engine wasn�t cold, I wouldn�t say it wasn�t even close to �normal� operating temps.
Here are the general steps:
1) Carefully clean the area around each sparkplug before removing it to prevent dirt from falling into the cylinders. I used compressed air to blow all the crap out.
2) Drive the truck around until the engine is hot.
3) Once parked and ready, remove the sparkplug wires from each plug and hit each one again with compressed air. All the while trying not to burn the crap out of my hands
4) Remove all 8 sparkplugs and enjoy the 180 degree plugs
5) Block the throttle wide open
6) Detach the low voltage wire from the coil to prevent spark from reaching the distributor
7) Because I�ve got electronic fuel injection (EFI) I also disabled the fuel pump circuit
8) Test compression in each cylinder
a. Install the compression tool
b. Crank the engine over at least 7 times. Assuming the engine is healthy, the pressure should build up quickly with each successive stroke.
c. Record the highest PSI value for the cylinder
d. Repeat a-c for each cylinder
9) Retest compression with oil
a. Add 3 squirts of oil to the cylinder
b. Install the compression tool and repeat test by cranking 7 times and recording the highest value for the cylinder
********************
Here are my results�
# PSI w/o Oil PSI w/ Oil
1 153
2 133 160
3 150
4 158
5 153
6 150
7 156
8 160
Let me know what you think or see. My plan is to use this engine as the base for the rebuild. The donor truck also has a 351W, but that engine is much worse off- if I need a block I have an option, but I wouldn�t be surprised if it was already bored out 0.40�
At first glance the area surrounding the spark plugs was, uh, dirty (duh). There was quite a bit of loose debris that seemed to be a mix of rust, dirt, gravel, and oil. Before I removed the plug wires I got the compressor out and blew some of the garbage out, then took the plug wires off and blew the area out again with the plugs still in to get all the junk out of the spark plug hole before the plugs come out- don�t want anything falling into the cylinder (considered by most experts and novices alike to be �not good�).
So out came the plugs and, viola!
Plug #1 (front passenger side, top left in pic) came out pretty easily. What I saw when I got it out made me wonder why I wasn�t having more issues- lot�s of carbon and white power. Neither is great, but easily fixed by changing the plug. Plug #2 & #3 were absolute bitches to get out- the hoses for the smog pump made it really tough. #3 was the most alarming of all the plugs- it was noticeably moist with oil, not dripping, but the outside surrounding of the hole was more oily and the underside of the plug itself was misted with oil. Surprisingly #8 on the back drivers side was the most difficult to get out- it seemed that the plug was pointing back to the driver, but this was probably mostly due to the reach it took to get to it.
As you can see from the pictures of the plugs, replacements were clearly needed. Besides the full out replacement though, I think there are two interesting signs from the plugs (using my handy Haynes Repair Manual as a guide).
1) The oily deposits on plug 1-4 is suggestive of poor oil control. I�ll need to do a compression tests to get more information, but the possibilities include leaky valves (worn seats) or leaky piston rings. Either one (and even both) are possible given the mileage on her�
2) The white deposits on 5-7 suggest the engine is running hot. I�m not sure if this was due to the injector cleaner (strong possibility) or poor coolant (which I doubt), sticking valves, or ignition timing.
Before doing the compression test I got new plugs (can�t remember exactly what I go, but mid-line price point) gaped them and threw them in for a few weeks of light use. I figured it would be helpful to get some fresh data to see how bad some of the initial observations might really be. I also threw in a new distributor rotor but didn�t go too nuts since I knew I�m going to rebuild the engine pretty soon. All in all it did improve things a little, but there were still noticeable issues. The power was low, the engine burned oil under load and sounded �loose�. I�m guessing the mileage and leaky/hissing sounds are suggestive of serious wear on the valves, particularly the exhaust, and gaskets. As another excuse to get my hands dirty and do some digging I did a compression test on each cylinder. I�m hopeful you all don�t see any major issues below (e.g. cracked pistons).
Here�s some background for anyone like myself who is new to compression tests�
*********************
Testing the compression within each cylinder provides valuable information about the health of upper half of the engine, namely the cylinder heads [valves, value seats, valve springs, rocker arms], pistons [pistons, piston rings, cylinder wall wear] and associated gaskets. The general range of the compression pressure for a 351W engine, in PSI, is expected to fall between 150 and 120. The exact values don�t seem to be of particular importance however as long as the lowest compression value is greater than 75% of the highest.
It�s important to note that the engine should be at normal operating temperature for the test- in other words, it needs to be hot, and the battery needs to be FULLY charged since I�ll be doing a lot of cranking. All in all this means a great deal of fun while unscrewing sparkplugs, screwing in the compression tool and hopefully NOT burning my hands raw on the exhaust manifolds or other engine parts.
One note of honesty- I did get the engine up to temp and started doing the tests, but when I got to cylinder 2 & 3 (pain in the ***) I got so pissed between trying to get the farkin socket on the spark plugs and burning my hands/arms on the exhaust manifold that I let the engine cool down a bit. So, while the engine wasn�t cold, I wouldn�t say it wasn�t even close to �normal� operating temps.
Here are the general steps:
1) Carefully clean the area around each sparkplug before removing it to prevent dirt from falling into the cylinders. I used compressed air to blow all the crap out.
2) Drive the truck around until the engine is hot.
3) Once parked and ready, remove the sparkplug wires from each plug and hit each one again with compressed air. All the while trying not to burn the crap out of my hands
4) Remove all 8 sparkplugs and enjoy the 180 degree plugs
5) Block the throttle wide open
6) Detach the low voltage wire from the coil to prevent spark from reaching the distributor
7) Because I�ve got electronic fuel injection (EFI) I also disabled the fuel pump circuit
8) Test compression in each cylinder
a. Install the compression tool
b. Crank the engine over at least 7 times. Assuming the engine is healthy, the pressure should build up quickly with each successive stroke.
c. Record the highest PSI value for the cylinder
d. Repeat a-c for each cylinder
9) Retest compression with oil
a. Add 3 squirts of oil to the cylinder
b. Install the compression tool and repeat test by cranking 7 times and recording the highest value for the cylinder
********************
Here are my results�
# PSI w/o Oil PSI w/ Oil
1 153
2 133 160
3 150
4 158
5 153
6 150
7 156
8 160
Let me know what you think or see. My plan is to use this engine as the base for the rebuild. The donor truck also has a 351W, but that engine is much worse off- if I need a block I have an option, but I wouldn�t be surprised if it was already bored out 0.40�
#3
12-16-2012, 11:11 AM
Join Date: Dec 2010
Location: Carlisle
Posts: 221
Likes: 0
Received 0 Likes
on
0 Posts
So I’ve had my two trucks for a full summer and managed to have some fun with both Betsy (donor) and Ugly Betty. At this point I am really happy with the F350 (Betsy) drive train- 4wd and the 4.10 axles are so much different than UBs 2wd 3.55 EVEN with a worse engine. At one point I was putting Betsy through her paces and hauling several large loads of mulch for the landscaping- the old tired truck did her job for the most part. At one point she left me stuck in the back yard while I was dumping the mulch, but if you have to get stuck, your back yard has to be at or near the top of the list! Here’s the thread where I was looking for some help:
https://www.ford-trucks.com/forums/1...isengaged.html
Anyhow, over the Thanksgiving break I started doing some general digging on Betsy to fix a few things, like the driver’s side window that wouldn’t roll up without pulling the window pane (the guide wasn’t attached to the door) and fixing the door latch, which wouldn’t open. I’m sure you can figure out the rest- once you start looking and poking, it’s a little tough to pull back- I reached the point where I’ve waited long enough and just started the tear down.
Before I jump into the tear down itself I think it makes sense to discuss the donor/swap approach. One of the main things I want the Betsy for is the 4WD components. For those of you familiar with these trucks you know that there are two different versions of ZF5 transmissions, one for 2WD and one for 4WD. The innards of the trannies are the same- it’s the output shaft length and flange that differ…

Betsy had a hard life, at least in the recent past, as a plow truck. The resulting wear and tear on her ZF5 wasn’t light. UBs tranny however was well cared for and used primarily for light horse trailer hauling on the highway. So I don’t want to simply swap a beat plow truck tranny out when I’ve got a solid ZF5. So my thought in the rebuild is to separate the trucks at the output shaft of the ZF5s. Everything forward from the output shaft and flange will essentially be UB, everything behind this point will be Betsy. This pic should give you the idea.
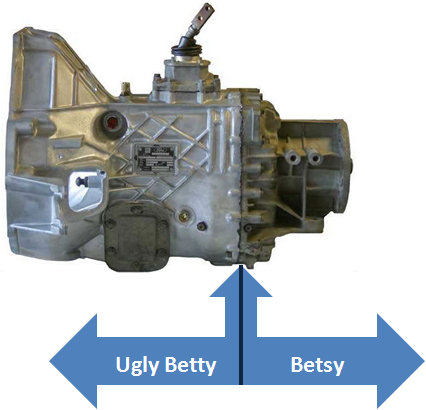
One thing of note- the ZF5 tranny is pressed together at this seam AND all the innards are ‘attached’ to the output flange. I’m pretty adventurous, but I’m not even going to attempt to mess with that work. Once I get both trucks torn down I’ll walk both transmissions over to a local shop and have them do the work. It shouldn’t be too hard (read expensive), they’ll be able to inspect the transmissions while they are at it, and I’ll come away with two functional transmissions just the way I want them.
So, with the above in mind, I needed to tear down Betsy to get my frame and drive train rebuilt and donated before I can start work on the top end of the truck… And now the tear down!
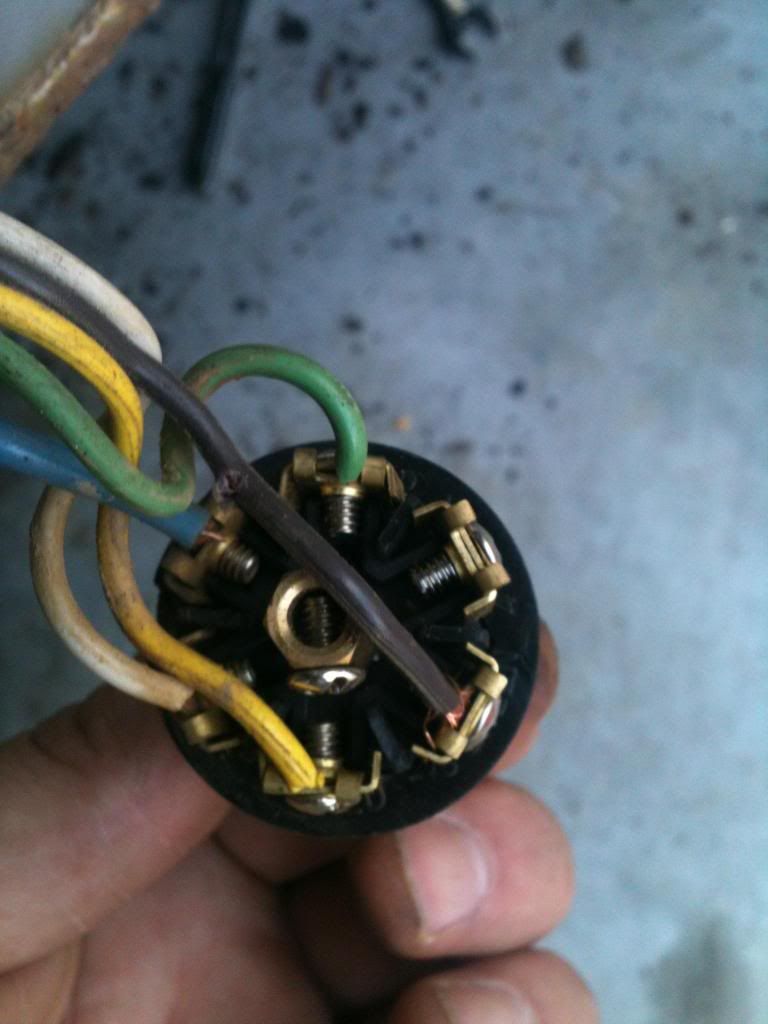
I started with the back end, bumper, trailer hitch and bed. The bumper came off super easy because two of the bolts were gone leaving only 1 per side. I had to remove the trailer plug before taking the bumper off, which involved removing all the wires from the plug, sliding them out of the bumper mount, removing the mount from the bumper and reassembling the plug, mount and wires off of the bumper. One question I have if for the trailer electrical plug blinkers- the wires are reversed, so when the trucks left blinker is on the trailers right is on. I was too lazy to put a multi-meter on it, so if someone can tell me what wires to switch I’d appreciate it (white is #1).
With bumper gone…

The passenger side of the bumper had a ‘stud’ of the bolt welded in place (shown), but the left just had a loose bolt held in place with a bit of rust.

The hitch came off pretty easily as well with nothing of great interest to show. Once the hitch was off it was time to focus on the bed- needless to say the location of the 6 bolts for the bed (3 on each side of the frame) makes for some challenging work. Adding to the mess was the state of the nuts…

I got the back two bolts, that were just inside the frame above the bumper, off with a slight bit of coaxing. The next two were pretty much dead above the rear axle and in a similar rusted state. So I crawled under the truck and contorted my 6’2” body to be able to get some leverage (thank God I had 4” of lift on the back end to work with). After about 10-15 minutes of awkward pulling and swearing I had an idea- since I’m not keeping the bed or the bolts why not just grind them off from the top. So, that’s how I got the last four off- with the grinder. It worked out pretty well, but I had to pretty much take the entire bolt head off to get it to break loose. After the first two I ended up just grinding the bed away from the bolts since there was less metal on the bed than the bolts. I didn’t have a spare set of arms to help get the bed off, so I drove Betsy into the back yard where I’m storing parts and tipped the bed off onto a pallet.
Of course when I got there and started moving the bed off I realized I forgot to detach the gas tank fill tube, so had to drive back up where my tools are and could see (it was dark by that point). And, since I was annoyed I didn’t think to put the break and reverse lights into the bed and ended up breaking the lights on the right because they were dangling below the bed… Anyhow, here’s where I ended up.
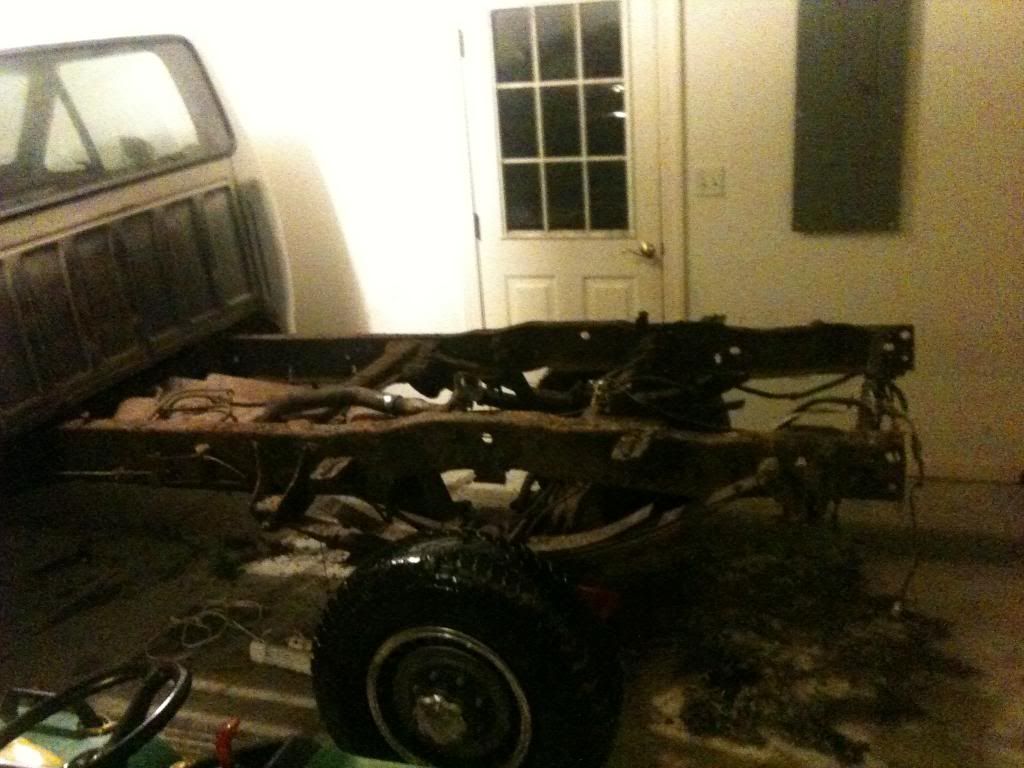
Funny thing, with all the banging I managed to lose a bit of rust from the frame and such which made a shadow kind of like someone with nasty dandruff. This pic is about 1/2 way done while there was still some daylight.

So, day 1 of the rebuild is done with about 3.5 hours of work. Only 600-800 more!
https://www.ford-trucks.com/forums/1...isengaged.html
Anyhow, over the Thanksgiving break I started doing some general digging on Betsy to fix a few things, like the driver’s side window that wouldn’t roll up without pulling the window pane (the guide wasn’t attached to the door) and fixing the door latch, which wouldn’t open. I’m sure you can figure out the rest- once you start looking and poking, it’s a little tough to pull back- I reached the point where I’ve waited long enough and just started the tear down.
Before I jump into the tear down itself I think it makes sense to discuss the donor/swap approach. One of the main things I want the Betsy for is the 4WD components. For those of you familiar with these trucks you know that there are two different versions of ZF5 transmissions, one for 2WD and one for 4WD. The innards of the trannies are the same- it’s the output shaft length and flange that differ…
Betsy had a hard life, at least in the recent past, as a plow truck. The resulting wear and tear on her ZF5 wasn’t light. UBs tranny however was well cared for and used primarily for light horse trailer hauling on the highway. So I don’t want to simply swap a beat plow truck tranny out when I’ve got a solid ZF5. So my thought in the rebuild is to separate the trucks at the output shaft of the ZF5s. Everything forward from the output shaft and flange will essentially be UB, everything behind this point will be Betsy. This pic should give you the idea.
One thing of note- the ZF5 tranny is pressed together at this seam AND all the innards are ‘attached’ to the output flange. I’m pretty adventurous, but I’m not even going to attempt to mess with that work. Once I get both trucks torn down I’ll walk both transmissions over to a local shop and have them do the work. It shouldn’t be too hard (read expensive), they’ll be able to inspect the transmissions while they are at it, and I’ll come away with two functional transmissions just the way I want them.
So, with the above in mind, I needed to tear down Betsy to get my frame and drive train rebuilt and donated before I can start work on the top end of the truck… And now the tear down!
I started with the back end, bumper, trailer hitch and bed. The bumper came off super easy because two of the bolts were gone leaving only 1 per side. I had to remove the trailer plug before taking the bumper off, which involved removing all the wires from the plug, sliding them out of the bumper mount, removing the mount from the bumper and reassembling the plug, mount and wires off of the bumper. One question I have if for the trailer electrical plug blinkers- the wires are reversed, so when the trucks left blinker is on the trailers right is on. I was too lazy to put a multi-meter on it, so if someone can tell me what wires to switch I’d appreciate it (white is #1).
With bumper gone…
The passenger side of the bumper had a ‘stud’ of the bolt welded in place (shown), but the left just had a loose bolt held in place with a bit of rust.
The hitch came off pretty easily as well with nothing of great interest to show. Once the hitch was off it was time to focus on the bed- needless to say the location of the 6 bolts for the bed (3 on each side of the frame) makes for some challenging work. Adding to the mess was the state of the nuts…
I got the back two bolts, that were just inside the frame above the bumper, off with a slight bit of coaxing. The next two were pretty much dead above the rear axle and in a similar rusted state. So I crawled under the truck and contorted my 6’2” body to be able to get some leverage (thank God I had 4” of lift on the back end to work with). After about 10-15 minutes of awkward pulling and swearing I had an idea- since I’m not keeping the bed or the bolts why not just grind them off from the top. So, that’s how I got the last four off- with the grinder. It worked out pretty well, but I had to pretty much take the entire bolt head off to get it to break loose. After the first two I ended up just grinding the bed away from the bolts since there was less metal on the bed than the bolts. I didn’t have a spare set of arms to help get the bed off, so I drove Betsy into the back yard where I’m storing parts and tipped the bed off onto a pallet.
Of course when I got there and started moving the bed off I realized I forgot to detach the gas tank fill tube, so had to drive back up where my tools are and could see (it was dark by that point). And, since I was annoyed I didn’t think to put the break and reverse lights into the bed and ended up breaking the lights on the right because they were dangling below the bed… Anyhow, here’s where I ended up.
Funny thing, with all the banging I managed to lose a bit of rust from the frame and such which made a shadow kind of like someone with nasty dandruff. This pic is about 1/2 way done while there was still some daylight.
So, day 1 of the rebuild is done with about 3.5 hours of work. Only 600-800 more!
#4
12-16-2012, 11:40 AM
Join Date: Dec 2010
Location: Carlisle
Posts: 221
Likes: 0
Received 0 Likes
on
0 Posts
Once the bed was off from Saturday�s work (that�s probably the easiest bang-for-the-buck thing on the truck) I wanted to shift my focus to the front end. While I was having some AM coffee I started inspecting my work from the previous day and poking around.
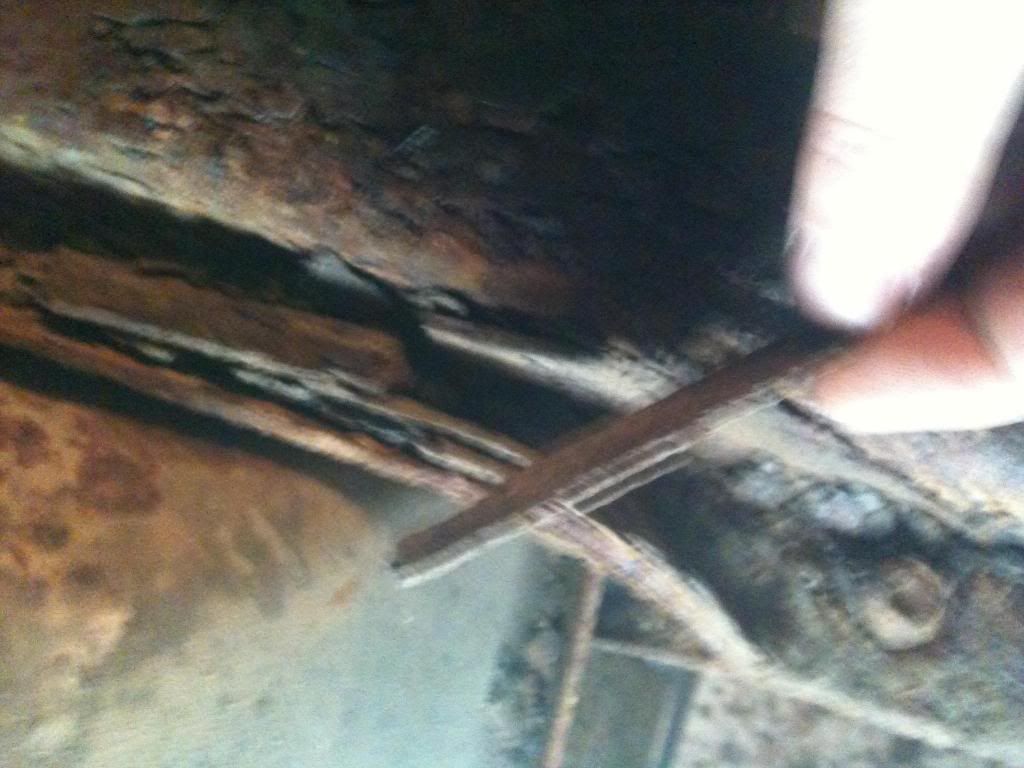
Two things of note jumped out at me- there�s a lot of thick scale and rust:
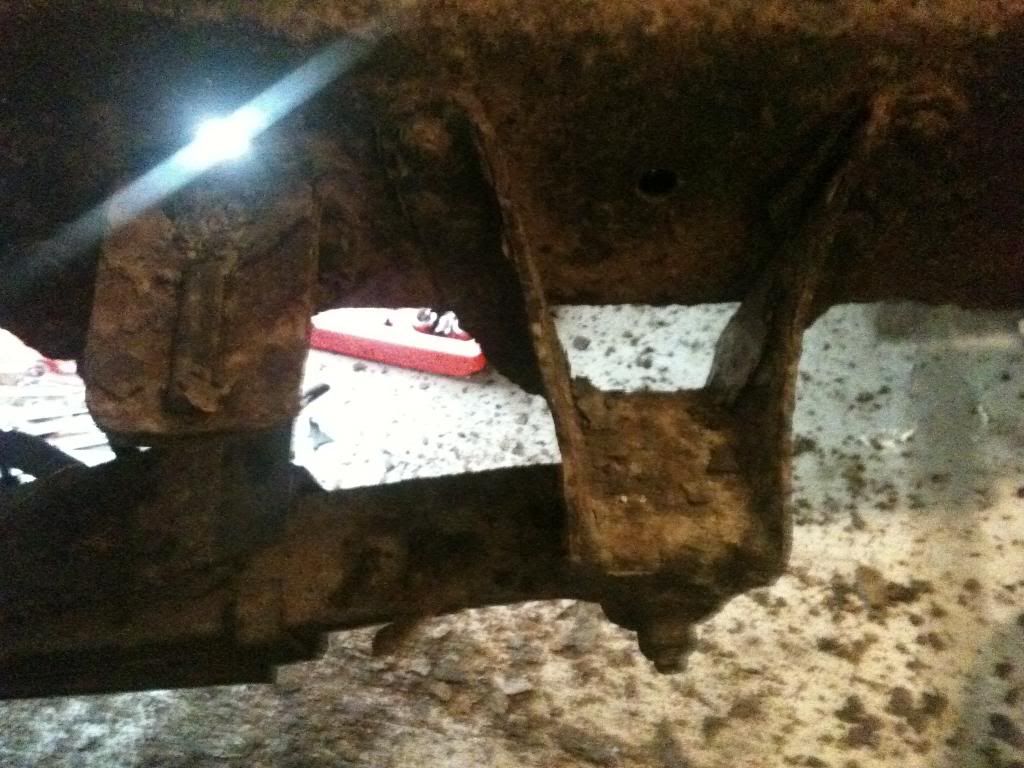

And two, as mentioned in the thread when I first got Betsy, I think I�ve got a new rear axle:
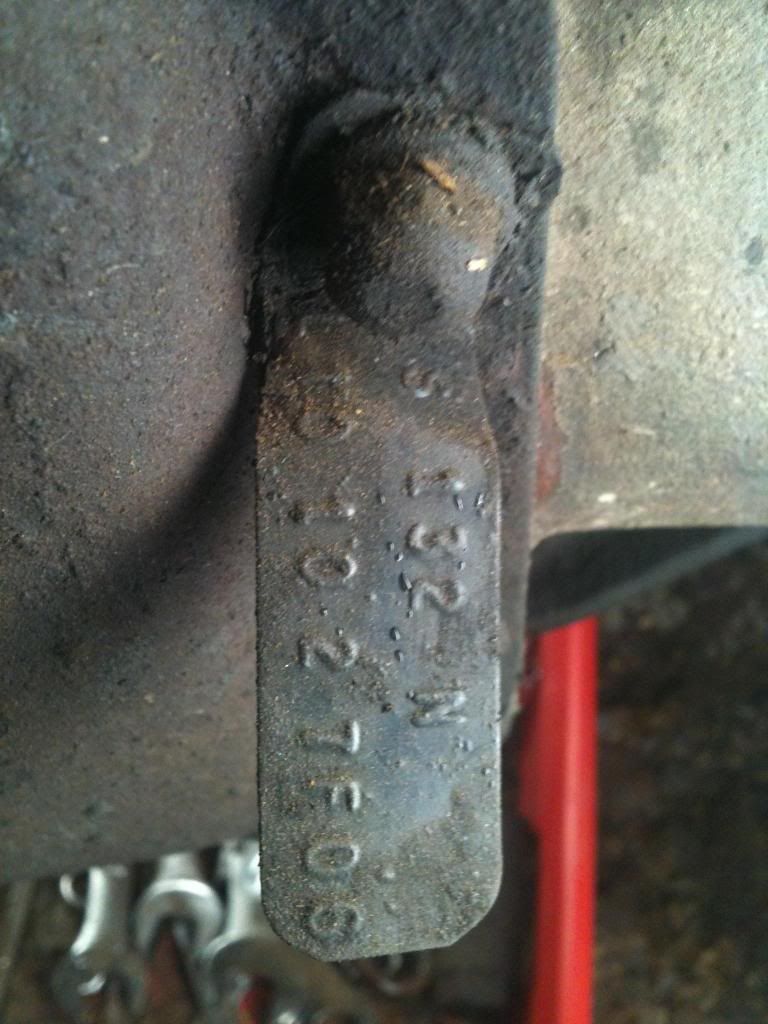
I�m pretty sure this confirms that I have a limited slip (the �L� that�s hard to read at the top) 4.10 ratio 10.25 axle, but anyone know the manufacture date? Thinking �7F06� might mean 2006�. In any event the rear axle appears to be in OUTSTANDING shape with little to no rust or exposure to the elements.
Two things of note jumped out at me- there�s a lot of thick scale and rust:
And two, as mentioned in the thread when I first got Betsy, I think I�ve got a new rear axle:
I�m pretty sure this confirms that I have a limited slip (the �L� that�s hard to read at the top) 4.10 ratio 10.25 axle, but anyone know the manufacture date? Thinking �7F06� might mean 2006�. In any event the rear axle appears to be in OUTSTANDING shape with little to no rust or exposure to the elements.
#5
12-16-2012, 12:26 PM
Join Date: Dec 2010
Location: Carlisle
Posts: 221
Likes: 0
Received 0 Likes
on
0 Posts
I originally intended to start taping/labeling connections and what not, but again ended up turning wrenches! I started by taking the hood off, which turned out to be kind of a pain by myself because the hood is large enough to be awkward to handle and you can�t really take it off without it being open with a lot of it�s weight on the bolts being removed. I removed one bolt from each side (there are two per side) and then loosened the remaining bolts until they were almost off. Then I closed the hood as much as I could with my arm still under the hood to remove the bolts. It worked pretty well and I didn�t end up dropping the hood on my hand or anything similarly stupid. What I did forget to do was remove the ground wire by the passenger side bracket before the structural bolts- kind of painful after the fact, but not a huge deal. Once detached I carried it off to the �bone pile� in the back where I put the bed.
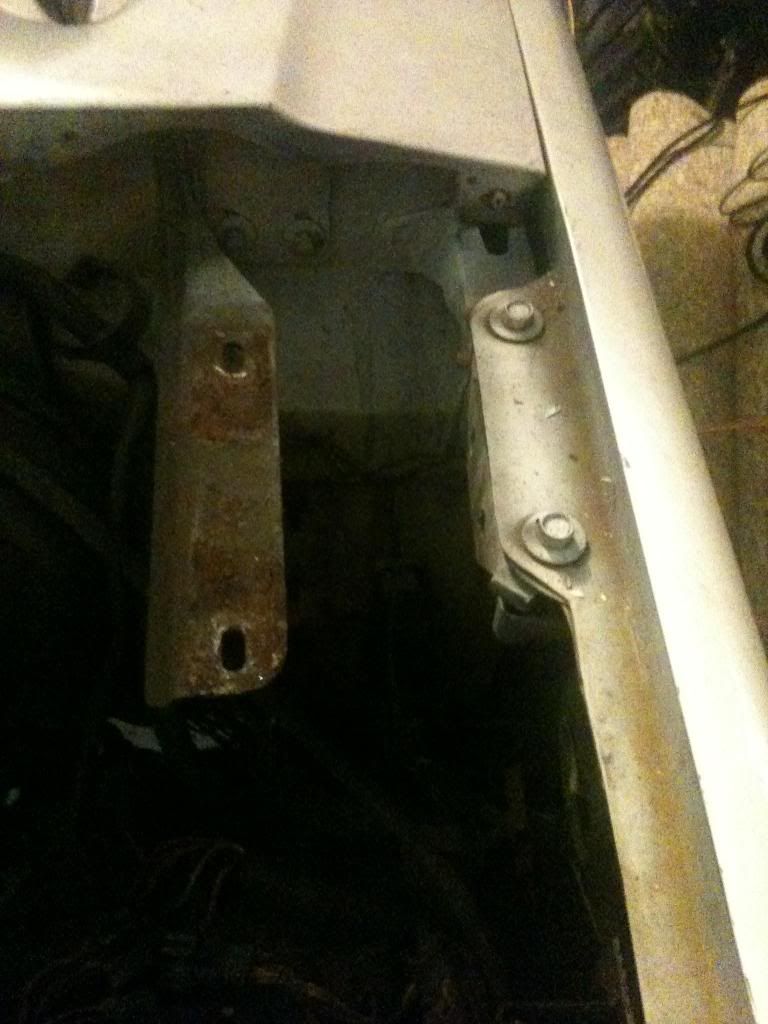
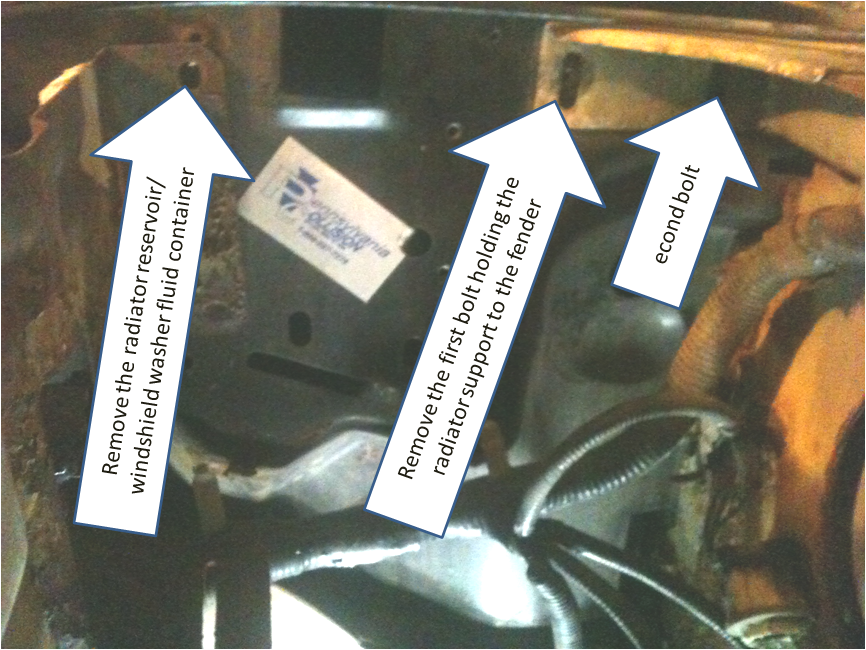
Next was the driver�s side fender. From the reading I�ve done on the site I expected to have about 6-7 bolts to remove, two main bolts up by the hood bolts (you can see them in the pictures above, just to the outside of the hood bolts), one in front of the door jam, and a few up in the headlight/corner area. The main bolts by the hood bracket were straight forward if not a little stubborn. The front corner required a bit of additional work to get behind the radiator overflow and washer fluid unit� Still no big deal.
The bolt in front of the doorjam just above the bottom hinge however was a royal pain and I couldn�t get it to budge. Turns out the mount attached to the bolt was broken and coming off anyhow, so rather than get too pissed at a bolt I just finished breaking the mount. If anyone knows a good way to get these bolts off let me know, I still have to get the passenger side fender off!

Once those bolts were removed I unscrewed the wheel well arch and remove it. It was kind of funny to see the wiring hanging there like the arch was still there. I took a pic looking up.
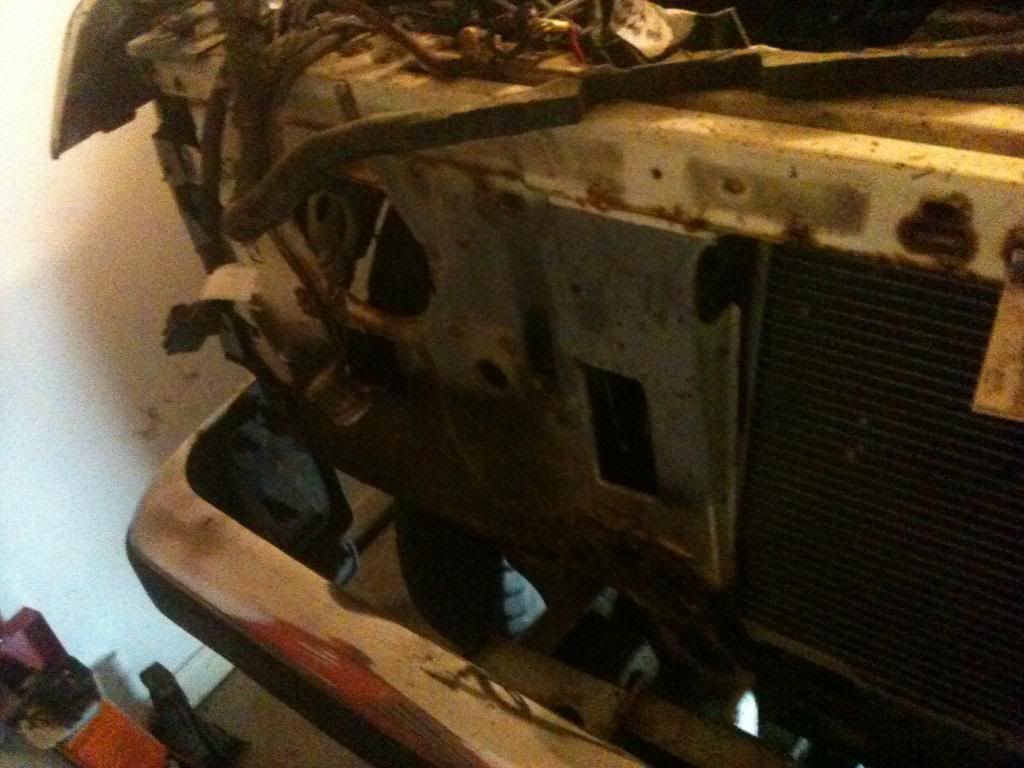
The biggest pain after that was getting the headlights off because there is some stupid little curved bracket behind both lights that has riveted bolts that hold the light fixtures to the radiator mount. Normally I wouldn�t care since the top bolt snapped off the bracket, but the bottom bolt on the drivers side started to spin and I had no way to get in there and cut, grind, or hold it still to get it off. After a bit of tinkering I ended up cracking the headlight assembly a little and could slide the assembly off past the bolt. Talk about stupid designs. On the passenger side both bolts started spinning and I had to break the mount off as and still ended up cracking the headlight assembly a bit. I didn�t grab any pictures since I guess I was too annoyed and pissed to stop and think about it. Anyhow, here�s where I ended up after about 5 hours of messing around on Sunday.

The front grill and a few associated parts came off without much work, so I didn�t take pictures outside of showing them stored on the back of the truck at the end of the day. There are a few small screws that go through both the radiator mount and the fender which I also took off, but don't think they warrant a picture.
I�ve got some videos as well, but am not sure how to post them or even if it�s possible. If someone knows how to do it, let me know� Next weekend I want to get the other fender off, the doors, strip the cab down a bit and start preping the engine bay by draining the radiator and marking connections.
Next was the driver�s side fender. From the reading I�ve done on the site I expected to have about 6-7 bolts to remove, two main bolts up by the hood bolts (you can see them in the pictures above, just to the outside of the hood bolts), one in front of the door jam, and a few up in the headlight/corner area. The main bolts by the hood bracket were straight forward if not a little stubborn. The front corner required a bit of additional work to get behind the radiator overflow and washer fluid unit� Still no big deal.
The bolt in front of the doorjam just above the bottom hinge however was a royal pain and I couldn�t get it to budge. Turns out the mount attached to the bolt was broken and coming off anyhow, so rather than get too pissed at a bolt I just finished breaking the mount. If anyone knows a good way to get these bolts off let me know, I still have to get the passenger side fender off!
Once those bolts were removed I unscrewed the wheel well arch and remove it. It was kind of funny to see the wiring hanging there like the arch was still there. I took a pic looking up.
The biggest pain after that was getting the headlights off because there is some stupid little curved bracket behind both lights that has riveted bolts that hold the light fixtures to the radiator mount. Normally I wouldn�t care since the top bolt snapped off the bracket, but the bottom bolt on the drivers side started to spin and I had no way to get in there and cut, grind, or hold it still to get it off. After a bit of tinkering I ended up cracking the headlight assembly a little and could slide the assembly off past the bolt. Talk about stupid designs. On the passenger side both bolts started spinning and I had to break the mount off as and still ended up cracking the headlight assembly a bit. I didn�t grab any pictures since I guess I was too annoyed and pissed to stop and think about it. Anyhow, here�s where I ended up after about 5 hours of messing around on Sunday.
The front grill and a few associated parts came off without much work, so I didn�t take pictures outside of showing them stored on the back of the truck at the end of the day. There are a few small screws that go through both the radiator mount and the fender which I also took off, but don't think they warrant a picture.
I�ve got some videos as well, but am not sure how to post them or even if it�s possible. If someone knows how to do it, let me know� Next weekend I want to get the other fender off, the doors, strip the cab down a bit and start preping the engine bay by draining the radiator and marking connections.
#6
12-16-2012, 12:30 PM
Join Date: Dec 2010
Location: Carlisle
Posts: 221
Likes: 0
Received 0 Likes
on
0 Posts
Quick update, most of the dis-assembly work above was done last weekend, 12/8 and 12/9. I got stuck working this weekend out of state and hence wasn't able to get the other fender off or continue the work. I'm hoping to be back mid week and be able to chip away over the Christmas break.
Since I couldn't work on the truck I took the time to post up the pictures and get my thread going instead though!
Since I couldn't work on the truck I took the time to post up the pictures and get my thread going instead though!
#7
12-20-2012, 03:50 PM
Join Date: Dec 2010
Location: Carlisle
Posts: 221
Likes: 0
Received 0 Likes
on
0 Posts
Gearing up for the holiday's when I can continue my tear-down. Over the week I did some digging on the axle tag to confirm what I have:
I used a two different sites:
Axle model decoder, which I guess is sometimes erroneous. It matched my expectations, so I guess it worked for me...
Ford Rear Axle Assembly Identification - Page 10 - FORDification.com
And the following site gave me the date decoder. I don't have the best warm and fuzzy about this site since the codes didn't seem to match what my tag has and might be more general Ford axles...
Ford Ranger Rear Axles - The Ranger Station
From the two sites I found that the top row, "S132N", indicates that
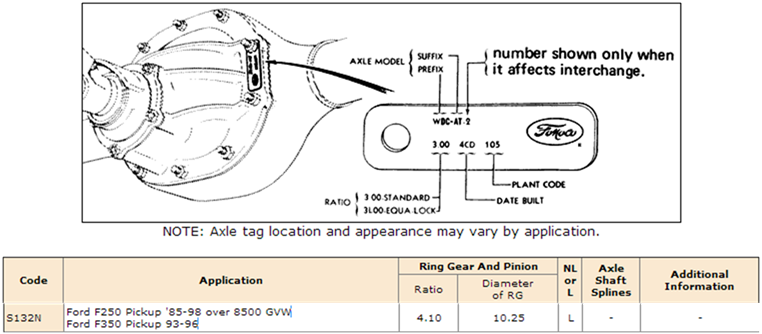
The bottom row "L10 10 2 7F06" means that:
"L10" - 4.10 limited slip. I expected to see 4L10, but I guess the 4 is under the bolt.
"10 2" means that the ring gear diameter is a 10.2" (10.25 to be more precise)
"7F06" means the axle was made in Y/M/DD, or 'x7, July (A=Jan, B=Feb, C=March, etc.) 06. I'm not sure the decade in front of the year though, but it's either a '97 or an '07. Since 10.25" Sterlings are still in production (per the Wiki Sterling 10.5 axle - Wikipedia, the free encyclopedia) I'm going to assume I've got an axle that was made in 2007 since I can still see the wax pencil marks on it and it looks SO good. In other words I think my axle was made July 6, 2007.
I'm looking forward to continuing the tear down tomorrow...
I used a two different sites:
Axle model decoder, which I guess is sometimes erroneous. It matched my expectations, so I guess it worked for me...
Ford Rear Axle Assembly Identification - Page 10 - FORDification.com
And the following site gave me the date decoder. I don't have the best warm and fuzzy about this site since the codes didn't seem to match what my tag has and might be more general Ford axles...
Ford Ranger Rear Axles - The Ranger Station
From the two sites I found that the top row, "S132N", indicates that
The bottom row "L10 10 2 7F06" means that:
"L10" - 4.10 limited slip. I expected to see 4L10, but I guess the 4 is under the bolt.
"10 2" means that the ring gear diameter is a 10.2" (10.25 to be more precise)
"7F06" means the axle was made in Y/M/DD, or 'x7, July (A=Jan, B=Feb, C=March, etc.) 06. I'm not sure the decade in front of the year though, but it's either a '97 or an '07. Since 10.25" Sterlings are still in production (per the Wiki Sterling 10.5 axle - Wikipedia, the free encyclopedia) I'm going to assume I've got an axle that was made in 2007 since I can still see the wax pencil marks on it and it looks SO good. In other words I think my axle was made July 6, 2007.
I'm looking forward to continuing the tear down tomorrow...
Trending Topics
#8
12-20-2012, 05:39 PM
Join Date: Dec 2010
Location: Carlisle
Posts: 221
Likes: 0
Received 0 Likes
on
0 Posts
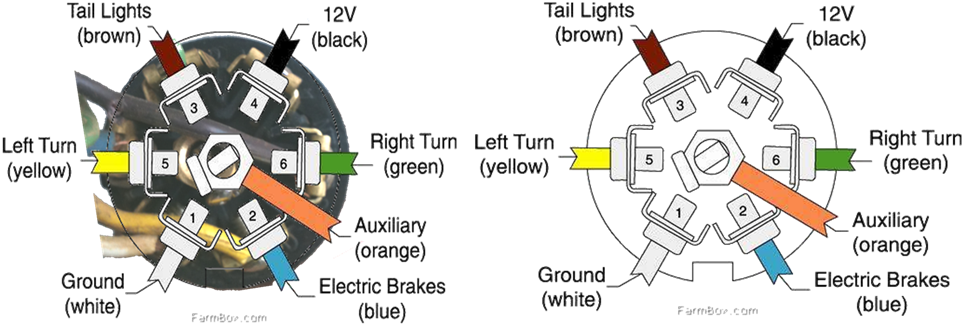
I also had some time to dig up some information on the trailer hitch electrical connection. I found a great diagram over at powerstroke.org (oh so close, but I'm not a diesel) that is to the right of this figure. Looks like I need to switch the black and blue wires on my rig (which should be green and yellow). Ever so slight problem is that the wires on my setup aren't exactly 'spec'...
#10
12-20-2012, 06:17 PM

#11
12-20-2012, 06:31 PM
Fleet Owner
#12
12-20-2012, 06:53 PM
Join Date: Dec 2010
Location: Carlisle
Posts: 221
Likes: 0
Received 0 Likes
on
0 Posts
Yep, I've accepted that the 'grunt' of Ugly Betty v2 will be a full F350 4WD, 4.10 axles, springs, frame and such (formerly known as Betsy). But the good, well maintained parts of the F250 Lariat (ZF5, 351W, interior and upper body) will be what I used to look at...
Kind-a nice to think my long-passed grandma sat on the bench and my dad shifted the same ZF5 stick more times than can be counted. It'll be fun to get the truck I would have built with the history behind it.
Kind-a nice to think my long-passed grandma sat on the bench and my dad shifted the same ZF5 stick more times than can be counted. It'll be fun to get the truck I would have built with the history behind it.
#14
12-21-2012, 08:44 AM
Join Date: Dec 2010
Location: Carlisle
Posts: 221
Likes: 0
Received 0 Likes
on
0 Posts
Turns out I'll be spending most of the afternoon in school with the kids at their holiday X-mas parties! Wrench turning will have to wait until late in the day...
Thanks- guess some of those �office skills� can be handy with the rebuild after all!
I drove Betsy (intended donor) around for a while and agree that she not only looks better, but has some much stronger parts. Her engine is kicked though, making it even more interesting that she pulled much better than UB- I think that comes down to the 3.55 rear vs. a 4.10 rear though. Interestingly, someone spent a LOT of money on new body panels- everything but the cab and bed appear to be after-market or replacement parts. The replacement panels are cheap and flimsy too- so I�ll use UBs thicker body parts where I can.
Hmm. Guess I�ll have think about the best/easiest way to get �er done. The 4WD ZF5 definitely needs attention- second gear misses and it�s pretty loose (plowing used second gear a lot I guess). I�d rather not pay for two tranny�s to be rebuilt- I think I�m seeing some wisdom in your words Brad�
Thanks- guess some of those �office skills� can be handy with the rebuild after all!
Hmm. Guess I�ll have think about the best/easiest way to get �er done. The 4WD ZF5 definitely needs attention- second gear misses and it�s pretty loose (plowing used second gear a lot I guess). I�d rather not pay for two tranny�s to be rebuilt- I think I�m seeing some wisdom in your words Brad�
#15
12-23-2012, 03:08 PM
Join Date: Dec 2010
Location: Carlisle
Posts: 221
Likes: 0
Received 0 Likes
on
0 Posts
The tear-down continued yesterday. I spend about 8 hours on it, with about 4 hours spent wasting time on an unbelievably stubborn snow plow mount. I ended up grinding several of the bolts off since I don't have a torch. I also don't have a lot of options on hand to handle stubborn 24 mm bolts- maybe Santa will bring me a breaker bar for Christmas!
Anyhow, for the components of interest, I started with the radiator mounts on the frame since most of the smaller attachments were removed during the last outing. I drained out the radiator first and got about 1.5 gallons of relatively good looking (green with little rust) antifreeze. Not sure what I expected, but I guess having good antifreeze is a bit important for a plow truck. I used a large ~2 gallon rectangular Tupperware (didn't tell the wife though) container to catch it- it was super handy to have a wide container since the antifreeze ran all over the plow mount and then down- I still managed to make a little mess though. Once the radiator was out it was time to start some wrench turning! Unfortunately I don't have a lot of larger deep-well sockets around, so I figured I'd just grind the extraneous 1" or so of bolt off and use a normal socket. That worked like a charm until I couldn't get the nut to break loose. So plan B involved splitting the nut with the grinder and then banging it in half. It was a bit tough working such a tight space though and I wouldn't recommend doing it this way if you want to keep the radiator mount. Mine was almost completely rotted out, so making space wasn't exactly a problem for me.

I'm not sure why, or if this is standard, but I had ground connections on both sides of the radiator mount on the inside bottoms near the frame. Seems a little overkill, but I guess it doesn't hurt much to be safe. Anyhow, I thought the drivers side radiator mount was hard until I hit the passenger side. Not really, because the entire mount was rusted through the the radiator mount came right out with a little pull...

After looking at it for a sec I think I'll be ok with a little bondo to get it back together- I just need to get the rest of the mount off the radiator... (for those of you who don't know me, I'm kidding about the bondo. I'm getting a new mount)
Next was the front bumper. Before I had the front clip off, I wasn't sure what bolts were for the front bumper and the plow- once the clip was off however I could see much better and realized that the bumper was only held on by four bolts. They came off pretty easily...
There was one little snag with the bumper though- I couldn't figure out why I couldn't get the wrench on a nut to hold it still while I cranked with the socket. That also became clear once I had it off (below). Be forewarned if you have an old truck that was craftily maintained by someone with a welder- you too might just find similar things (for the record I NEVER do anything like that... Uh, I mean rarely).
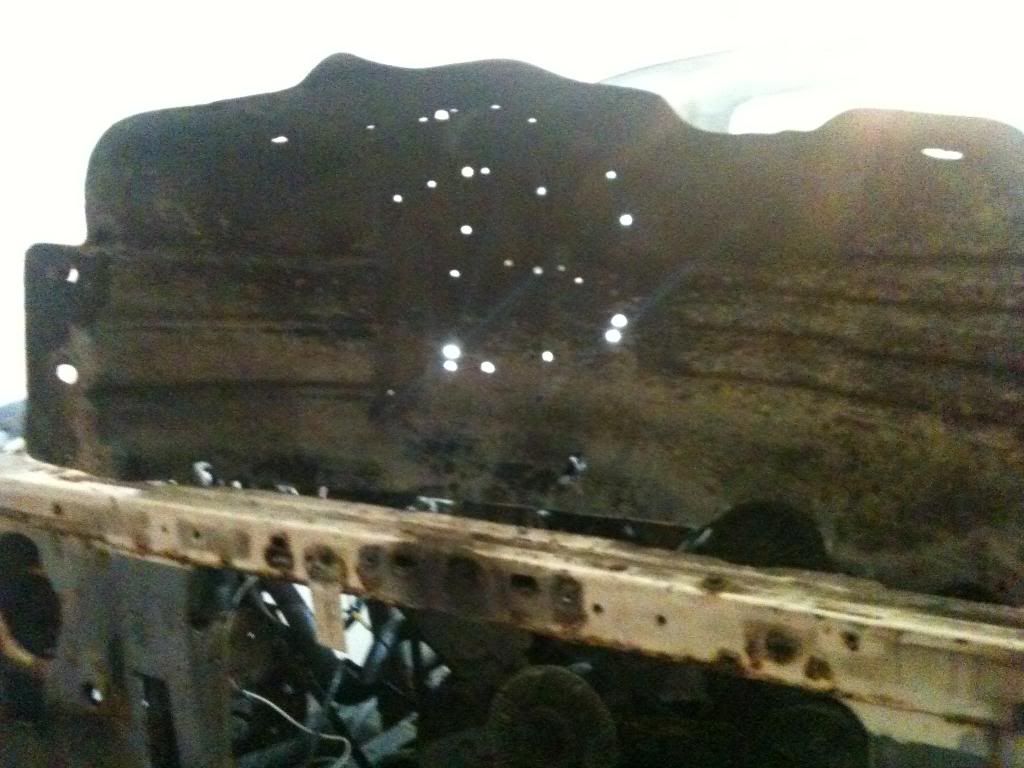
Next to the passenger wheel well. Makes sense that it would be just like the drivers side right? Uh no. Every time I went to get the thing out there was another bolt or fastner holiding it in place. Seriously it got really annoying! Took this picutre just to illustrate the point. And NO, I didn't hit it with a load of buck-shot...
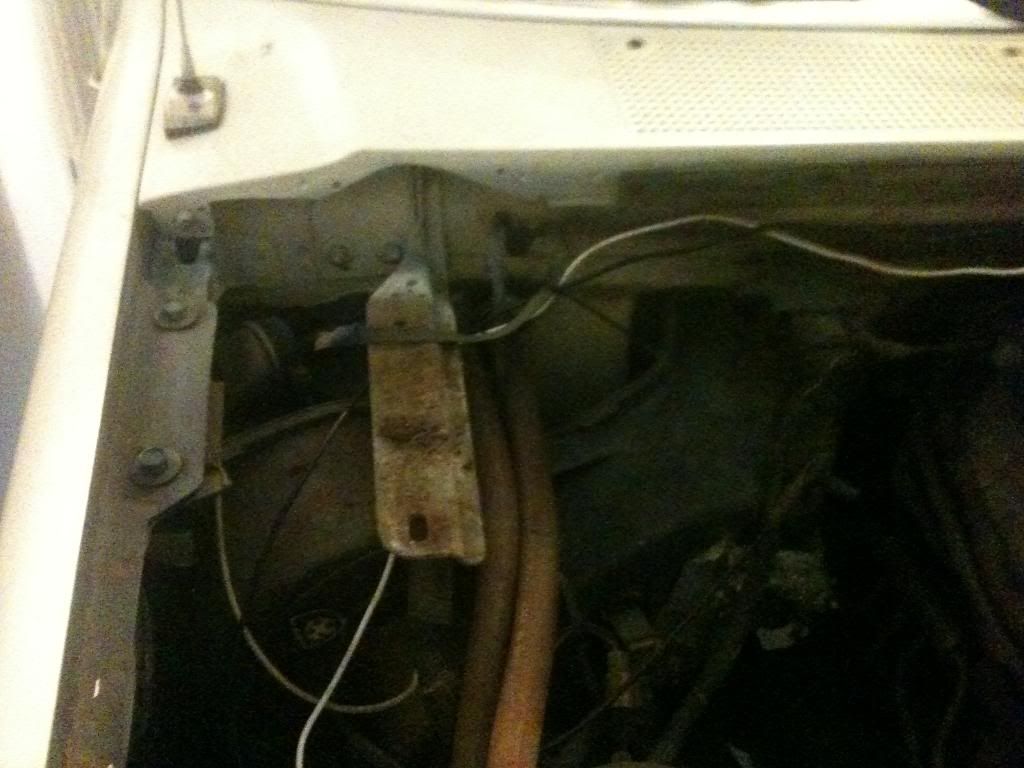
I had to get the battery and box out as well, and while un-attaching it came across this little item- anyone know what it is? It's got vacuum hoses and electrical connections and sits just below the battery box on the right-hand side when looking onto the engine bay...

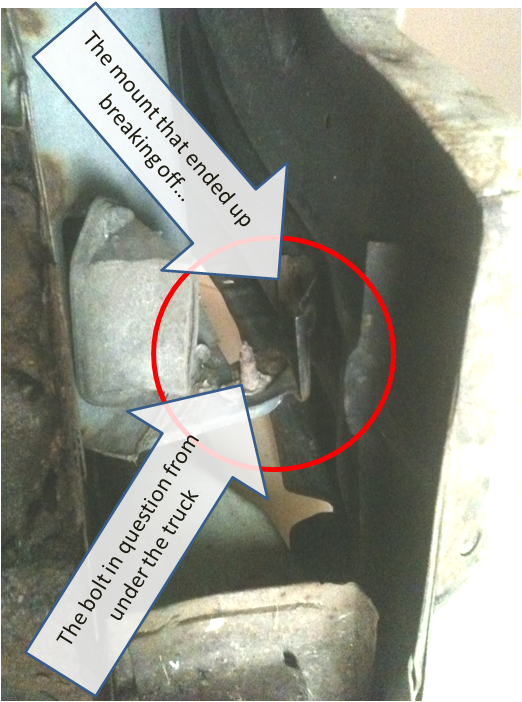
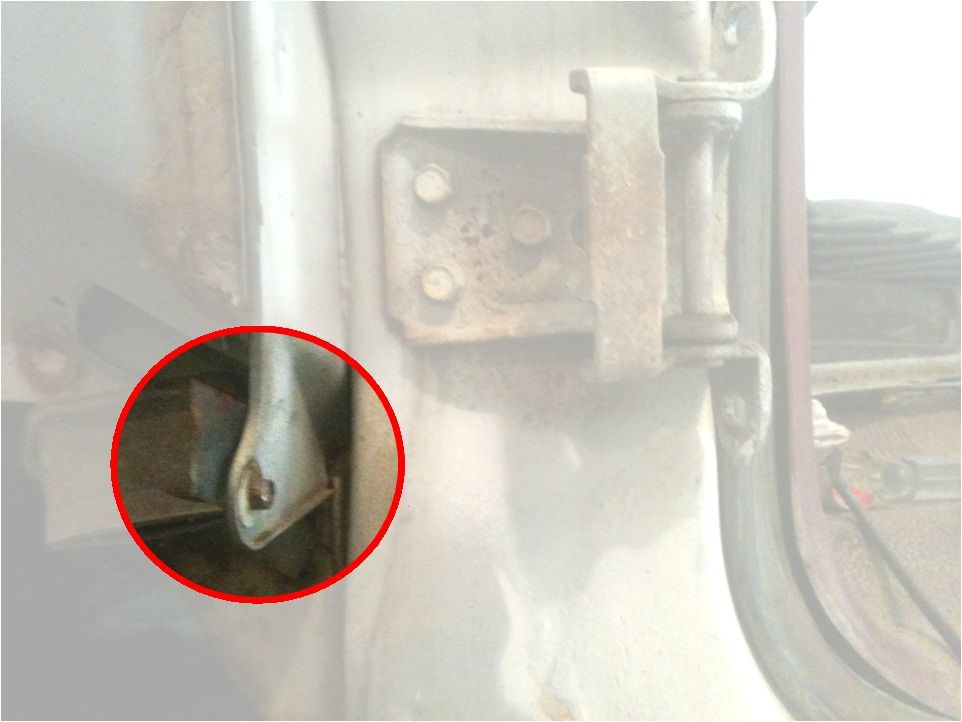
Anyhow, I think I've figured out the best way to get that stubborn front fender bolt off that is behind/in-front of the doors- TAKE THE DOOR OFF! The doors are only held on by four bolts (electrical connections as well) and once out you have really easy access to the bolt in question. The following picture shows the point...
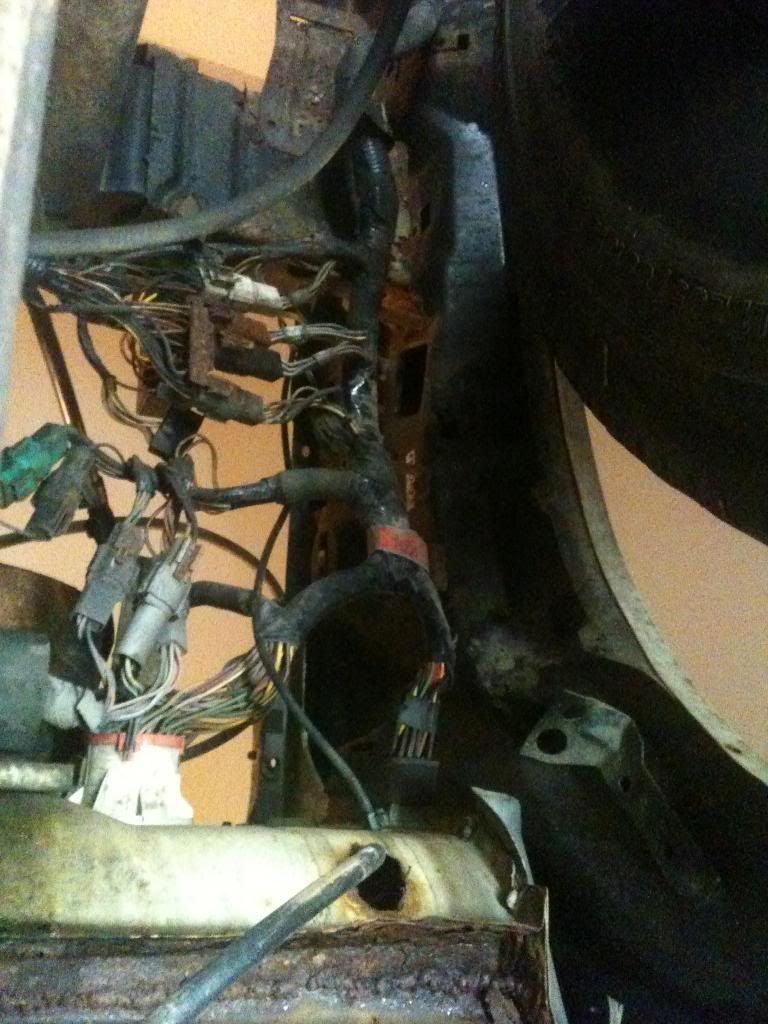
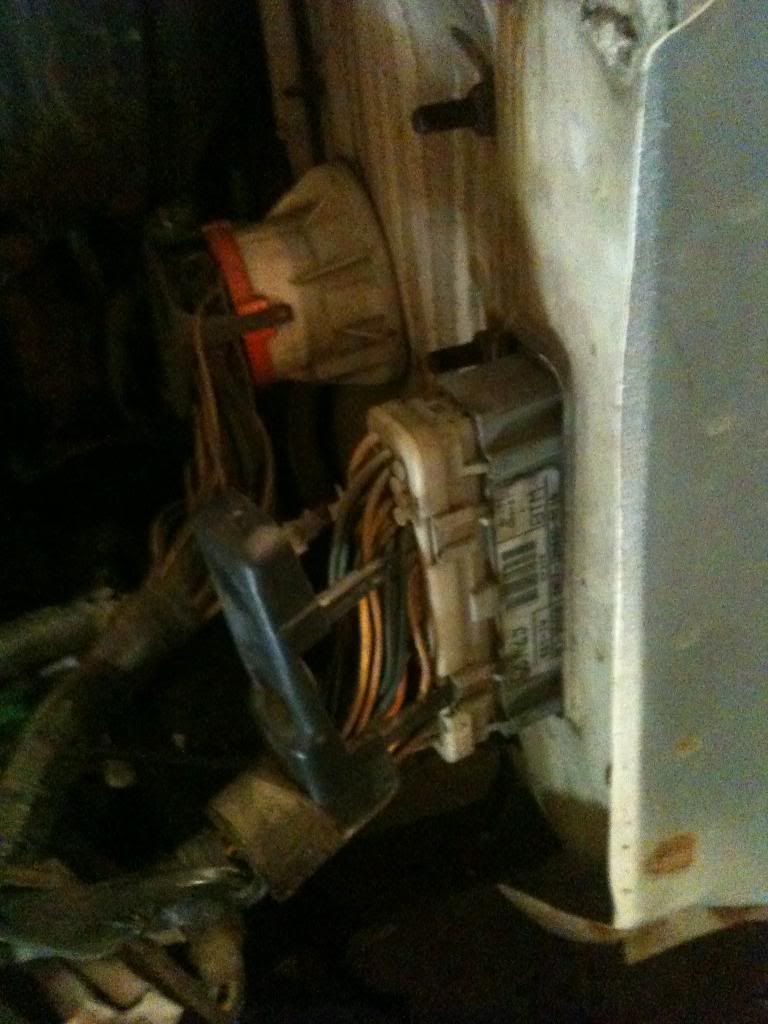
I marked off most of the wiring harness on 12/09 with masking tape and a sharpie marker, so once the fender was off I just unplugged the connectors. One thing I didn't expect was that the two main connectors to the harness would be attached with bolts, which needed to be unscrewed and then the connectors just popped out. Here's a pic of the two connectors that are just behind the drivers side door.
Anyhow, the doors came off and then I shifted focus to the cab for the remainder of the day. I got the bench out (four bolts with a little to-do on the passenger front side) and moved leading me to pretty much where I stand right now...

Anyhow, for the components of interest, I started with the radiator mounts on the frame since most of the smaller attachments were removed during the last outing. I drained out the radiator first and got about 1.5 gallons of relatively good looking (green with little rust) antifreeze. Not sure what I expected, but I guess having good antifreeze is a bit important for a plow truck. I used a large ~2 gallon rectangular Tupperware (didn't tell the wife though) container to catch it- it was super handy to have a wide container since the antifreeze ran all over the plow mount and then down- I still managed to make a little mess though. Once the radiator was out it was time to start some wrench turning! Unfortunately I don't have a lot of larger deep-well sockets around, so I figured I'd just grind the extraneous 1" or so of bolt off and use a normal socket. That worked like a charm until I couldn't get the nut to break loose. So plan B involved splitting the nut with the grinder and then banging it in half. It was a bit tough working such a tight space though and I wouldn't recommend doing it this way if you want to keep the radiator mount. Mine was almost completely rotted out, so making space wasn't exactly a problem for me.
I'm not sure why, or if this is standard, but I had ground connections on both sides of the radiator mount on the inside bottoms near the frame. Seems a little overkill, but I guess it doesn't hurt much to be safe. Anyhow, I thought the drivers side radiator mount was hard until I hit the passenger side. Not really, because the entire mount was rusted through the the radiator mount came right out with a little pull...
After looking at it for a sec I think I'll be ok with a little bondo to get it back together- I just need to get the rest of the mount off the radiator... (for those of you who don't know me, I'm kidding about the bondo. I'm getting a new mount)
Next was the front bumper. Before I had the front clip off, I wasn't sure what bolts were for the front bumper and the plow- once the clip was off however I could see much better and realized that the bumper was only held on by four bolts. They came off pretty easily...
There was one little snag with the bumper though- I couldn't figure out why I couldn't get the wrench on a nut to hold it still while I cranked with the socket. That also became clear once I had it off (below). Be forewarned if you have an old truck that was craftily maintained by someone with a welder- you too might just find similar things (for the record I NEVER do anything like that... Uh, I mean rarely).
Next to the passenger wheel well. Makes sense that it would be just like the drivers side right? Uh no. Every time I went to get the thing out there was another bolt or fastner holiding it in place. Seriously it got really annoying! Took this picutre just to illustrate the point. And NO, I didn't hit it with a load of buck-shot...
I had to get the battery and box out as well, and while un-attaching it came across this little item- anyone know what it is? It's got vacuum hoses and electrical connections and sits just below the battery box on the right-hand side when looking onto the engine bay...
Anyhow, I think I've figured out the best way to get that stubborn front fender bolt off that is behind/in-front of the doors- TAKE THE DOOR OFF! The doors are only held on by four bolts (electrical connections as well) and once out you have really easy access to the bolt in question. The following picture shows the point...
I marked off most of the wiring harness on 12/09 with masking tape and a sharpie marker, so once the fender was off I just unplugged the connectors. One thing I didn't expect was that the two main connectors to the harness would be attached with bolts, which needed to be unscrewed and then the connectors just popped out. Here's a pic of the two connectors that are just behind the drivers side door.
Anyhow, the doors came off and then I shifted focus to the cab for the remainder of the day. I got the bench out (four bolts with a little to-do on the passenger front side) and moved leading me to pretty much where I stand right now...