
My Hutch mod justification
#1
 11-06-2012, 02:47 PM

My Hutch mod justification
EDIT: please read the the entire thread, as there have been several reccomendations and changes that may be valuable to you when performing this mod. Examples are how to undo the connector at the fuel pump, different filter options, fuel pump inlet size, etc...
Ok, I decided to tackle the Hutch mod this past weekend. It was one of those mods that I read and read and read up on, and I learned a lot about the fuel system in the process. I wasn't really sure that Gus had the crackle noise, and didn't really have a good way to gauge it either. There were 2 factor that helped me decide to go ahead and do it anyway:
1) I'm going to start being very diligent in recording and calculating fuel mileage, rather than "estimating" mileage off of the lie-O-meter. This is partly to see how Gus is actually performing economically, and also to evaluate the different economy of various tunes. In order to properly calculate mileage, I needed to complete the harpoon mod, which requires removing the fuel pickup.
2) Gus is sitting at just over 155K miles, which by rough calculation and rounding is 11000 gallons worth of diesel. That's a lot of diesel running through the screens on the pickup inside the tank. Surely it's worth dropping the tank to check.
Since checking the screens in the tank and performing the harpoon mod require the same work, I might as well prepare to do the Hutch mod in the process.
So here we go: I chose to put the pieces together myself, and followed Guzzle's instructions on his website.
Parts (from memory)
10' of 3/8" 30R7 or higher fuel line. I ended up only using about 8'. It was less than $2 a foot, which seemed inexpensive to me.
3' of 5/16" stainless steel tubing. I wasn't able to find any stainless, but found steel hydraulic tubing in stead, and figured it would be safe to use. I only needed about 2', but the first two bends didn't work, and I had just enough after sacrificing the end. That was about $7.
4" of 3/8" stainless steel tubing. Again, I used steel hydraulic tubing instead, and got a 6" piece for about $3.
5/16" brass compression union and a 3/8" brass compression union. They were about $2 each. I ended up dropping and losing one of the ferrules, and had to go back and get another union. They did have just assorted ferrules, but I figured it wouldn't hurt to have a few spare parts in the toolbox. I used brass because I've heard that copper and diesel don't work together too well. I'm not sure how true that is, but didn't want to find out first hand.
3/8" barb in-line clear Wix filter. I've read where it needs to be suction rated, I just told the guy pre-pump and trusted that he picked out the right one. If it seems to not be working, it's changed easily enough. About $3.
Atleast 5 3/8" hose clamps. I used fuel injection clamps rather than worm gear clamps, but I recommend doubling the clamps on the pickup and pump if using worm gear clamps. About $5.
Altogether parts were right around $40, then I bought a tubing bender for $10. I'd say that's rather inexpensive, and didn't even require Tugly's Buck$zooka...
I'm not going to go through the process, Guzzle did a fantastic job at that. I do want to make a few notes though. Dropping the tank was very easy. I had done it in other older vehicles and was dreading it, but was surprised at the ease of access to the bolts and how easy it was to lower using a floor jack and block on each end. I even managed to do this with half a tank of diesel, which was dumb, but I had my reasons and I'm hard headed. Gus had just enough ground clearance for the tank to be drug out from under him. He's a stock 2003 FX4 with no running boards, so I'd imagine anything lower than that may need a slight lift to help the tank clear. Just something to be prepared for, especially 2wd models.
Be sure to clean off the area around and on top of the pickup before removing the ring. I had a can of degreaser and used several shop towels to get the 1/2" of grime off. I hammered the ring loose, then used elbow grease to unscrew it the rest of the way. Once the pickup is out, it's very simple to do the mods. Dont make the "Z" too big, or it will hit the side of the tank... It took holding my mouth right to get it started again, but it'll go. Don't forget to do the harpoon. I remembered right before I started putting the ring back on.
Run the new fuel line before installing the tank. The return gets reused since the quick connect is fine under pressure.
I didn't photo document the whole thing because I was covered in filth and smelled of diesel. Guzzle has all the pics you need.
What I do want to document is the trash in the screens. I hope the pics show up, they are hard to see on my phone.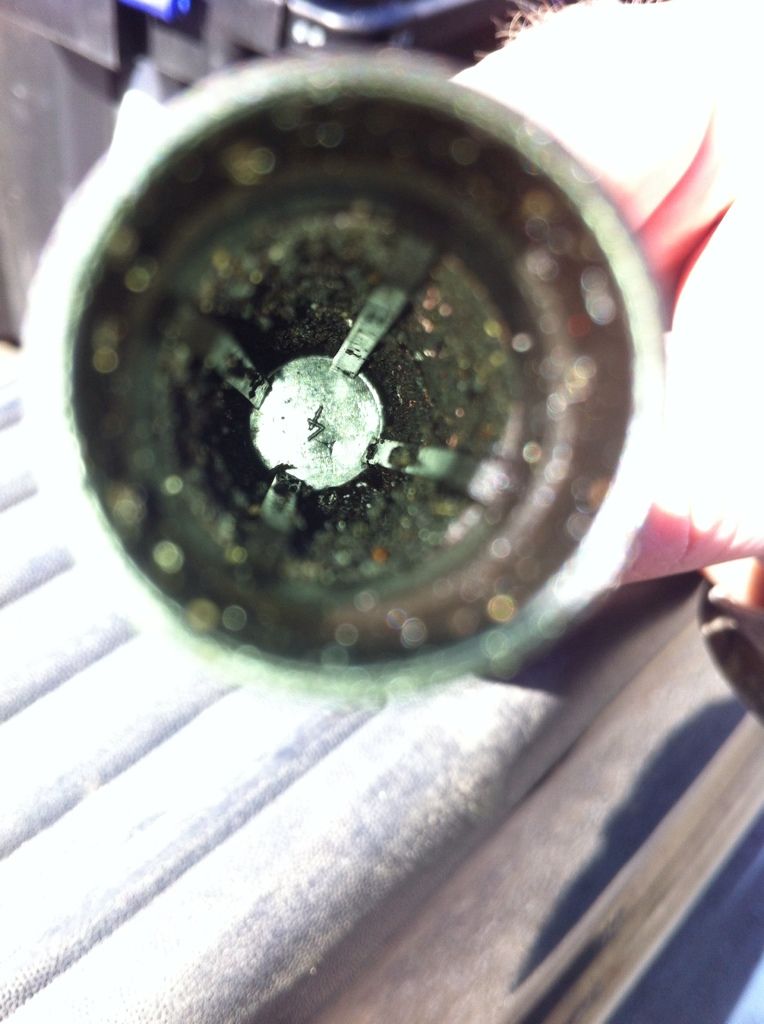

Can I tell a difference in sound? Very slightly. I'm told FRx piggie backed on the Hutch mod is the key. I may or may not do the FRx anytime soon. But Atleast my harpoon mod is complete, my screens are removed, and my prepump filter is easily accessible.
Ok, I decided to tackle the Hutch mod this past weekend. It was one of those mods that I read and read and read up on, and I learned a lot about the fuel system in the process. I wasn't really sure that Gus had the crackle noise, and didn't really have a good way to gauge it either. There were 2 factor that helped me decide to go ahead and do it anyway:
1) I'm going to start being very diligent in recording and calculating fuel mileage, rather than "estimating" mileage off of the lie-O-meter. This is partly to see how Gus is actually performing economically, and also to evaluate the different economy of various tunes. In order to properly calculate mileage, I needed to complete the harpoon mod, which requires removing the fuel pickup.
2) Gus is sitting at just over 155K miles, which by rough calculation and rounding is 11000 gallons worth of diesel. That's a lot of diesel running through the screens on the pickup inside the tank. Surely it's worth dropping the tank to check.
Since checking the screens in the tank and performing the harpoon mod require the same work, I might as well prepare to do the Hutch mod in the process.
So here we go: I chose to put the pieces together myself, and followed Guzzle's instructions on his website.
Parts (from memory)
10' of 3/8" 30R7 or higher fuel line. I ended up only using about 8'. It was less than $2 a foot, which seemed inexpensive to me.
3' of 5/16" stainless steel tubing. I wasn't able to find any stainless, but found steel hydraulic tubing in stead, and figured it would be safe to use. I only needed about 2', but the first two bends didn't work, and I had just enough after sacrificing the end. That was about $7.
4" of 3/8" stainless steel tubing. Again, I used steel hydraulic tubing instead, and got a 6" piece for about $3.
5/16" brass compression union and a 3/8" brass compression union. They were about $2 each. I ended up dropping and losing one of the ferrules, and had to go back and get another union. They did have just assorted ferrules, but I figured it wouldn't hurt to have a few spare parts in the toolbox. I used brass because I've heard that copper and diesel don't work together too well. I'm not sure how true that is, but didn't want to find out first hand.
3/8" barb in-line clear Wix filter. I've read where it needs to be suction rated, I just told the guy pre-pump and trusted that he picked out the right one. If it seems to not be working, it's changed easily enough. About $3.
Atleast 5 3/8" hose clamps. I used fuel injection clamps rather than worm gear clamps, but I recommend doubling the clamps on the pickup and pump if using worm gear clamps. About $5.
Altogether parts were right around $40, then I bought a tubing bender for $10. I'd say that's rather inexpensive, and didn't even require Tugly's Buck$zooka...
I'm not going to go through the process, Guzzle did a fantastic job at that. I do want to make a few notes though. Dropping the tank was very easy. I had done it in other older vehicles and was dreading it, but was surprised at the ease of access to the bolts and how easy it was to lower using a floor jack and block on each end. I even managed to do this with half a tank of diesel, which was dumb, but I had my reasons and I'm hard headed. Gus had just enough ground clearance for the tank to be drug out from under him. He's a stock 2003 FX4 with no running boards, so I'd imagine anything lower than that may need a slight lift to help the tank clear. Just something to be prepared for, especially 2wd models.
Be sure to clean off the area around and on top of the pickup before removing the ring. I had a can of degreaser and used several shop towels to get the 1/2" of grime off. I hammered the ring loose, then used elbow grease to unscrew it the rest of the way. Once the pickup is out, it's very simple to do the mods. Dont make the "Z" too big, or it will hit the side of the tank... It took holding my mouth right to get it started again, but it'll go. Don't forget to do the harpoon. I remembered right before I started putting the ring back on.
Run the new fuel line before installing the tank. The return gets reused since the quick connect is fine under pressure.
I didn't photo document the whole thing because I was covered in filth and smelled of diesel. Guzzle has all the pics you need.
What I do want to document is the trash in the screens. I hope the pics show up, they are hard to see on my phone.
Can I tell a difference in sound? Very slightly. I'm told FRx piggie backed on the Hutch mod is the key. I may or may not do the FRx anytime soon. But Atleast my harpoon mod is complete, my screens are removed, and my prepump filter is easily accessible.
#2
11-06-2012, 03:01 PM
One more thing, I ended up breaking the pickup line where it connects to the pump. I didn't care since I wasn't reusing it. I believe the same disconnect tool used for the pickup and return lines works there as well. Push in and twist while inserting the plastic tool, then pull forcefully. It likely won't slide off smooth, just takes a little jerk to release.
Also, here's a link to Guzzle's In Tank Modification Page.
Also, here's a link to Guzzle's In Tank Modification Page.
#3
11-06-2012, 03:10 PM

Great job! You can see getting into these mods is not as nit-picky as they sound. These are real issues to be addressed and you are on your way to having a more reliable vehicle than what Ford sold off the lot.
I am the grand poo-bah of all stubborndom - I had to drop the tank four times to get all the kinks out of my system of mechanically mimmicking a famous Sinatra tune.
I am the grand poo-bah of all stubborndom - I had to drop the tank four times to get all the kinks out of my system of mechanically mimmicking a famous Sinatra tune.
#5
11-06-2012, 03:27 PM
#6
11-06-2012, 04:22 PM
Well I dug up the receipt and it says napa gold 3003, which after research is a wix33003. Doesnt say whether its rated for diesel or what media is used, although i know it's paper because its clear. The napa gold 3007 is the wix 33007, which does state that it can be used with gas or diesel and has wire screen media. That's an easy swap, thanks for the heads up David. I knew better, just got lazy with the parts guy.
#7
11-06-2012, 04:30 PM
Great job! You can see getting into these mods is not as nit-picky as they sound. These are real issues to be addressed and you are on your way to having a more reliable vehicle than what Ford sold off the lot.
I am the grand poo-bah of all stubborndom - I had to drop the tank four times to get all the kinks out of my system of mechanically mimmicking a famous Sinatra tune.
I am the grand poo-bah of all stubborndom - I had to drop the tank four times to get all the kinks out of my system of mechanically mimmicking a famous Sinatra tune.
Trending Topics
#8
11-06-2012, 04:38 PM
#9
11-07-2012, 03:57 AM

Posting Guru
Join Date: Apr 2010
Location: Canberra Australia
Posts: 1,164
Likes: 0
Received 0 Likes
on
0 Posts
#10
11-10-2012, 02:03 PM
I know it probably isn't that much of an issue to just tighten down the clamp a little further, but i'd prefer a propper fit.
#11
11-11-2012, 08:34 AM
#12
11-11-2012, 08:44 PM

Senior User
Join Date: Jun 2006
Location: Lubbock, TX
Posts: 222
Likes: 0
Received 0 Likes
on
0 Posts
#13
11-11-2012, 10:14 PM
The only thing that I was concerned about was using copper. I read several places where the zinc I believe that was in the copper would react with the diesel. I used brass fittings instead, but there are stainless fittings as well. As far as the tubing goes, it won't really be exposed to the elements, as it will be submerged in diesel most of the time. That fact removed any worries that I had about rusting out.
#14
11-12-2012, 01:03 AM


<TABLE style="BORDER-BOTTOM: rgb(191,204,221) 1px solid; BORDER-LEFT: rgb(191,204,221) 1px solid; PADDING-BOTTOM: 0px; MARGIN: 0px; PADDING-LEFT: 0px; PADDING-RIGHT: 0px; BORDER-TOP: rgb(191,204,221) 1px solid; BORDER-RIGHT: rgb(191,204,221) 1px solid; PADDING-TOP: 0px" cellSpacing=0 width="100%" valign="top"><TBODY><TR><TD style="PADDING-LEFT: 7px; MARGIN-LEFT: 7px">PRODUCT TYPE</TD><TD>FILTER FUEL </TD></TR><TR style="BACKGROUND-COLOR: rgb(243,243,243)"><TD style="PADDING-LEFT: 7px; MARGIN-LEFT: 7px">PORT/CONNECTION SIZE</TD><TD>SAE J476 3/8" NPTF</TD></TR><TR><TD style="PADDING-LEFT: 7px; MARGIN-LEFT: 7px">FILTER RATING</TD><TD>200 to 260 Micron</TD></TR><TR style="BACKGROUND-COLOR: rgb(243,243,243)"><TD style="PADDING-LEFT: 7px; MARGIN-LEFT: 7px">ADDITIONAL DETAIL</TD><TD>2 inlets and 2 Outlets</TD></TR><TR><TD style="PADDING-LEFT: 7px; MARGIN-LEFT: 7px">TRADE/BRAND NAME</TD><TD>Racor</TD></TR><TR style="BACKGROUND-COLOR: rgb(243,243,243)"><TD style="PADDING-LEFT: 7px; MARGIN-LEFT: 7px">DESCRIPTION</TD><TD>Filter Assembly/Pre-screen</TD></TR><TR><TD style="PADDING-LEFT: 7px; MARGIN-LEFT: 7px">MAXIMUM FLOW RATE</TD><TD>120 GPH (454 LPH)</TD></TR></TBODY></TABLE>

