
Homemade digital tach (pics)
#1
 10-13-2012, 09:34 PM


Homemade digital tach (pics)
Every once in a while there's a "show me your tach" thread, so I thought I'd finally share mine. This is a project I have been working on for a while that I finally finished up. I designed and built my own fully-digital tachometer:

The circuit board itself mounts along the bottom of the dash, next to the rest of my gauges. It is completely full-featured and highly accurate, with the following specifications:
* Range of 9,999 RPM down to 240 RPM (8-cyl)
* Accuracy of 99.99%
* Dual shift lights with programmable redline
* Night-time display mode (numeric display dims with headlights on)
* Adjustable for 4, 6, and 8-cylinder engines
Below is a shot of it running, followed by a shot of both shift lights coming on.

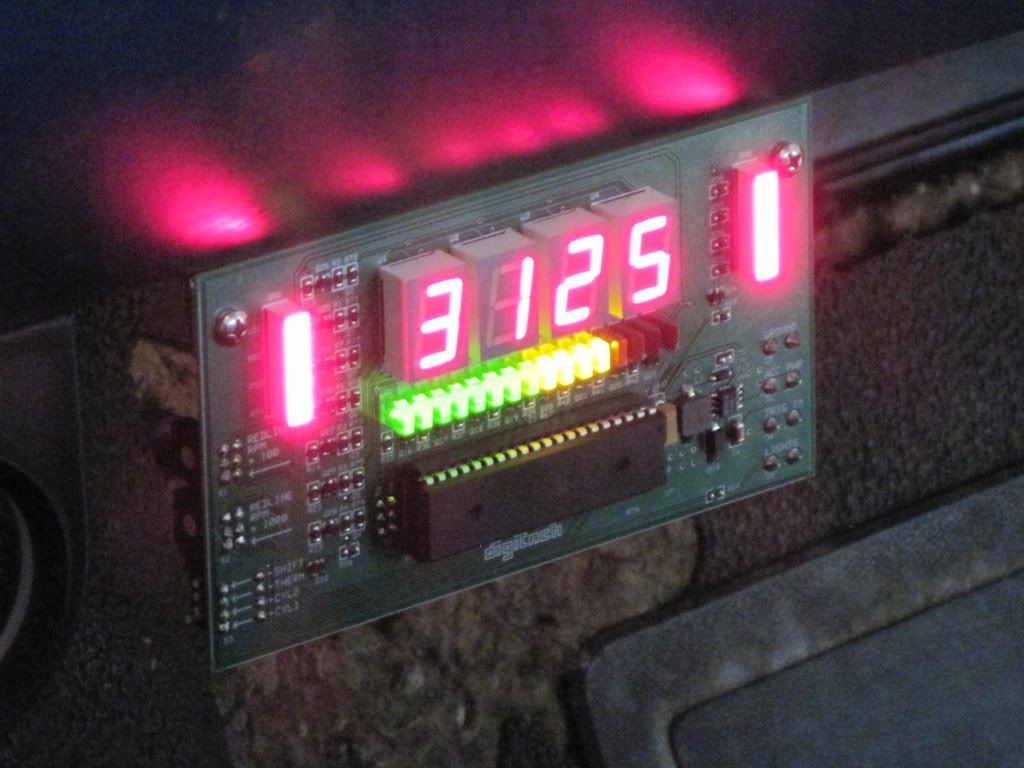
Two dials allow you to adjust the redline (which can be brought up on the display) in increments of 100 RPM. This adjusts where the bar display under the numbers crosses from yellow to red. The bar display moves up and down with engine RPM, and can also be turned off. The shift lights come on once the bar display crosses halfway through the yellow region.
The next picture shows the tach up against an engine analyzer to show a comparison, followed by a shot of the back, and then finally a shot of the tach as it is mounted in the dash.


This project was technically two projects in one - the tach that you see on the dash, and the sensor unit (which I called the "trigger box") that goes under the hood.
The "trigger box" senses the current through the ignition coil. This is done inductively, and as such the design changes nothing about the coil's discharge characteristics (zero impact on performance). The trigger box converts the ignition coil current charge/discharge waveform into a digital signal that is then processed by the display on the dash. Below is a shot of the box:

As you can see, it has the matching male and female Duraspark connectors - therefore it simply goes in between the ignition module and its mating connector, with zero modifications to the truck's original wiring. Below is a shot of the box installed in the truck, tucked behind the existing ignition module:

Weatherpack connectors are used for the rest of the signals going between the tach and the trigger box. Next is a shot of the box with the cover off, followed by a lone shot of the circuit board that goes inside:


Finally, here are a couple shots I took along the development process. First is my "lab" where I developed the software that resides in the tach's microprocessor. I developed a separate "test bench" to simulate different engine conditions to test the tach and fine tune it. The last shot shows my oscilloscope hooked up to a test version of the trigger box as I fine tuned the analog circuitry inside the box.


That's all! I hope you guys like it - this project took quite a bit of research and development time, but I'm really happy with how it turned out, and I think I can safely say that I have what is probably the most accurate tachometer available.
The circuit board itself mounts along the bottom of the dash, next to the rest of my gauges. It is completely full-featured and highly accurate, with the following specifications:
* Range of 9,999 RPM down to 240 RPM (8-cyl)
* Accuracy of 99.99%
* Dual shift lights with programmable redline
* Night-time display mode (numeric display dims with headlights on)
* Adjustable for 4, 6, and 8-cylinder engines
Below is a shot of it running, followed by a shot of both shift lights coming on.
Two dials allow you to adjust the redline (which can be brought up on the display) in increments of 100 RPM. This adjusts where the bar display under the numbers crosses from yellow to red. The bar display moves up and down with engine RPM, and can also be turned off. The shift lights come on once the bar display crosses halfway through the yellow region.
The next picture shows the tach up against an engine analyzer to show a comparison, followed by a shot of the back, and then finally a shot of the tach as it is mounted in the dash.
This project was technically two projects in one - the tach that you see on the dash, and the sensor unit (which I called the "trigger box") that goes under the hood.
The "trigger box" senses the current through the ignition coil. This is done inductively, and as such the design changes nothing about the coil's discharge characteristics (zero impact on performance). The trigger box converts the ignition coil current charge/discharge waveform into a digital signal that is then processed by the display on the dash. Below is a shot of the box:
As you can see, it has the matching male and female Duraspark connectors - therefore it simply goes in between the ignition module and its mating connector, with zero modifications to the truck's original wiring. Below is a shot of the box installed in the truck, tucked behind the existing ignition module:
Weatherpack connectors are used for the rest of the signals going between the tach and the trigger box. Next is a shot of the box with the cover off, followed by a lone shot of the circuit board that goes inside:
Finally, here are a couple shots I took along the development process. First is my "lab" where I developed the software that resides in the tach's microprocessor. I developed a separate "test bench" to simulate different engine conditions to test the tach and fine tune it. The last shot shows my oscilloscope hooked up to a test version of the trigger box as I fine tuned the analog circuitry inside the box.
That's all! I hope you guys like it - this project took quite a bit of research and development time, but I'm really happy with how it turned out, and I think I can safely say that I have what is probably the most accurate tachometer available.
#3
10-13-2012, 09:55 PM
Senior User
Join Date: Nov 2010
Location: Glenvil Ne
Posts: 256
Likes: 0
Received 0 Likes
on
0 Posts
#4
10-13-2012, 10:02 PM
Thanks for the feedback. While it may not appear obvious from the picture, it's actually quite visible and easy to see as it's placed now. The display is bright, clear, and highly visible without being distracting.
Along the bottom of the dash was the original design goal, and I tested a few different locations before landing on where it's at now.
Along the bottom of the dash was the original design goal, and I tested a few different locations before landing on where it's at now.
#5
10-13-2012, 10:19 PM

Great idea and kudos on the design/development. I think the finished product needs a bit more finish though. It needs some kind of case or enclosure, if for no other reason to keep a muddy boot from making a mess of it. If you can build a trigger to run from my mechanical Cummins diesel, sign me up for one.
 . Consider this a "virtual rep"
#7
10-14-2012, 12:15 AM
Trending Topics
#8
10-14-2012, 04:00 AM


#10
10-14-2012, 07:06 AM
Senior User
Join Date: Nov 2010
Location: Glenvil Ne
Posts: 256
Likes: 0
Received 0 Likes
on
0 Posts
Thanks for the feedback. While it may not appear obvious from the picture, it's actually quite visible and easy to see as it's placed now. The display is bright, clear, and highly visible without being distracting.
Along the bottom of the dash was the original design goal, and I tested a few different locations before landing on where it's at now.
Along the bottom of the dash was the original design goal, and I tested a few different locations before landing on where it's at now.
#11
10-14-2012, 08:02 AM
Thank you all for the kind words! I appreciate all the feedback, both positive and negative. Regarding the latter:
The idea of an enclosure did come up during the development, but in the end I opted for the bare "industrial" look. Building an enclosure also would have added another layer of cost and time that wasn't in the original scope of the project.
One of the original goals was limited impact to the original dash, hence the mounting style and location. Not mounting it in or near the instrument cluster was intentional. Avoiding any cuts or modifications to the dash was a requirement; I preferred to make it in a way such that I could completely remove everything and the truck still look the same.
I have not found it inconvenient to glance down at the display while driving, as it only takes a split second (not much more than to look at the fuel gauge or radio). Mounting it slightly out of my direct line of sight was intentional so as to not be distracted by the changing numbers, as the display is very bright so as to still be visible when the sun is coming through the back of the cab (I wasn't able to capture that with pictures).
I want to stress that aesthetics was not the focus of this project; I did not intend to make something polished that you would see in a catalog. The original goals were feature set and accuracy. Here, the idea was to show craftsmanship through circuit design, board layout, and technical detail.
#12
10-14-2012, 08:17 AM

#15
10-14-2012, 11:35 AM

Wow you put a lot of work into that. The quality of it is very nice too. How much time do you have put into that?
If you could figure out how to mount it into the dash It would be perfect, Id be worried about accidentally kicking or hitting it with it hanging off the dash. Pretty cool stuff though, Ive never seen anything like this done.
If you could figure out how to mount it into the dash It would be perfect, Id be worried about accidentally kicking or hitting it with it hanging off the dash. Pretty cool stuff though, Ive never seen anything like this done.

