When you click on links to various merchants on this site and make a purchase, this can result in this site earning a commission. Affiliate programs and affiliations include, but are not limited to, the eBay Partner Network.
Yet another fuel pump. I've owned five Aeros, so I've done this job at least four times.
This rig's pump was just noisy, and I hate unplanned maintenance (stuck by the side of the road or in a parking lot). On start, it would make horrible noises for about 15 seconds about one start in five. I'd taped a fuel pressure gauge to the windscreen for a couple of days, and the pressure was always in spec, but I didn't like that noise. So, I set aside a Sunday to replace it.
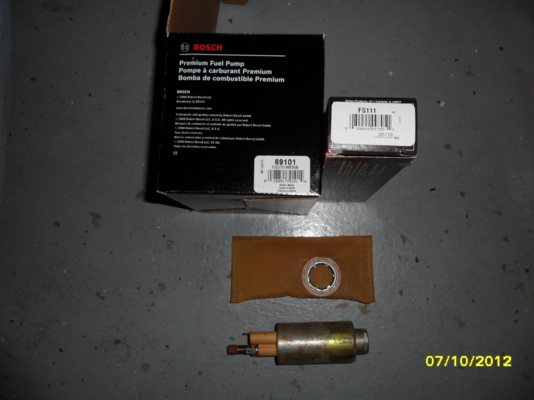
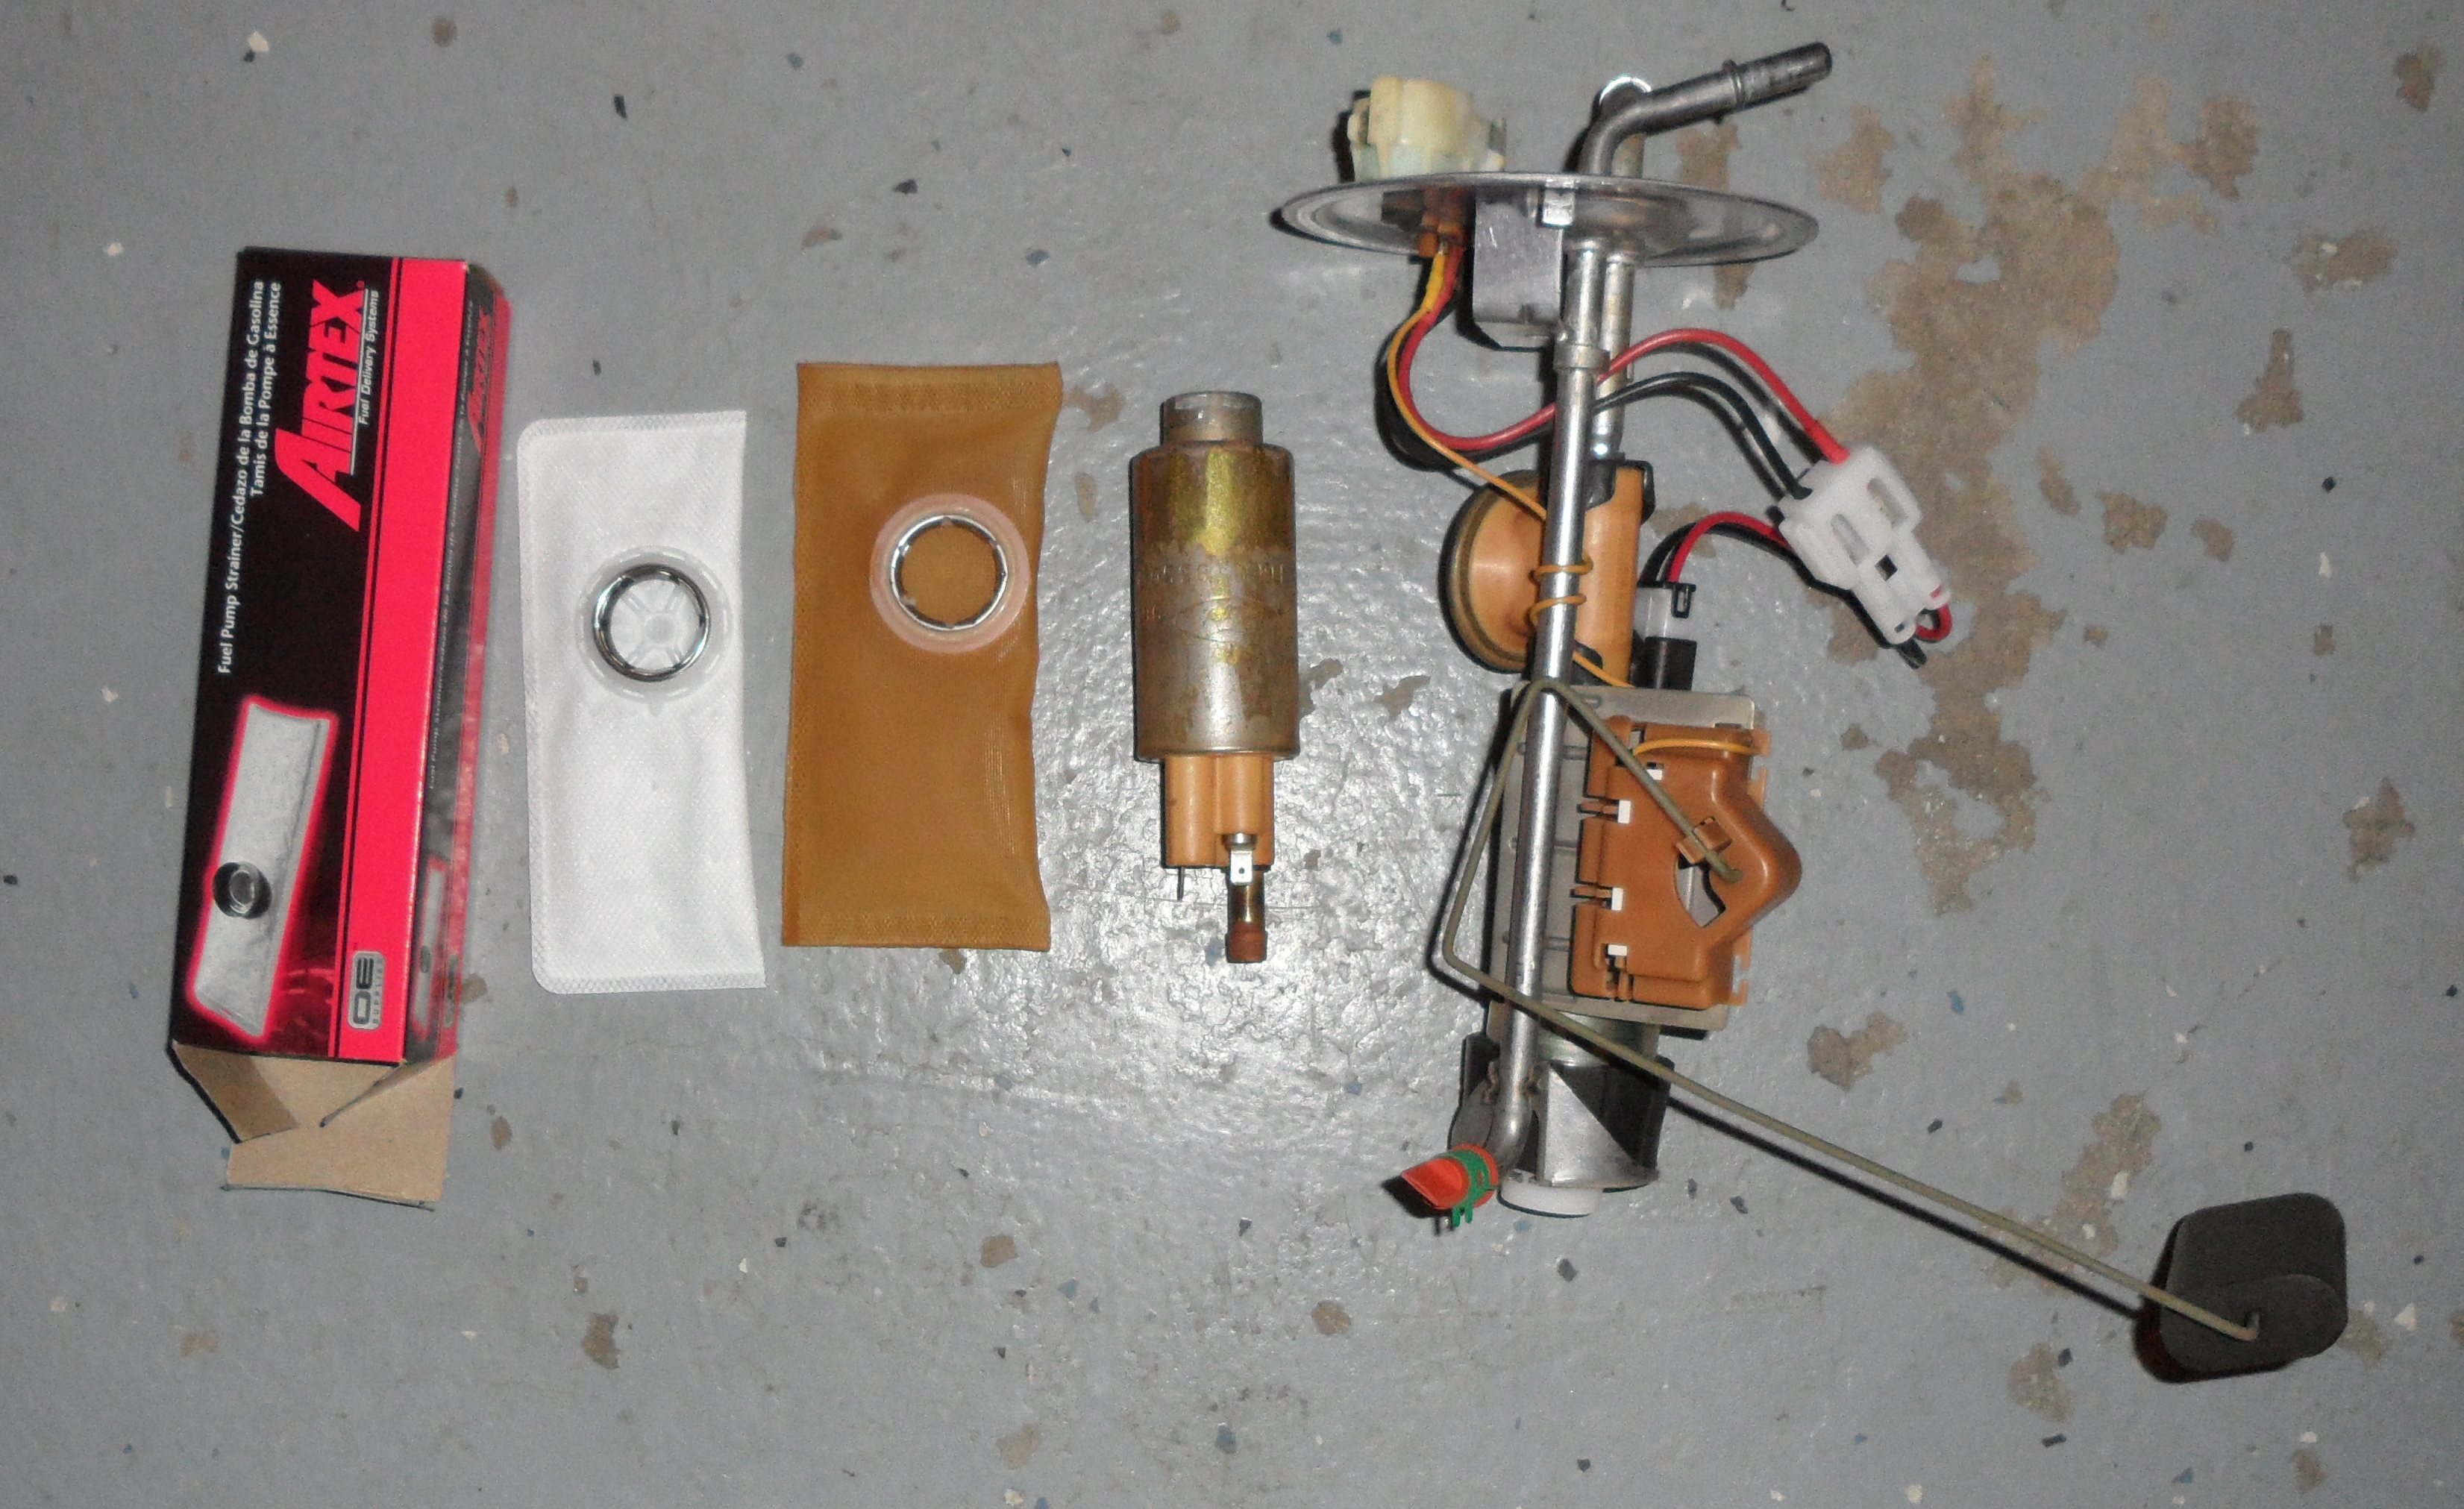
I bought a Bosch 69101 bare pump kit (via Amazon) for around $39. This is just the pump, not the whole assy that includes the fuel level sensor, filter sock, & plumbing. I'm cheap that way. This kit came with NO instructions (but I suspect it normally does). I bought an Airtex filter sock FS111 locally for another $7. Any brand of filter sock ought to be just fine. You're not supposed to be able to re-use the filter sock.
Started at 12:30, was vacuuming up the garage and ordering pizza at 6:30, and that included three trips out for the filter sock, a piece of pipe, and a replacement 12mm combo wrench, so all-in-all a typical afternoon's repair. As I'm temporarily living half a continent away from my own shop, I did have to make-do on a couple of things, and run for supplies when I'd normally have them on-hand. Still, it's not a terribly hard job to replace the pump.
Tools I needed to accomplish this job:
Jack. A floor jack is recommended, but any jack you can use to get all four wheels up reasonably high will do.
Jack stands (4) or equivalent in blocking. I only had two jack stands and no blocking
8mm socket, extension, and ratchet. Needed to remove the fuel filler neck screws (3), and also for the filler hose hose clamp.
13mm socket, 12" extension, and ratchet. Needed to remove the tank strap bolts (2).
12mm box end wrench, 12-point. Needed to remove the driveshaft's bolts (4). I have any number of 6-point wrenches, but I had only a cheesy Harbor-Freight-quality 12-point 12mm box-end, which broke and forced me to do a run to Sears on a Sunday afternoon for a decent-quality replacement. Cheap tools will always bite you in the *** in the end.
Cheater pipe. I used an off-the-shelf 1" x 12" nipple from Lowes. This give the 12mm wrench more leverage for those companion flange bolts. You could also just use a hammer on the wrench instead, but while that'll work to remove them, it's not reliable to tighten them.
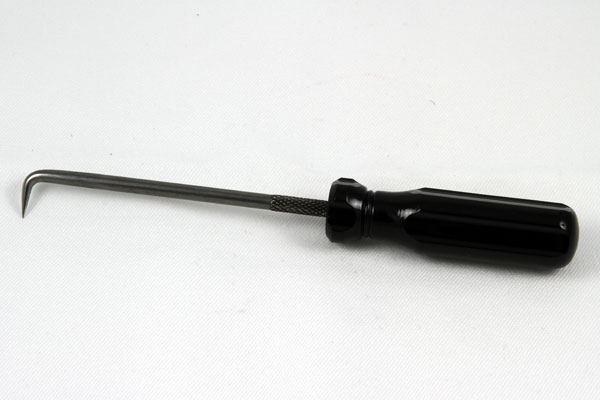
O-ring pick. They are generally sold in a four-piece set. I use the right-angle one every day in my job, and while you can get away with a No. 0 screwdriver for a lot of work like this, a set of four is o-ring picks is under $10, and my Harbor Freight quality one is almost as good as my lifetime-warranty Matco one, so just buy cheap here if you like. Even Sears sells them.
Aerosol cleaner. Needed to clean off the quick-disconnect fittings and wire harness connector on top of the fuel pump. Brake cleaner, throttle body cleaner, whatever.
Grease. To re-waterproof the wire harness connector on the top of the pump assy., and to lube the two quick-disconnects upon reassembly. Any grease will do, even Vaseline. I used Tri-Flow silicone/teflon grease. Dielectric grease is not needed.
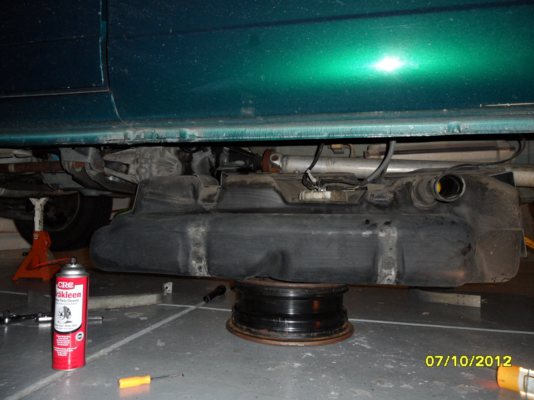
Prop for the tank. Needed to rest the tank on whilst you disconnect the lines & harness. I used a spare steel rim I had laying around.
If you're working with a pre-'90, substitute a 13mm wrench for the yoke u-bolts (4), and you'll need 10mm tools to remove the metal shield between the tank and driveshaft. I think I used a 10mm 1/4" drive socket for those.
A typical o-ring pick, right-angle style:
If you have the luxury of planning your fuel pump replacement (ie it hasn't died yet), you can make things a LOT easier by
Running the tank down to empty. I ran mine down past the red, and when I finished this job and drove it to the station to fill, I put 21.7G in this 21G tank: perfect!
Using a car wash wand under the body pointed up toward the filler, to knock all the mud off the top of the filler hose (see pic below). Even using a garden hose and nozzle will be better than nothing.
Get the rig jacked up and on stands.
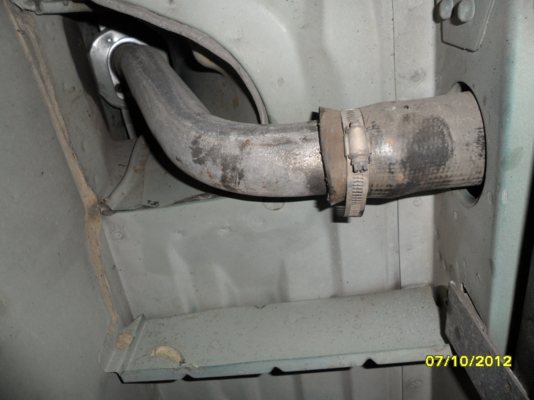
The fuel filler neck's three 8mm head screws have to come out.
(click on any image for larger)
Remove the filler neck hose clamp (also 8mm/5/16").
The filler hose doesn't want to come off the neck. I used one of the o-ring picks to slip between the hose and neck, then sprayed a lubricant between the the hose & neck. That let me break the bond, then work the neck out of the hose. The filler neck doesn't really want to come out the top unless you remove the filler door, but it's not really necessary to remove it, just slide it back/around far enough to clear the filler hose, then pull out the inner liner (it's very flexible).
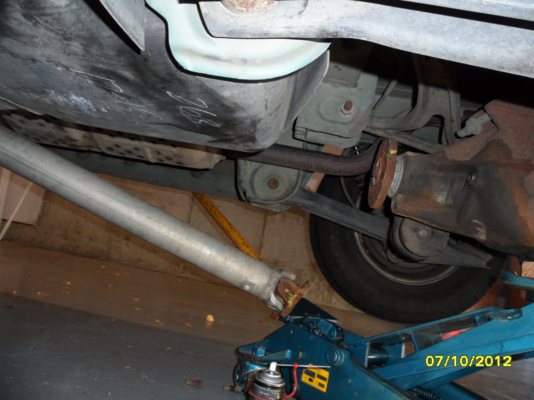
While (on the '97) you can get the tank down without disconnecting the driveshaft, I wasn't able to get the tank back up without (thought I'd try it, anyway). Even on the E4WD, you don't have to remove the driveshaft, just disconnect the back and swing it off toward the passenger side.
On the '90-on with the companion flange, a 12mm box-end wrench & leverage-enhancer (1' x 1" dia pipe) will break the bolts loose. On E4WD, the park brake needs to work (or have a helper stand on the pedal); merely putting the trans in Park won't do the job. These bolts are tight! It's good shop practice to match-mark the companion flanges; I used a paint pen that had travelled to a higher altitude and thus was pressurized just a bit too much, hence the slopply yellow marks shown below.
Please, don't support the van the way I did. You're not supposed to jack on the pumpkin (it's actually warned against in the Owners Manual) as that can deform/bend the axle tubes, and never work under a vehicle that isn't safely supported on jack stands. I was in a pinch. Not an excuse, just an explanation.
(older rigs: remove the metal shield between the tank & driveshaft now)
With the driveshaft pushed over toward the passenger side, you can attack the two tank straps. On salt-area rigs, you might break the captive nuts in the body, so plan ahead if you have a rusty van and pick up replacement captive nuts. They are replaceable, but I didn't look hard at them as they weren't a problem on my rigs.
Plan ahead: have a tank prop nearby, as the slack in the lines & wire harness isn't enough to allow the tank to sit on the ground while you work on disconnecting them.
If you haven't got the tank mostly empty, the fuel sloshes from end to end and makes dropping the tank and putting it on the prop miserable. BTDT.
Unscrew one tank strap bolt, and learn that they're somewhat lock-bolts: it's normal for them to fight you all the way out. The tank won't drop (if empty) or won't drop much (if not empty), so the first strap bolt is the easy one to learn on. Remove the strap entirely from the van once its bolt is removed. You have to wiggle the strap's anchor end to find the correct angle to get it to disengage from the frame rail, but no bending of the strap is required, and I advise you to resist the temptation to do so.
ti
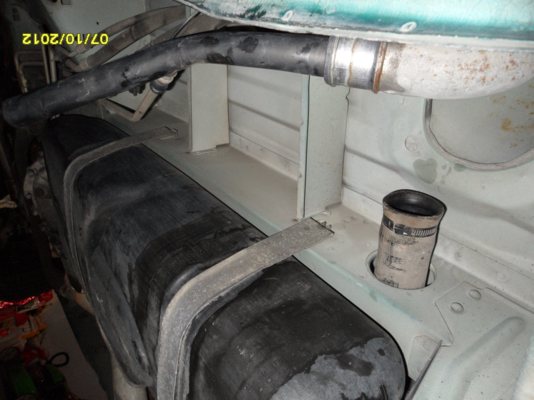
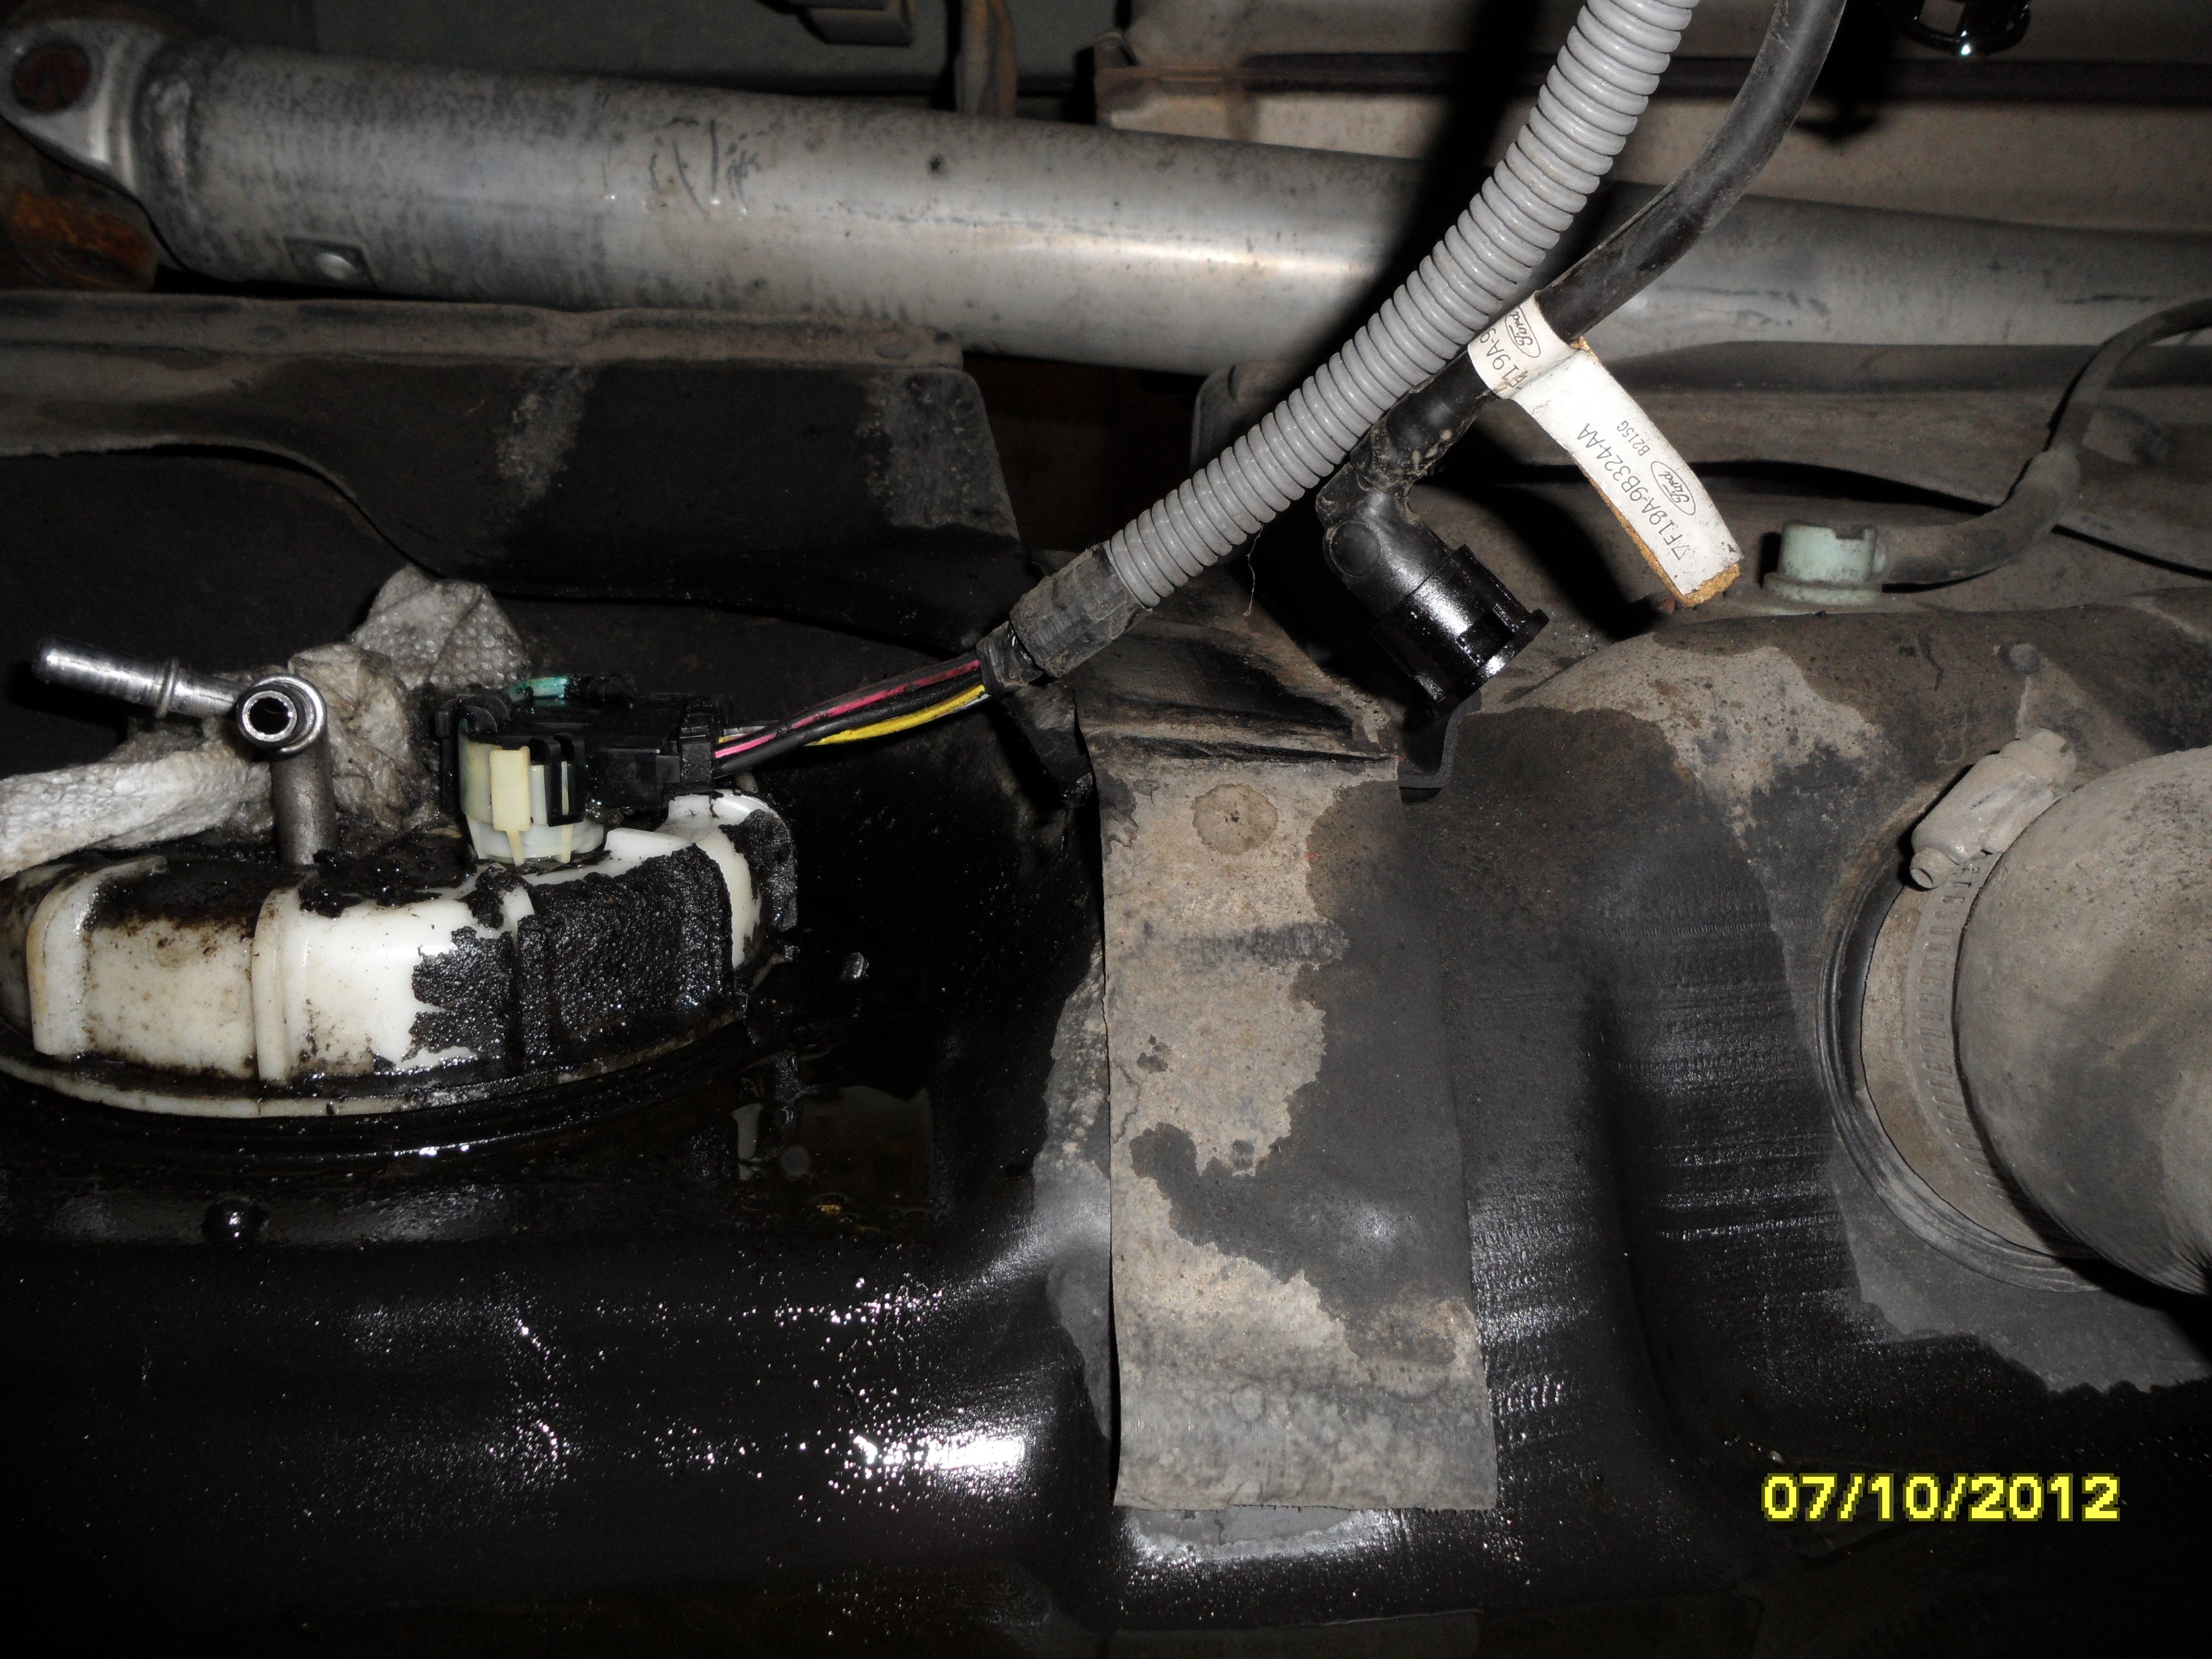
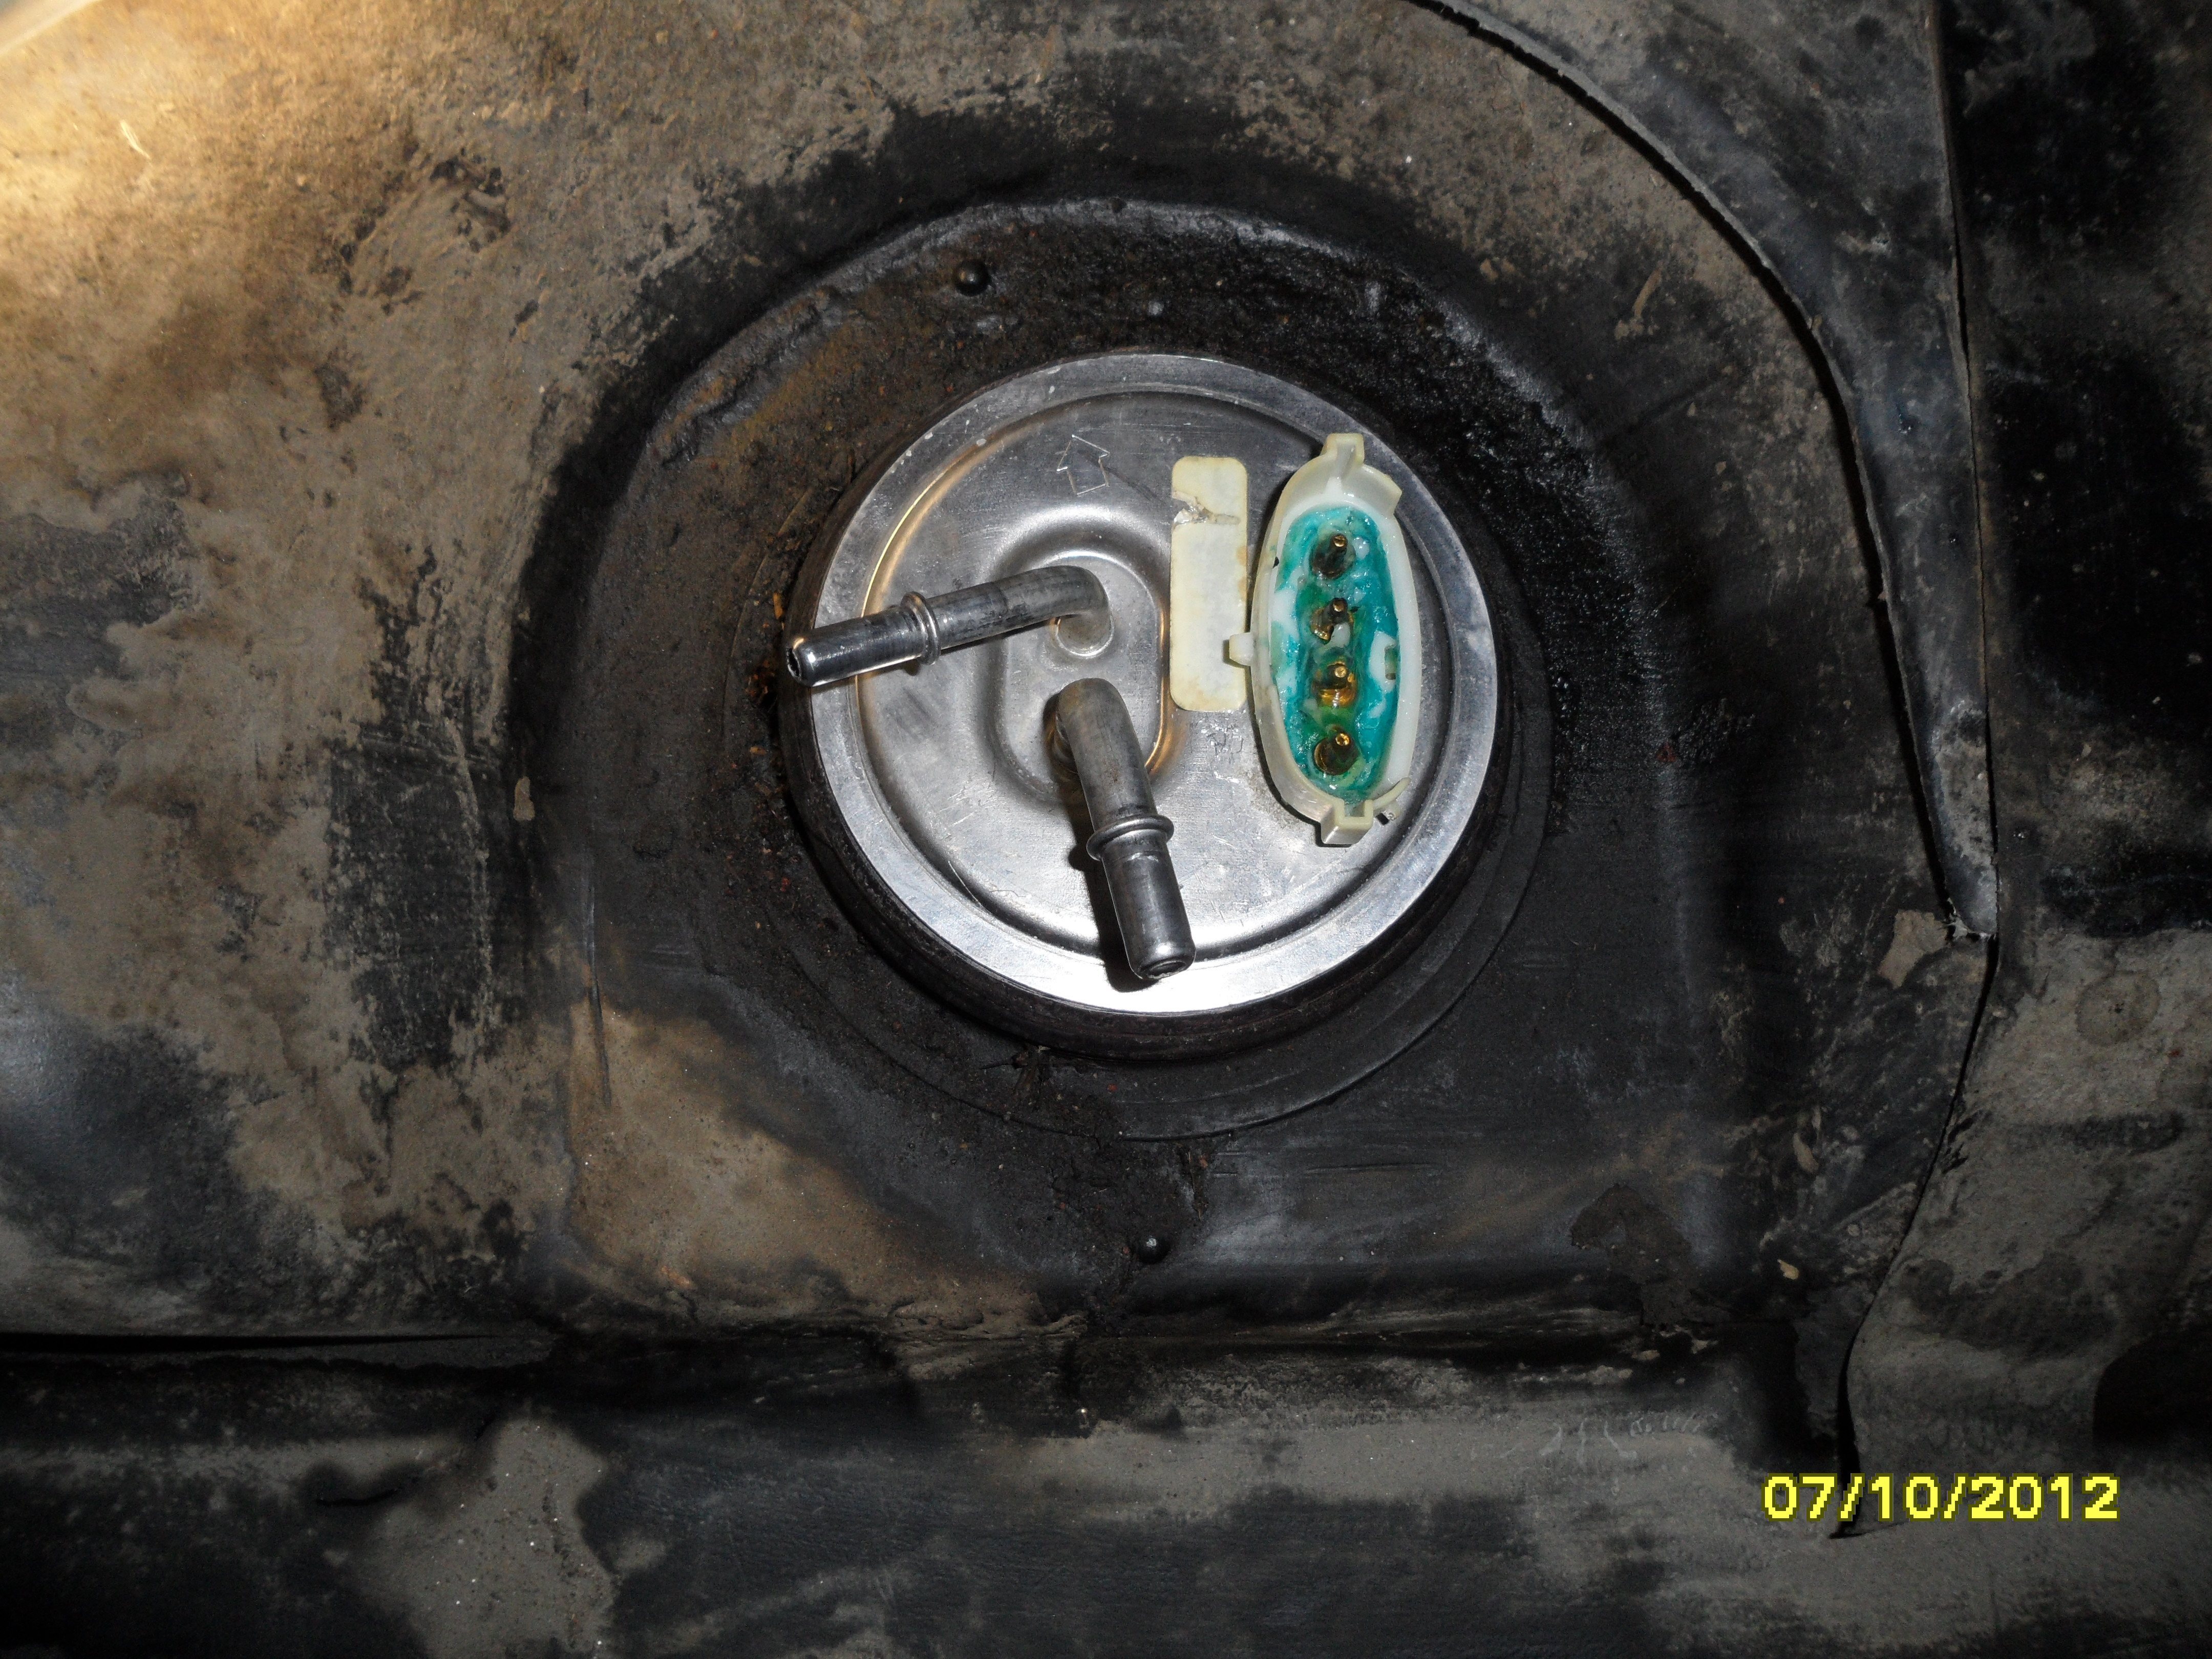
This is actually a pretty clean tank top. Most have a lot more mud around them, and in the past I've used a shop vac to get the majority off, before spraying cleaner.
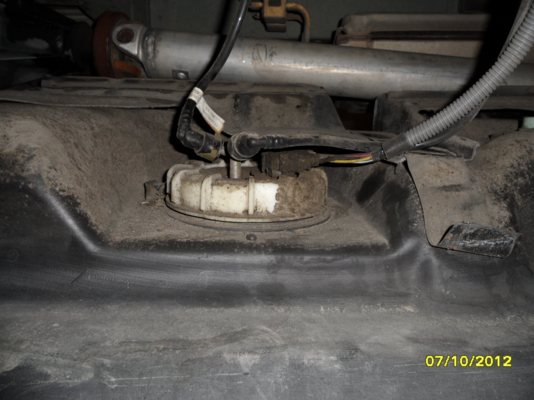
Some light cleaning and you can remove the duck-bill clips that retain the fuel lines. The new Bosch pump came with new duck-bill clips, so you don't have to be gentle with the old ones, you can just break them in pieces, but I like to practice removing them in one piece. The right-angle o-ring tool is ideal for this.
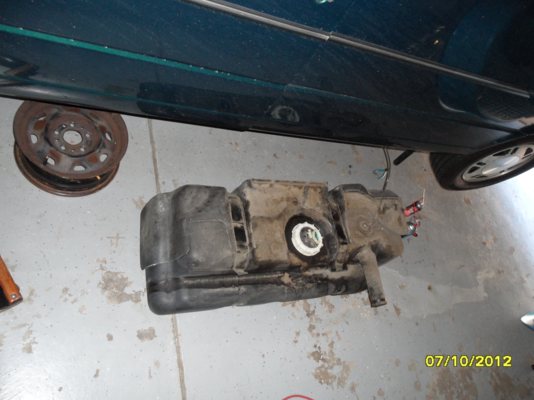
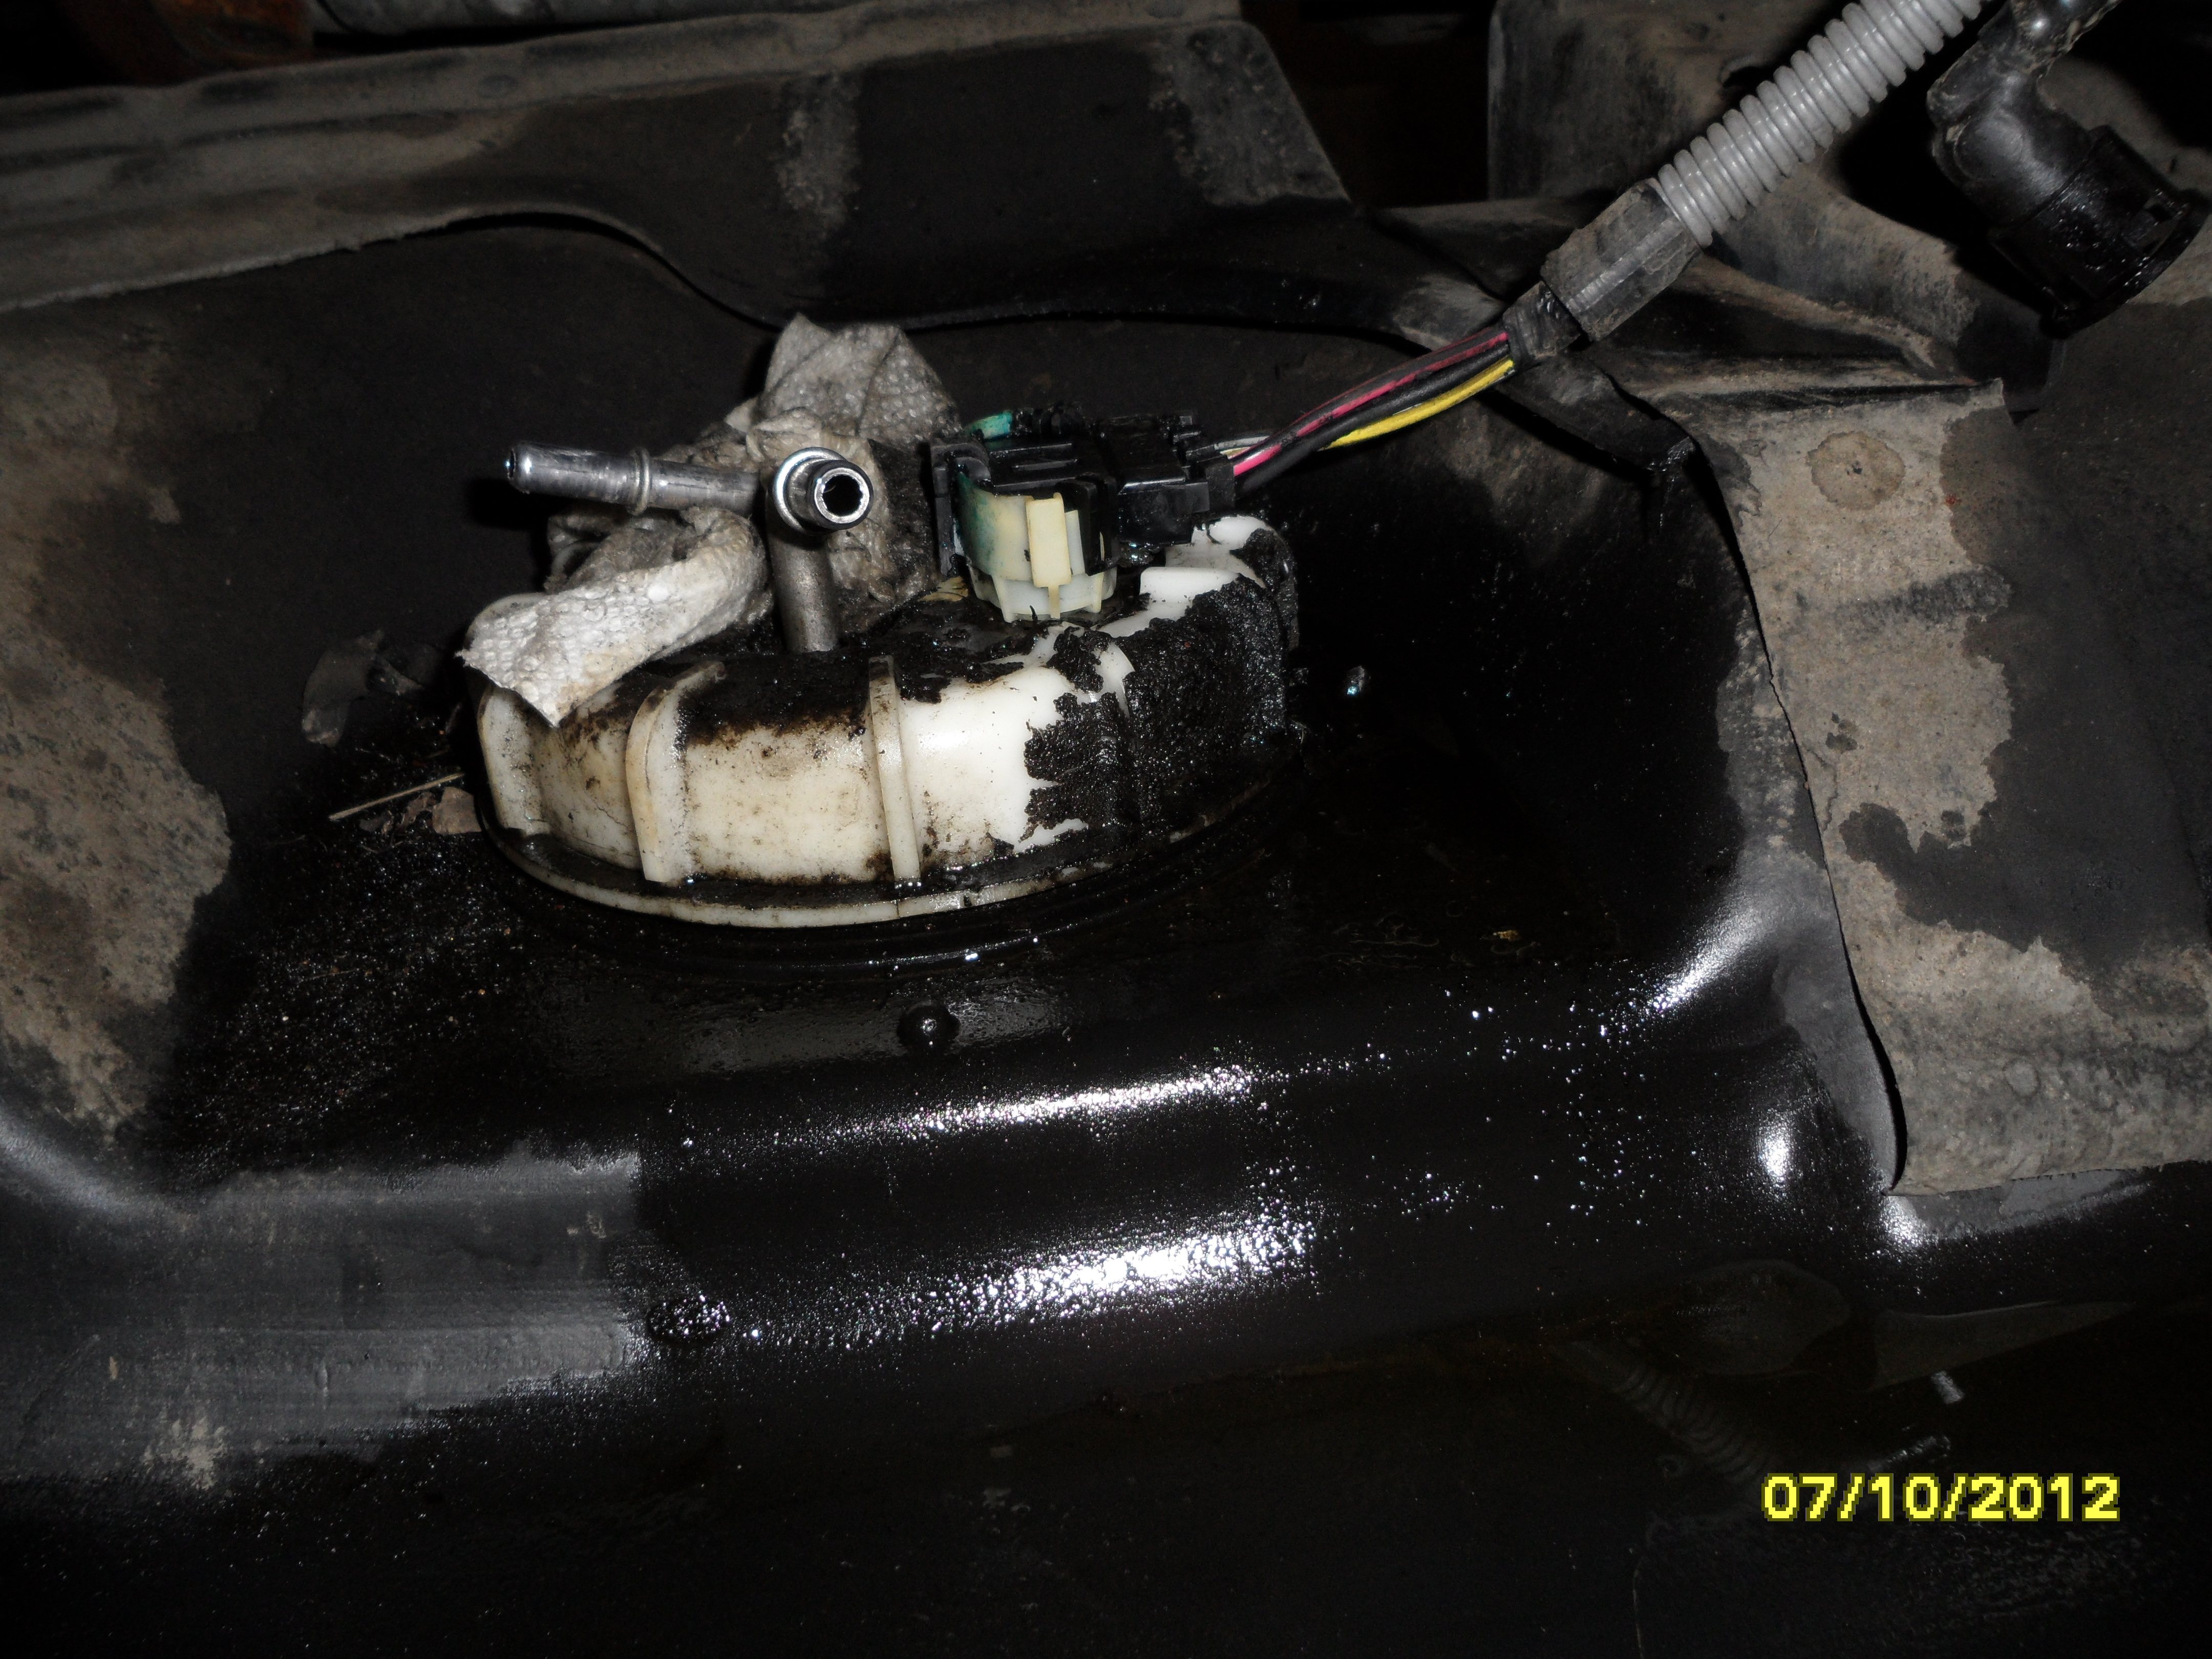
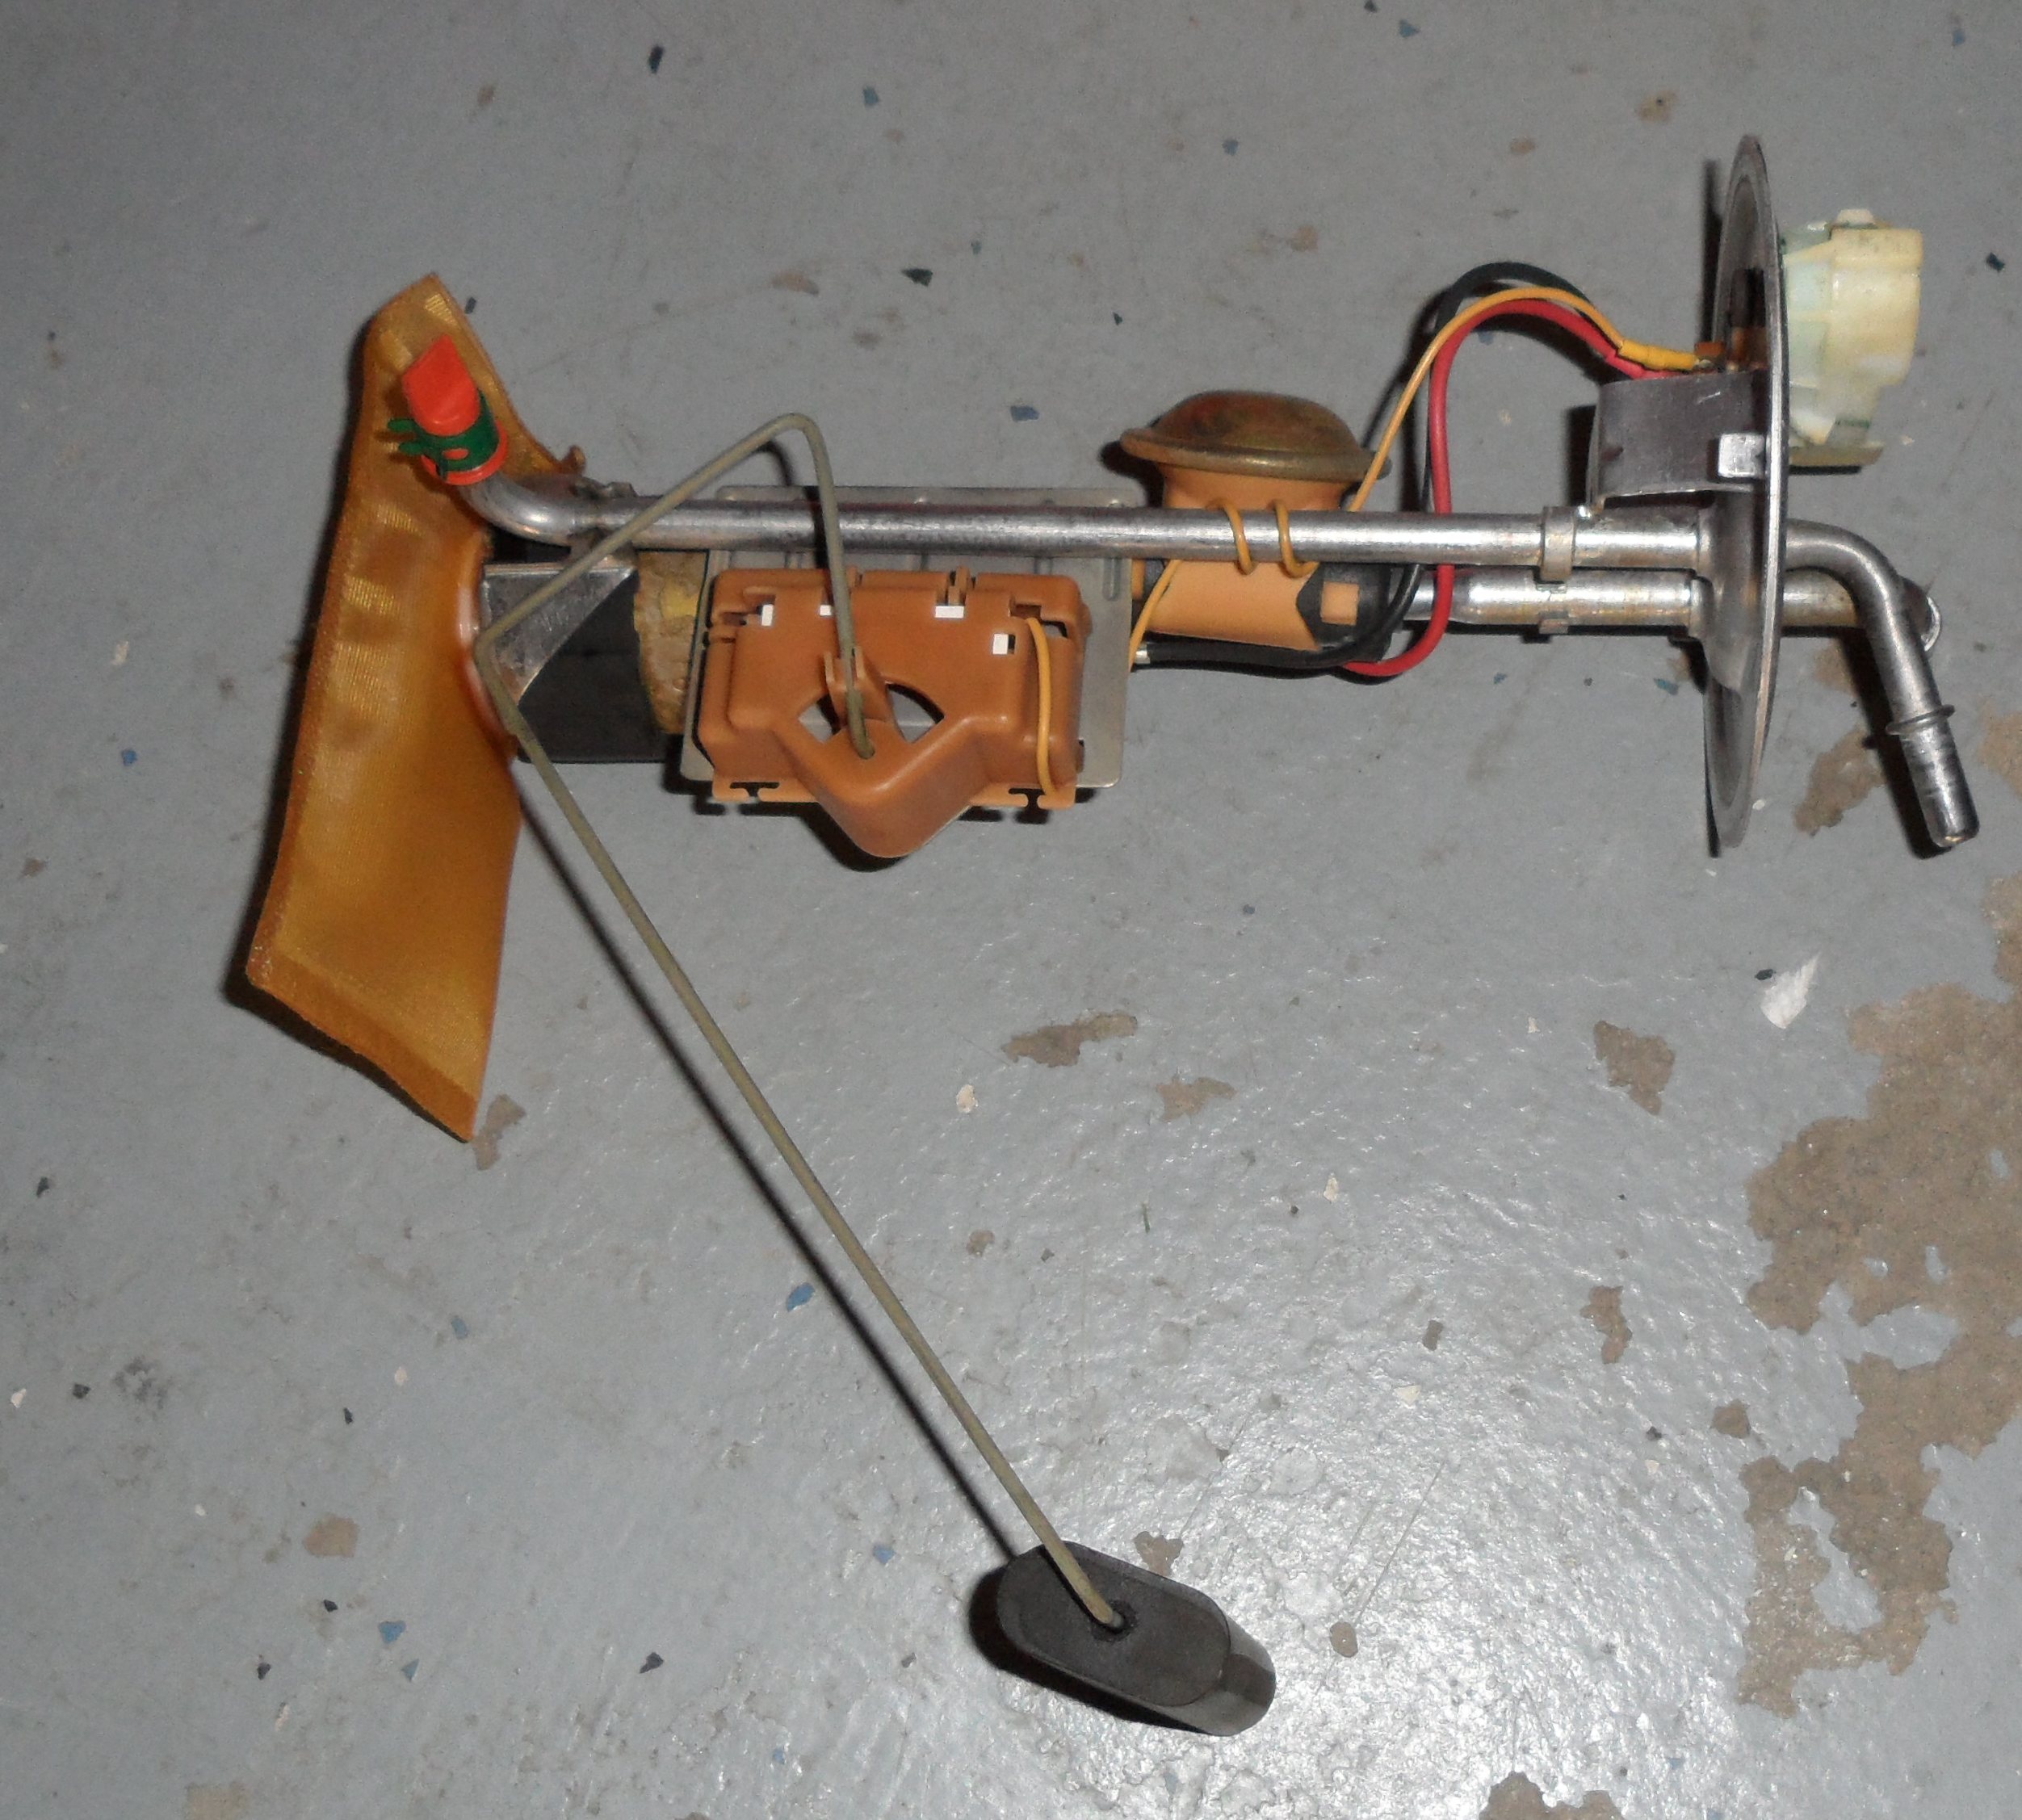
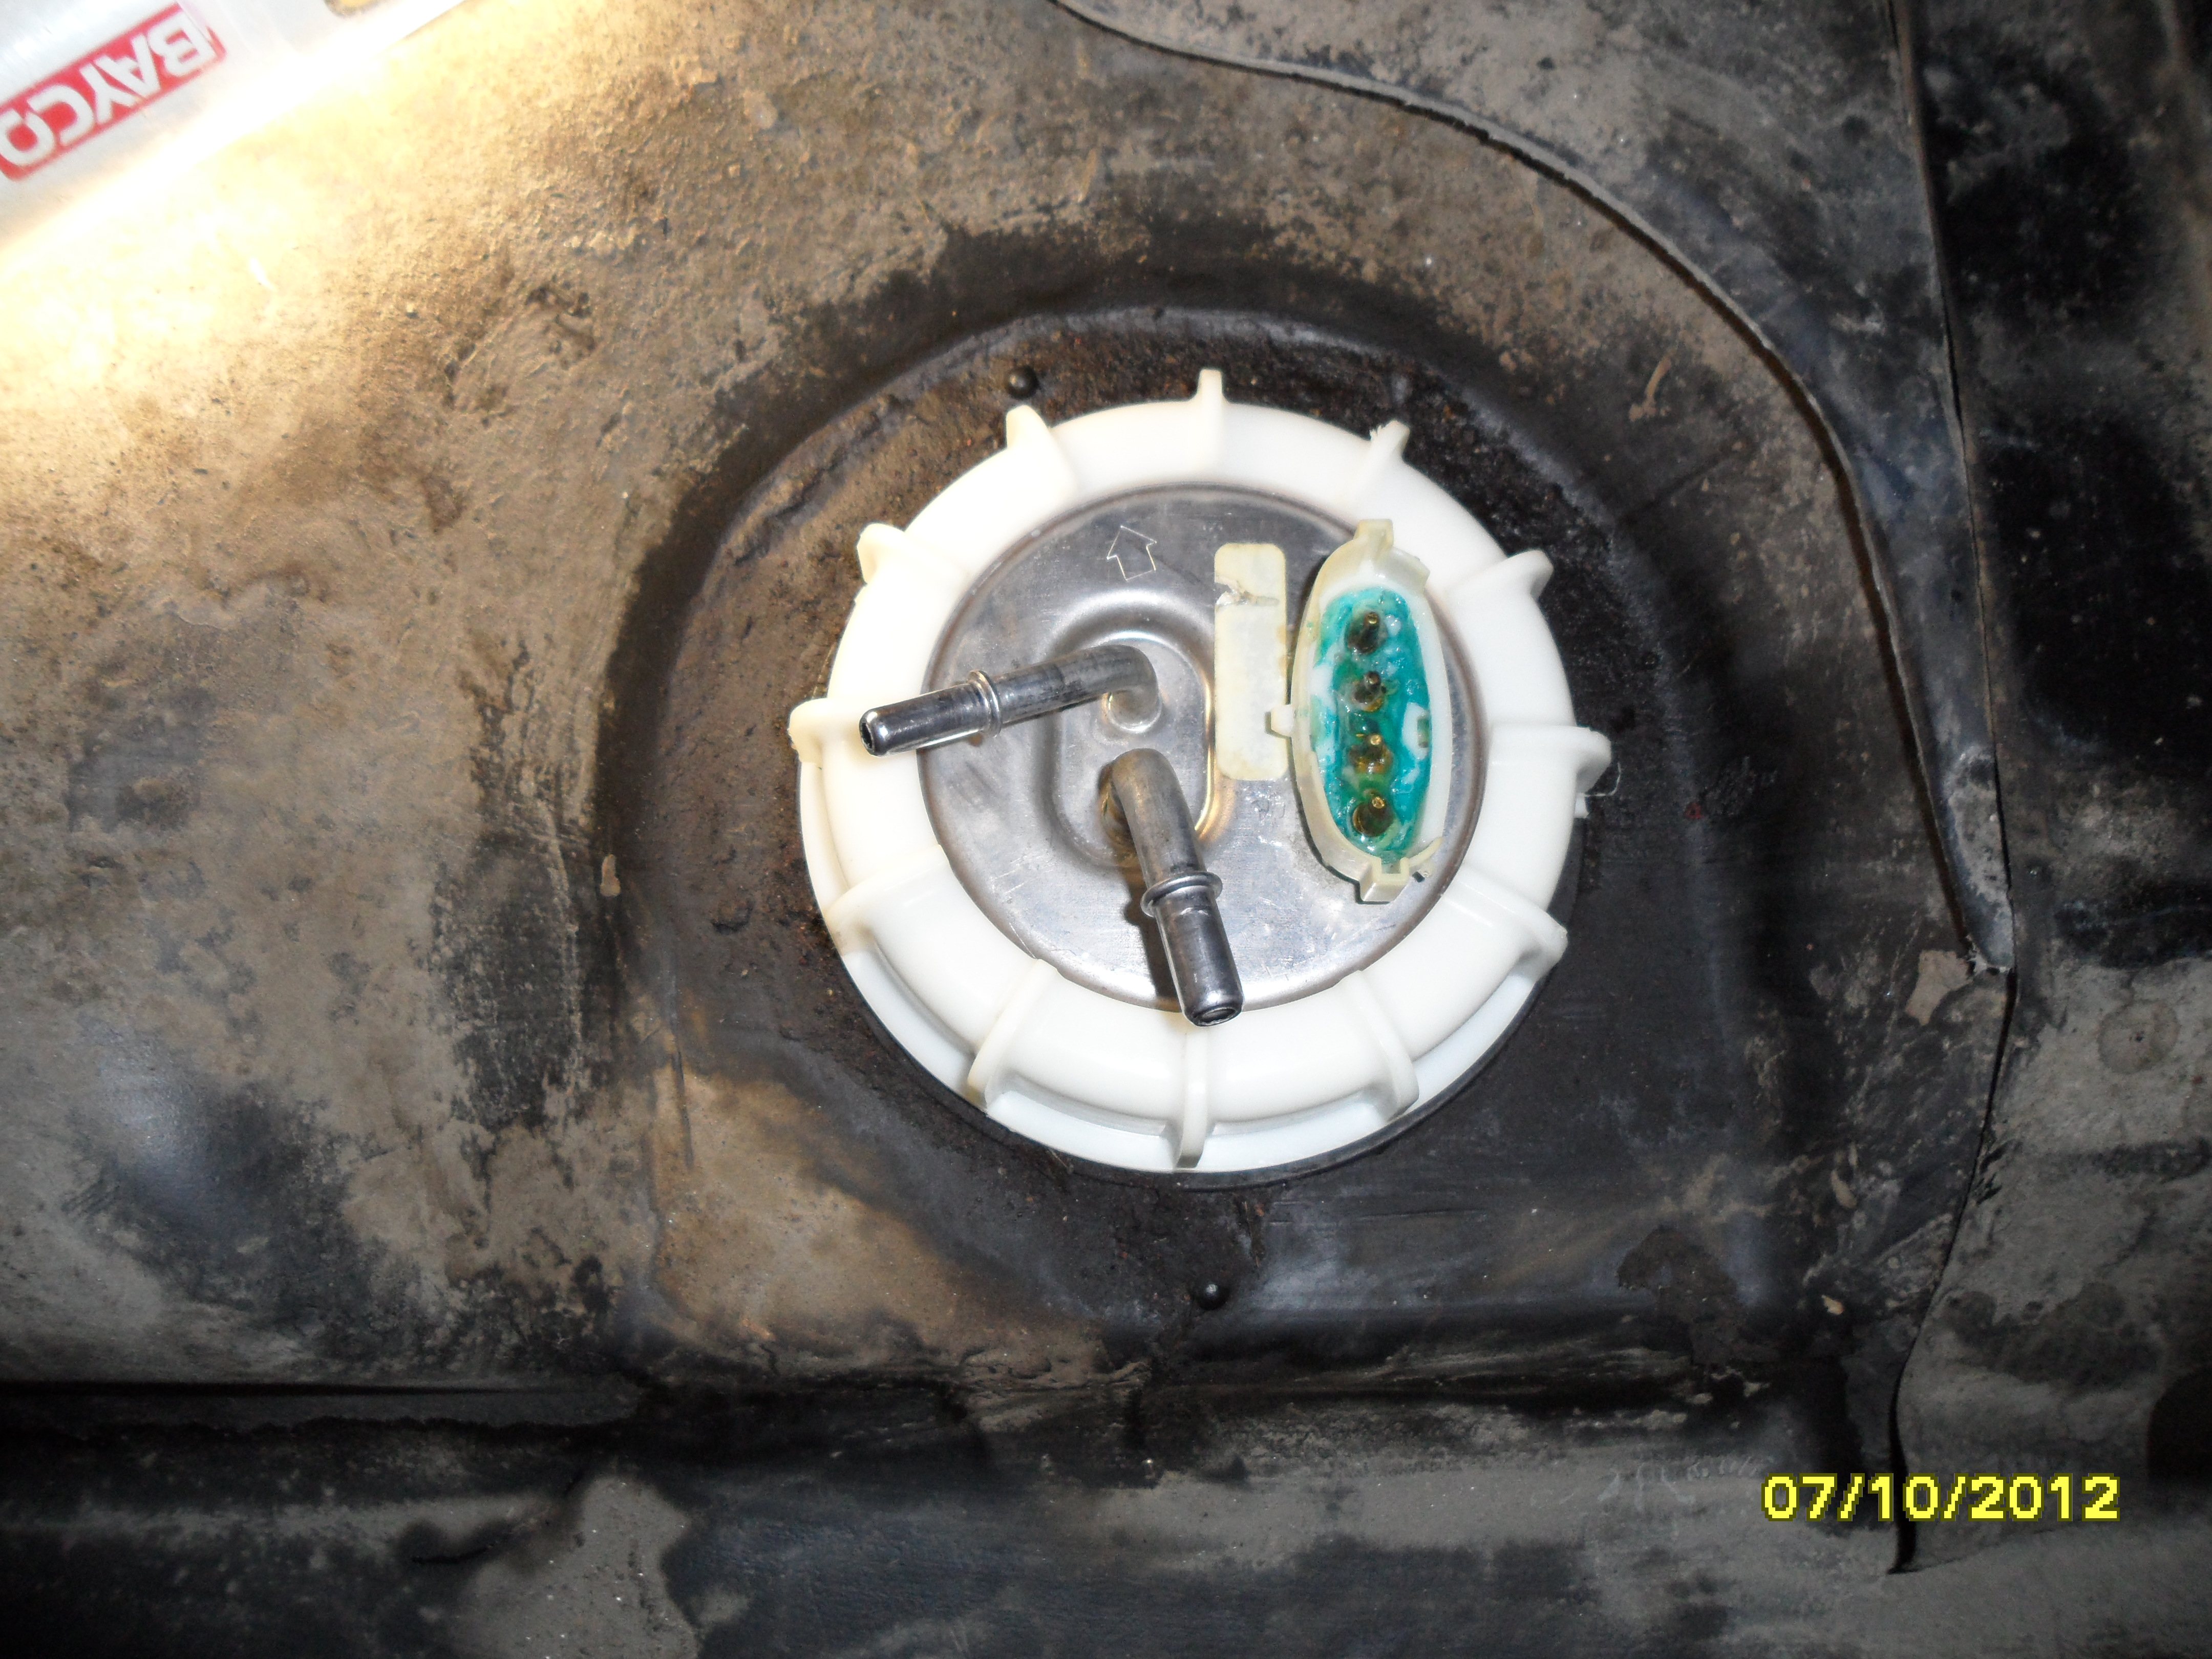
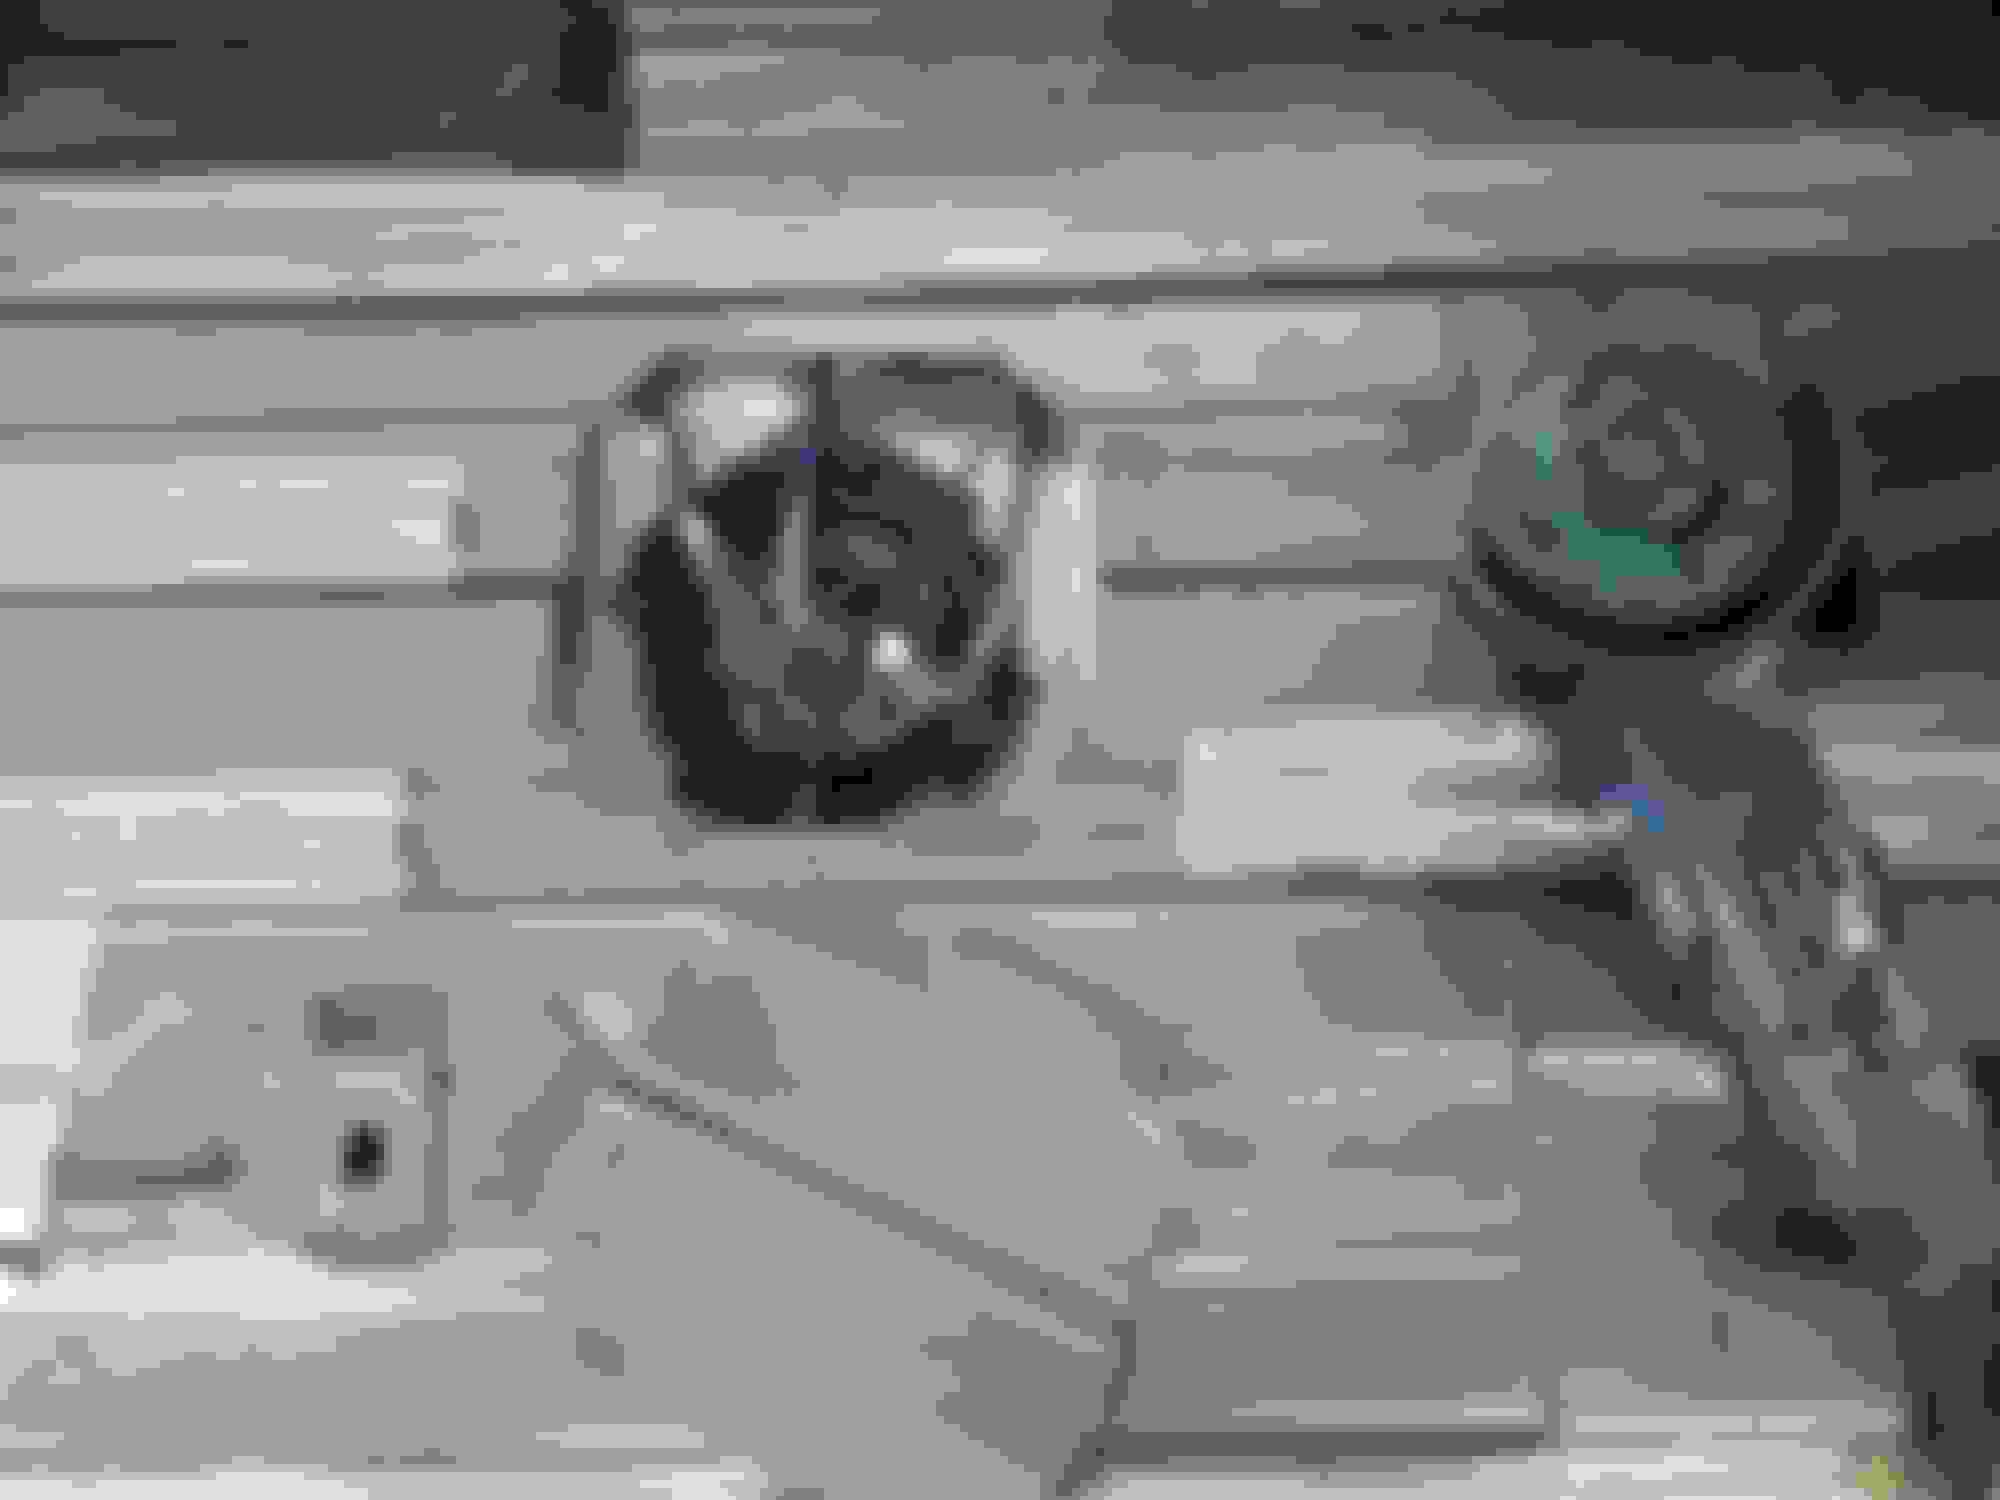
Once the lines & harness are disconnected, you can pull the tank out from under the van and start cleaning in earnest. The white retaining ring unscrews: wrap a rag around it and pretend it's a pickle jar.
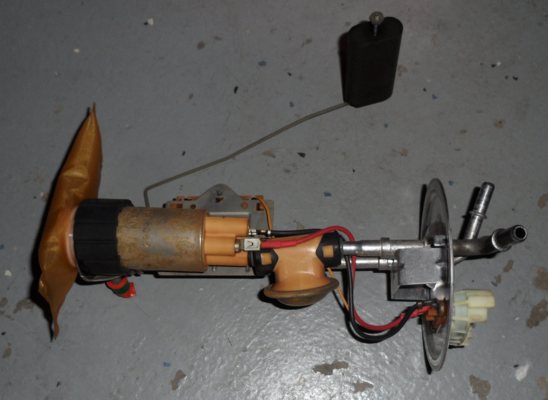
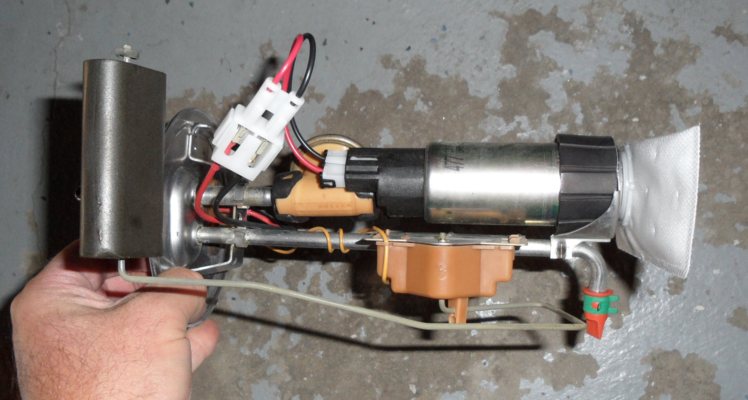
The pump assy. lifts right out, with a minimum of snaking to get the return nipple (orange with green clamp in this picture) and the fuel level sensor float clear of the opening. Note the orientation of the filter sock with regards to the float. In this picture, the sock points to the float. In the past, I've installed the filter sock pointing the wrong direction, and that caused the pump to pick up air at sharp angles, which when I parked on a steep downhill with less than 1/4 tank, lead to me not being able to start the van until I'd coasted to the flat. Truely. I'd had occasion to have that pump out a couple of years later for another reason, and I rotated the sock to the correct orientation, and that problem went away.
If your tank isn't empty, now's a good time to try to find a way to empty it.
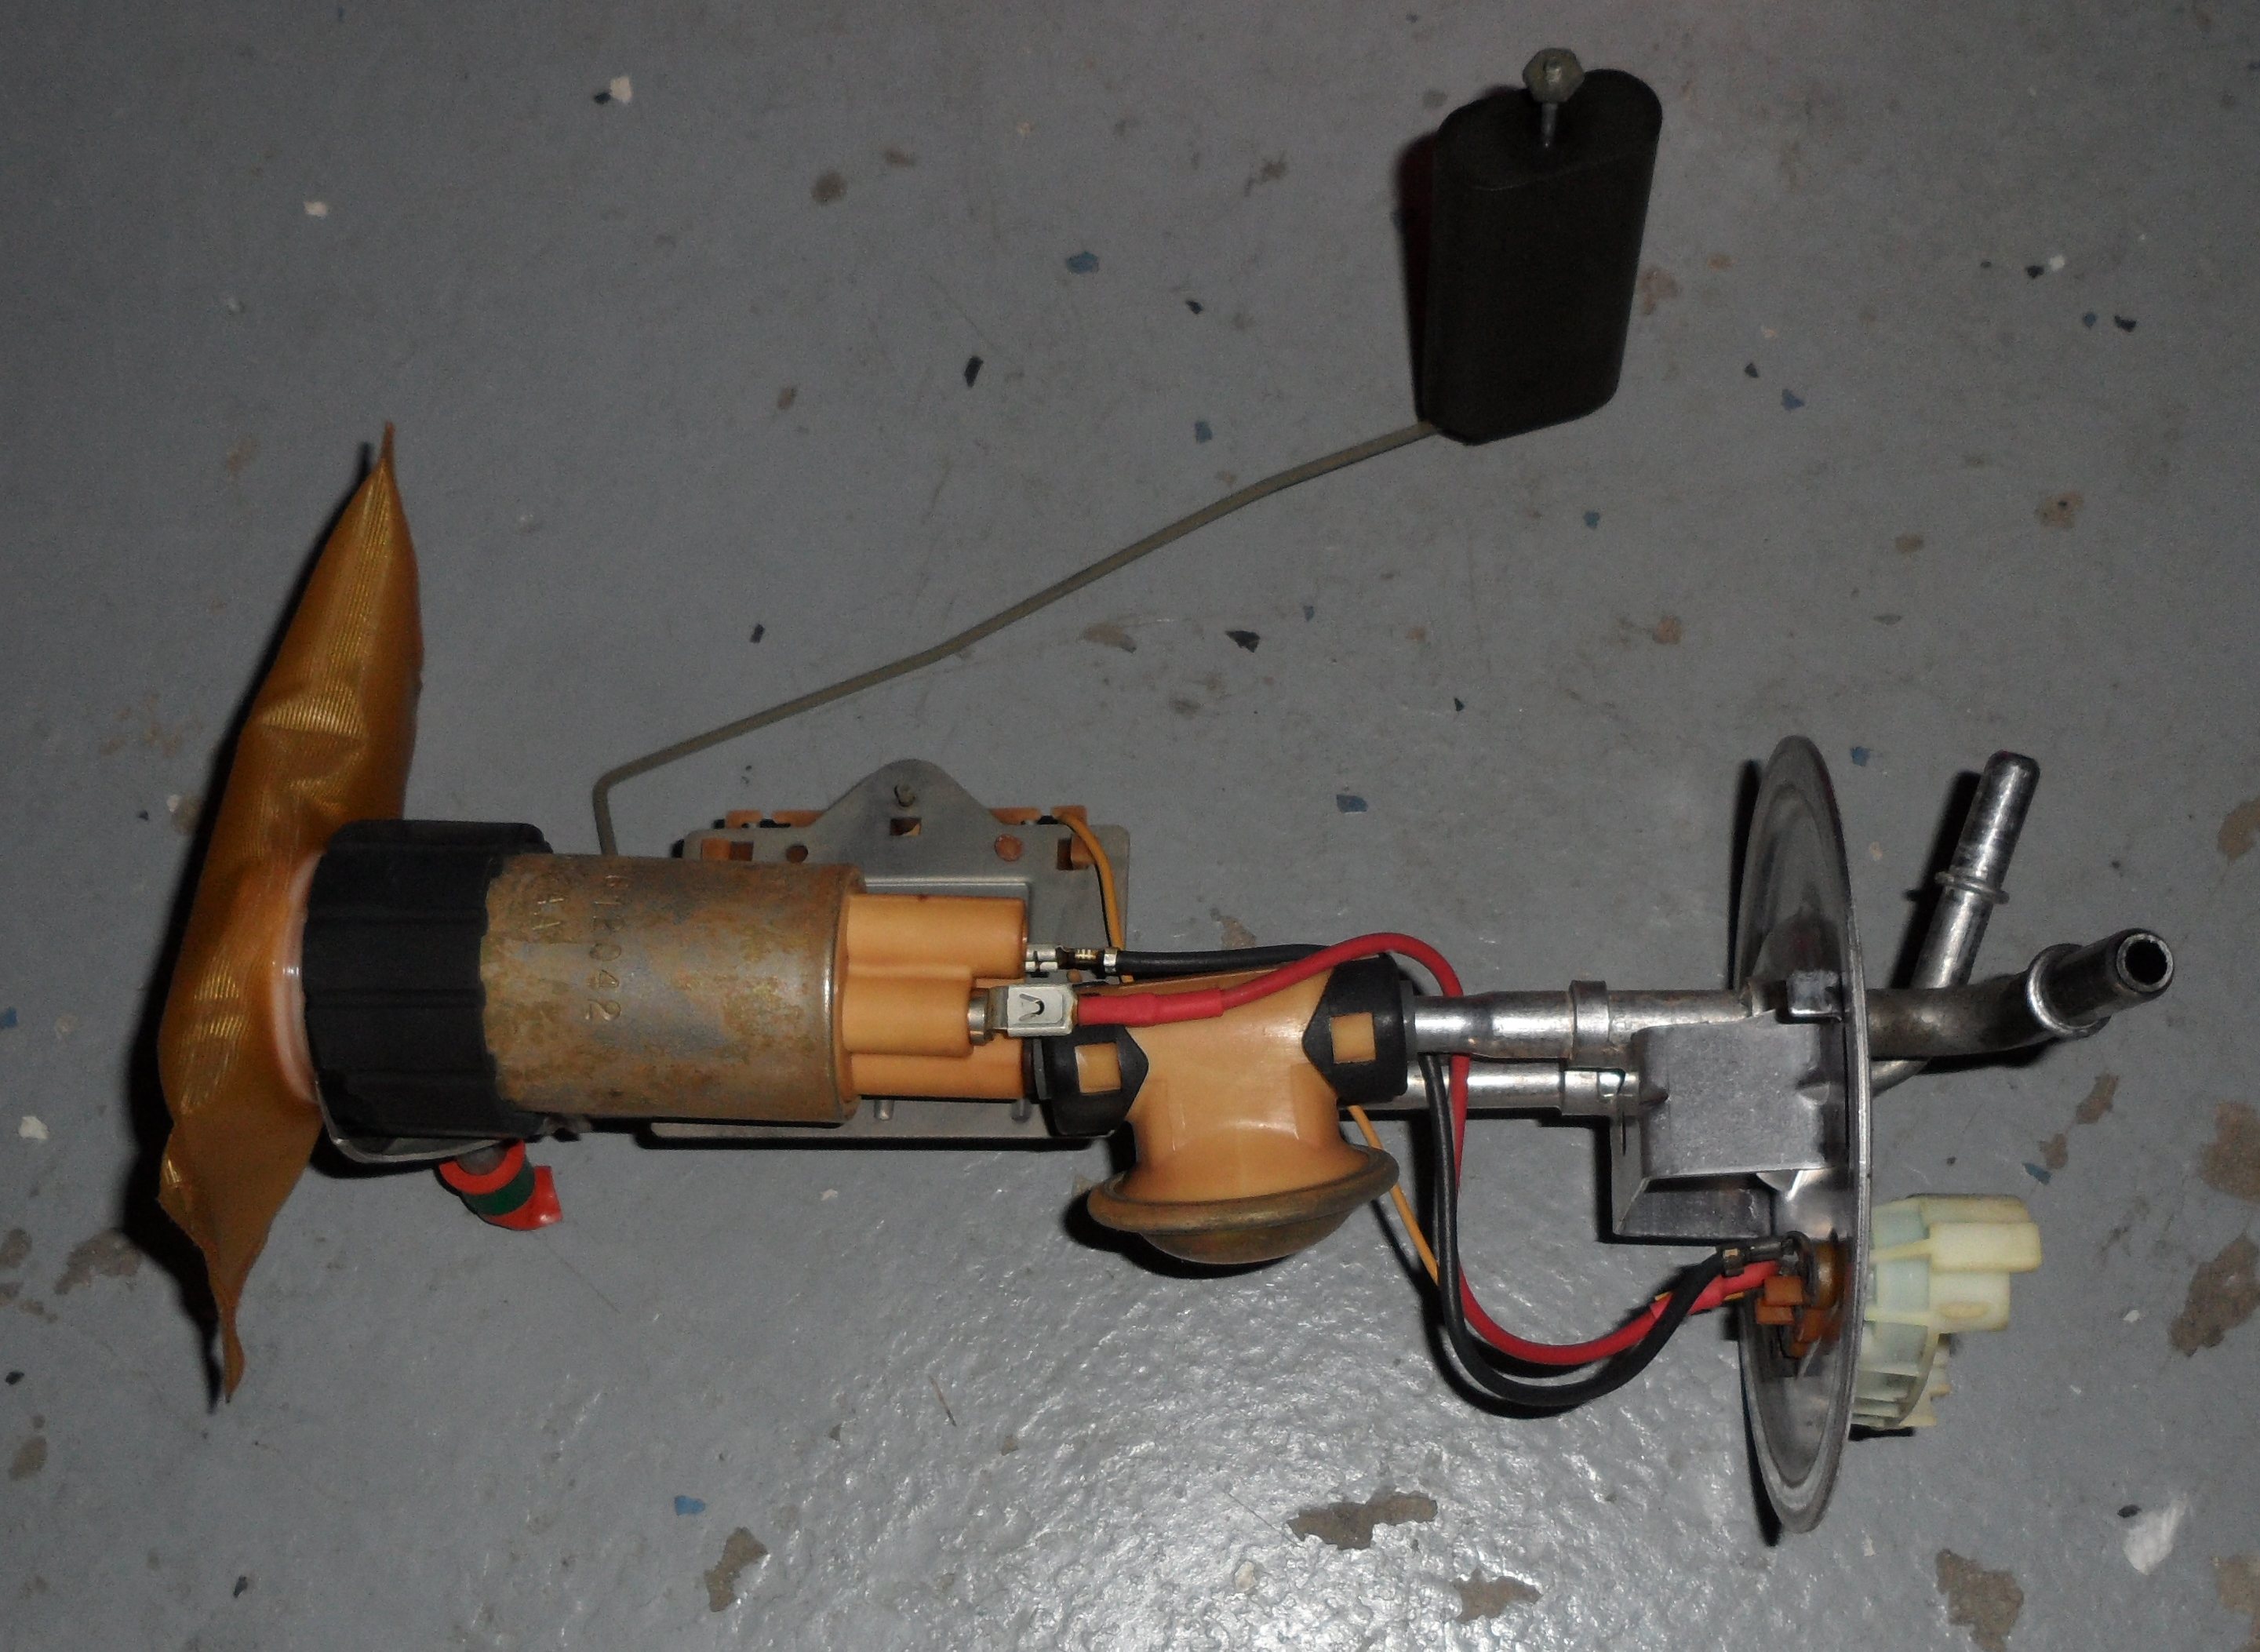
To remove the old pump, first pry off the filter sock. Go ahead, use your favorite prying tool and just bust it off the end.
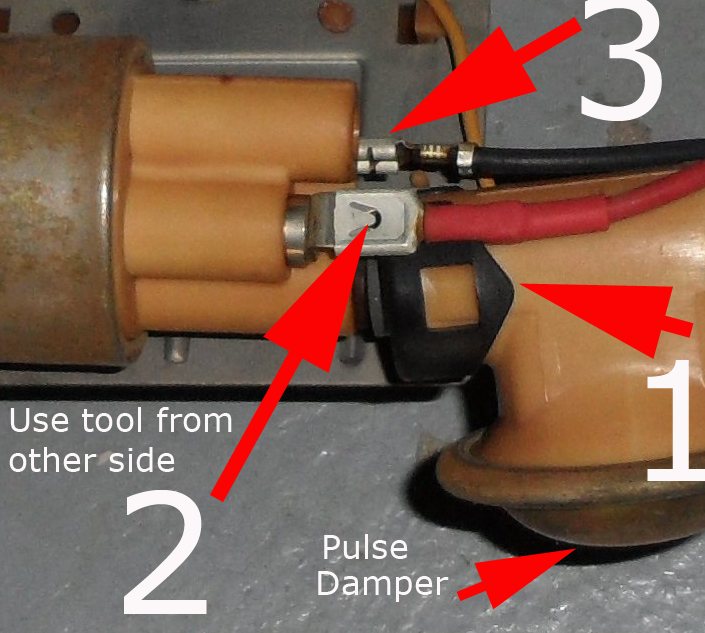
Then, use your o-ring pick again to lift the two ears of the black retaining clip (No. 1 in the picture below). Be careful with these ears, as that retainer is not included in the Bosch kit.
After you've disengaged the ears, the pump can be shoved toward the sock end in the bracket, and the Pulse Damper can be slid away from the pump. It'll be obvious.
Then you have to disconnect the pump's spade terminals. However, they're locking female spade terminals (Nos. 2 & 3 below), so use your right-angle o-ring pick again to press through the hole in the male terminal (from the opposite side) and release the lock tabs. Be gentle, but firm.
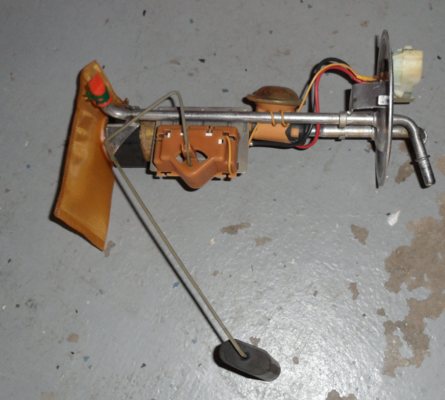
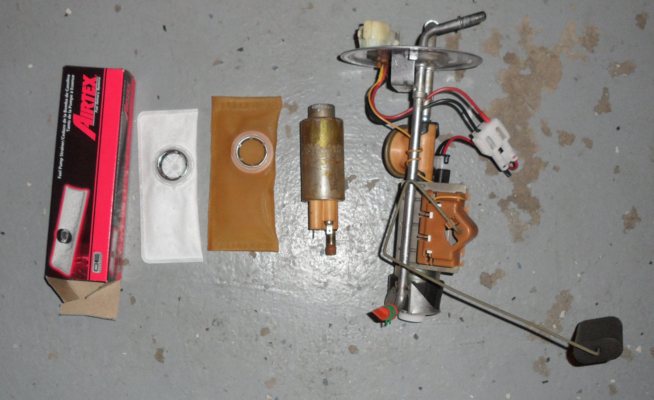
Pump & filter sock removed:
New pump installed. The Bosch unit comes with an adapter wire harness to make mating with the old pump assy. easy. Just push the filter sock on firmly.
Install the pump assy. back into the tank. The Bosch kit includes several tank seal o-rings, but I reused the OEM one, as it was in good condition. On older Aeros, there is a more complex rubber seal that is easily deformed, so be careful on reassembly. I never liked the older design.
The pump assy. is notched and will only lay flat upon the tank flange & o-ring when installed just so, as shown.
Screw the white retainer ring down.
Apply grease liberally to the wire harness connector area on the pump assy. A little lubricant on the line nipples will ease slipping the quick-disconnects over them. The nipples are of different diameters, so you can't install the quick-disconnects on the wrong nipples.
Install the new duck-bill retainers in the quick-disconnects. Each connector has four slots, and you can insert the "legs" of the duck-bill retainers in any two, there's no right or wrong ones.
As they say in the aftermarket manuals, reassembly is the reverse of the above. Put the tank on the prop, connect the lines & harness, then bench-press it into place. If it's empty, it's not bad to place it back up at all.
I made three trips out: to the parts store (filter sock), to Lowe's (cheater pipe), and to Sears (12mm wrench), plus I dropped the front bumper & grille to tighten a hose clamp on my aftermarket trans cooler, and I was still able to get this all done in under six hours, so it's not a terrible job to do.
This pump is so quiet, I was scared when I first cycled the ignition, as I couldn't hear it running! It's very nice to have to strain to hear the pump now
That being said, I can speak out against both Airtex and Bosch fuel pumps. I can also speak out against the Napa fuel pump. Every one I have used of those brands has left be broken down out of town. They work great for short trips, but for longer trips, the pumps overheat and cavitate. This causes a loss of pressure. The symptoms go away after a cool down.
If you can get a Motorcraft pump, its worth the extra money. I have yet to prove it, but another member here has so been using a Denso pump with good results, and I have a spare Denso I carry in my van, but so far I have not needed it as the Motorcraft one just keep on ticking.
Carter used to be good (they made the Motorcraft), but the current Carter pumps are just re-boxed Airtex pumps, which are known garbage. My Focus has a Carter pump, and it is working great.
I have heard a Walbro pump, while noisy, does work great. The 255 lph models flow too much and can actually jam the FPR and cause erratic pressures. The lower rated models should work fine.
When I had to fix the gasket between the mounting plate and the tank opening, I jacked up the driver's side of the van enough to lower the outside of the tank. I didn't actually drop the tank as you did. It gave me enough access to that assembly that if I wanted to replace the fuel pump, I could have.
great service writeup asavage.
top quality pictures of a difficult area to light and photo well.
we all use what we can afford and justify at the time.
hard times and mouths to feed, been there.
my OEM factory FoMoCo. pump is still running strong and quiet almost 200k miles later. never run it below 1/4 tank of fuel so pump is always buried on cold fuel.
quickest starting rig I've ever had, cold or hot, even dead of winter when the girl is covered in snow and ice.
wished I started in the mornings and ran as well at the end of service life.
Great writeup! My denso pump is so quiet you can barely hear anything..Doing another 500 miles this weekend in the green monster..I didn't take the driveshaft out to drop my tank as it came out easy enough. Thats a '96 by the way.
I got the tank out without touching the driveshaft, but I couldn't get it back in. Doubtless, with enough force, it'll wiggle back up there, but I couldn't do it.
The earlier Aeros don't have the plastic shield on the tank, they use a separate, metal shield that bolts to the body. I've always had to swing the driveshaft off to one side to get the tanks out/in.
I just replaced on in a 2000 E-150 with a 40 gallon tank. I replaced the whole unit and not just the pump, with an Ford factory unit. the cost was $325.00 and will last forever if people would not run out of gas. The gasoline is the cooling for the pump and would have lasted 30 years if they would keep some in it.
Forth pump replacement went like this. 89 Aero short body 17 gallon tank. Hole is 7" each way just slightly in front of the floor cross member. I plan to cut a patch from the U pull&pay.
Don't cut too deep with the left side cut. That cut being on a ridge puts the fuel lines at least 1/4" below the bottom of the metal being cut.
And I always lift the bed on my Rangers for tank jobs.
My forth Aerostar pump replacement went like this. 89 Aero short body 17 gallon tank. Hole is 7" each way just slightly in front of the floor cross member. I plan to cut a patch slightly larger than the hole from an Aerostar at the U pull&pay. All fear of a pump failure on the road is gone if I carry a spare.
Don't cut too deep with the left side cut. That cut being on a ridge puts the fuel lines at least 1/4" below the bottom of the metal being cut. The shield was already removed and I cut and bent it away from this hole.
And I always lift the bed on my Rangers for fuel tank jobs. No chance of jack failures or spilled gasoline.
My recollection from my '89 is that the floor had self-adhesive sound deadening on the low portions of the corrugations on the floor. I fought them on my '89 when I cut access holes in the rear floor to mount a Class IV receiver hitch. I can't find the pictures now, though.
At any rate, cutting an access hatch for a very likely once or twice in a lifetime repair seems more work than the downsides: uneven floor, increased corrosion, and grinder debris in the interior. I've run cutting tools and grinders enough to know it's a PITA to keep the work area clean, and even worse if you don't.
But, to each their own. Aerostars are all but gone around here now. I sold my last/fifth one, a '97 AWD, three years ago, replaced with an AWD Sienna that I also hardly use; we drive EVs mostly now, and I use the Sienna for occasional towing, moving furniture, etc. instead of a pickup.
 10-08-2012, 08:24 PM