
My 78 Bronco Project (Daddy's Big Truck)
#256
 08-31-2016, 07:35 AM


#257
09-01-2016, 06:57 PM

I bought and have been using a Harbor Freight ATV/Motorcycle jack. It has parallel lift points so I just blocked the T-case to the angle it needed to be, strapped it on the jack, and lifted it then slid it forward.
#258
09-02-2016, 07:19 AM

#259
09-03-2016, 03:42 PM
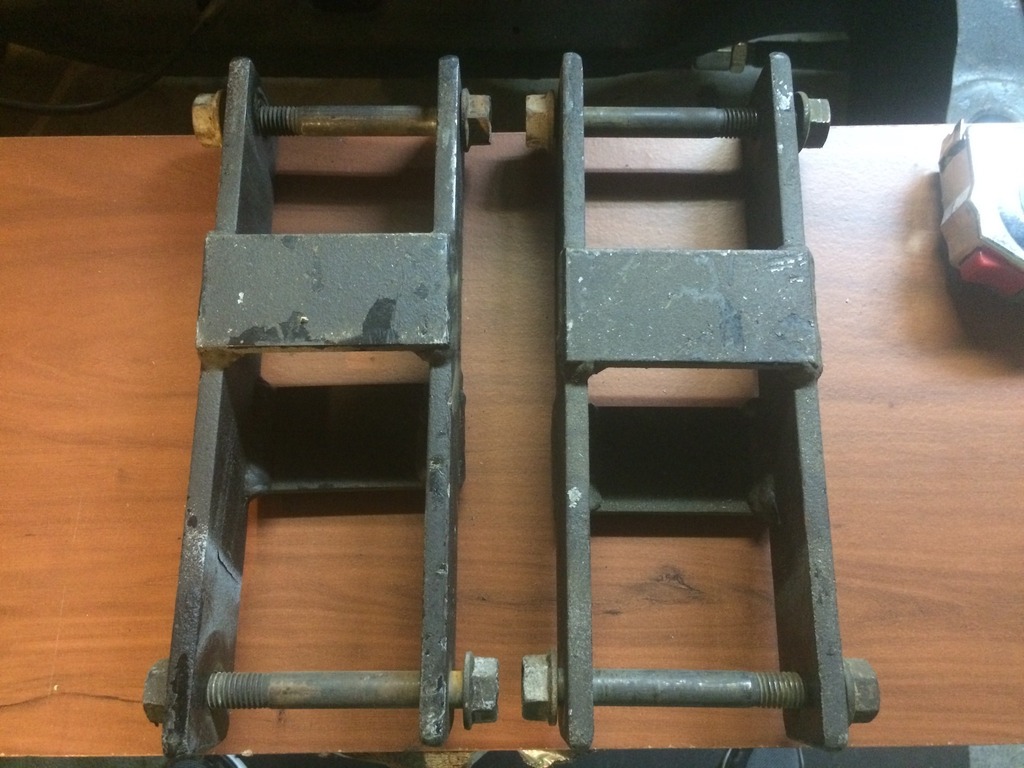
This will be as complete of a write up as I can manage so feel free to ask questions about anything I forgot or that confuses you. I am using the Ruff Stuff Specialties universal shackle flip kit with their 6" shackles. While it is a universal kit, they actually make it to the dimensions that you provide to them. This kit also changes from the Ford factory pocket style shackle to a dual outer mounting style. I'm not an expert, just trying to help out the next guy that try's this swap. I did forget to take pictures at the start so I hope you can figure the easy steps out. I'm also not done at this point but I figured I would try to write it up while it is still fresh in my head.

My project is a 1978 Ford Bronco that I bought in pieces from the second owner. It already had a lift on it of unknown height and a Dana 60 swapped into the rear, I did the rear disc swap. So it was finally time to get rid of the blocks on the rear of my Bronco and the scary long U-bolts that were not even straight on the axle! The blocks are 5 1/2" at the rear and taper to 5" at the front. That makes me guess the lift on my Bronco was a 6" lift from some unknown company. My goal is to get rid of the blocks, correct the pinion angle, and maintain or increase the rear lift slightly.
I read a bunch of threads on a lot of different sites to try and figure out where the perfect mounting for the bracket is on the frame. After all the reading it seems the answer is, "it depends on your rig and suspension setup." I did find that most guys agree that at ride height the shackle should have an angle of 40 to 50 degrees to allow full droop without the shackle swinging too far forward. This should also allow full compression without the shackle limiting the spring movement.
I started today by taking a lot of measurements so I had a good base for before and after comparisons. Next up was jacking up the rear and supporting the Bronco by the frame. Then I set a second set of jack stands just as a precaution. I removed the rear tires and lowered the rear axle until it was neutral, no tension or compression on it while leaving it on the floor jack. Next up was putting a couple of ratchet straps from the frame to the axle to keep things from falling sideways, or onto a toe or leg. Then I took the nuts off the U-bolts, tapped them off the axle, and knocked out the blocks. Next step was to unbolt the factory shackles from the factory hanger and lower the spring onto the axle.

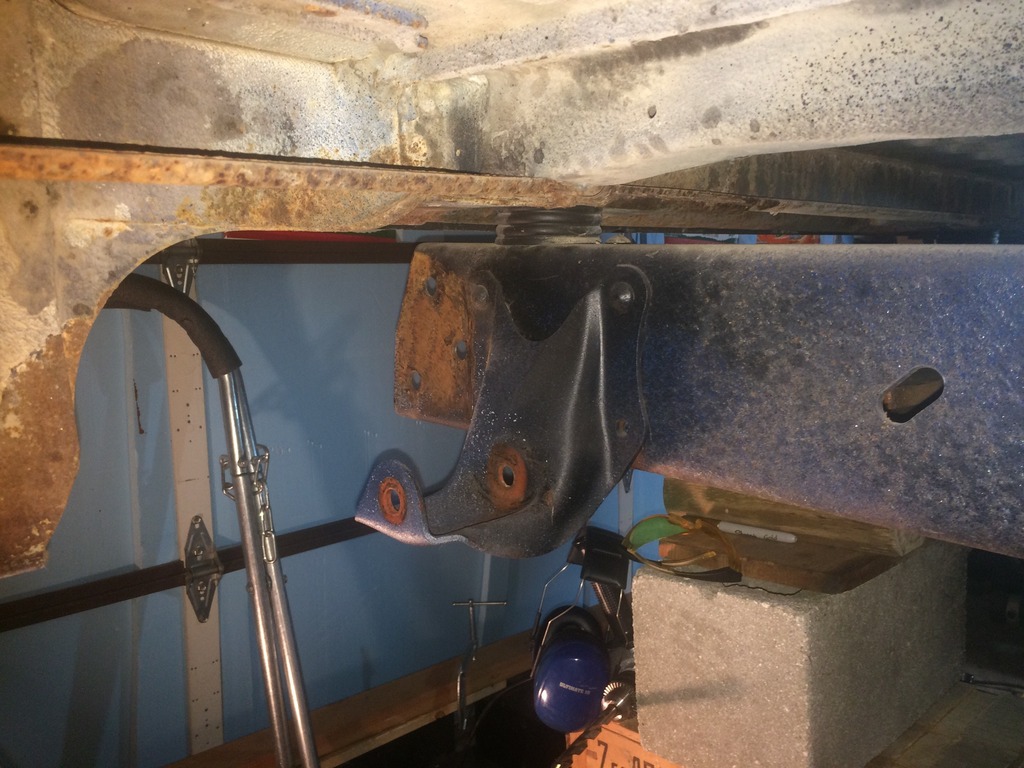
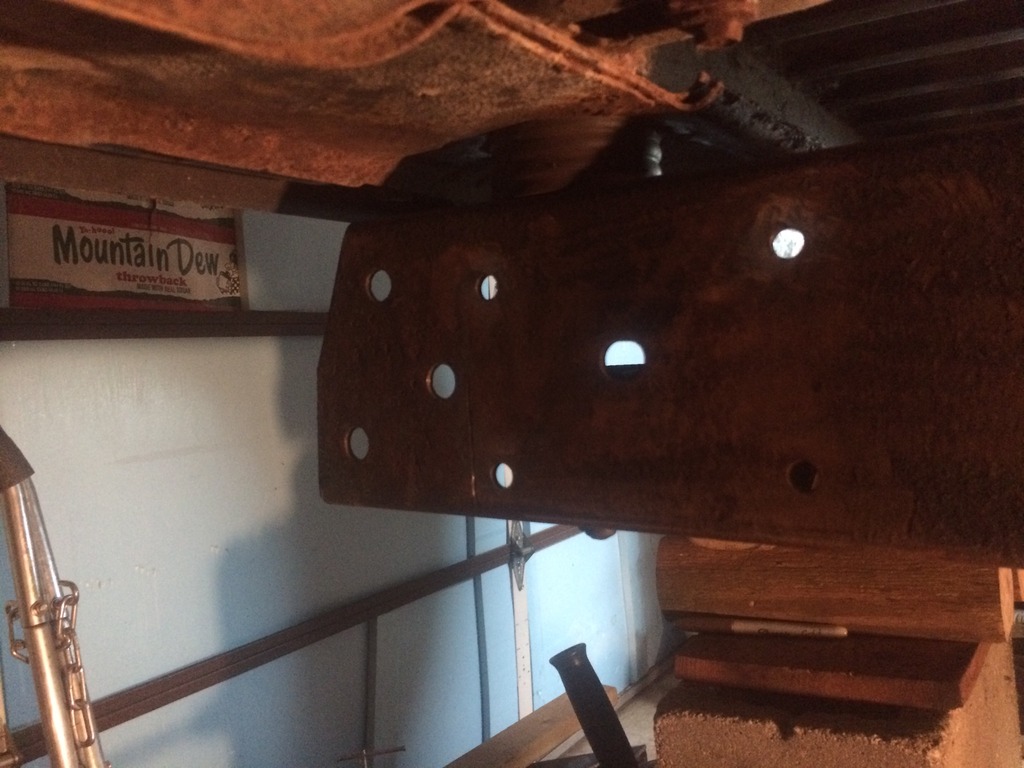
Now is when I discovered that I needed to remove my rear bumper to gain access to the rivets on the rear half of the factory hanger. I have a custom rear bumper that I had already sliced a piece of the rear hangers off to use two of the factory holes because the bumper brackets are so long. Once the access to the rivets is clear you can break out the grinder and start taking the heads off the factory rivets off so you can drive them out and remove the factory shackle hanger. This is also where I noticed that my passenger side bracket was missing the lower front rivet, wonder how long it was gone...
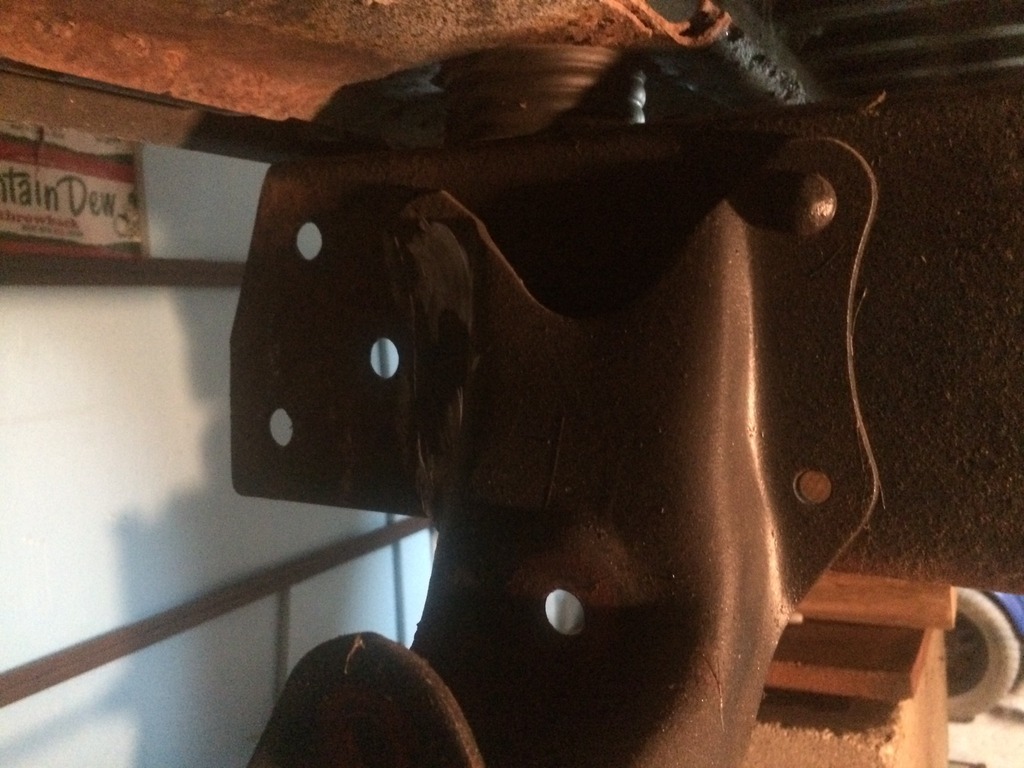
Got the rear two rivets off.
Next I used the three pound hammer to knock the bracket off the frame.
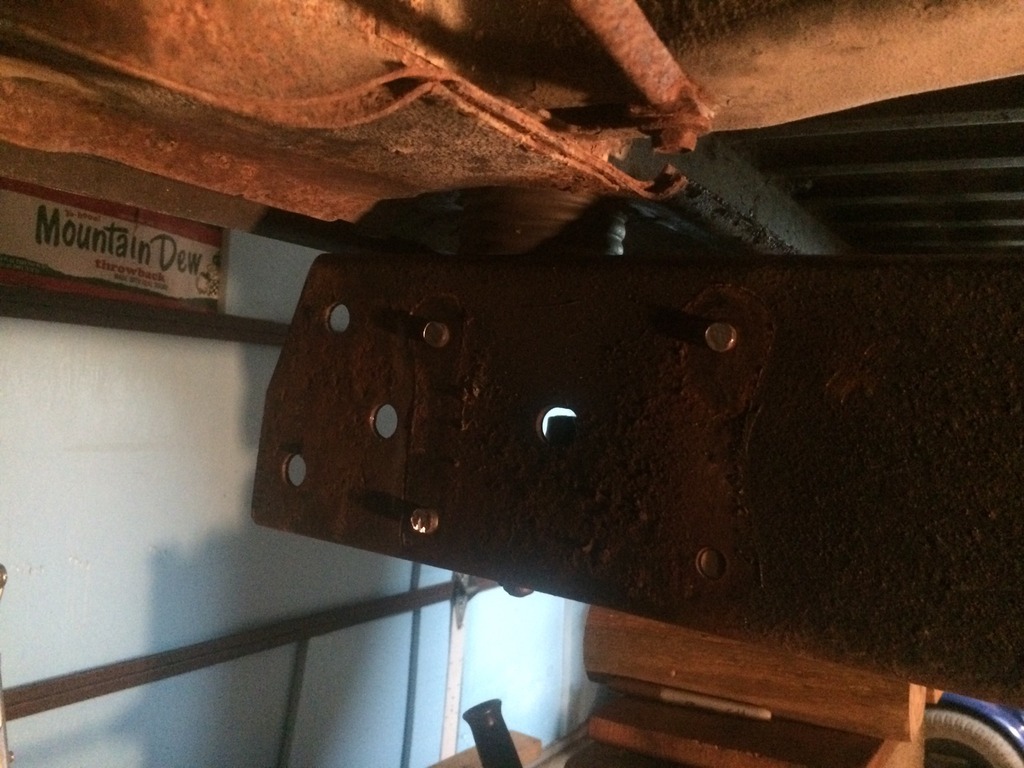
Then I grabbed the air chisel and drove the rivets out of the frame. After that I grabbed the wire wheel and flap disc and cleaned up the frame behind the bracket since this was the first time it's seen the light of day since 1978.
This is when I realized I should have painted the brackets a long time ago when I had nice weather since I can't paint in the attached garage and it's going to be raining for the next few days here. I guess I will get everything mocked into place then take it off later to paint it all since I will have to wait for new U-bolts to arrive.
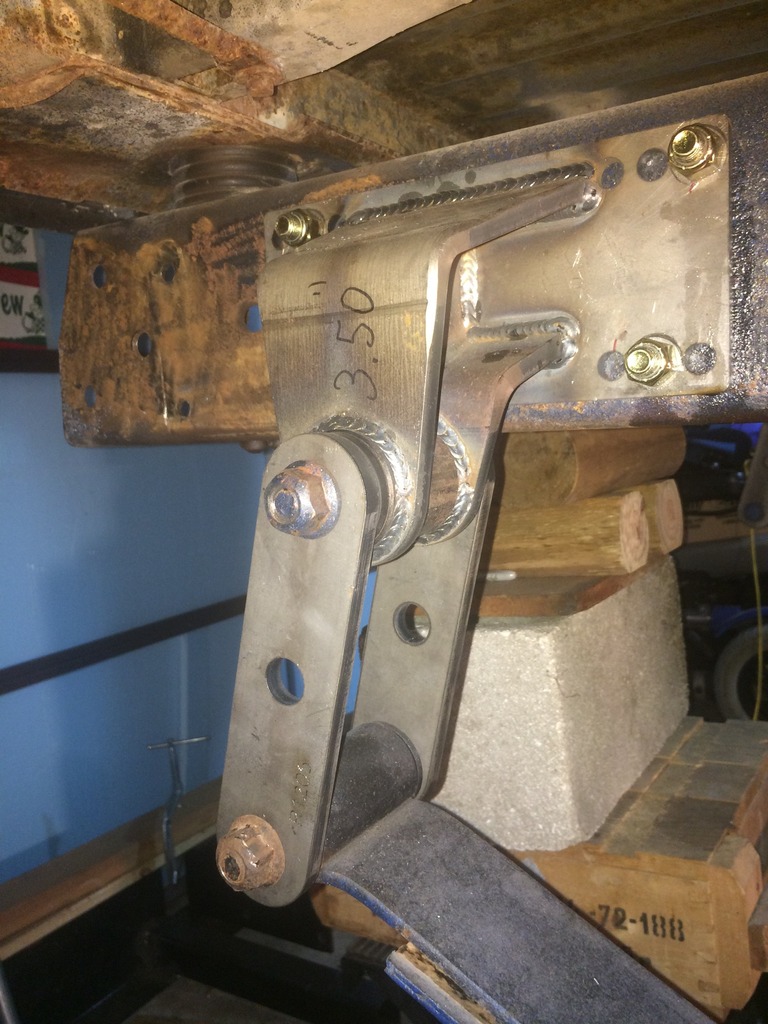
Now that the old parts were off it was time to start figuring out where to install the new hanger bracket on the clean frame rail. I measured, clamped the bracket on. Mocked up the spring, checked the shackle angles thru their range of motion, then adjusted and did it all again. Once I found what I decided was the location I wanted I realized that if I moved the bracket a 1/16" forward I could enlarge and use a factory hole. That will make it so much easier to duplicate the mounting on the other side. So I chose to line up the front most lower hole on the bracket with where the front lower factory rivet for the factory hanger was in the frame. I drilled out the hole to 1/2" while the bracket was clamped to the frame. Then I bolted that location and started drilling the other three mounting holes.
Then I started drilling the rest of the holes that I am using to mount the hanger. I used the 1/2" bit in the hole to mark the center. Then I used a 1/8" hole to drill a pilot hole before going back to the 1/2" to drill all the way thru the frame.

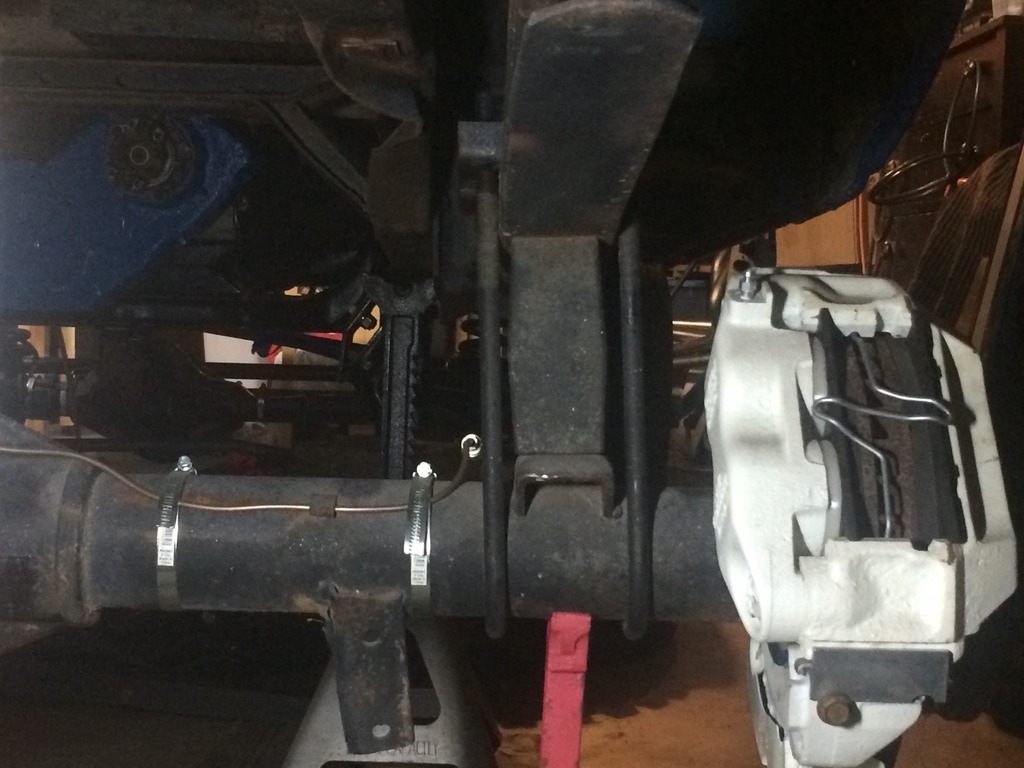
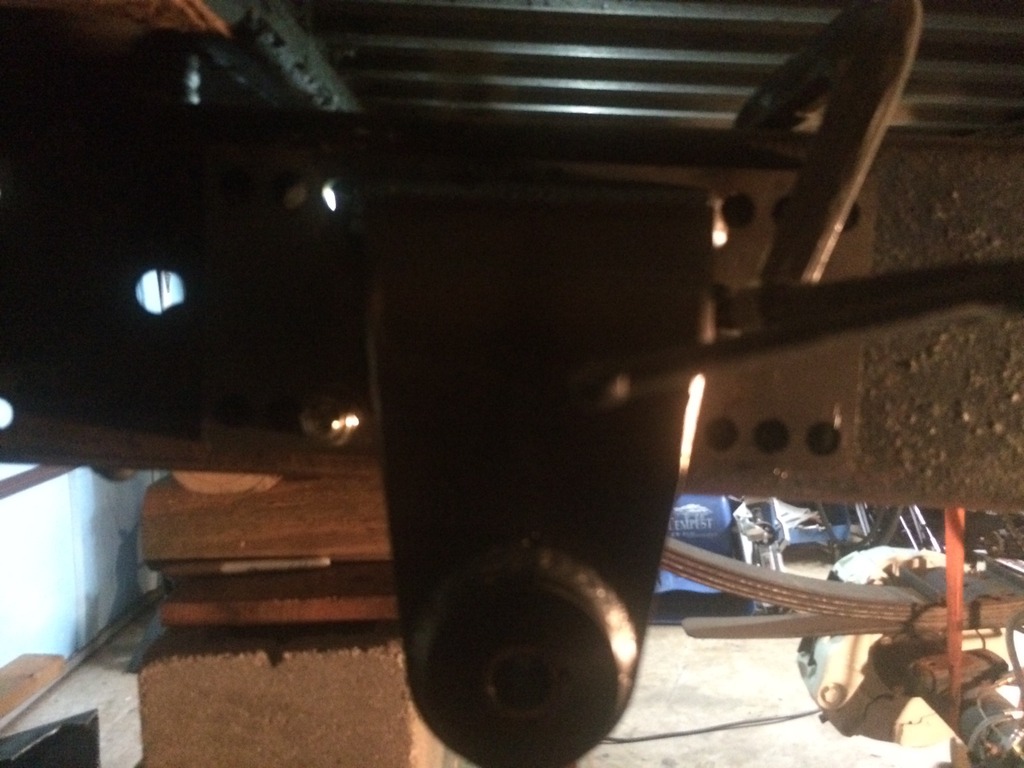
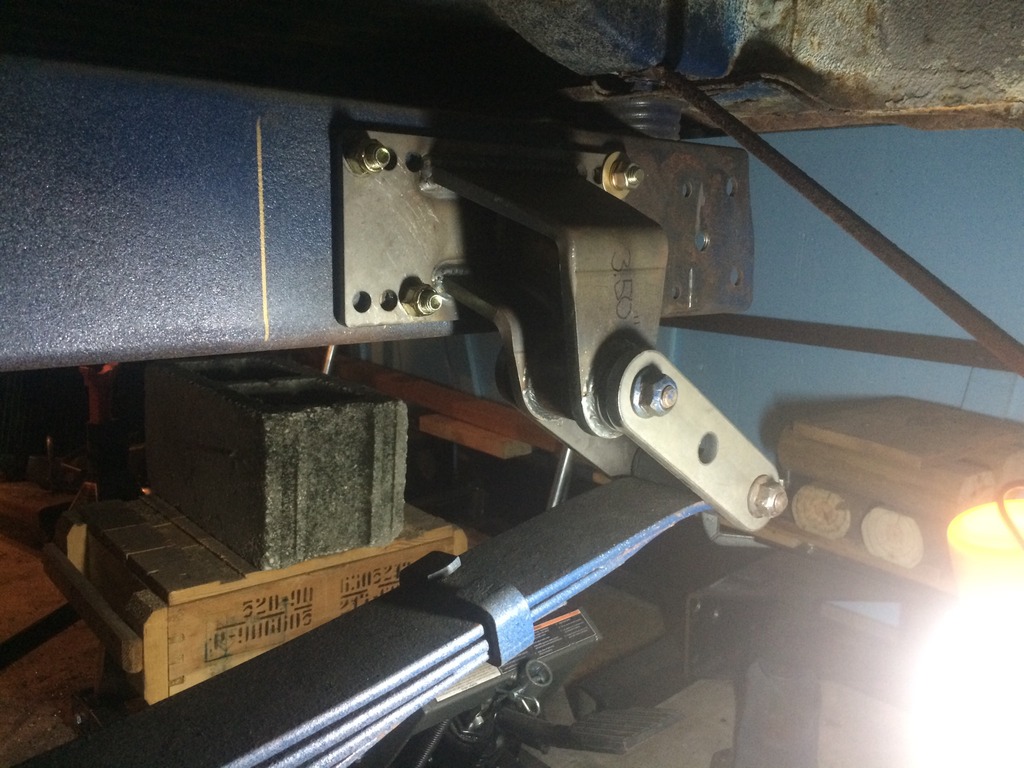
After you have secured the hanger with the four supplied bolts it is time to bolt on the shackles to the hanger and the spring. The stack of stuff in the back of the pic is on my ATV jack and jacked up to the rear crossmember just to help keep the Bronco steady while I was pounding on it, the weight of the Bronco is being supported by the jackstands under it.
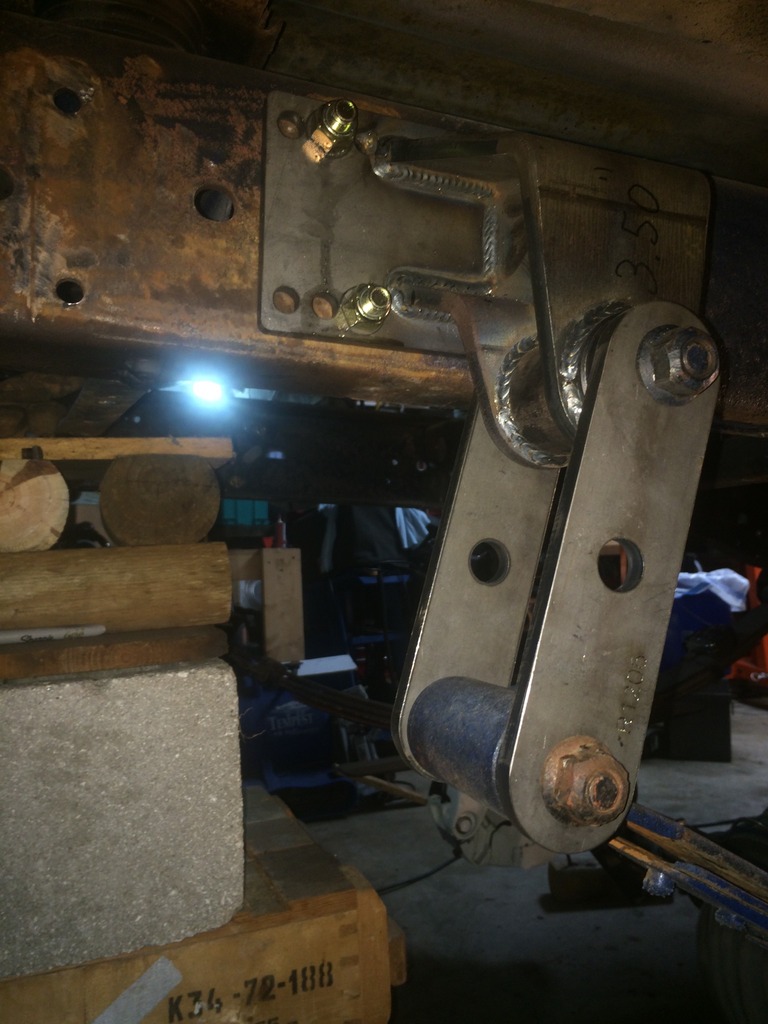
Next up is to copy all of the work to the other side. Once you are done with the other side it's time to figure out if you got all of the lift that you wanted and if the tire is where you want it to be in the wheel well. I used the old U-bolts to attach the springs back to the axle to do this because I was still waiting to order the new U-bolts after I figured out if I need a zero rate block to move the axle in the wheel well. Once it was back on the ground I found that I had a shackle angle of 52* and had lost exactly 1" of lift.
At this point I'm not sure if I'm going to try a longer shackle, add a zero rate 1" block, some add a leaves, or let it be as it is. I really don't know if these are a stock leaf pack or if they are supposed to have some minor lift of their own. I have a set of 10" shackles I made years ago for another truck and I might try them on at some point just to see what it does to the lift and shackle angle. I am happy with the ease of the Ruff Stuff kits to work with and really impressed with the thickness of the material and quality of the welds.
I hope this helps the next guy trying this project. It probably took me 10 hours of time in the garage to do it, but I am working alone in a cramped garage and had to stop frequently to do other things. If you are planning this I recommend signing up for Ruff Stuff's email list as they send out several big sales a year. I got the kit at 22% off by waiting until a sale to buy it. I hope this helps someone else trying this project.

My project is a 1978 Ford Bronco that I bought in pieces from the second owner. It already had a lift on it of unknown height and a Dana 60 swapped into the rear, I did the rear disc swap. So it was finally time to get rid of the blocks on the rear of my Bronco and the scary long U-bolts that were not even straight on the axle! The blocks are 5 1/2" at the rear and taper to 5" at the front. That makes me guess the lift on my Bronco was a 6" lift from some unknown company. My goal is to get rid of the blocks, correct the pinion angle, and maintain or increase the rear lift slightly.

I read a bunch of threads on a lot of different sites to try and figure out where the perfect mounting for the bracket is on the frame. After all the reading it seems the answer is, "it depends on your rig and suspension setup." I did find that most guys agree that at ride height the shackle should have an angle of 40 to 50 degrees to allow full droop without the shackle swinging too far forward. This should also allow full compression without the shackle limiting the spring movement.
I started today by taking a lot of measurements so I had a good base for before and after comparisons. Next up was jacking up the rear and supporting the Bronco by the frame. Then I set a second set of jack stands just as a precaution. I removed the rear tires and lowered the rear axle until it was neutral, no tension or compression on it while leaving it on the floor jack. Next up was putting a couple of ratchet straps from the frame to the axle to keep things from falling sideways, or onto a toe or leg. Then I took the nuts off the U-bolts, tapped them off the axle, and knocked out the blocks. Next step was to unbolt the factory shackles from the factory hanger and lower the spring onto the axle.

Now is when I discovered that I needed to remove my rear bumper to gain access to the rivets on the rear half of the factory hanger. I have a custom rear bumper that I had already sliced a piece of the rear hangers off to use two of the factory holes because the bumper brackets are so long. Once the access to the rivets is clear you can break out the grinder and start taking the heads off the factory rivets off so you can drive them out and remove the factory shackle hanger. This is also where I noticed that my passenger side bracket was missing the lower front rivet, wonder how long it was gone...

Got the rear two rivets off.

Next I used the three pound hammer to knock the bracket off the frame.

Then I grabbed the air chisel and drove the rivets out of the frame. After that I grabbed the wire wheel and flap disc and cleaned up the frame behind the bracket since this was the first time it's seen the light of day since 1978.

This is when I realized I should have painted the brackets a long time ago when I had nice weather since I can't paint in the attached garage and it's going to be raining for the next few days here. I guess I will get everything mocked into place then take it off later to paint it all since I will have to wait for new U-bolts to arrive.
Now that the old parts were off it was time to start figuring out where to install the new hanger bracket on the clean frame rail. I measured, clamped the bracket on. Mocked up the spring, checked the shackle angles thru their range of motion, then adjusted and did it all again. Once I found what I decided was the location I wanted I realized that if I moved the bracket a 1/16" forward I could enlarge and use a factory hole. That will make it so much easier to duplicate the mounting on the other side. So I chose to line up the front most lower hole on the bracket with where the front lower factory rivet for the factory hanger was in the frame. I drilled out the hole to 1/2" while the bracket was clamped to the frame. Then I bolted that location and started drilling the other three mounting holes.

Then I started drilling the rest of the holes that I am using to mount the hanger. I used the 1/2" bit in the hole to mark the center. Then I used a 1/8" hole to drill a pilot hole before going back to the 1/2" to drill all the way thru the frame.

After you have secured the hanger with the four supplied bolts it is time to bolt on the shackles to the hanger and the spring. The stack of stuff in the back of the pic is on my ATV jack and jacked up to the rear crossmember just to help keep the Bronco steady while I was pounding on it, the weight of the Bronco is being supported by the jackstands under it.


Next up is to copy all of the work to the other side. Once you are done with the other side it's time to figure out if you got all of the lift that you wanted and if the tire is where you want it to be in the wheel well. I used the old U-bolts to attach the springs back to the axle to do this because I was still waiting to order the new U-bolts after I figured out if I need a zero rate block to move the axle in the wheel well. Once it was back on the ground I found that I had a shackle angle of 52* and had lost exactly 1" of lift.

At this point I'm not sure if I'm going to try a longer shackle, add a zero rate 1" block, some add a leaves, or let it be as it is. I really don't know if these are a stock leaf pack or if they are supposed to have some minor lift of their own. I have a set of 10" shackles I made years ago for another truck and I might try them on at some point just to see what it does to the lift and shackle angle. I am happy with the ease of the Ruff Stuff kits to work with and really impressed with the thickness of the material and quality of the welds.

I hope this helps the next guy trying this project. It probably took me 10 hours of time in the garage to do it, but I am working alone in a cramped garage and had to stop frequently to do other things. If you are planning this I recommend signing up for Ruff Stuff's email list as they send out several big sales a year. I got the kit at 22% off by waiting until a sale to buy it. I hope this helps someone else trying this project.
#260
09-04-2016, 11:20 PM
Post Fiend
Join Date: Nov 2011
Location: Algona, Washington
Posts: 8,908
Likes: 0
Received 0 Likes
on
0 Posts
#261
09-06-2016, 07:11 PM
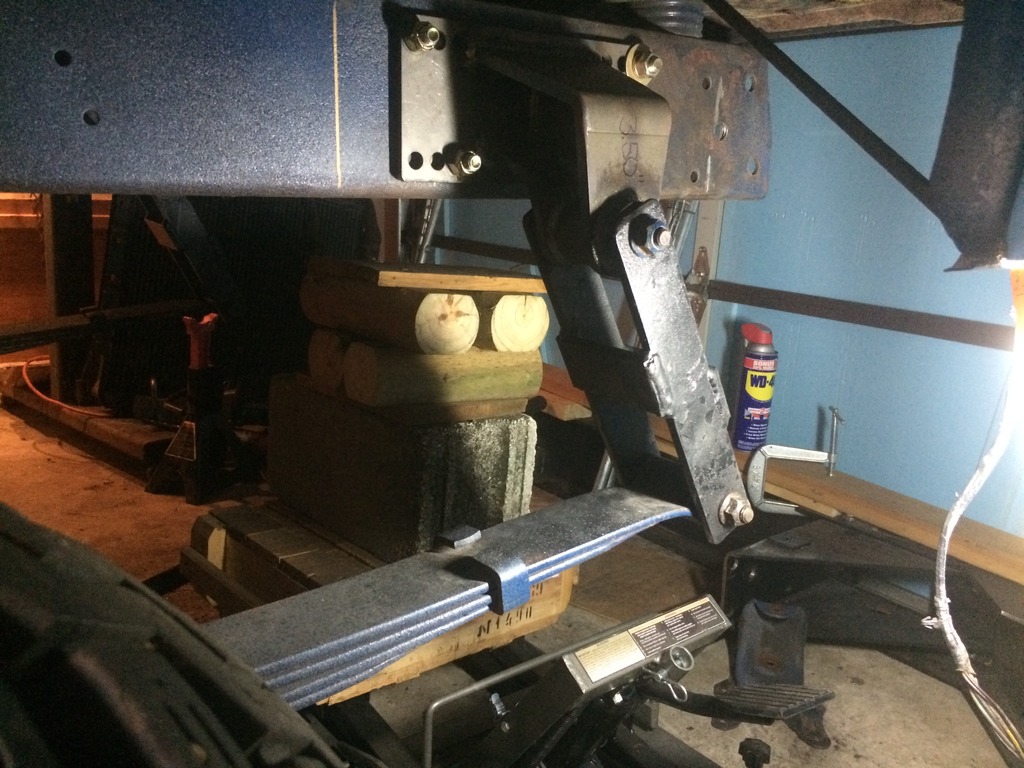
So today I threw on the 10" shackles I built many years ago for a different truck just to see what they did with my shackle flip. Going from 6" to 10" shackles gained me 2 5/8" of lift so the Bronco is now 1 5/8" taller then before my shackle flip. The bad part is it decreased my shackle angle at ride height from 52* down to 28*. I'm not a fan of that, so I'll probably buy the ORD zero rate block to move the axle back a little and got back to the 6" shackles while maintaining the amount of lift I had before the flip.
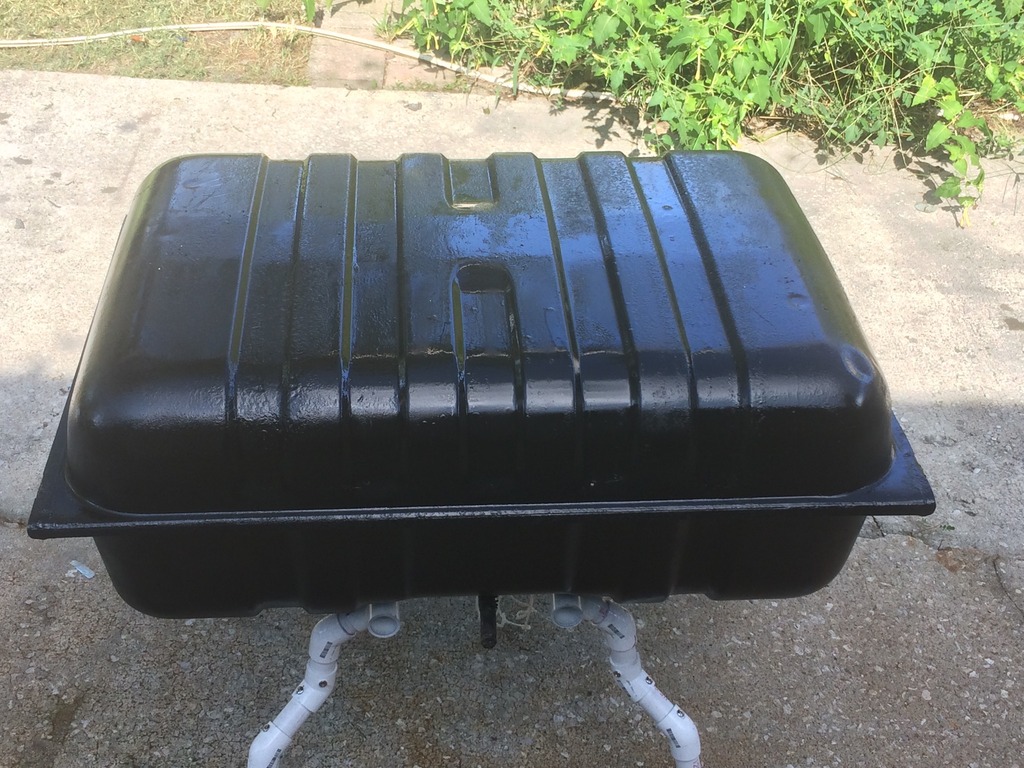
Since I'm not sure what I'm going to do with the rear springs I decided to dig my fuel tank out of the shed and see what kind of shape it is in. After an inspection the inside of the tank looks almost perfect (at least everything I can see) even as the outside has some minor surface rest and flaking paint. I decided I'll try this tank so I grabbed a scotch bright pad and knocked all the flaky paint off and the rest of the loose crud. Then I hit the tank and mounting straps with 3 coats of black paint.
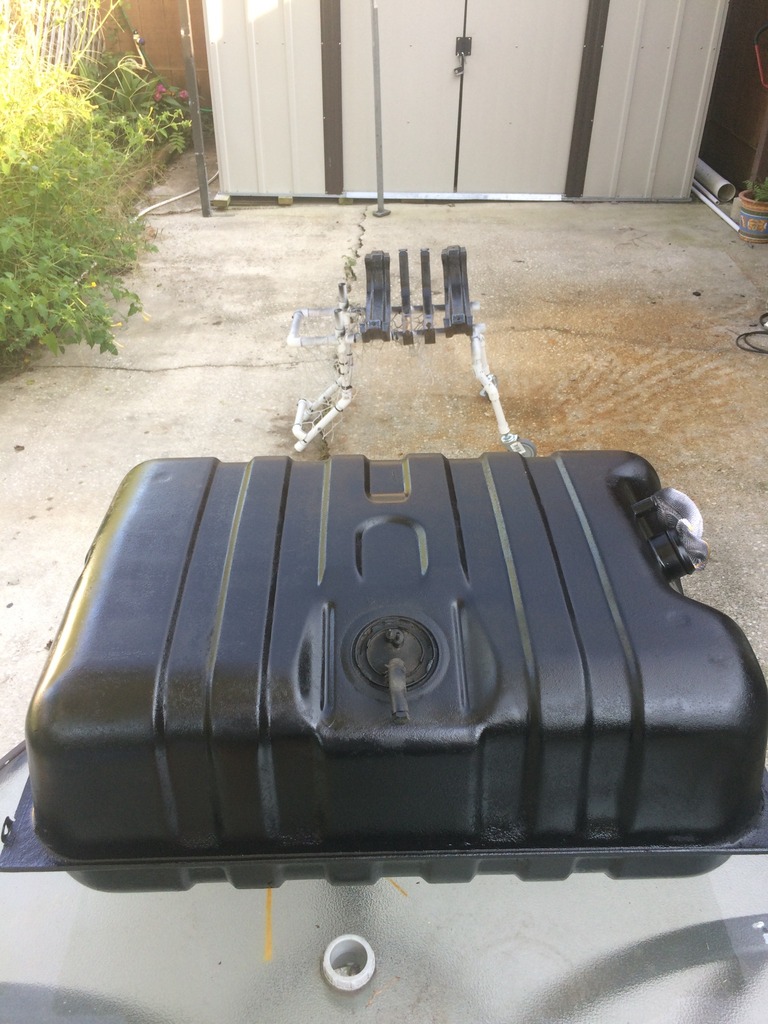
Tomorrow I'm hoping to clean the garage under the rear of the Bronco so I can start laying out the fuel line. After that it's tank instal time! I'm making progress so I'll get kicked in the head with a major setback soon...

Since I'm not sure what I'm going to do with the rear springs I decided to dig my fuel tank out of the shed and see what kind of shape it is in. After an inspection the inside of the tank looks almost perfect (at least everything I can see) even as the outside has some minor surface rest and flaking paint. I decided I'll try this tank so I grabbed a scotch bright pad and knocked all the flaky paint off and the rest of the loose crud. Then I hit the tank and mounting straps with 3 coats of black paint.


Tomorrow I'm hoping to clean the garage under the rear of the Bronco so I can start laying out the fuel line. After that it's tank instal time! I'm making progress so I'll get kicked in the head with a major setback soon...
#262
09-10-2016, 08:37 PM
Well this week I have been plugging away at little projects on the Bronco any chance I get. I started the week by tearing into the rear half of the wiring harness. My Bronco did not have any of the wiring from the firewall to the taillight a when I bought it. Thankfully the donor I bought had almost all of its wiring on it still when I got ahold of it. I pulled the wiring from the donor and this week I took a few hours to pull all of the factory braided fabric loom off so I could inspect the wires and clean everything up. I go luck in that I only had 2 spots where the wires had been chafed thru the insulation so I cut, cleaned, soldered, and heat shrunk those spots. The other problem was the fuel tank sending unit plug had been ripped off. It is a 90* twin connector bullet hookup. I searched the harnesses I had around and found two individual 90* connectors so I did the same cut, clean, solder, and heat shrink to them as well. Then with the help of a visiting friend we got all of the wiring bundled up and into some nice wire loom. I used a lot of cable ties because they are cheap and I don't want the wiring to have any problems in the future. 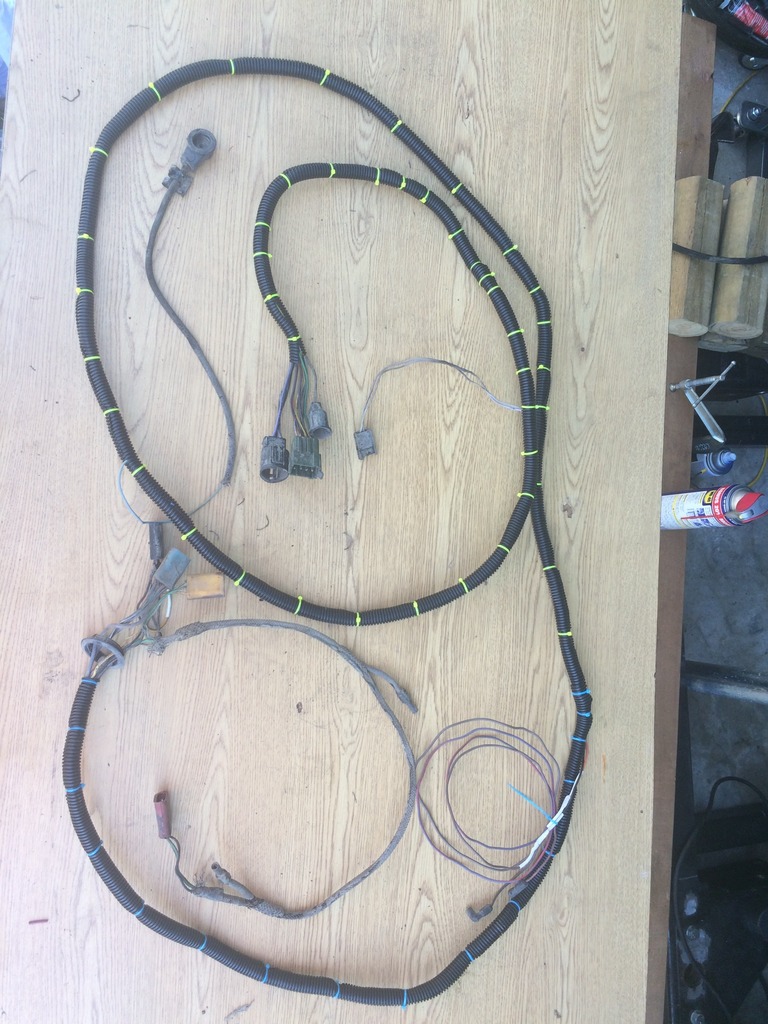
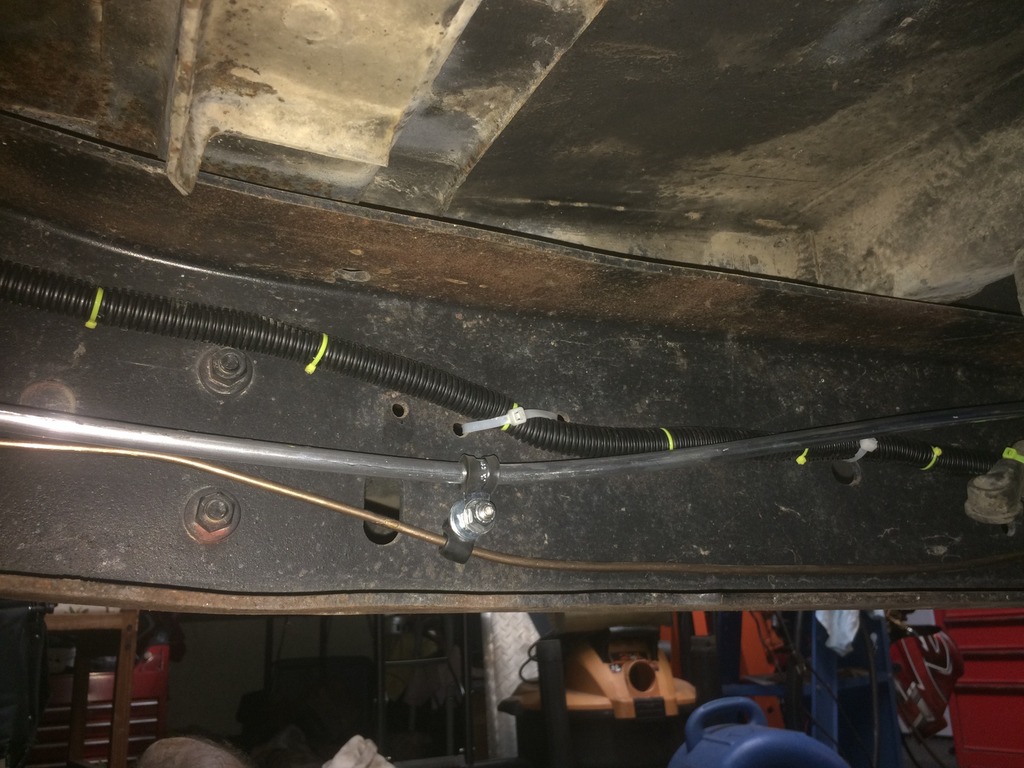
I managed to get the 3/8" hard fuel lines run from the tank to the engine bay. I took the time to route them down the frame where I had run the brake lines and fastened them to the frame with some rubber coated clamps on the same bolts holding the brake lines. I also got the wiring harness installed as well, though it is installed with cable ties right now instead of clamps as I ran out of the clamps.

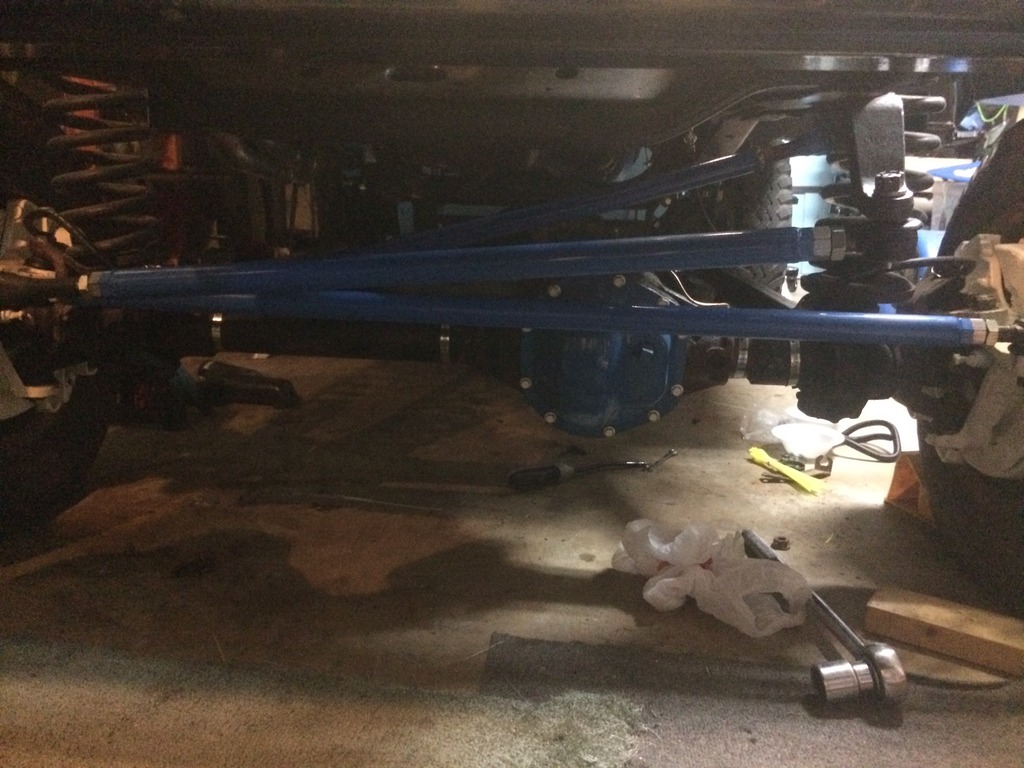
The next item I took care of was having my steering links welded at a local shop since the welder I have right now wouldn't do well on .25" wall DOM tubing. I got them painted while playing baseball with my son this morning. This afternoon I bolted them into place and am happy with how they look so far. The only thing bothering me right now is that the drag link and track bar are at very different angles so I might have a problem with bumpsteer in the future.
I ended the week by installing my electric fuel pump this evening. It's no where near as clean of an install as I hoped for but having to adapt the 5/16" inlet and outlet of the pump to the 3/8" lines from the tank and the rest of the hard lines made for more connections then I wanted. At least I have lots of access to it if there is a problem. I do plan to add a skid plate to protect it from damage before it goes off road.
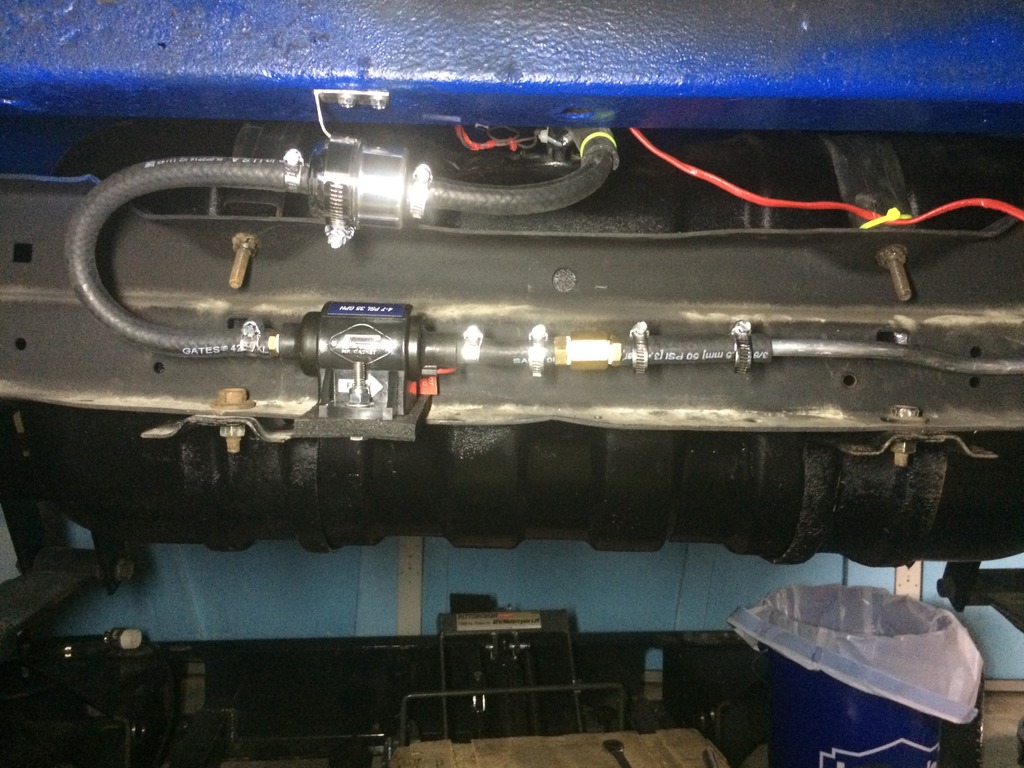

I managed to get the 3/8" hard fuel lines run from the tank to the engine bay. I took the time to route them down the frame where I had run the brake lines and fastened them to the frame with some rubber coated clamps on the same bolts holding the brake lines. I also got the wiring harness installed as well, though it is installed with cable ties right now instead of clamps as I ran out of the clamps.


The next item I took care of was having my steering links welded at a local shop since the welder I have right now wouldn't do well on .25" wall DOM tubing. I got them painted while playing baseball with my son this morning. This afternoon I bolted them into place and am happy with how they look so far. The only thing bothering me right now is that the drag link and track bar are at very different angles so I might have a problem with bumpsteer in the future.

I ended the week by installing my electric fuel pump this evening. It's no where near as clean of an install as I hoped for but having to adapt the 5/16" inlet and outlet of the pump to the 3/8" lines from the tank and the rest of the hard lines made for more connections then I wanted. At least I have lots of access to it if there is a problem. I do plan to add a skid plate to protect it from damage before it goes off road.

#263
09-11-2016, 07:32 PM
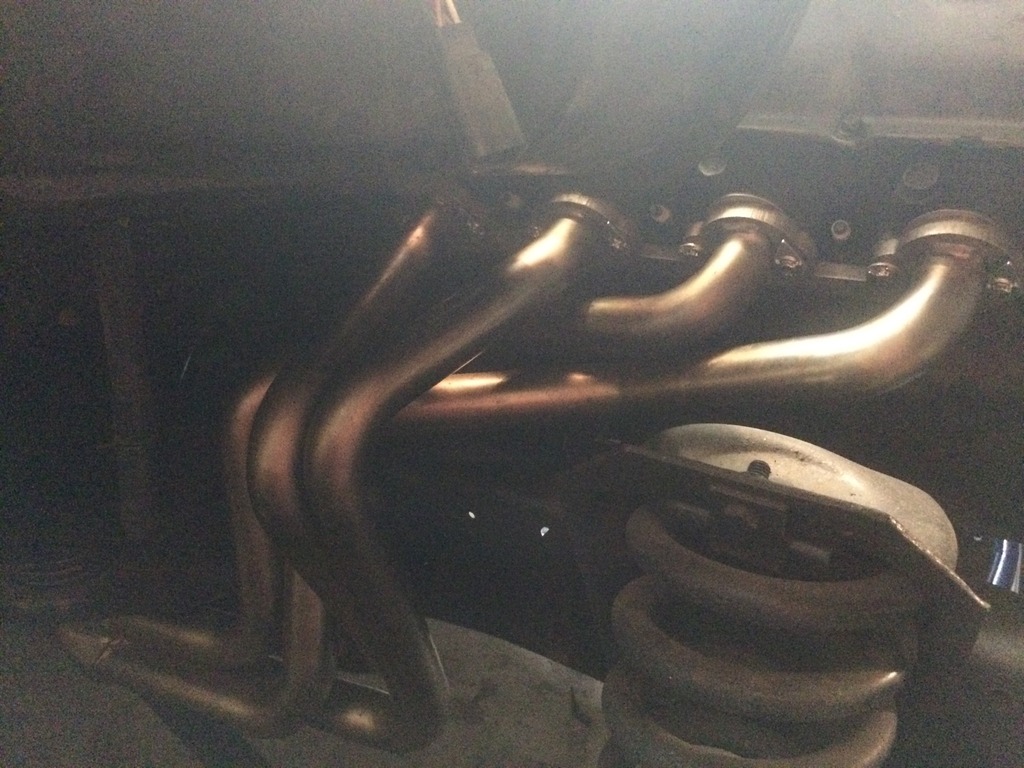
Today I managed to get my headers installed for what I hope is the last time. They are L&L fender well exit headers and I had to trim the bottom of the cab mount brackets to get the headers to line up all the way. I was confident enough that I installed the stage 8 locking fasteners on the header bolts.
After I got the driver side on and half the locking tabs on I took a break and put the Borgeson steering shaft on as well.
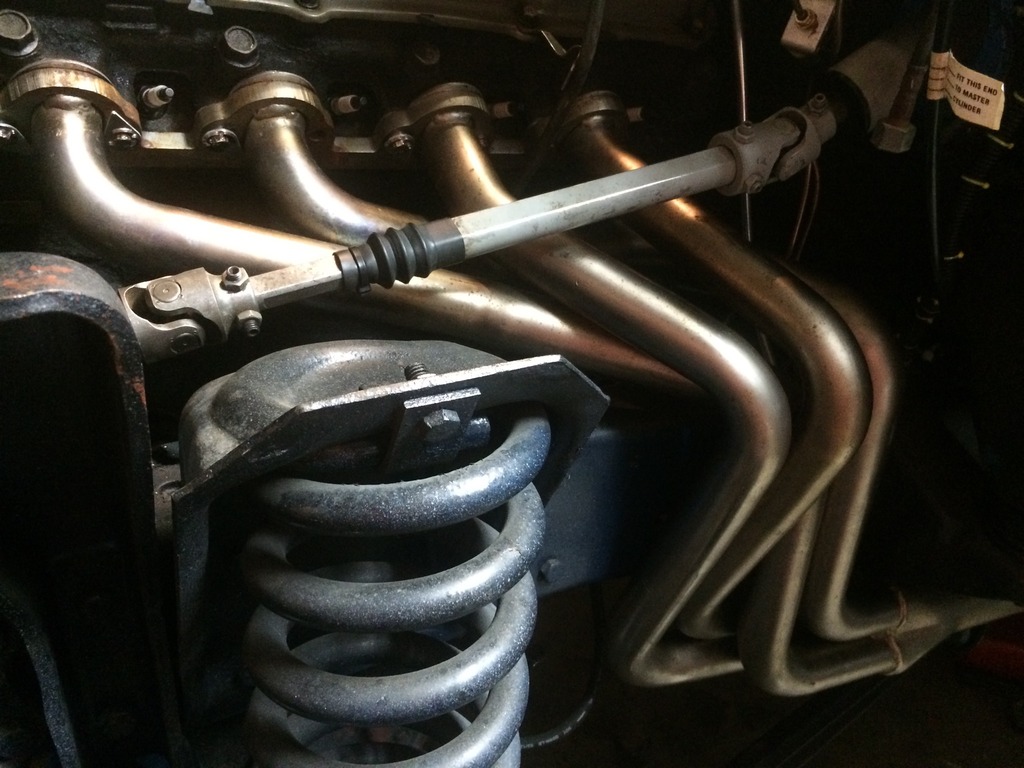

After I got the driver side on and half the locking tabs on I took a break and put the Borgeson steering shaft on as well.

#264
09-11-2016, 08:21 PM
Postmaster
Join Date: Nov 2009
Location: SE Georgia
Posts: 3,189
Likes: 0
Received 0 Likes
on
0 Posts
Today I managed to get my headers installed for what I hope is the last time. They are L&L fender well exit headers and I had to trim the bottom of the cab mount brackets to get the headers to line up all the way. I was confident enough that I installed the stage 8 locking fasteners on the header bolts.

After I got the driver side on and half the locking tabs on I took a break and put the Borgeson steering shaft on as well.

After I got the driver side on and half the locking tabs on I took a break and put the Borgeson steering shaft on as well.
#265
09-11-2016, 10:06 PM
Fleet Mechanic
I haven't been on the forums a while because I've been pretty busy but it looks like you have got a lot done since I've last checked! I haven't read through yet but the last thing I remember was you having trouble with the header install the first time you were trying to do it! They sure look good on there now!
#266
09-11-2016, 10:17 PM
Postmaster
Join Date: Nov 2009
Location: SE Georgia
Posts: 3,189
Likes: 0
Received 0 Likes
on
0 Posts
#267
09-12-2016, 10:01 AM
Manfred, the steering column is an Ididit replacement so no factory Ford plastic retainer to fall apart on this one. The headers are L&L electro less nickel plated that are not currently available from L&L. They don't look it, but these are used headers. I picked them up from another FTE'r who decided he didn't like the fender well exit look.
#268
09-13-2016, 08:50 PM

#269
09-14-2016, 05:09 PM
Between yesterday and today I got the driver side inner fender trimmed for the headers and the "pocket" made for the clutch master cylinder.
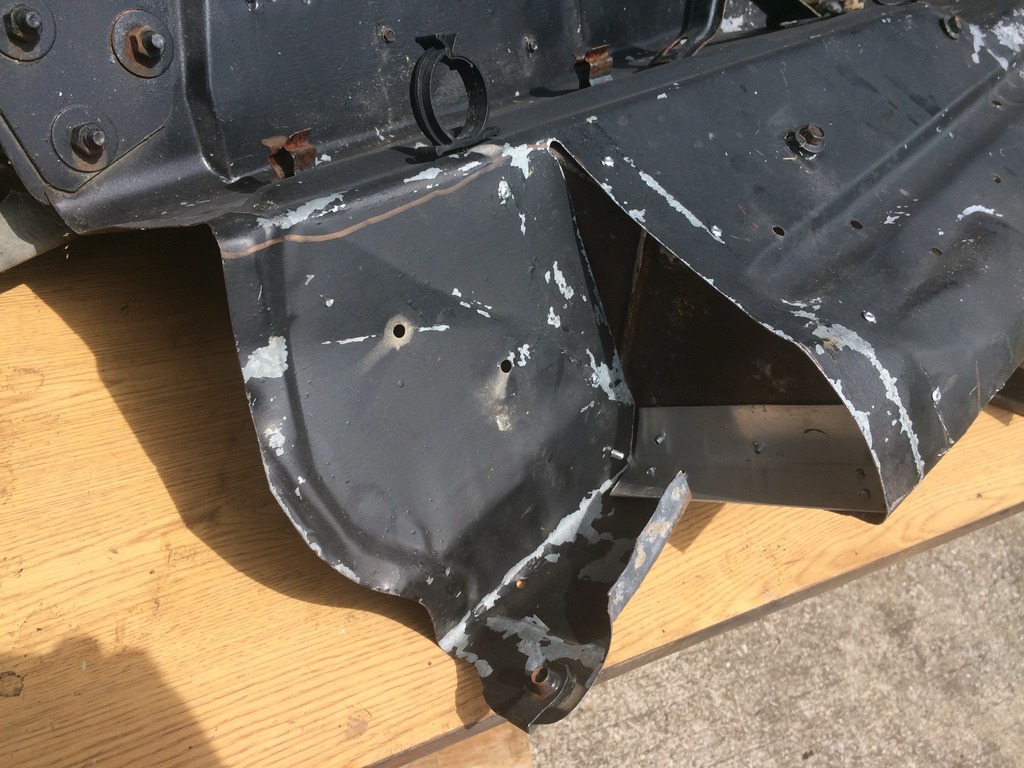
I closed the pocket with a short piece of 1-1/2" X1-1/2" angle and some scrap sheetmetal I had laying around. It is all together with pop rivets because of the different metals.
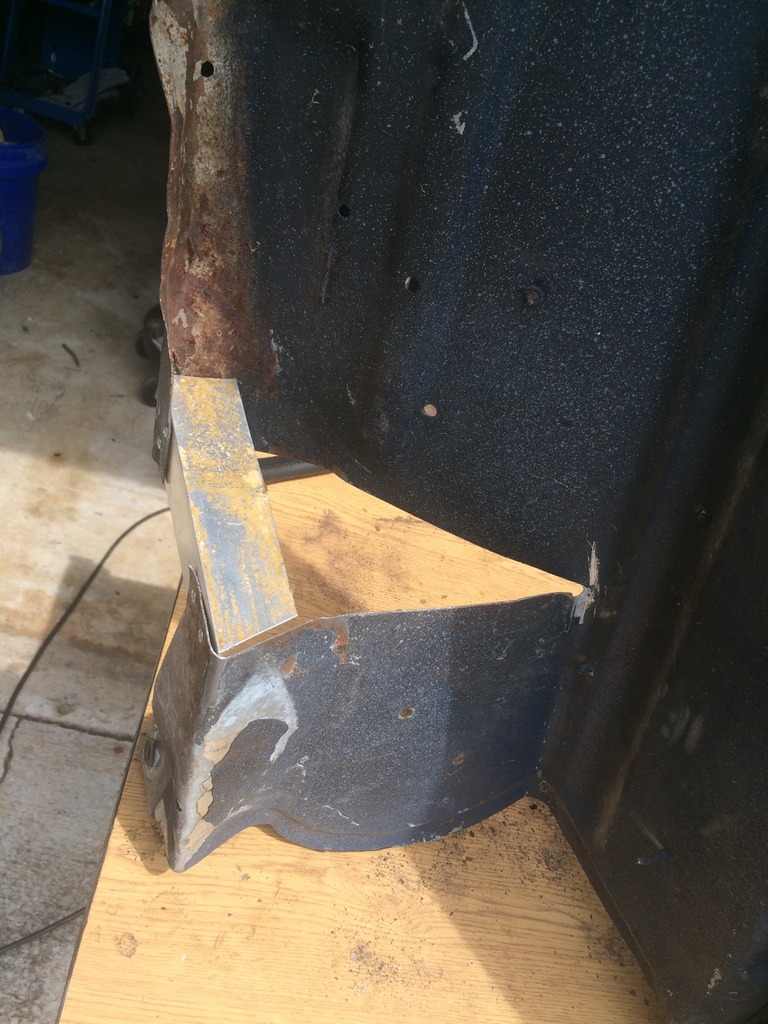

I closed the pocket with a short piece of 1-1/2" X1-1/2" angle and some scrap sheetmetal I had laying around. It is all together with pop rivets because of the different metals.

#270
09-26-2016, 07:29 PM
Well in the last two weeks I have been working on the Bronco every chance I get. I've been so close to starting the motor I can taste it so I decided to check myself. I'm stealing an idea from "Roadkill" and have begun making big lists on card board that I can cross off as I get the things done so I don't miss something. I've been doing a lot of things that don't really need pics but I'll throw a few in where I can.
I started working on the underhood and engine wiring. I thought this would be easy since I didn't take it off the Bronco, I was wrong, but more on that later.
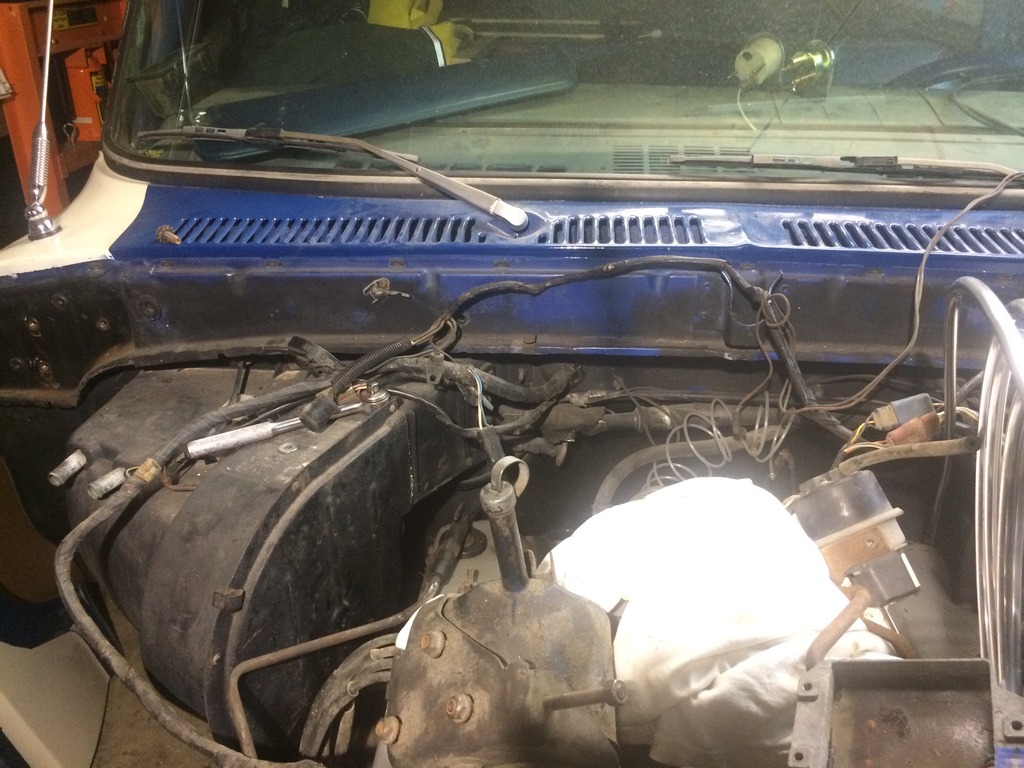
Once I got it straightened out a bit I put the inner fenders back on so I could mount the wiring where it is supposed to go.
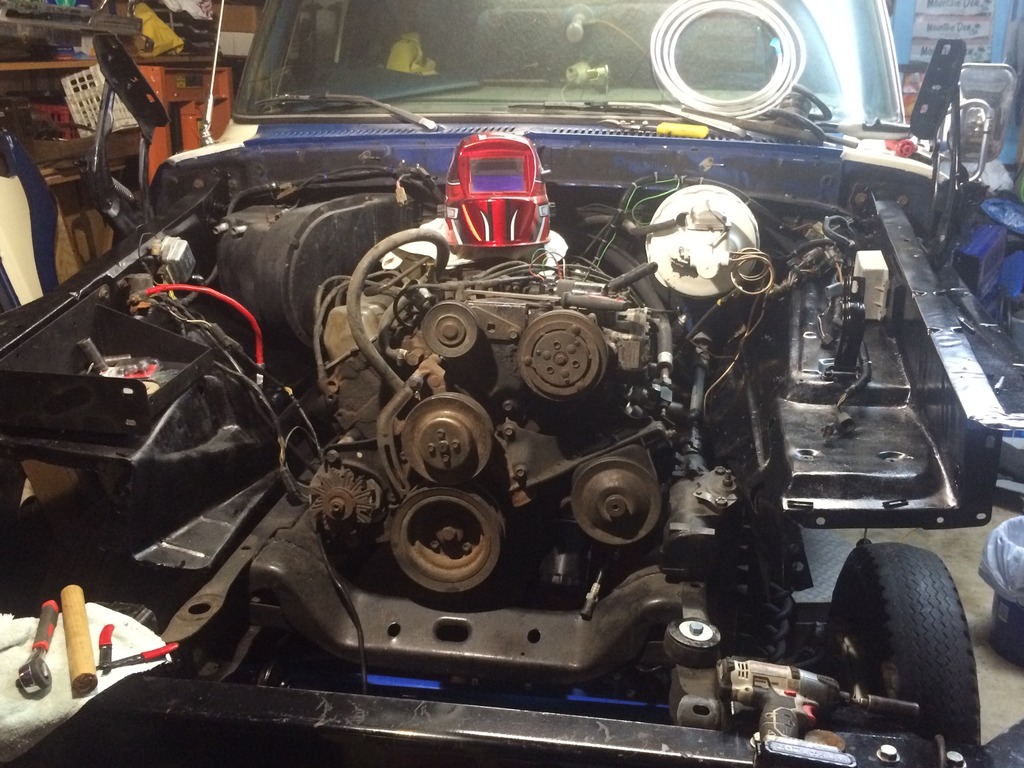
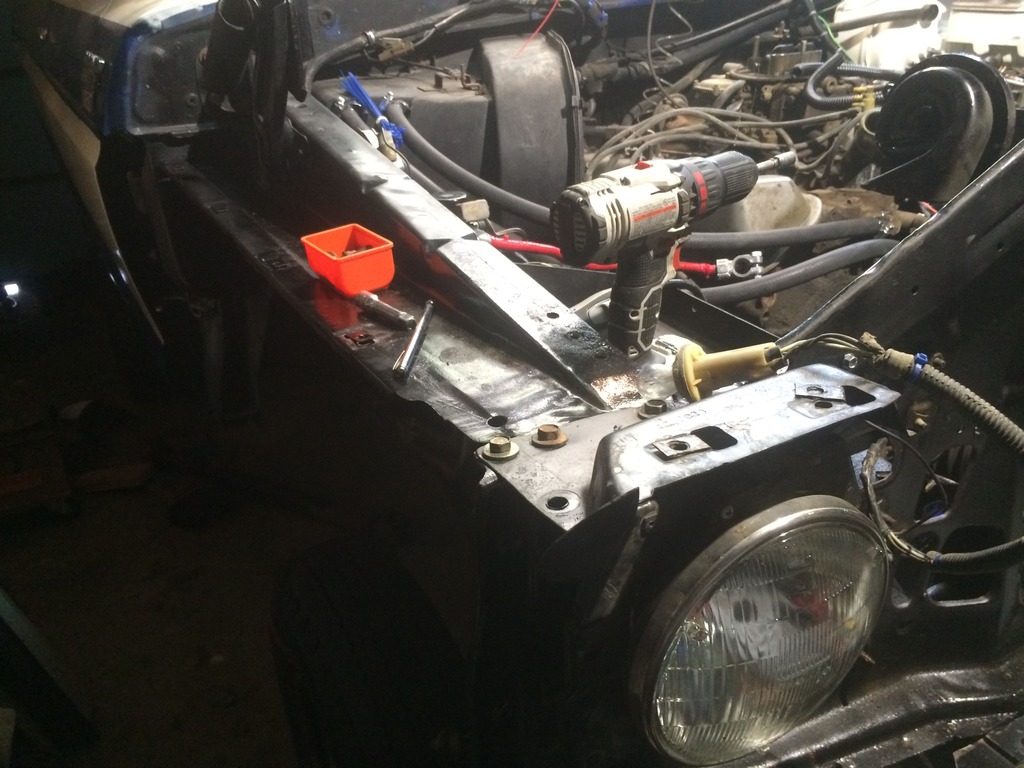
Then I got the idea to try and start the engine since I've never heard it run. This seemed like a simple idea until I actually tried to start it. The first thing I did was pull the distributor and grab the 1/2" drill. I ran the oil pump off the drill for about 5 min to make sure everything had oil on it so I wasn't starting a dry engine since it has sat for over a year since the last time I primed it. It did show 70 psi on the oil gauge running the pump off the drill so that was promising.
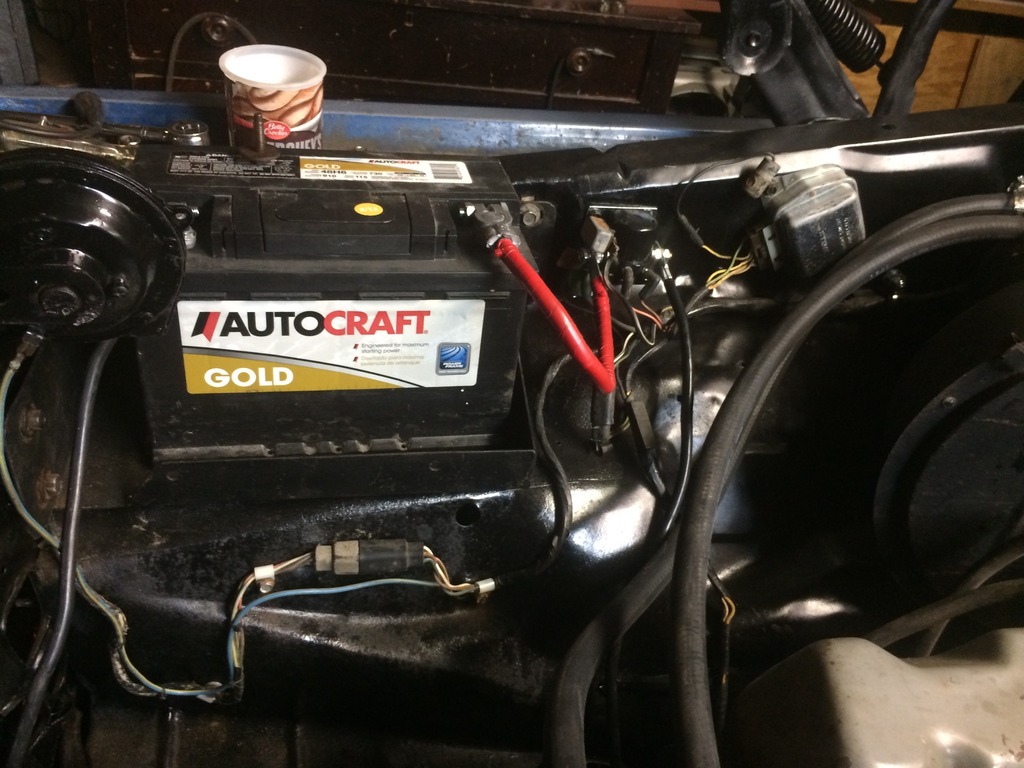
I put a battery in and had all of the engine wiring hooked up so I hit the key and...nothing. I was getting warning lights on the dash so I knew it all had power but the key would not engage the starter. I went out with a jump wire and when I jumped the solenoid the starter engaged and turned the motor over great. I shot some starting fluid in the carb and...nothing. I backed up and pulled the coil wire and put a tester in and found I had no spark. LOOONG story shorter, after 2 days of chasing wires, testing parts, and lots of frustration I found the ignition box was bad. I put another ignition box I had on the shelf on it and went on to finding my no key start issue. I narrowed it down to the neutral safety switch for the no longer in the Bronco automatic transmission. After a lot of searching, since wiring diagrams don't tell you where the connectors are on the vehicle, I found this sweet little connector with no other half.
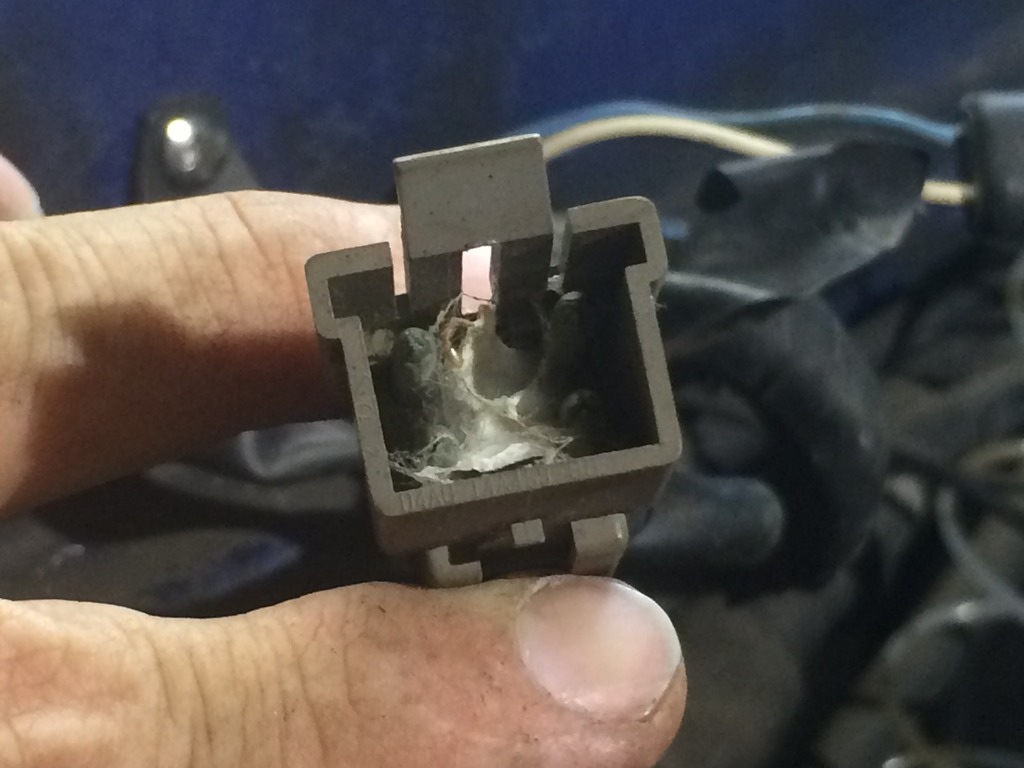
This is where my NSS should be hooked up. I ran a jumper wire across the correct terminals and hit they key...engine cranking!!! I grabbed the starting fluid and sprayed a bit then hit the key, sprayed a bit more and had the beautiful sounds of a living 460 on open long tube headers!!!!
Once I was reassured that the engine would run I set about finishing the items that will make it run long term.
I started with mounting the fuel line up the firewall and installing the filter before hooking it to the carb. Next up was securing the routing for the front and rear brak lines since I had left them loose not knowing what would be in the way in the engine compartment. I welded up the pinch are of the core support that I had trimmed for my new front bumper to clear and installed the core support. I have worked my way around the engine bay securing the wiring in place. Here I was getting the driver side headlight harness sorted out and installed.

Then I moved to the passenger side to sort out the headlight and horn harness and secure the wiring.
In the middle of all of my wiring issues I found the second gas filler neck that I had which was awesome since the one for my Bronco was full of rust and crud. I had cleaned it as best I could and painted the outside one day while I was frustrated. I laid them down and found out " One of these things is not like the other!"
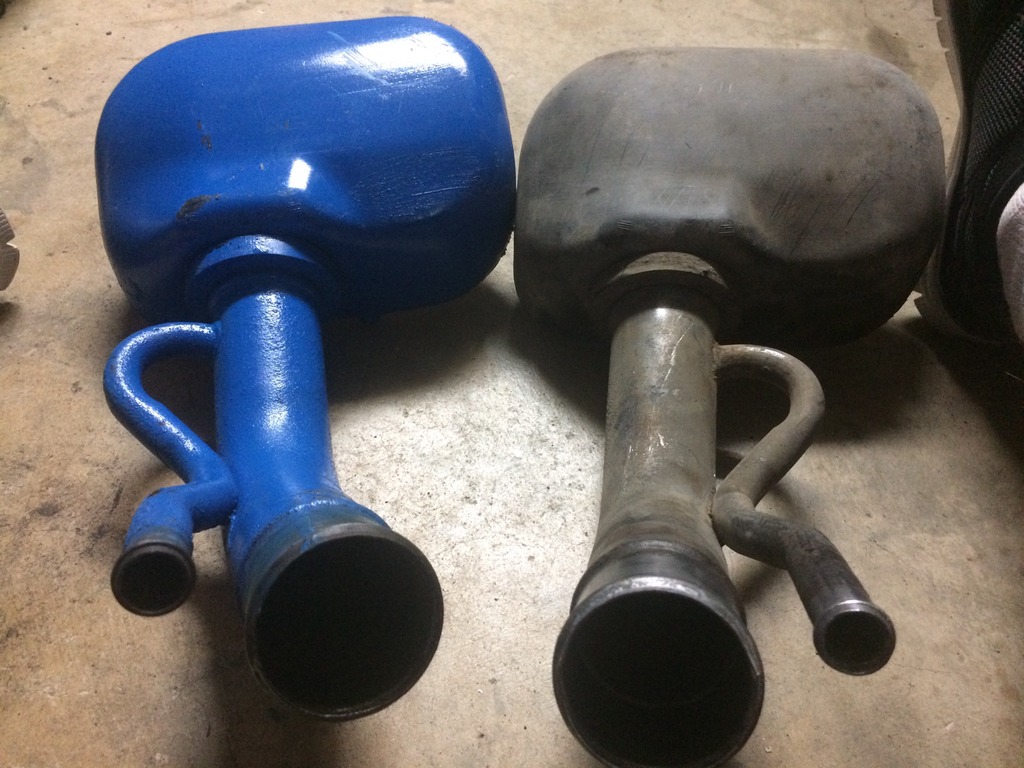
After walking away in frustration I later decided to install the original filler and just plan on carrying an extra fuel filter in the glove box. The Bronco had other plans and I split the vent hose while trying to install the filler. I went back to the second clean filler and got it installed with some extra creative routing of the vent line up and over the filler hose. We will see if it causes and issues in the future. Lots more done but it's time to get back to work for tonight.
I started working on the underhood and engine wiring. I thought this would be easy since I didn't take it off the Bronco, I was wrong, but more on that later.

Once I got it straightened out a bit I put the inner fenders back on so I could mount the wiring where it is supposed to go.

Then I got the idea to try and start the engine since I've never heard it run. This seemed like a simple idea until I actually tried to start it. The first thing I did was pull the distributor and grab the 1/2" drill. I ran the oil pump off the drill for about 5 min to make sure everything had oil on it so I wasn't starting a dry engine since it has sat for over a year since the last time I primed it. It did show 70 psi on the oil gauge running the pump off the drill so that was promising.
I put a battery in and had all of the engine wiring hooked up so I hit the key and...nothing. I was getting warning lights on the dash so I knew it all had power but the key would not engage the starter. I went out with a jump wire and when I jumped the solenoid the starter engaged and turned the motor over great. I shot some starting fluid in the carb and...nothing. I backed up and pulled the coil wire and put a tester in and found I had no spark. LOOONG story shorter, after 2 days of chasing wires, testing parts, and lots of frustration I found the ignition box was bad. I put another ignition box I had on the shelf on it and went on to finding my no key start issue. I narrowed it down to the neutral safety switch for the no longer in the Bronco automatic transmission. After a lot of searching, since wiring diagrams don't tell you where the connectors are on the vehicle, I found this sweet little connector with no other half.

This is where my NSS should be hooked up. I ran a jumper wire across the correct terminals and hit they key...engine cranking!!! I grabbed the starting fluid and sprayed a bit then hit the key, sprayed a bit more and had the beautiful sounds of a living 460 on open long tube headers!!!!
Once I was reassured that the engine would run I set about finishing the items that will make it run long term.
I started with mounting the fuel line up the firewall and installing the filter before hooking it to the carb. Next up was securing the routing for the front and rear brak lines since I had left them loose not knowing what would be in the way in the engine compartment. I welded up the pinch are of the core support that I had trimmed for my new front bumper to clear and installed the core support. I have worked my way around the engine bay securing the wiring in place. Here I was getting the driver side headlight harness sorted out and installed.

Then I moved to the passenger side to sort out the headlight and horn harness and secure the wiring.


In the middle of all of my wiring issues I found the second gas filler neck that I had which was awesome since the one for my Bronco was full of rust and crud. I had cleaned it as best I could and painted the outside one day while I was frustrated. I laid them down and found out " One of these things is not like the other!"

After walking away in frustration I later decided to install the original filler and just plan on carrying an extra fuel filter in the glove box. The Bronco had other plans and I split the vent hose while trying to install the filler. I went back to the second clean filler and got it installed with some extra creative routing of the vent line up and over the filler hose. We will see if it causes and issues in the future. Lots more done but it's time to get back to work for tonight.