
push bar mod build lots of pics
#1
 08-10-2012, 08:53 PM

push bar mod build lots of pics
This is what i started with a push bar with the bottom tube crushed and piece of angle iron thats a lot stronger than the tube that i ripped off an old grain silo sitting it the scrap pile.
<!-- / message --><!-- attachments --><FIELDSET class=fieldset><LEGEND>Attached Thumbnails</LEGEND>


</FIELDSET>
Next i used the plasma cutter and cut the bottom tube out.
Then i grinded it smooth from what the plasma cutter didnt get and cleaned it all up.
<!-- / message --><!-- attachments --><FIELDSET class=fieldset><LEGEND>Attached Thumbnails</LEGEND>


</FIELDSET>
Next i cut the angle iron down to length and cleaned up the edges but couldnt grind in smooth enough or it wouldnt fit right from me cutting it crooked with plasma cutter.
Next i tried fitting it in 2 different ways
First i fit it so it would be flat in the front and on top. Didnt look bad and it would be easier to mount lights that way
Second was to have it so the edge sticked out in the front. Liked it better but harder to mount lights so ill have to make my own brackets cause im doing it this way.
Next is to weld it.
<!-- / message --><!-- attachments --><FIELDSET class=fieldset><LEGEND>Attached Thumbnails</LEGEND>


</FIELDSET>
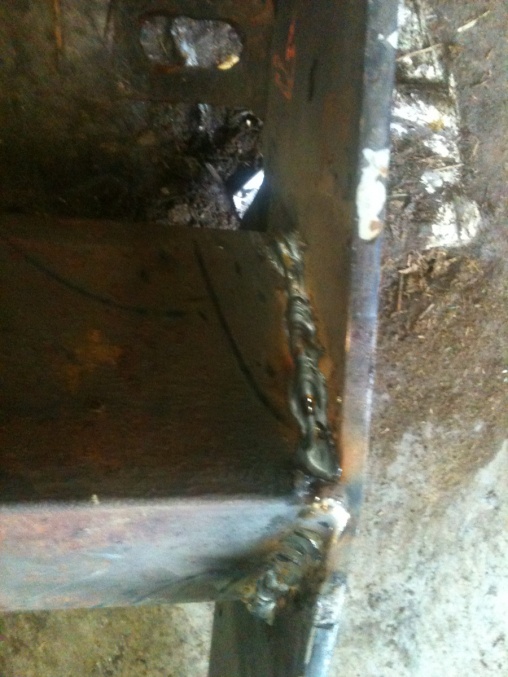
welded it i think for the most part they came out good. Now i just want to put another brace between the 2 brackets for more support and then i got to sand it paint it and mount it.
<!-- / message --><!-- attachments -->
<FIELDSET class=fieldset><LEGEND>Attached Thumbnails</LEGEND>


</FIELDSET>
Now i welded on the bottom brace and the little tabs for mounting the lights. Came out pretty good. I just got to do the paint find some lights off junk tractors and mount it.
Attached Thumbnails
<!-- / message --><!-- attachments --><FIELDSET class=fieldset><LEGEND>Attached Thumbnails</LEGEND>


</FIELDSET>
Next i used the plasma cutter and cut the bottom tube out.
Then i grinded it smooth from what the plasma cutter didnt get and cleaned it all up.
<!-- / message --><!-- attachments --><FIELDSET class=fieldset><LEGEND>Attached Thumbnails</LEGEND>


</FIELDSET>
Next i cut the angle iron down to length and cleaned up the edges but couldnt grind in smooth enough or it wouldnt fit right from me cutting it crooked with plasma cutter.
Next i tried fitting it in 2 different ways
First i fit it so it would be flat in the front and on top. Didnt look bad and it would be easier to mount lights that way
Second was to have it so the edge sticked out in the front. Liked it better but harder to mount lights so ill have to make my own brackets cause im doing it this way.
Next is to weld it.
<!-- / message --><!-- attachments --><FIELDSET class=fieldset><LEGEND>Attached Thumbnails</LEGEND>


</FIELDSET>
welded it i think for the most part they came out good. Now i just want to put another brace between the 2 brackets for more support and then i got to sand it paint it and mount it.
<!-- / message --><!-- attachments -->
<FIELDSET class=fieldset><LEGEND>Attached Thumbnails</LEGEND>


</FIELDSET>
Now i welded on the bottom brace and the little tabs for mounting the lights. Came out pretty good. I just got to do the paint find some lights off junk tractors and mount it.
Attached Thumbnails
#3
08-11-2012, 07:41 AM


#4
08-11-2012, 09:00 AM
Thanks guys. Its a harbor freight plasma cutter. Im not sure what the actual brand is though just whatever they sell. I think its like 4 inch angle iron. I got a pile behind the barn bigger than that i wanted to use but dad wouldnt let so i went and scavenged my own. Yes i do have to make by own brackets to mount lights. Got more than enough spare tractor lights around i think a couple on a parts tractor i can take too so no need to buy any


Thread
Thread Starter
Forum
Replies
Last Post
gregstith
1948 - 1956 F1, F100 & Larger F-Series Trucks
18
08-03-2013 08:45 PM