Challenges Continue
#1
 06-24-2012, 07:03 PM

Join Date: Feb 2011
Location: Huntsville, Al
Posts: 298
Likes: 0
Received 0 Likes
on
0 Posts
Challenges Continue
I've researched and enjoyed many threads here on the forum which has helped me improve my build skills especially Xracers thread on Welding which I have been able to salvage my fenders instead of purchasing new.
After cleaning the frame and getting ready to do some rear spring bushing rebuild I ran across a situation with the frame I need some advise. As you can see from the pic's it looks like the rear frame rails have been bent putting the spring and shackle bushings in a bind. I don't have access to a frame shop and am trying to come up with a way to take the twist out of the area of the shackle perch. Any advice in correcting this situation in a home shop would be greatly appreciated.
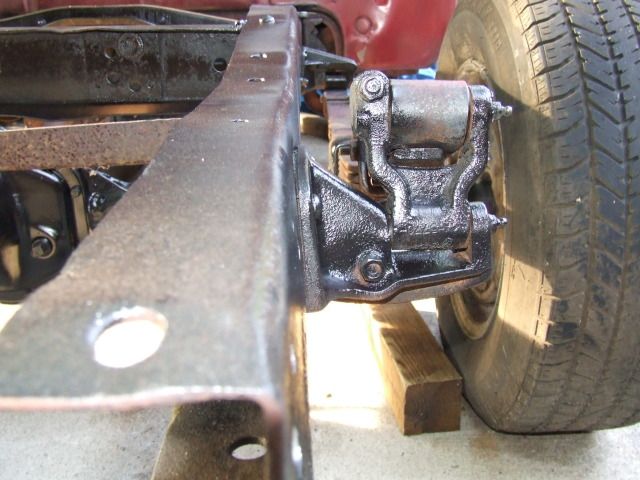
After cleaning the frame and getting ready to do some rear spring bushing rebuild I ran across a situation with the frame I need some advise. As you can see from the pic's it looks like the rear frame rails have been bent putting the spring and shackle bushings in a bind. I don't have access to a frame shop and am trying to come up with a way to take the twist out of the area of the shackle perch. Any advice in correcting this situation in a home shop would be greatly appreciated.
#2
06-24-2012, 09:36 PM
#3
06-24-2012, 10:12 PM


#4
06-25-2012, 07:34 AM
Posting Guru
Join Date: May 2010
Location: Kalamazoo MI
Posts: 1,057
Likes: 0
Received 0 Likes
on
0 Posts
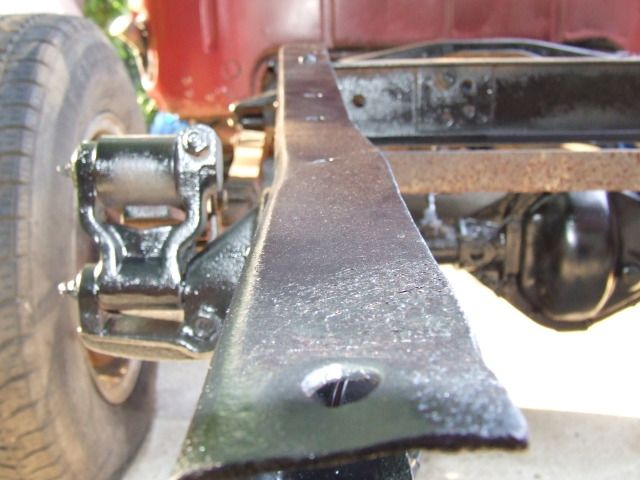
Good call Wayne. I think he might be missing both rear crossmembers. Not sure you need a frame shop Smitty49 but you do need to get that rear part of the frame beefed back up. I would find some suitable crossmembers or some rectangular steel tubing and make some members. Once you have the pieces you should be able to knock the rails back in place with a good sledge hammer and check everything with a tape measure. You may have to securely raise the truck to get the weight off the axle/rails. Once it is back in shape, secure the crossmembers and check for binding.

#5
06-25-2012, 09:45 AM
Join Date: Feb 2011
Location: Huntsville, Al
Posts: 298
Likes: 0
Received 0 Likes
on
0 Posts
Thanks for the replies everyone. I looked at your frame teardropty and comparing it some others I've seen on the net your frame looks a little longer in the rear. I found this frame dimension pic-
and it looks like I do need the rear crossmember. Can I use just a piece of C channel bolted in place? I ran across one frame pic that showed the crossmember raised slightly above the main rails- is the raised portion necessary or does the raised portion serve a purpose for the bed wood?
We're not able to get out and stomp through the junk yards like we did 40 years ago to try and locate an exact replacement so fabricating one looks to be my only option.! If I had a template of the original design I think I know of a FAB shop that could help me make one.
Again , Thanks for the replies!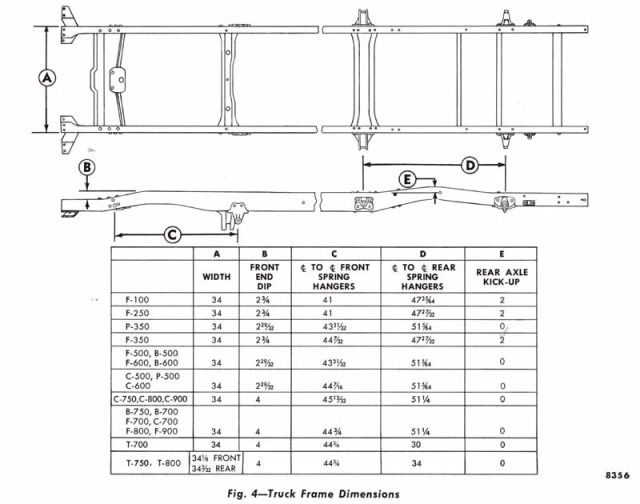
#6
06-25-2012, 10:16 AM
If you can find a piece of C channel that is the right size, it'll work fine. If you need the raised area for support like you mentioned, anything can be used as a spacer between, even a small block of wood. It's also possible someone is parting out an effie and might have a crossmember to offer.
#7
06-25-2012, 12:11 PM

It is a common practice to remove this crossmember when installing an aftermarket fuel tank in that space between the frame rails. On the frame in the photo, I had some twist in the frame rails and I was in need of a new crossmember as well. I set the frame up on jackstands, as seen in the photo, and chained it to the garage floor using anchor bolts into the concrete. I used a come-along to pull the frame back into alignment...in your case this may involve adding some persuaion with a BFH and/or heat on the areas of the frame rail that are bulging.
After the frame came into square, and while still anchored, I cut a piece of 2x4 box steel to the proper width and welded it in place (as seem in the photo). This made the frame exceedingly strong but at the same time it precluded the use of the stock bumper brackets. This crossmember is sufficiently strong now to accomodate a trailer hitch. As for the bumper mounting I just fabricated a new bracket that bolts to my new crossmember. Hope this helps...
After the frame came into square, and while still anchored, I cut a piece of 2x4 box steel to the proper width and welded it in place (as seem in the photo). This made the frame exceedingly strong but at the same time it precluded the use of the stock bumper brackets. This crossmember is sufficiently strong now to accomodate a trailer hitch. As for the bumper mounting I just fabricated a new bracket that bolts to my new crossmember. Hope this helps...
Trending Topics
#8
06-25-2012, 12:14 PM


#9
06-25-2012, 12:22 PM
I think 2x4 rect tubing will be much easier to find than C channel. You could cut one side off to make the tubing into c stock if it's important to you. Your fab shop could cut the ends off the tubing or stock nice and square and weld on flange plates to allow a bolt in install. Drawing the bolts up tight while heating the rail flanges should make it easy to straighten the rails, a couple bumps with a hand maul and I beam should set the rails in shape.
#10
06-25-2012, 12:30 PM
Join Date: Feb 2011
Location: Huntsville, Al
Posts: 298
Likes: 0
Received 0 Likes
on
0 Posts
#11
06-25-2012, 12:39 PM
Join Date: Feb 2011
Location: Huntsville, Al
Posts: 298
Likes: 0
Received 0 Likes
on
0 Posts
#12
06-25-2012, 12:45 PM
Join Date: Feb 2011
Location: Huntsville, Al
Posts: 298
Likes: 0
Received 0 Likes
on
0 Posts
I think 2x4 rect tubing will be much easier to find than C channel. You could cut one side off to make the tubing into c stock if it's important to you. Your fab shop could cut the ends off the tubing or stock nice and square and weld on flange plates to allow a bolt in install. Drawing the bolts up tight while heating the rail flanges should make it easy to straighten the rails, a couple bumps with a hand maul and I beam should set the rails in shape.
You'll have given me some very good advise and I really appreciate the response. Going to stop by a welding and fab shop this afternoon and see what his cost might be.
#13
06-25-2012, 02:25 PM
This may be a bit of overkill but I used 0.125 wall box steel on both the frame crossmember and the bed sill. Here is a photo of the bed sill, I really did not like the stock 14 ga bent sheetmetal sill so I replaced the original with 2x4 box steel. The floor in this bed has been raised 2 inches to accomodate the lowering of the truck (differential would have hit the floor if I didn't raise it) so the mounting holes in the original sill were not needed in my new layout. I kinda like the idea of having this much heft between the "between the rails" fuel tank and any vehicle that may want to rearend me. The added weight over the rear wheels doesn't hurt either.

#15
06-25-2012, 06:58 PM
Join Date: Feb 2011
Location: Huntsville, Al
Posts: 298
Likes: 0
Received 0 Likes
on
0 Posts
Thanks Racer looks good. I looked at the existing holes in the frame in the supposed area of the original support and seems quite a few to pick from for a bolt up assembly which if used would leave variable options open for future alterations if needed and your drawing will help greatly.