Viair system installed. Love it!
#1
 05-23-2012, 10:28 PM

Viair system installed. Love it!
As several of you have read, I put a Firestone Ride-Rite system on my dually last week. It made a considerable difference in the ride quality of my '10 F350 DRW 4x4, both loaded and unloaded. I had searched several different companies for an on board air system an ultimately decided on the Viair 10007 system. (same one Epic put on with his train horns). I wanted to able to adjust the bag pressures from the cab and have a constant duty compressor with a tank. The Viair was it. First I started off by researching several Ford truck forums, including this one and found a bracket setup for the air tank that I loved. I wish I could take credit for this design, but found it on another forum and it just made so easy to install(almost!). 

I bought 1" square tubing with .120 wall thickness from Fastenal and 1" C channel from Tractor Supply. I used 4-10" by 1/2" diameter grade 5 bolts with nylon lock nuts to secure it to the frame. The tubing was cut 11" in length. Any longer will not work. I tried. Holes were drilled to match the legs of the tank and the width of the frame. After installing it like the pic above, I realized that I could not get my X-Large hands in there to mount the tank to the bracket. So, I took the bracket back off the truck and mounted it to the tank first and then put the bolts for the bracket up from the bottom instead of top down.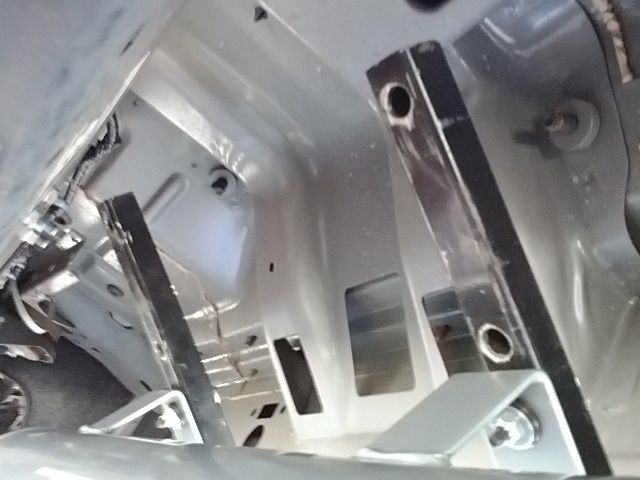
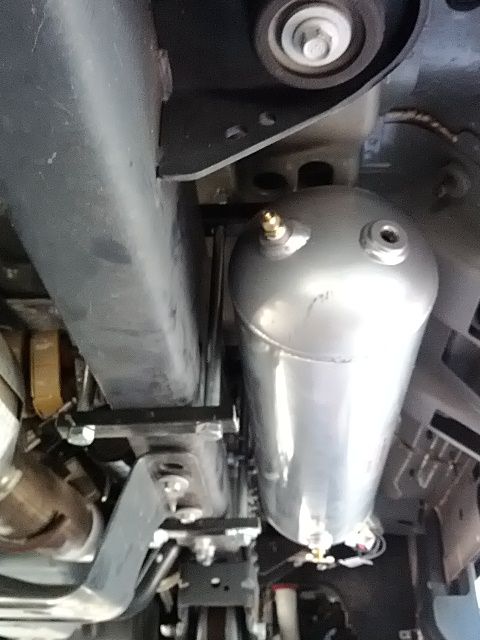 Plenty of room to get hands and 3/4(19mm) wrench up there to tighten the bolts. You have to watch out for the wiring harness for the EGT sensor as it can get caught between the bracket and frame. The tank is mounted under the front passenger door with the pressure sensor towards the rear to protect it and the compressor is mounted under the rear passenger door on a $25 Viair mounting bracket.(only holes drilled in frame)Tank mounted
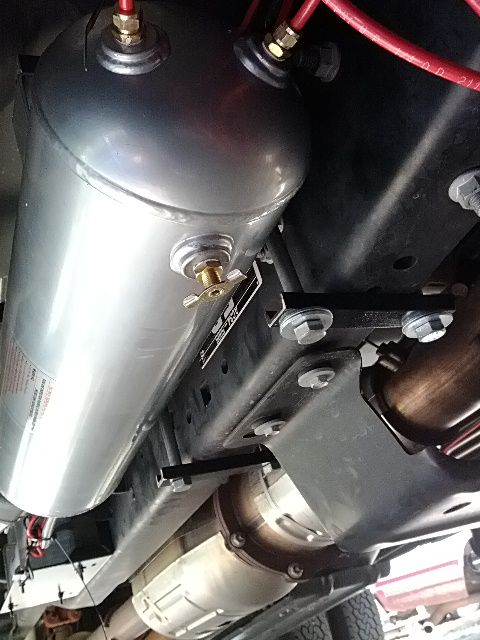
Tank and compressor mounted. 
 Air chuck under rear passenger's door.
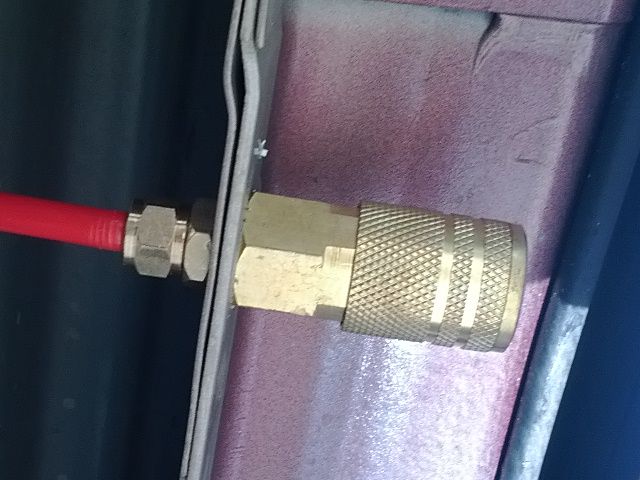 All wired into the cab for a tank pressure switch on the left and the Firestone Dual Pneumatic control panel on right.
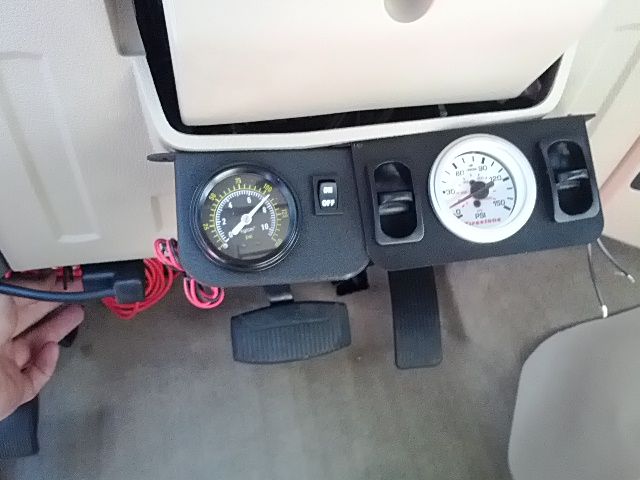 I wanted the guages to be different colors. You can get a black faced Firestone controller but the white is easier for me to see. All wired into the 30 amp Upfitter #1 switch which controls the system. I left the 30 amp inline fuse from Firestone under the dash near where I joined the Upfitter as a safety. Still have to dress up the under dash mount, hide all lines and wires and put wire loom on lines under the truck. Hopefully will get the done in the morning and add more teflon tape to air chuck to stop a small leak. I love the setup. It was a very time consuming install trying to fit everything, but all worth it now. The pressure switch comes on a 110 psi and goes off at 150 which the system is rated for. Each air bag can be inflated individually and I can do it form the driver's seat. Love this setup. If anyone is thinking about a setup like this, I hope this helps.
I bought 1" square tubing with .120 wall thickness from Fastenal and 1" C channel from Tractor Supply. I used 4-10" by 1/2" diameter grade 5 bolts with nylon lock nuts to secure it to the frame. The tubing was cut 11" in length. Any longer will not work. I tried. Holes were drilled to match the legs of the tank and the width of the frame. After installing it like the pic above, I realized that I could not get my X-Large hands in there to mount the tank to the bracket. So, I took the bracket back off the truck and mounted it to the tank first and then put the bolts for the bracket up from the bottom instead of top down.
Plenty of room to get hands and 3/4(19mm) wrench up there to tighten the bolts. You have to watch out for the wiring harness for the EGT sensor as it can get caught between the bracket and frame. The tank is mounted under the front passenger door with the pressure sensor towards the rear to protect it and the compressor is mounted under the rear passenger door on a $25 Viair mounting bracket.(only holes drilled in frame)Tank mounted Tank and compressor mounted. Air chuck under rear passenger's door. All wired into the cab for a tank pressure switch on the left and the Firestone Dual Pneumatic control panel on right. I wanted the guages to be different colors. You can get a black faced Firestone controller but the white is easier for me to see. All wired into the 30 amp Upfitter #1 switch which controls the system. I left the 30 amp inline fuse from Firestone under the dash near where I joined the Upfitter as a safety. Still have to dress up the under dash mount, hide all lines and wires and put wire loom on lines under the truck. Hopefully will get the done in the morning and add more teflon tape to air chuck to stop a small leak. I love the setup. It was a very time consuming install trying to fit everything, but all worth it now. The pressure switch comes on a 110 psi and goes off at 150 which the system is rated for. Each air bag can be inflated individually and I can do it form the driver's seat. Love this setup. If anyone is thinking about a setup like this, I hope this helps.
#3
05-24-2012, 07:11 AM
Airing up the bags is extremely quick! 10 psi (for unloaded) takes just two quick shots from each lever and it's done. No more fooling with a bike pump to air them up. Of course I'll keep it as a backup though.
#4
05-24-2012, 07:21 AM
Post Fiend
Join Date: Apr 2004
Location: North of Salt Lake City
Posts: 5,159
Likes: 0
Received 26 Likes
on
24 Posts

You are styling with that new Viar compressor for sure. I have found the compressor to be one of the more useful mods I've made. It seems like I use it every few days for something different. I have couplers under the driver and passenger door and keep tools under the seat in the back.
The train horn is awesome for drivers who text. Thier reaction is always the same when I honk the horn. They usually do something akin to peeing their pants when the horn goes off but then demonstrate huge guilt when they see me wagging my finger at them. I figure it's a teaching moment.

#5
05-24-2012, 07:55 AM
lol... bike pump. Wow... just wow...
You are styling with that new Viar compressor for sure. I have found the compressor to be one of the more useful mods I've made. It seems like I use it every few days for something different. I have couplers under the driver and passenger door and keep tools under the seat in the back.
The train horn is awesome for drivers who text. Thier reaction is always the same when I honk the horn. They usually do something akin to peeing their pants when the horn goes off but then demonstrate huge guilt when they see me wagging my finger at them. I figure it's a teaching moment.
 ...
...Being in public safety for 25 years now, texting had really become an epidemic. And not with just younger people. The older ones do it and have to look at the phone longer to concentrate on reading the smaller letters, therefore being distracted longer. You ought to submit your idea of "text-breaking" for some kind of patent

It's definitely not fun to have to face parents and loved ones at the ER when they've been injured doing something so foolish as texting! Maybe train horns are next in my future

#6
05-24-2012, 10:00 AM


#7
05-24-2012, 12:34 PM
I decided to put mine on the passenger side in case I need to use the air chuck while on the side of the road somewhere. I know I could've just ran a line over there to it, but this way I didn't have to miss the parking brake cable. I thought long and hard about the fuel tank bracket, but then just bought the mount and relocated the filter up into the cab through a grommet on the far right hand rear of the cab. Inside, it's behind the jack and goes out level with the bed.
Trending Topics
#9
05-24-2012, 12:40 PM
I will be painting everything again, I did it before I put it in and knocked off a lot of paint. Going to silicon each hole in frame too. Thanks for the advice Scott.
#10
05-24-2012, 01:08 PM

Very nice install. Thanks for sharing.
One thing to consider is the line from the compressor to the tank gets quite hot so you might think about securing the electrical wires some other way. Just a thought...
My air tanks and chuck are on the passenger side also...I find it to be a more convenient spot as well.
One thing to consider is the line from the compressor to the tank gets quite hot so you might think about securing the electrical wires some other way. Just a thought...
My air tanks and chuck are on the passenger side also...I find it to be a more convenient spot as well.
#11
05-24-2012, 01:10 PM
Very nice install. Thanks for sharing.
One thing to consider is the line from the compressor to the tank gets quite hot so you might think about securing the electrical wires some other way. Just a thought...
My air tanks and chuck are on the passenger side also...I find it to be a more convenient spot as well.
One thing to consider is the line from the compressor to the tank gets quite hot so you might think about securing the electrical wires some other way. Just a thought...
My air tanks and chuck are on the passenger side also...I find it to be a more convenient spot as well.
#13
05-24-2012, 07:02 PM
I already have a new hose in the toolbox. After your PM, I went out and bought one! Thanks!
#14
05-25-2012, 04:04 PM
I've had a constant air leak since the system was installed and it was the air chuck every time. I've bought 3 different chucks(all made in Ch**a) and all 3 have leaked. So, I solved the problem by putting a 2" nipple and a ball valve shut off (and a couple of washers to take up the space)on the chuck line under the truck. Can easily be reached to turn it on and off. Until I find a decent chuck, this will do fine. Also wanted to cover the chuck to keep the water spray and dirt from getting into the end of it so after searching around, I found something that works very well for protecting the end 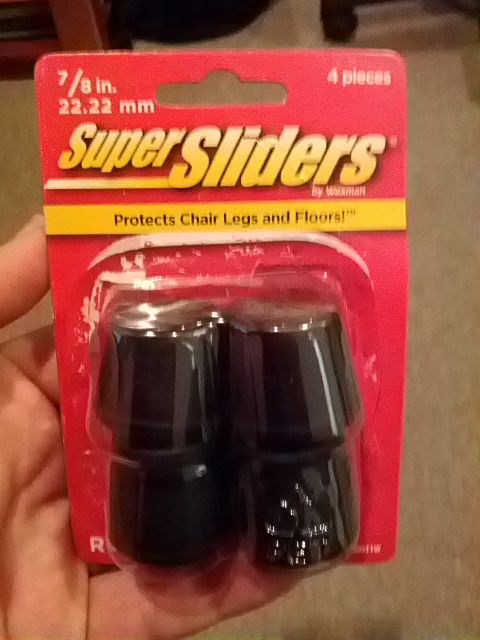 Available at WallyWorld for $1.77 for 4. Here's what is looks like on the chuck

It fits REALLY WELL, so don't push it on all the way, or you will be prying to pull it off. No cold weather, so I don't how it will react as far as contracting. It is rubber so who knows.
Available at WallyWorld for $1.77 for 4. Here's what is looks like on the chuckIt fits REALLY WELL, so don't push it on all the way, or you will be prying to pull it off. No cold weather, so I don't how it will react as far as contracting. It is rubber so who knows.