Replacing the Rear Bearings in your 8.8 equipped E150 - A guide to learning new bad words.
#1
 05-13-2012, 11:26 PM


Replacing the Rear Bearings in your 8.8 equipped E150 - A guide to learning new bad words.
I was hungry, I admit it. I was weak, and I was gonna get me a Chilidog from Sonic. I hopped into my 95 E150. As I departed my workshop and started down the driveway; I heard a nice loud BANG then grinding. After about 3 seconds, I managed to isolate the source as the rear right wheel bearing. What follows is my journey into the deranged mind of the individual who engineered the Ford 8.8 inch 31 spline axle. This axle was used from like 1983-2007.
Step 1) Lift the Van.
Step 1a) The lift is broken, get your jack-stands and jack out after saying some bad words in the name of Bend-Pak, and their cheap Chinese made hydraulic power units. Realize that Chinese made stuff can be good, but we consumers are to blame for demanding lower prices at the expense of quality. Chock the van with some handy dandy bricks and pick up the rear end. Don't lift it by the pumpkin, jack it up one side at a time, slip in the jack stand, set it down, and move to the next side. You may remove the tires at this point as well.

Step 2) Set the van in Neutral. Disconnect the battery cable from your incorrect for the van battery, and take off the parking brake. You want to be able to remove the drums, and need to be able to spin the driveshaft. You will note that once the van is in neutral, you cannot remove the keys, this is why we pop the battery terminal.

Step 3) Skip to the second to last step in most guides, and make sure you can remove the differential fill plug. Use a 3/8 drive ratchet, invent new swear words. Get your half inch drive out with a 2 inch extension and a 3/8s reducer and have it off in 2 seconds. Ponder why this is a 3/8s instead of a 1/2, cause that sure as hell was much easier. IF YOU CANNOT DO THIS, THIS IS A GAME KILLER! THAT PLUG MUST BE REMOVED BEFORE CONTINUING!

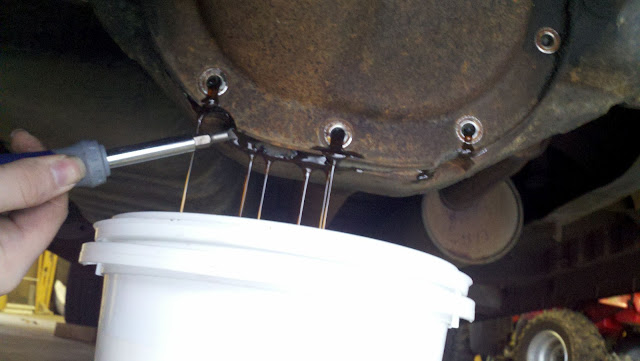
Step 4) Place a drain pan (who am I kidding, use that little bucket the pool tabs come in) under the diff and unbolt the 10 bolts. Abuse the power/leverage of your half inch drive socket wrench, and install a 2 inch extension with a half inch SIX-POINT socket. I swear I didn't strip any bolts by accidentally using my 12 point. Honest.

Step 5) Loosen the top 3 bolts, and remove the bottom 7 bolts. Leave the top 3 in place, about a quarter of an inch of thread exposed.

Step 6) Gently pry the diff cover off a small amount with your screwdriver.
Step 7) Get gear lube all over your hands, get paper towels and remove the gear lube from your hands.
Step 8) Remove the remaining three bolts and pop off the diff cover.

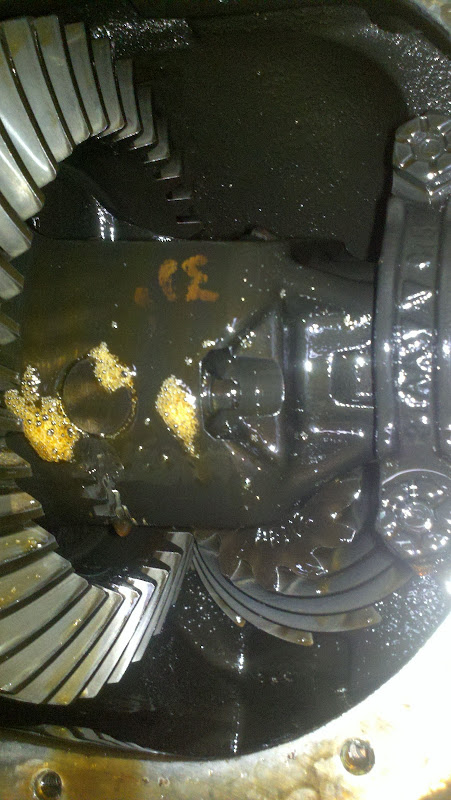
Step 9) Stare slack jawed at the diff. Dear lord, what have you gotten yourself into?

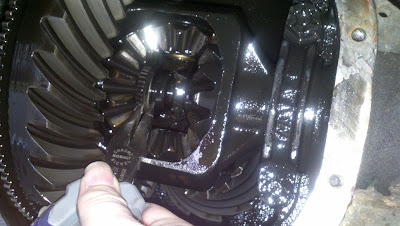
Step 10) Rotate the Differential. Locate what ford calls the 'Differential Cross-Pin Retaining Bolt, or as i call it, Satan's Little Helper.
Step 11) Pro Tip - SIX POINT wrenches and sockets here. NOT 12 point. No, I swear I didn't strip this, use a hammer to force on a smaller socket, then have to drive all 31 miles to Frikkin MEMPHIS to get one. Remove the devil incarnate, I mean cross pin retaining bolt. Its 5/16ths. (Its also smaller than the websites make it look.)

Step 12) Remove the cross pin. Comically, this thing just falls right out. I dont know why, but it was a stark contrast to its retaining bolt. I didnt even have to sacrafice a virgin on the altar of Ford. I've got a better use in mind for her tonight anyway...

Step 13) Remove the Drums. If your brake system is properly maintained (like mine) they should come off with pretty much no trouble. If you are like 99% of van owners; you will have to pound on it with a deadblow or similar hammer.

Step 14) Press the axle shaft towards the differential. It will scare the HELL out of you and actually move in about half an inch.

Step 15) The whole reason we wen through all this. While holding the spider gears with one hand, rotate the Drive Shaft. The C-Clips are now exposed. Steele your mind for epic battle. Chant the ancient battle cry of your peoples! Use a pair of needle nose pliers and watch the clips pretty much just fall out when you poke them. Uh, hmm... That was rather anticlimactic..
Step 16) Tepidly give a little tug on the drive shaft, freak out as it nearly comes all the way out. it seems like thise whole rear end just falls apart one you get those clips out. Dang. This shaft is a bit worn.


Step 17) Our prize! The bearing! I bet it just comes right out! No? Son of a b... Ahem; bust out your bearing puller and connect your slide Hammer (You got those right? No? Just rent it from Autozone. Its like 90 bucks, and you get 100% of it back when you drop the tools off.) Insert the tool into the opening (heh) and let it rest against the back of the bearing. Thread the nut down the shaft (hehe) until the washer makes a sandwich out of the bearing and the seal. You're probably pretty good at this next motion, I mean, hell, I did it for ~10 years. Hammer out the bearing and seal as one unit. I tried using my seal puller, but it just wasn't worth the trouble. I cussed at it for ~1 hr before i just went for this arrangement instead.

The Culprit:

Step 18) Clean the bore and install the new bearing. I went with a 'repair' style bearing due to the damage on the shaft. I will probably replace the shaft and bearing(s) when i do a full rebuild of the diff to slip in an E or Air locker. At this point i used the old (good) bearing from the other side as my driver. my 'proper' seal installer seemed to put the force onto the bearings themselves inside the assembly, and i didn't like that.

Step 19) The directions for this Timken bearing (Yeah, i read them, can you belive that crap?) state that it should protrude about 1/4 of an inch when properly installed. I used calipers to verify this, but i offer this alternative for those of you who lack such a 280 dollar finely calibrated tool.

(close enough)
Step 20) Repeat steps 16-19 on the other side.
Step 21) Slide axles back into housing. Take your time with this. As you get close to the diff, you will have to push down on the flanges to get everything in place. If you get to the center and cant make the last inch go in (story of my life) you may have to pull it back a quarter of an inch, turn it EVER so slightly, and push it back in. I refer you to the Kama Sutra of Rear Ends (heh) for additional reading guidance on this maneuver. It takes a light touch and a bit of finesse. Put down your sledgehammer. You don't want to just rotate it while the shaft rests against the spider gears, as this may make them pop out. That would make for a bad time, and require an assistant to get them back in place unless you have experience. You will be rewarded for your patience and skill as the axle slides home with a satisfying thunk.

Step 22) Reinstall the C-Clips. Even with my giant hands, I was able to manipulate the small bits in tight place with some patience and finesse (My mind is admittedly a bit one track...) With one finger I was able to press the clip in place, and push the axle away from the diff, securing the c-clip into its grove in the spider gear.

Step 23) Install the Crosspin, the Retaining Bolt, gasket and diff cover. You can use an Anaerobic Gasket Maker (Permatex) if you don't want to buy the gasket. This isnt rocket science, just bolt the damn cover on. I used both a bit of gasket sealant and gasket. At this point you let it sit for 15-45 minutes. I had some testing to do, so I left it set for a while.
Step 24) Fill 'er up! You did make sure (all the way back at step like, what? 3?) that you can remove the fill plug right? GOOD! 3 quarts go in!

Step 25) No leaks? YAY! Go for a test spin! Warm it up, take it up to speed, stop somewhere after a few miles and look for leaks.

(I got me that damn chillidog!)
Step 1) Lift the Van.
Step 1a) The lift is broken, get your jack-stands and jack out after saying some bad words in the name of Bend-Pak, and their cheap Chinese made hydraulic power units. Realize that Chinese made stuff can be good, but we consumers are to blame for demanding lower prices at the expense of quality. Chock the van with some handy dandy bricks and pick up the rear end. Don't lift it by the pumpkin, jack it up one side at a time, slip in the jack stand, set it down, and move to the next side. You may remove the tires at this point as well.
Step 2) Set the van in Neutral. Disconnect the battery cable from your incorrect for the van battery, and take off the parking brake. You want to be able to remove the drums, and need to be able to spin the driveshaft. You will note that once the van is in neutral, you cannot remove the keys, this is why we pop the battery terminal.
Step 3) Skip to the second to last step in most guides, and make sure you can remove the differential fill plug. Use a 3/8 drive ratchet, invent new swear words. Get your half inch drive out with a 2 inch extension and a 3/8s reducer and have it off in 2 seconds. Ponder why this is a 3/8s instead of a 1/2, cause that sure as hell was much easier. IF YOU CANNOT DO THIS, THIS IS A GAME KILLER! THAT PLUG MUST BE REMOVED BEFORE CONTINUING!
Step 4) Place a drain pan (who am I kidding, use that little bucket the pool tabs come in) under the diff and unbolt the 10 bolts. Abuse the power/leverage of your half inch drive socket wrench, and install a 2 inch extension with a half inch SIX-POINT socket. I swear I didn't strip any bolts by accidentally using my 12 point. Honest.
Step 5) Loosen the top 3 bolts, and remove the bottom 7 bolts. Leave the top 3 in place, about a quarter of an inch of thread exposed.
Step 6) Gently pry the diff cover off a small amount with your screwdriver.
Step 7) Get gear lube all over your hands, get paper towels and remove the gear lube from your hands.
Step 8) Remove the remaining three bolts and pop off the diff cover.
Step 9) Stare slack jawed at the diff. Dear lord, what have you gotten yourself into?
Step 10) Rotate the Differential. Locate what ford calls the 'Differential Cross-Pin Retaining Bolt, or as i call it, Satan's Little Helper.
Step 11) Pro Tip - SIX POINT wrenches and sockets here. NOT 12 point. No, I swear I didn't strip this, use a hammer to force on a smaller socket, then have to drive all 31 miles to Frikkin MEMPHIS to get one. Remove the devil incarnate, I mean cross pin retaining bolt. Its 5/16ths. (Its also smaller than the websites make it look.)
Step 12) Remove the cross pin. Comically, this thing just falls right out. I dont know why, but it was a stark contrast to its retaining bolt. I didnt even have to sacrafice a virgin on the altar of Ford. I've got a better use in mind for her tonight anyway...
Step 13) Remove the Drums. If your brake system is properly maintained (like mine) they should come off with pretty much no trouble. If you are like 99% of van owners; you will have to pound on it with a deadblow or similar hammer.
Step 14) Press the axle shaft towards the differential. It will scare the HELL out of you and actually move in about half an inch.
Step 15) The whole reason we wen through all this. While holding the spider gears with one hand, rotate the Drive Shaft. The C-Clips are now exposed. Steele your mind for epic battle. Chant the ancient battle cry of your peoples! Use a pair of needle nose pliers and watch the clips pretty much just fall out when you poke them. Uh, hmm... That was rather anticlimactic..
Step 16) Tepidly give a little tug on the drive shaft, freak out as it nearly comes all the way out. it seems like thise whole rear end just falls apart one you get those clips out. Dang. This shaft is a bit worn.
Step 17) Our prize! The bearing! I bet it just comes right out! No? Son of a b... Ahem; bust out your bearing puller and connect your slide Hammer (You got those right? No? Just rent it from Autozone. Its like 90 bucks, and you get 100% of it back when you drop the tools off.) Insert the tool into the opening (heh) and let it rest against the back of the bearing. Thread the nut down the shaft (hehe) until the washer makes a sandwich out of the bearing and the seal. You're probably pretty good at this next motion, I mean, hell, I did it for ~10 years. Hammer out the bearing and seal as one unit. I tried using my seal puller, but it just wasn't worth the trouble. I cussed at it for ~1 hr before i just went for this arrangement instead.
The Culprit:
Step 18) Clean the bore and install the new bearing. I went with a 'repair' style bearing due to the damage on the shaft. I will probably replace the shaft and bearing(s) when i do a full rebuild of the diff to slip in an E or Air locker. At this point i used the old (good) bearing from the other side as my driver. my 'proper' seal installer seemed to put the force onto the bearings themselves inside the assembly, and i didn't like that.
Step 19) The directions for this Timken bearing (Yeah, i read them, can you belive that crap?) state that it should protrude about 1/4 of an inch when properly installed. I used calipers to verify this, but i offer this alternative for those of you who lack such a 280 dollar finely calibrated tool.
(close enough)
Step 20) Repeat steps 16-19 on the other side.
Step 21) Slide axles back into housing. Take your time with this. As you get close to the diff, you will have to push down on the flanges to get everything in place. If you get to the center and cant make the last inch go in (story of my life) you may have to pull it back a quarter of an inch, turn it EVER so slightly, and push it back in. I refer you to the Kama Sutra of Rear Ends (heh) for additional reading guidance on this maneuver. It takes a light touch and a bit of finesse. Put down your sledgehammer. You don't want to just rotate it while the shaft rests against the spider gears, as this may make them pop out. That would make for a bad time, and require an assistant to get them back in place unless you have experience. You will be rewarded for your patience and skill as the axle slides home with a satisfying thunk.
Step 22) Reinstall the C-Clips. Even with my giant hands, I was able to manipulate the small bits in tight place with some patience and finesse (My mind is admittedly a bit one track...) With one finger I was able to press the clip in place, and push the axle away from the diff, securing the c-clip into its grove in the spider gear.
Step 23) Install the Crosspin, the Retaining Bolt, gasket and diff cover. You can use an Anaerobic Gasket Maker (Permatex) if you don't want to buy the gasket. This isnt rocket science, just bolt the damn cover on. I used both a bit of gasket sealant and gasket. At this point you let it sit for 15-45 minutes. I had some testing to do, so I left it set for a while.
Step 24) Fill 'er up! You did make sure (all the way back at step like, what? 3?) that you can remove the fill plug right? GOOD! 3 quarts go in!
Step 25) No leaks? YAY! Go for a test spin! Warm it up, take it up to speed, stop somewhere after a few miles and look for leaks.
(I got me that damn chillidog!)
#2
05-14-2012, 12:12 AM
Consumables/Parts:
Paper Towels
Gojo
3 1-Qt bottles of Gear Lube. Ford specs 75-90 for non LS differentials. I got some cheap yet fully servicable Coastal stuff.
2 - Bearings Buy good ones. National, Timken, Torringdon, all good. 8 dollar bearings are not your friends. You are elbows deep, and this is a bitch of a job. Do it right.
2 - Seals I got some Timken ones.
1 - 8.8 Differential Cover Gasket (Optional, I got a felpro, you may use gasket maker instead)
1 - Tube of Gasket Maker
1 - Crosspin Retaining Bolt. Just do it. Even if yours is good, its a common failure point when these diffs are pushed.
You MAY need:
2x repair bearings. If your driveshafts are damaged/worn but not bent, you may use these. They are quite spendy (i think 31 bucks each) but you dont need seals as they are integrated. With these you dont need the other bearings/seals.
Tools Needed:
1/2 Inch Drive Socket Wrench
6-point 1/2 socket - 1/2 inch drive
2 inch half inch drive extension
1/2 inch drive to 3/8s drive adapter
1/4 drive socket wrench (low profile if possible)
6-point 5/16ths socket (low profile if possible)
(Above can be substituted with a 6-point 5/16 screwdriver driver bit, and 1/4 wrench as i did)
Needle Nose Pliers
Jack & Jackstands
Tools to remove tire and center cap. (Air Tools recommended if available)
Engineering Hammer (aka Sledge)
Slide Hammer (Rent)
Bearing Puller (Rent)
Screwdriver

I rate this job a 2 out of 5 if the crosspin bolt complies. It will take about 5-6 hours if you don't have access to a lift and have wrenching experience. Do this on a Saturday so the parts store is open, as I had a last second issue with my bearings and had to swap out 'repair' style.
Paper Towels
Gojo
3 1-Qt bottles of Gear Lube. Ford specs 75-90 for non LS differentials. I got some cheap yet fully servicable Coastal stuff.
2 - Bearings Buy good ones. National, Timken, Torringdon, all good. 8 dollar bearings are not your friends. You are elbows deep, and this is a bitch of a job. Do it right.
2 - Seals I got some Timken ones.
1 - 8.8 Differential Cover Gasket (Optional, I got a felpro, you may use gasket maker instead)
1 - Tube of Gasket Maker
1 - Crosspin Retaining Bolt. Just do it. Even if yours is good, its a common failure point when these diffs are pushed.
You MAY need:
2x repair bearings. If your driveshafts are damaged/worn but not bent, you may use these. They are quite spendy (i think 31 bucks each) but you dont need seals as they are integrated. With these you dont need the other bearings/seals.
Tools Needed:
1/2 Inch Drive Socket Wrench
6-point 1/2 socket - 1/2 inch drive
2 inch half inch drive extension
1/2 inch drive to 3/8s drive adapter
1/4 drive socket wrench (low profile if possible)
6-point 5/16ths socket (low profile if possible)
(Above can be substituted with a 6-point 5/16 screwdriver driver bit, and 1/4 wrench as i did)
Needle Nose Pliers
Jack & Jackstands
Tools to remove tire and center cap. (Air Tools recommended if available)
Engineering Hammer (aka Sledge)
Slide Hammer (Rent)
Bearing Puller (Rent)
Screwdriver
I rate this job a 2 out of 5 if the crosspin bolt complies. It will take about 5-6 hours if you don't have access to a lift and have wrenching experience. Do this on a Saturday so the parts store is open, as I had a last second issue with my bearings and had to swap out 'repair' style.
#3
05-15-2012, 12:43 AM

some years ago i had an 86 with the accursed 8.8. my story goes as follows:
1) drive like a high schooler, then load it down until you don't want to drive faster than 35
2) while driving unloaded, hear/feel CLUNK-momentary LOCKUP-release. repeat every mile until you get home.
during this process, i understood i was having rearend problems, and prepared to get into it.
3) raise truck and remove diff cover
4) stare in amazement at the spider gears that are missing more teeth then they have left
5) attempt to find new gears, find out the older diffs with small cross-shaft are obsolete
6) buy complete diff carrier
7) clean interior of axle housing
8) install new diff carrier, get everything done right, new bearings and lube, etc
9) drive 10k miles
10) develop large leaks from both axle shafts and the pinion shaft, all around the same time
11) add oil every day for a couple months until getting around to fixing it
12) buy new wheel bearings and seals
13) open up the diff and remove axle shafts, notice deep wear and even deeper pitting at bearing and seal surfaces on axle shafts.
14) price new shafts as compared to a 9" axle, choose 9"
15) use a calculator to determine that the 3.00 gears available in the 9" are a suitable replacement for the 3.08 gears in my 8.8 (truck was 4x4) ONLY if the front tires are 1" larger than rear tires. deal with this one later
16) buy and install the complete 9" axle
17) shift to 4x4 for a couuple of VERY SHORT spots where 1 wheel drive just wouldn't do
18) curse loudly at the condition of my front tires - looked like i'd been doing burnouts all afternoon
19) buy a pair of used 32" tires from my local tire shop to go with the 31s on the rear. they lasted until the truck was retired from service, and so did the axle
oh, and you must be an amateur because you don't wear gloves and don't show any power tools being used
but anyway, nice write-up
did i ever tell you about the time i had to tear apart the rearend on my 83 LTD to change the tires... yeah, that was fun
#4
05-15-2012, 06:17 AM
#5
05-15-2012, 07:11 AM

#6
05-15-2012, 10:15 AM
The repair sleeves aren't staying for long. I didn't mention it, but that axle housing is bent. I have brand new Alloy USA axles sitting right here, but i don't want to install them into a bent housing and eat the bearing surfaces on 280 bucks worth of steel. I am pulling a junkyard axle and doing a full rebuild on that, and installing an Eaton e-locker into it before reinstalling it on the van. I could straighten the axle housing out, but I cant tie up the big lift on my farm for a day or two; business before pleasure. Plus it actually is broke. Starter capacitor smoked, and grainger didn't have it in stock. Bendpak wants you to bend over for one (180 bucks) vs Grainger's 15.99. Grainger also had it yesterday, Bendpak said it would be a few days.
I have air tools, but my storage building doesn't have an air compressor. My portable air compressor is also the farm's welder/generator, and was being used to repair a broken idler wheel mount on the cat-track. I ended up getting it back about 5 minutes after I opened the rear diff, and used it to take off the tires and reassemble the diff housing, hence no pics.
I should have worn gloves, but I almost never do. This is one of those jobs I really should have honestly.
#7
05-15-2012, 11:33 AM
in theory, the repair bearings would work great if the only wear was at the seal, and not at the bearing surface.
i went bare-handed for a long time, but learned that gloves are a lot better than getting sick from all the oil soaking through your skin into your body. now i'll hardly pull a dipstick with bare hands
i went bare-handed for a long time, but learned that gloves are a lot better than getting sick from all the oil soaking through your skin into your body. now i'll hardly pull a dipstick with bare hands
Trending Topics
#8
08-20-2012, 01:20 PM

Great write-up! Thanks!
For those about to do this procedure like I am, Satan's Little Helper in NAPA's catalogue is called a "Differential Shaft Lock Bolt - Rear Axle", part number BK 6351023.
How do I know if I need the repair bearings? How much wear does it take? I'm only doing it because of bad seals, I haven't noticed any noise etc. from the bearings, but I figured with 190,000 on it I might as well do the bearings now. I can't afford new axle shafts. I want to have all the parts before I start because it's my only vehicle. With that many miles and leaky seals should I assume the shafts are worn?
#9
08-20-2012, 01:49 PM
#10
08-20-2012, 02:26 PM
If my budget allowed, I would just buy new axles, but they're over $200 each.
It's hard to tell from the pic how worn yours were. Was it just the seal area, or the bearing surface as well? If it was the bearing surface, how do those bearings move it out far enough to be on a good unworn shaft surface yet still be able to support the weight of the van? Wouldn't that put the bearing outside of the housing bearing area?
And what was the sledgehammer for? LOL
#11
08-20-2012, 02:44 PM
#12
08-20-2012, 03:00 PM
Ok, that makes sense to me mechanically, but the people who make the bearings that NAPA sells say "the repair bearing moves the position of the bearing and seal so that they ride on an unworn section of the axle shaft"...
https://partimages.genpt.com/partimages/1358558.pdf
https://partimages.genpt.com/partimages/1358558.pdf
#13
08-20-2012, 04:55 PM
Don't install them unless you have to, and if you do, plan on having to remove them at a later date.
#14
08-20-2012, 06:33 PM