7.3 fuel system upgrade
#1
 04-20-2012, 12:18 AM

7.3 fuel system upgrade
this mod (if u wanna call it that) is used on pre-89 IDIs with the 7.3 (6.9s also probably). Reason i did this was i ordered the wrong return line kit and i was looking for a way to eliminate areas of air intrustion. While walking around the junkyard one day i noticed a 92 F250 7.3, after i took what i wanted i seen the T fitting at the back was different. Intrigued i took it and when i got home i got online to search a little.
This is the part:

And this is what is replaces:
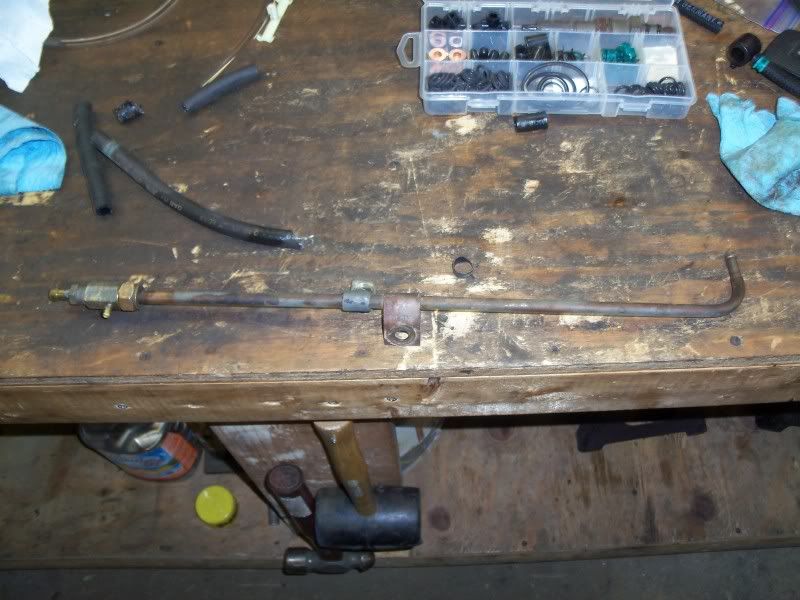
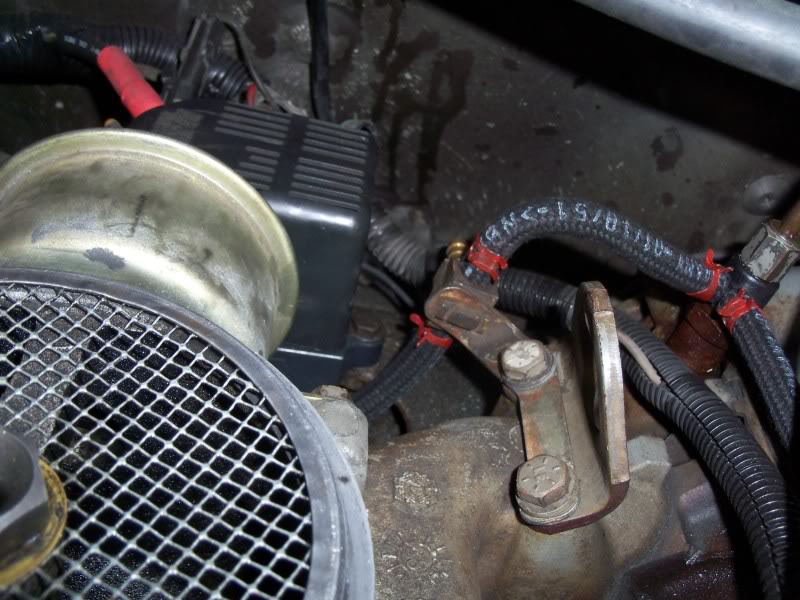
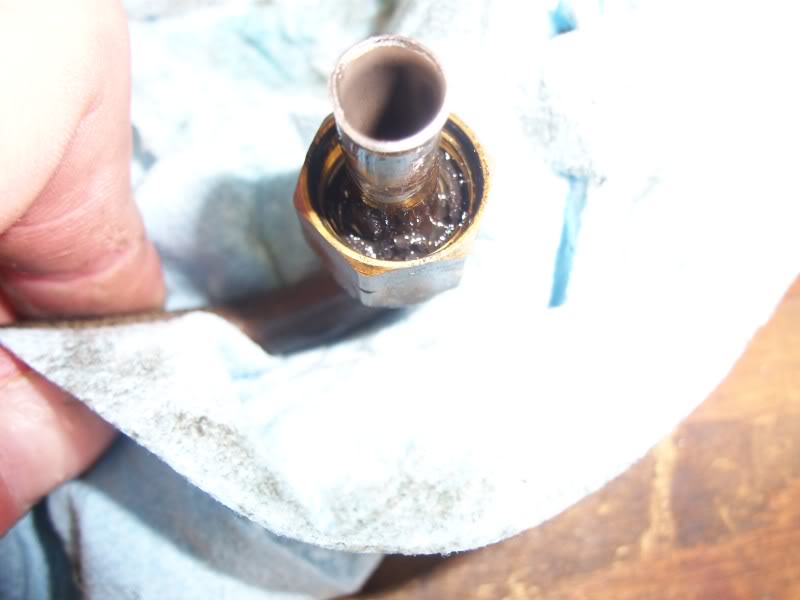
The end to the left has both banks meet up and dump fuel off from the IP via that steel line to the return line to the tank. Notice the brass nut on the end, that hides the infamous 4th olive (pic is of an olive for those who dont know):

Its an often over looked area when looking for air intrustion. I previously replaced all the olives (two at the filter head, one at the back of the IP, and that one).
Location of 4th olive on truck:
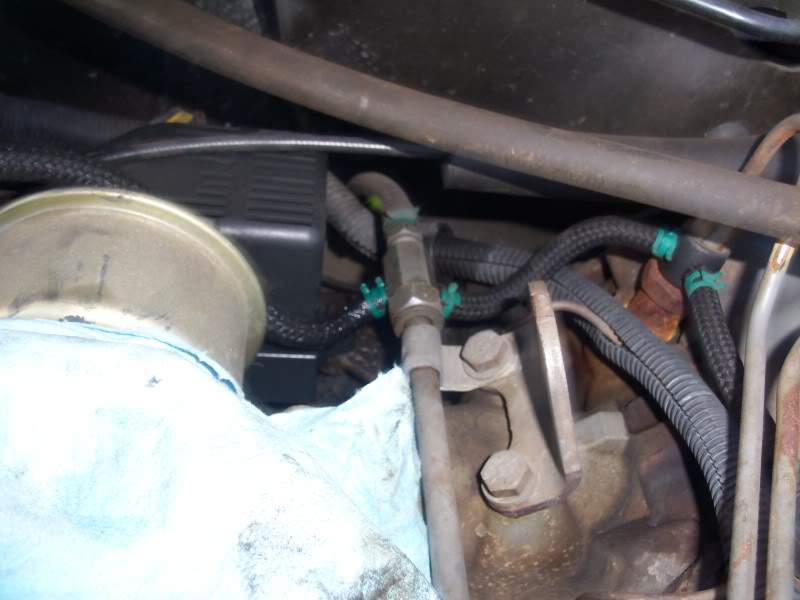
To replace that brass T, its pretty easy. After the return lines are removed remove the brass fitting that seperates the steel line from the T, then unbolt the two intake bolts that hold that line down and snake it out. For the new T, remove the other intake bolt that held the steel line at the back and put the engine hook, brass t and bolts back in and dont forget the other bolt that was removed. Torque to spec (will add later).
After that is replaced its time to move onto using the new return caps. These differ from the old style in a few ways: 1) the return line is on the side of the cap, not in the middle; 2) the return line is larger, 1/4" vs. 3/16"; and 3) the routing is slighly altered. As previously mentioned the old style took un-used fuel from both banks, merged it at the brass fitting and dumped it off to the tank. The new style runs both banks to that brass T but also uses the drivers side bank to dump excess fuel from the IP.
Old 7.3 fuel routing:
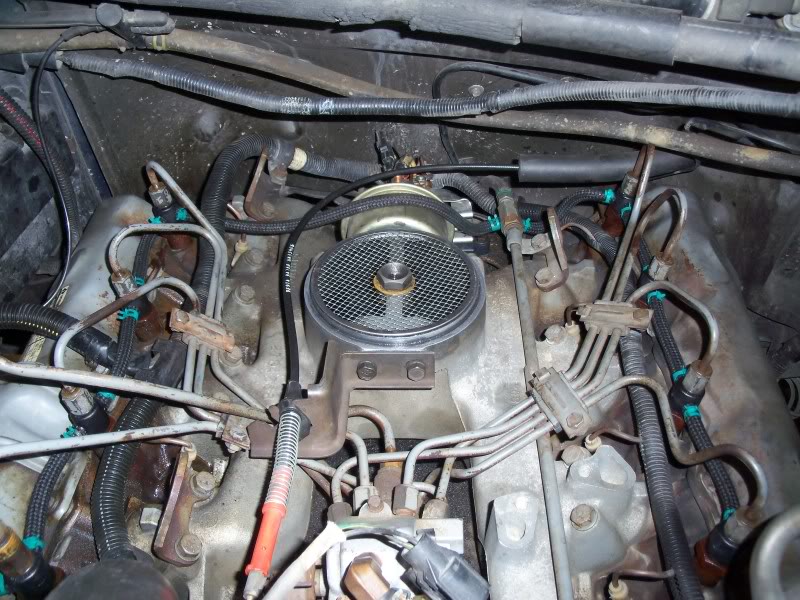
New 7.3 fuel routing:
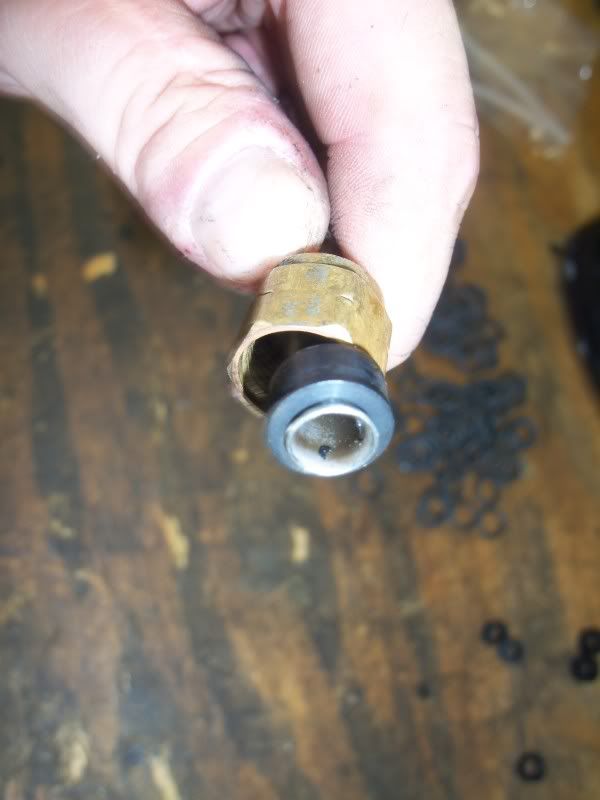
Close up of new brass T:
Note how the two lines that merge are offset, this allows for easy hose routing under the CDR.
Also now would be a good time to replace the short 5/16" hose that runs from the brass T down to the fuel line. Mine was brittle like and crumbled like a potato chip:
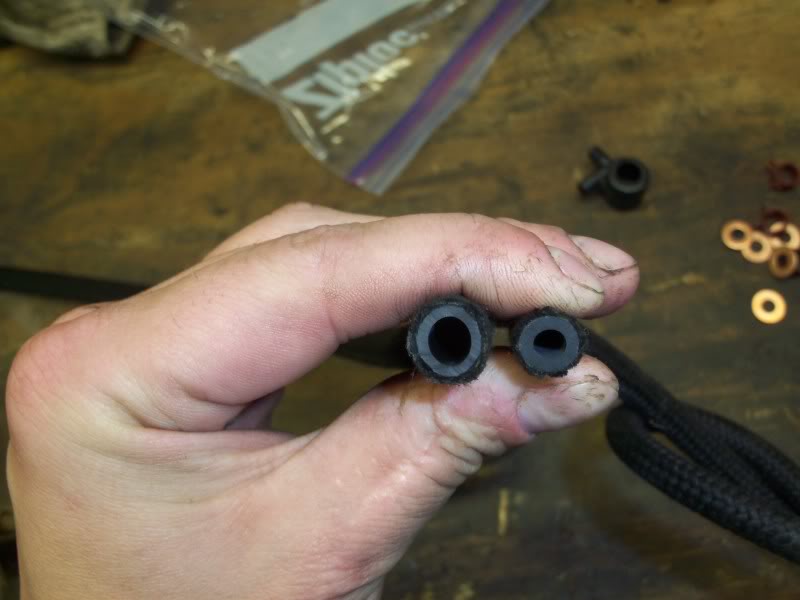
Hose diameter differences (New-left; old-right):
This is the part:
And this is what is replaces:
The end to the left has both banks meet up and dump fuel off from the IP via that steel line to the return line to the tank. Notice the brass nut on the end, that hides the infamous 4th olive (pic is of an olive for those who dont know):
Its an often over looked area when looking for air intrustion. I previously replaced all the olives (two at the filter head, one at the back of the IP, and that one).
Location of 4th olive on truck:
To replace that brass T, its pretty easy. After the return lines are removed remove the brass fitting that seperates the steel line from the T, then unbolt the two intake bolts that hold that line down and snake it out. For the new T, remove the other intake bolt that held the steel line at the back and put the engine hook, brass t and bolts back in and dont forget the other bolt that was removed. Torque to spec (will add later).
After that is replaced its time to move onto using the new return caps. These differ from the old style in a few ways: 1) the return line is on the side of the cap, not in the middle; 2) the return line is larger, 1/4" vs. 3/16"; and 3) the routing is slighly altered. As previously mentioned the old style took un-used fuel from both banks, merged it at the brass fitting and dumped it off to the tank. The new style runs both banks to that brass T but also uses the drivers side bank to dump excess fuel from the IP.
Old 7.3 fuel routing:
New 7.3 fuel routing:
Close up of new brass T:
Note how the two lines that merge are offset, this allows for easy hose routing under the CDR.
Also now would be a good time to replace the short 5/16" hose that runs from the brass T down to the fuel line. Mine was brittle like and crumbled like a potato chip:
Hose diameter differences (New-left; old-right):
#2
04-20-2012, 12:19 AM
time for the additional info i was talkin about. This installment ill be going over olive replacement. Now before ya go out n get a jar of olives and try to put em on stop! These fuel line olives seal the hard fuel lines up and over time can break down, get brittle can cause air intrustion.
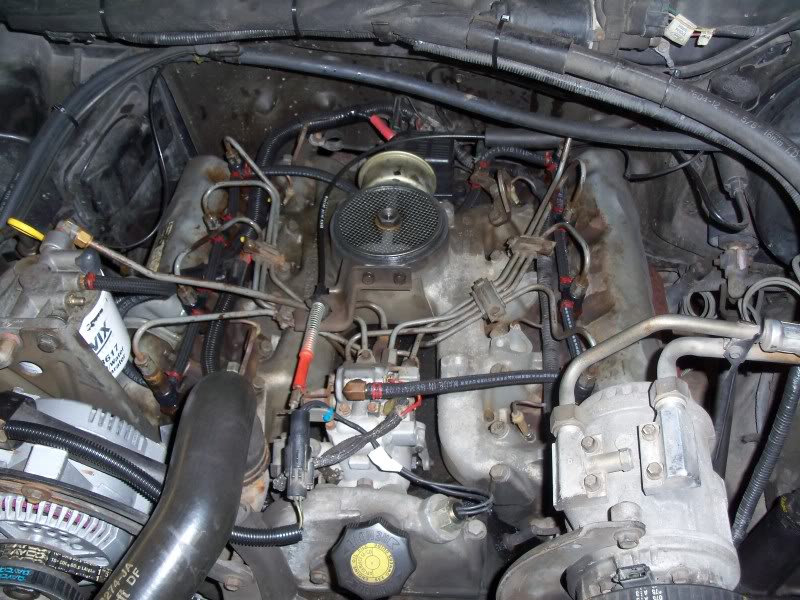
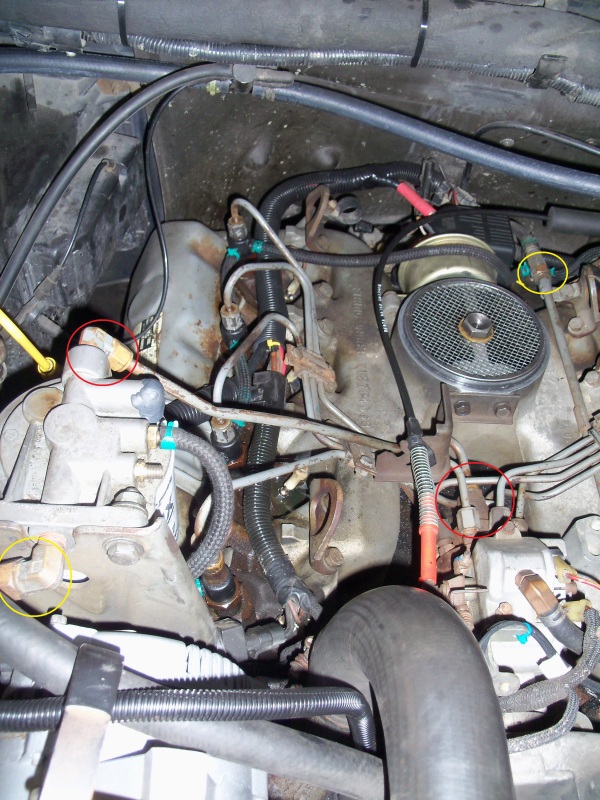
First picture is of the olive location; red ( fuel filter out and IP in) is 5/16" and yellow (fuel filter in and old style T) is 3/8". NOTE, this upgrade does away with the yellow circled olive:
This is what the new olive looks like installed on the fuel line:

To get the old olive out, there are a few choices. One method is to soak the end in some brake fluid for a couple minutes to soften up the rubber. The method i chose was to just dig it out with a pick. Mine were so brittle they came out pretty easy with a pick in a few pieces:
To install the new olive, select the appropiate size, lube the flared end with some vasoline or lube the olive with some diesel fuel and slide it over the flare at a 45* until its on and push it to the end of the flare and slide the brass nut over:
Then simple reinstall and snug up. Im sure they have a torque spec but i dont have them at the moment.
First picture is of the olive location; red ( fuel filter out and IP in) is 5/16" and yellow (fuel filter in and old style T) is 3/8". NOTE, this upgrade does away with the yellow circled olive:
This is what the new olive looks like installed on the fuel line:
To get the old olive out, there are a few choices. One method is to soak the end in some brake fluid for a couple minutes to soften up the rubber. The method i chose was to just dig it out with a pick. Mine were so brittle they came out pretty easy with a pick in a few pieces:
To install the new olive, select the appropiate size, lube the flared end with some vasoline or lube the olive with some diesel fuel and slide it over the flare at a 45* until its on and push it to the end of the flare and slide the brass nut over:
Then simple reinstall and snug up. Im sure they have a torque spec but i dont have them at the moment.
#4
04-21-2012, 12:44 PM

Senior User
Join Date: Jun 2010
Location: NW Ga
Posts: 406
Likes: 0
Received 0 Likes
on
0 Posts
#5
04-21-2012, 11:51 PM
mechel, I was having hard starts from a while ago...over the winter my GP controller took a **** and upon replacing it i broke a return cap. Plus i had air intrustion from before. I put on a spare kit i had that was absolute junk. so i ordered two kits from Typ4 (Russ) but mistakenly ordered two for the later 7.3 (which is what i upgaded to)...so not wanting to send em back i did some invesitgating at the jukyard and found that brass T which made things so much easier. But yes now it'll spin over n fire up within 2 seconds after sitting for weeks, which is a lot better than the 6-8 seconds before.
finite, any international parts or hydrolic place SHOULD be able to get them or look up Typ4 on oilburners...i dont know if he has a name here.
finite, any international parts or hydrolic place SHOULD be able to get them or look up Typ4 on oilburners...i dont know if he has a name here.

#7
11-10-2013, 06:28 PM

I was not prepared for just how hard it was going to be to get the old olive seals out of the nuts. I soaked mine in brake fluid for an hour and they were still as hard as the plastic caps that go over the injector o-rings. I've got o-ring picks and little tiny screwdrivers but they were not very effective, it just took time and lots of patience and just dig, dig, dig.
What did you do for the fitting where the return line goes into the filter head? The old-style is too small for the larger hoses of the new-style. I can probably get a fitting from home depot, but is the little built-in restrictor required?
What did you do for the fitting where the return line goes into the filter head? The old-style is too small for the larger hoses of the new-style. I can probably get a fitting from home depot, but is the little built-in restrictor required?
Trending Topics
#8
11-10-2013, 11:38 PM
#9
11-11-2013, 07:15 AM
#10
11-11-2013, 07:39 AM
I was not prepared for just how hard it was going to be to get the old olive seals out of the nuts. I soaked mine in brake fluid for an hour and they were still as hard as the plastic caps that go over the injector o-rings. I've got o-ring picks and little tiny screwdrivers but they were not very effective, it just took time and lots of patience and just dig, dig, dig.
What did you do for the fitting where the return line goes into the filter head? The old-style is too small for the larger hoses of the new-style. I can probably get a fitting from home depot, but is the little built-in restrictor required?
What did you do for the fitting where the return line goes into the filter head? The old-style is too small for the larger hoses of the new-style. I can probably get a fitting from home depot, but is the little built-in restrictor required?
#11
11-11-2013, 11:45 AM
#12
11-11-2013, 04:44 PM
#13
11-11-2013, 05:25 PM
#14
11-11-2013, 06:07 PM

Freshman User
Join Date: Nov 2012
Location: Yamhill, OR
Posts: 37
Likes: 0
Received 0 Likes
on
0 Posts
#15
11-11-2013, 09:10 PM
I want to suggest a very simple solution to air intrusion: Add a squeeze-bulb between the mechanical fuel pump and the fuel filter. Not only does it completely stop air intrusion from causing a problem(so what if a little air gets in, so long as it can't allow fuel to drain back), but gives you a manual primer in the case of running out of fuel.
Plus, at ~$5, they're cheap enough. In fact, I found them cheaper than getting a 'real' checkvalve, and primer bulbs like this have two, so...
I ended up with rubber fuel line from just after the low-pressure pump to the input of the fuel filter, with the bulb about half way. After doing this, it completely solved all lack-of-fuel related hard starts, and the "roars to life, then starves and dies 10s later" issue, despite having intermittently leaking o-rings, etc. over the last year I've had this system.

