How to: 3G install for 83-92 IDIs
#1
 04-20-2012, 12:15 AM

How to: 3G install for 83-92 IDIs
This is a how-to write up on installing a late model 3G alternator into a 83-1992 F-250/F350/F-Superduty series trucks with the 6.9/7.3L IDI diesel. The following article is a compliation of pictures from my own projects and sources online.
First off, why the 3G? Well, simply put its hands down a better choice over the 1G style used from the factory. With a self contained voltage regulator, durable design, and superior output its leaps and bounds better than the 1G. Output at idle on the 130A version is an outstanding 90-100A, and output at 2,000 rpm is a mind blowing 160-170A (well over the factory rating). I have seen three different junkyard units all put out 160-165A when tested @ 2,000 rpm.
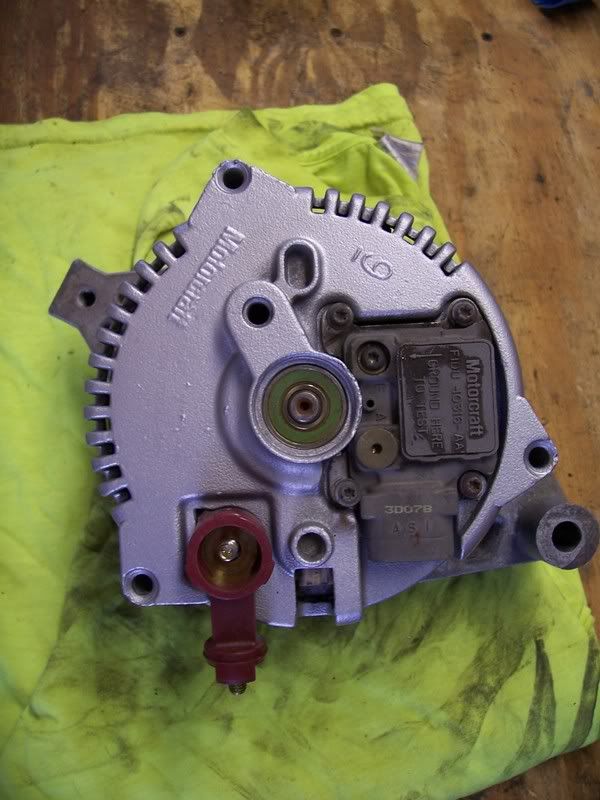
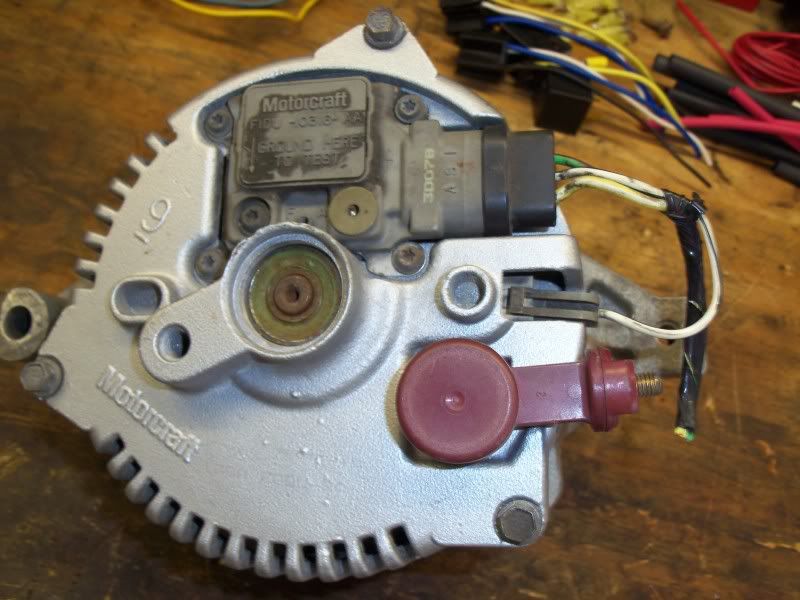
Now lets dive into the technical aspect a big here and see the main differences of the 3G. There are two output versions available (95A and 130A) in several mounting positions. For the easiest identifaction a 3G 95A version has two sets of cooling holes on the front and a smaller case which is commonly refered to as a small case 3G. The 130A 3G has three sets of cooling holes and a large case, commonly refered to as a large case 3G. There are also several different mounting patterns available, such as standard two ear mount with a 7” ear spacing and 8.25” each spacing. There is also the side mount that used three mounting ears. For the purpose of this article we’ll be using the large case (130A) 8.25” ear spacing version commonly found on early-mid 90s Taurus and Windstars with the 3.8L v-8. Some select trucks and vans with the 300 had a large case 3G, but they are rare while most use the small case 3G with 8.25” ear spacing (both can be used on the IDI equipped trucks, but most opt for the large case for its higher output, installation is the same for either).
Both example shown have 8.25" ear spacing.
Small case 95A 3G:

Large case 130A 3G:
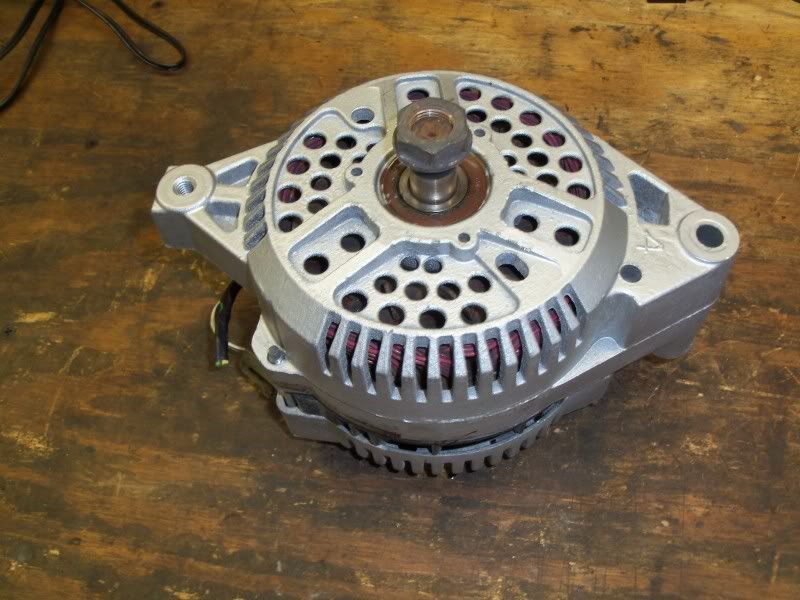
Now for what parts are needed for this install
Parts from donor vehicle:
- Large case 3G alt with 8.25" ear spacing from mid 90s Taurus or Windstar with a 3.8L v6
- Plug end with as much wiring as possible (mininium of 6”)
- Top mounting bolt
Additional items:
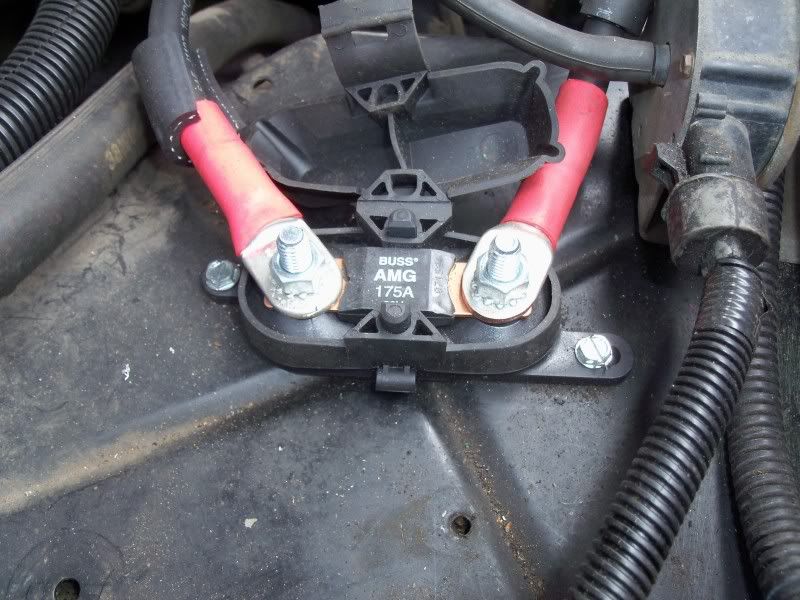
- Megafuse (AMG) fuse holder
- 175A megafuse (AMG)
- 4awg length of wire (approx 3’)
- Appropiate cable lug ends (three 5/16" and one 1/4") and solder pellets if soldering on the ends
- Basic electrical supplies (ring terminal, shrink wrap, length of 16 awg wire, soldering iron)
- Basic hand tools, soldering iron, and either a propane torch or cable lug crimper
- M8 metric bolt, 1 1/4" long if missing top mounting bolt*
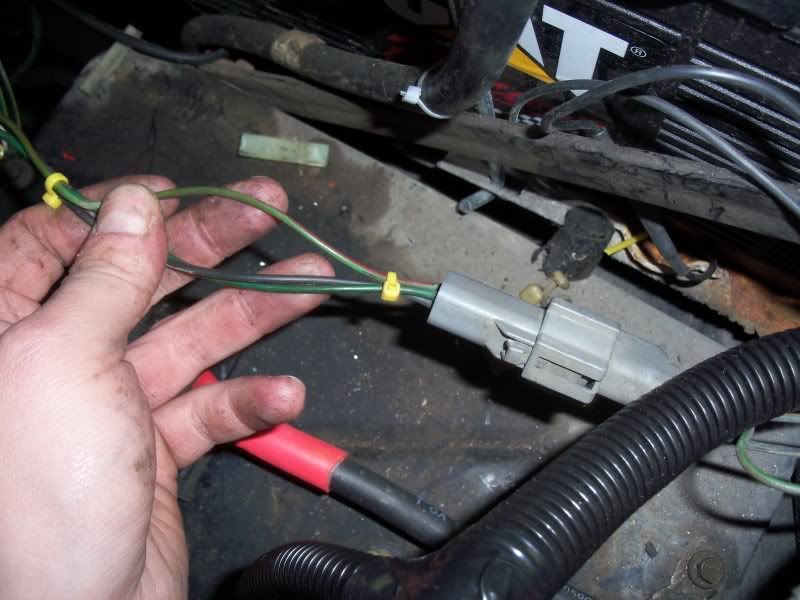
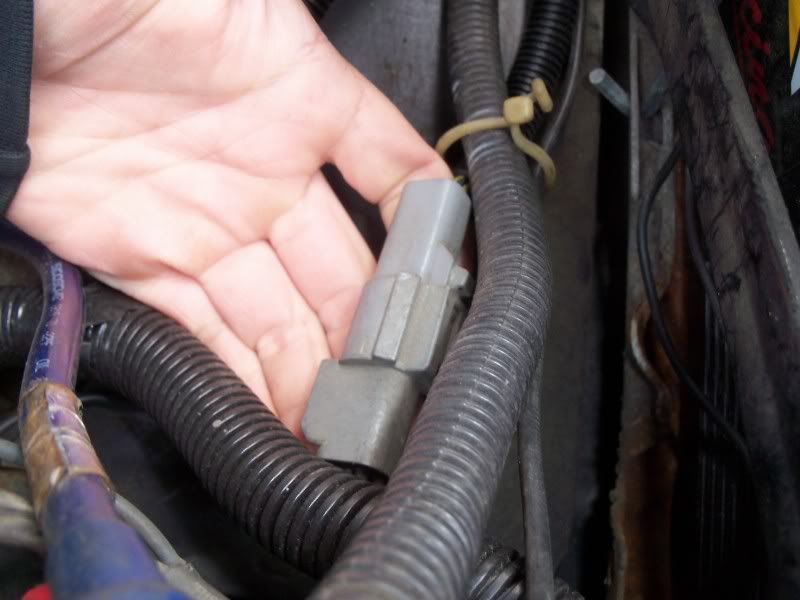
Now lets start the install. First remove the belts from the alt to vacuum pump and alt to crank pulley. Then liberate the crapatisic old alt from its hibernation hole and set it aside. Remove the voltage regulator and wiring (this harness also has the tach sendor so that will need to be unplug and removed as well, and the green wire with red tracer at the plug near the passenger inner fender by the battery) and set them aside as well.
Top view of old alt wiring:

Plug near the pass inner fender:
Voltage regulator wiring removed:
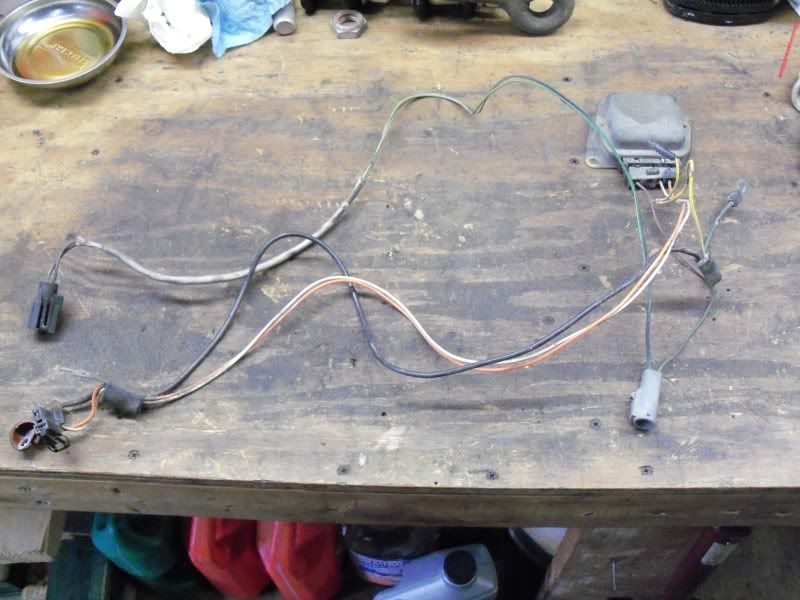
Remove the V-belt pulley from the old alt and toss the alt in the scrap pile, and begin to dissect the voltage regulator wiring. All you need from the voltage regulator wiring is the green wire with the red tracer, clip this off at the regulator plug. With the cut section of wiring clean the wires up and set them aside while tossing the voltage regulator and wiring in the trash. Next step is to install the V-belt pulley on the 3G (use red loc-tite to prevent the nut from coming loose), which will require a small shim to clear the case.
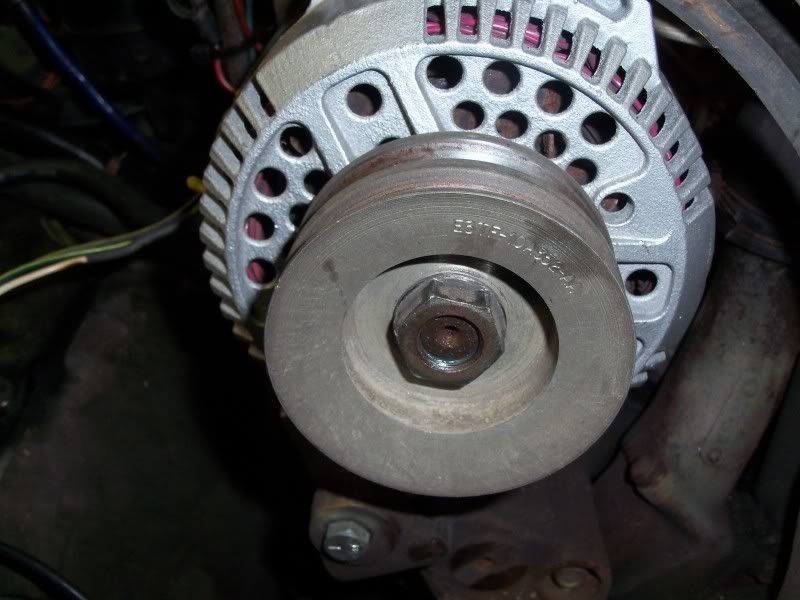
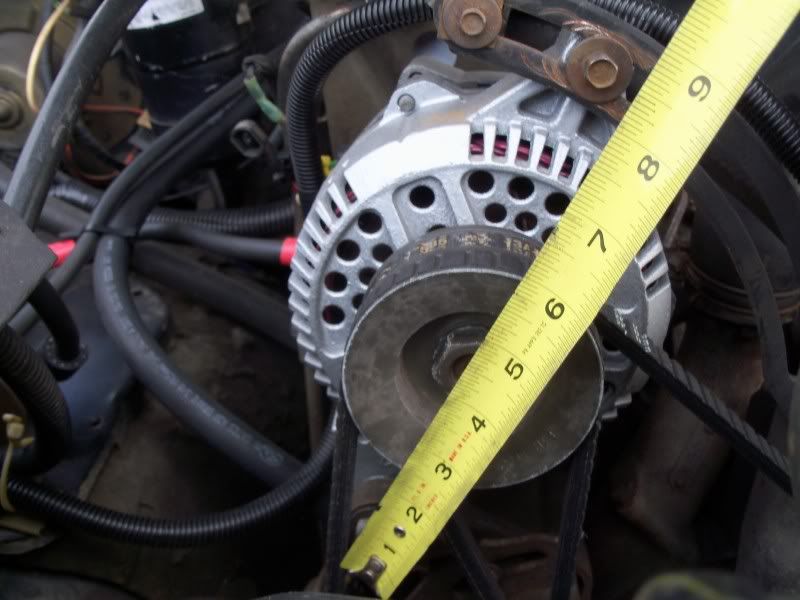
After that’s been swapped over temporarly mock up the alt in place (*note a metric M8 bolt will be needed, if the factory top mout bolt isnt available, for the top hole to adjust the tension of the belt, or the hole can be drilled and tapped for the factory bolt). With the alt mocked up you can now see if the case needs to be reclocked. This is done by simply removing the 3 bolts on the perimeter of the case and rotating to needed position.
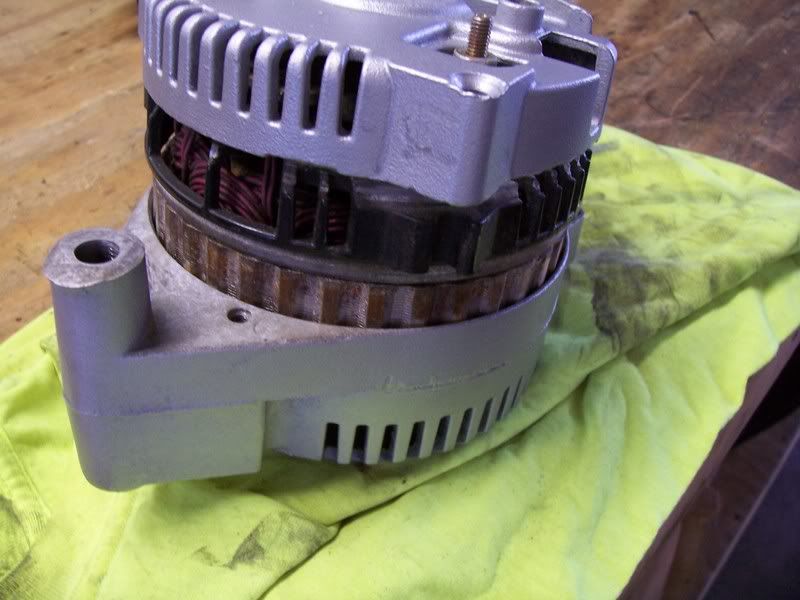
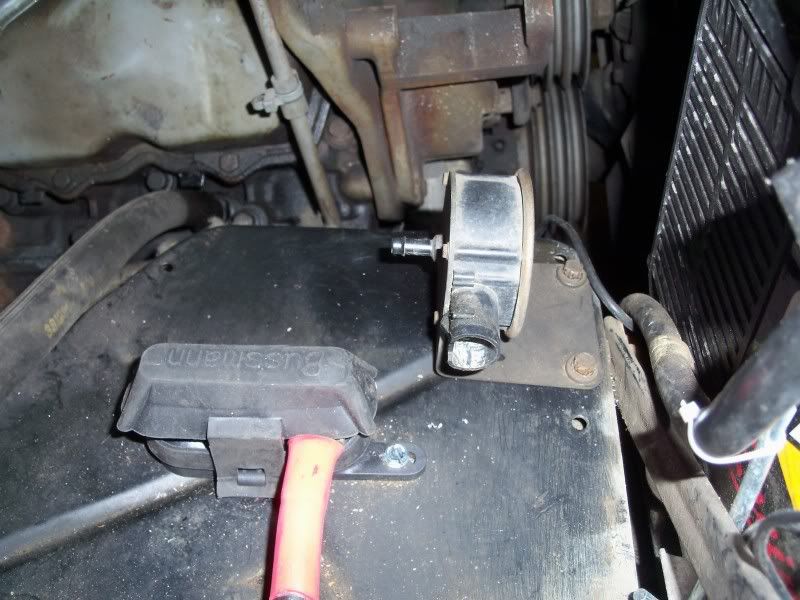
I used a sharpie to mark the spot it needed to be reclocked to and stuck the top ear in a vise to spin it into place. After its been reclocked reinstall the 3 case bolts and put it back in to mock up state. This will allow you to measure if any additional wire eneds to be added to the green/red wire and measure for the length of charge cables. I first mounted the megafuse holder in a safe spot and measured for charge cable length. The I cut, stripped and soldered on 4 ends (three are 5/16” and at the back of the alt is 1/4”). After the charge cables have been made and mounted (leaving the one going to the alt off).
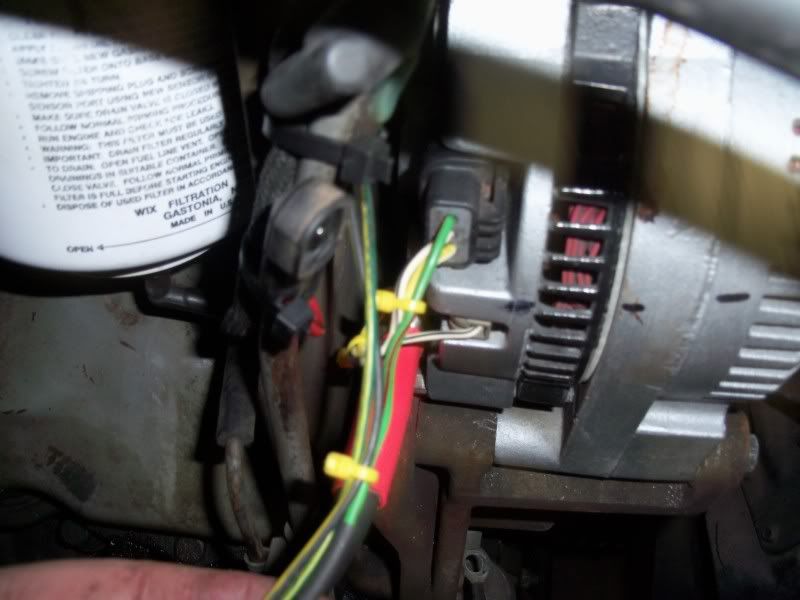
I installed the 3G pigtail and measured for length for the green/red wire. In my case I needed to add approx 6” of additional wire so I soldered it in and shrink wrapped it. After I got the length correct I removed the alt and set it on my work bench. Now comes time for final wiring. At the 3G pigtail, the green/red wire goes to the plug at the inner fender, white wire goes to the small plug on the alt and the yellow wire goes to the back of the alt stud along with the main charge cable.
Pic of 3G pigtail:

Pigtail wiring diagram:
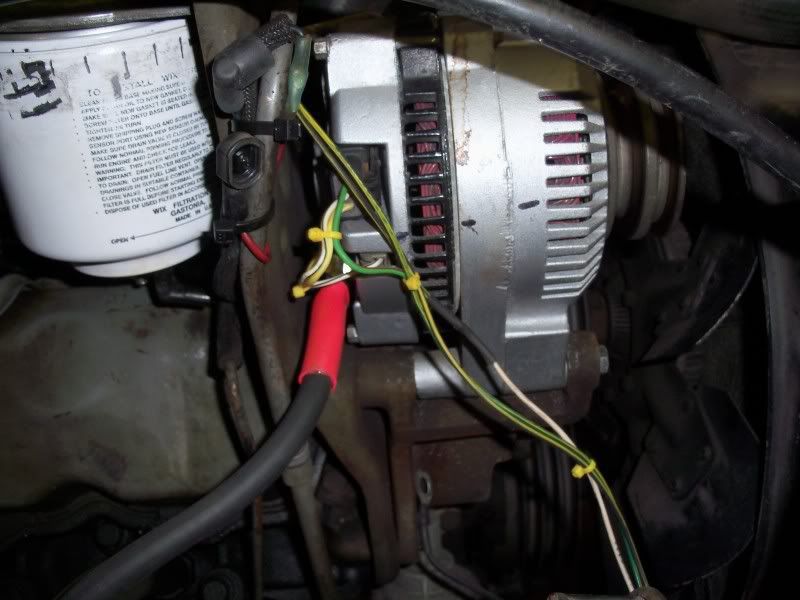
While the harness wiring is off the truck, now is a good time to wire loom and finish the harness for a professional look:

Now set the assembly back into place with the wiring all installed. Nearing the finish hook the main charge cable up to one side of the fuse holder, and plug the green/red wire back to its inner fender connector. Hook up the tach sendor and the other charge cable to the fuse holder and starter solenoid (I opted to run my charge cable from the other side of the fuse holder diretly to the battery, either way Is ok).
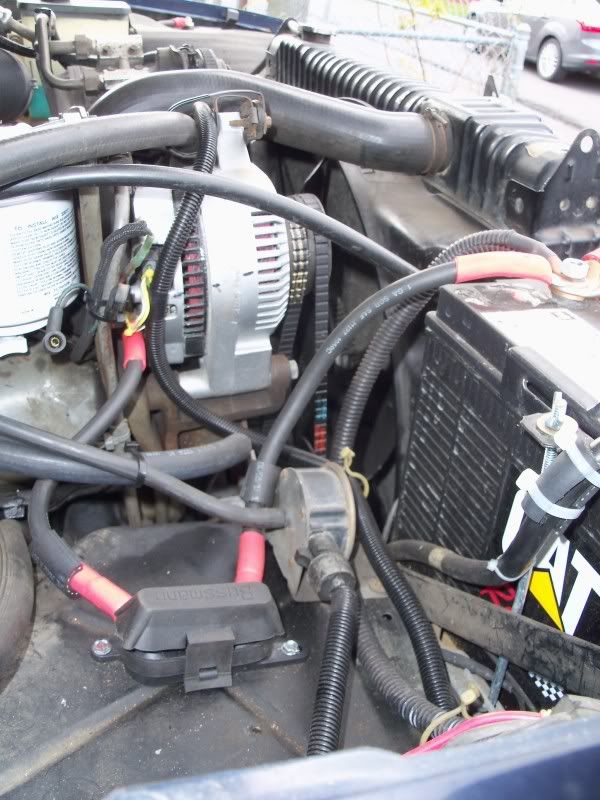

After the wiring has been snugged up, reinstall the belts, adjust the tension and snug em up. Give everything a once over checking connections and making sure everything is tight. Clean up tools and start the truck up, measure voltage output at the battery, u should now see 14-14.6V at idle instead of the 12.5-13V from the 1G (at least it was in my case). Now pop open a refreshing beverage of choice, and sit back and enjoy the joy of a properly charging alt knowing its gunna keep them batteries charged and run most add on electrical devices u wanna add.
First off, why the 3G? Well, simply put its hands down a better choice over the 1G style used from the factory. With a self contained voltage regulator, durable design, and superior output its leaps and bounds better than the 1G. Output at idle on the 130A version is an outstanding 90-100A, and output at 2,000 rpm is a mind blowing 160-170A (well over the factory rating). I have seen three different junkyard units all put out 160-165A when tested @ 2,000 rpm.
Now lets dive into the technical aspect a big here and see the main differences of the 3G. There are two output versions available (95A and 130A) in several mounting positions. For the easiest identifaction a 3G 95A version has two sets of cooling holes on the front and a smaller case which is commonly refered to as a small case 3G. The 130A 3G has three sets of cooling holes and a large case, commonly refered to as a large case 3G. There are also several different mounting patterns available, such as standard two ear mount with a 7” ear spacing and 8.25” each spacing. There is also the side mount that used three mounting ears. For the purpose of this article we’ll be using the large case (130A) 8.25” ear spacing version commonly found on early-mid 90s Taurus and Windstars with the 3.8L v-8. Some select trucks and vans with the 300 had a large case 3G, but they are rare while most use the small case 3G with 8.25” ear spacing (both can be used on the IDI equipped trucks, but most opt for the large case for its higher output, installation is the same for either).
Both example shown have 8.25" ear spacing.
Small case 95A 3G:
Large case 130A 3G:
Now for what parts are needed for this install
Parts from donor vehicle:
- Large case 3G alt with 8.25" ear spacing from mid 90s Taurus or Windstar with a 3.8L v6
- Plug end with as much wiring as possible (mininium of 6”)
- Top mounting bolt
Additional items:
- Megafuse (AMG) fuse holder
- 175A megafuse (AMG)
- 4awg length of wire (approx 3’)
- Appropiate cable lug ends (three 5/16" and one 1/4") and solder pellets if soldering on the ends
- Basic electrical supplies (ring terminal, shrink wrap, length of 16 awg wire, soldering iron)
- Basic hand tools, soldering iron, and either a propane torch or cable lug crimper
- M8 metric bolt, 1 1/4" long if missing top mounting bolt*
Now lets start the install. First remove the belts from the alt to vacuum pump and alt to crank pulley. Then liberate the crapatisic old alt from its hibernation hole and set it aside. Remove the voltage regulator and wiring (this harness also has the tach sendor so that will need to be unplug and removed as well, and the green wire with red tracer at the plug near the passenger inner fender by the battery) and set them aside as well.
Top view of old alt wiring:
Plug near the pass inner fender:
Voltage regulator wiring removed:
Remove the V-belt pulley from the old alt and toss the alt in the scrap pile, and begin to dissect the voltage regulator wiring. All you need from the voltage regulator wiring is the green wire with the red tracer, clip this off at the regulator plug. With the cut section of wiring clean the wires up and set them aside while tossing the voltage regulator and wiring in the trash. Next step is to install the V-belt pulley on the 3G (use red loc-tite to prevent the nut from coming loose), which will require a small shim to clear the case.
After that’s been swapped over temporarly mock up the alt in place (*note a metric M8 bolt will be needed, if the factory top mout bolt isnt available, for the top hole to adjust the tension of the belt, or the hole can be drilled and tapped for the factory bolt). With the alt mocked up you can now see if the case needs to be reclocked. This is done by simply removing the 3 bolts on the perimeter of the case and rotating to needed position.
I used a sharpie to mark the spot it needed to be reclocked to and stuck the top ear in a vise to spin it into place. After its been reclocked reinstall the 3 case bolts and put it back in to mock up state. This will allow you to measure if any additional wire eneds to be added to the green/red wire and measure for the length of charge cables. I first mounted the megafuse holder in a safe spot and measured for charge cable length. The I cut, stripped and soldered on 4 ends (three are 5/16” and at the back of the alt is 1/4”). After the charge cables have been made and mounted (leaving the one going to the alt off).
I installed the 3G pigtail and measured for length for the green/red wire. In my case I needed to add approx 6” of additional wire so I soldered it in and shrink wrapped it. After I got the length correct I removed the alt and set it on my work bench. Now comes time for final wiring. At the 3G pigtail, the green/red wire goes to the plug at the inner fender, white wire goes to the small plug on the alt and the yellow wire goes to the back of the alt stud along with the main charge cable.
Pic of 3G pigtail:
Pigtail wiring diagram:
While the harness wiring is off the truck, now is a good time to wire loom and finish the harness for a professional look:
Now set the assembly back into place with the wiring all installed. Nearing the finish hook the main charge cable up to one side of the fuse holder, and plug the green/red wire back to its inner fender connector. Hook up the tach sendor and the other charge cable to the fuse holder and starter solenoid (I opted to run my charge cable from the other side of the fuse holder diretly to the battery, either way Is ok).
After the wiring has been snugged up, reinstall the belts, adjust the tension and snug em up. Give everything a once over checking connections and making sure everything is tight. Clean up tools and start the truck up, measure voltage output at the battery, u should now see 14-14.6V at idle instead of the 12.5-13V from the 1G (at least it was in my case). Now pop open a refreshing beverage of choice, and sit back and enjoy the joy of a properly charging alt knowing its gunna keep them batteries charged and run most add on electrical devices u wanna add.
The following users liked this post:

#3
04-20-2012, 12:58 AM
#4
04-20-2012, 05:14 AM

Senior User
Join Date: Dec 2011
Location: Rockland Ontario
Posts: 484
Likes: 0
Received 0 Likes
on
0 Posts

#5
04-20-2012, 07:32 AM
Posting Guru
Join Date: Jan 2001
Location: Poway, CA
Posts: 1,101
Likes: 0
Received 0 Likes
on
0 Posts

#7
04-20-2012, 11:22 PM
Cargo Master
Trending Topics
#9
04-21-2012, 11:53 PM
#10
04-23-2012, 04:11 PM
More Turbo
#11
01-16-2014, 04:52 PM

These Vehicles had 3G Alternators:
- 1990-1997 Lincoln Town Car 4.6L, 5.0L
- 1990-1999 Ford Taurus, Windstar; Lincoln; Mercury Sable 3.0L, 2.5L, 3.8L
- 1991-1994 Ford Tempo, Mercury Topaz 2.3L
- 1991-1994 Lincoln Continental 3.8L
- 1991-1994 Mazda Navajo 4.0L
- 1991-2000 Ford Thunderbird, Mercury Cougar, Grand Marquis 2.5, 3.8L, 4.6L, 5.0L
- 1991-2002 Ford Escort, Mercury Tracer 1.9L, 2.0L
- 1991-2004 Ford Explorer, Mercury Mountaineer 4.0L, 4.6L
- 1992-1995 Ford Truck B, F Series Truck 5.9L, 7.0L, 8.3L
- 1992-1997 Ford Aerostar 3.0L, 4.0L
- 1992-1999 Ford Crown Victoria, Police 4.6L
- 1992-2005 Ford Ranger, Mazda Pickup 2.3L, 2.5L, 3.0L, 4.0L
- 1992-2008 Ford Excursion, Ford E Series Van, Ford F Series Pickup 4.2L, 4.6L, 4.9L, 5.0L, 5.4L, 5.8L, 6.8L, 7.3L, 7.5L
- 1992 Lincoln Town Car Limousine 4.6L
- 1993-1996 Ford Bronco 5.0L, 5.8L
- 1994-2000 Ford Mustang 3.8L, 4.6L, 5.0L
- 1995-2000 Ford Contour, Mercury Mystique 2.5, 2.0L
- 1997-2002 Ford Expedition 4.6L, 5.4L
- 1998-2002 Lincoln Navigator 5.4L
- 2002 Lincoln Blackwood 5.4L
- 2003 Ford ZX2 2.0L
- Ford Mondeo 1.8L Diesel (Europe)
#12
01-19-2014, 03:30 PM
Tuned
Join Date: Sep 2010
Location: Indianapolis,In
Posts: 259
Likes: 0
Received 0 Likes
on
0 Posts
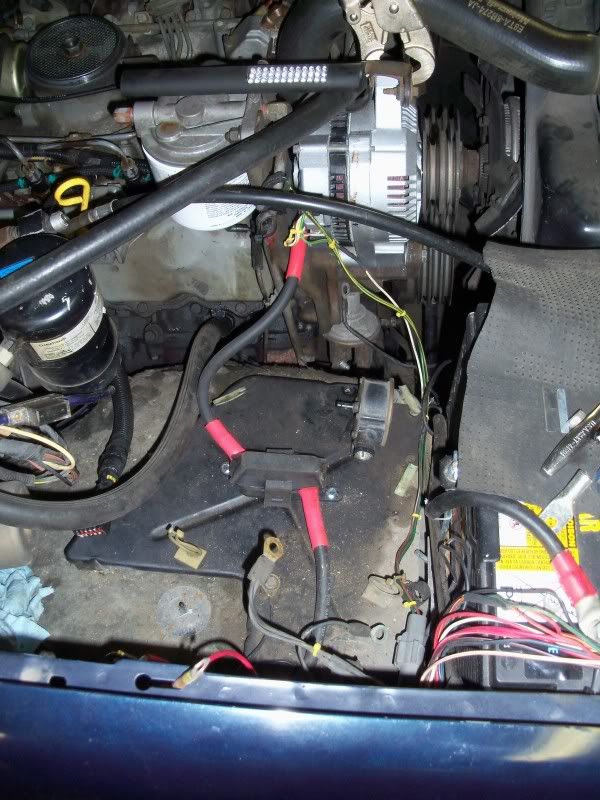
I would like to add on the 87' that I converted to your thread my truck looks a little different since my batteries are mounted under the bed. All the wiring is similar I just dont have those batteries under the hood.
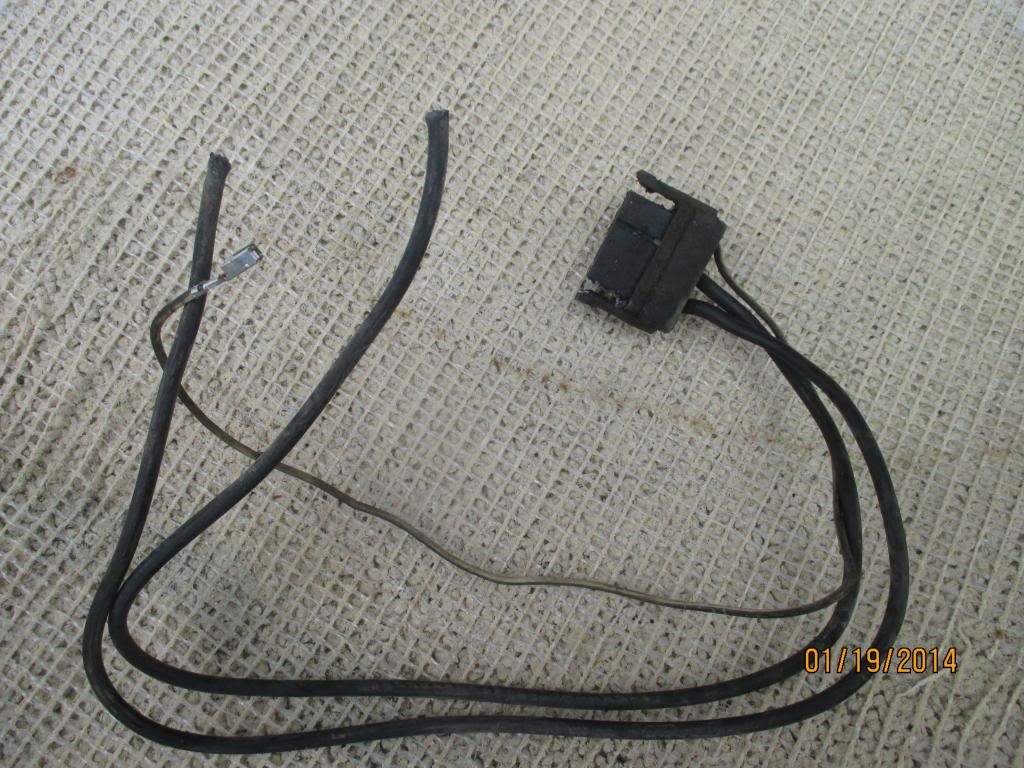
Newer style alternator is almost completely wired correctly for the regulator. the 3 pin connector needs the jumper wire in the middle installed.
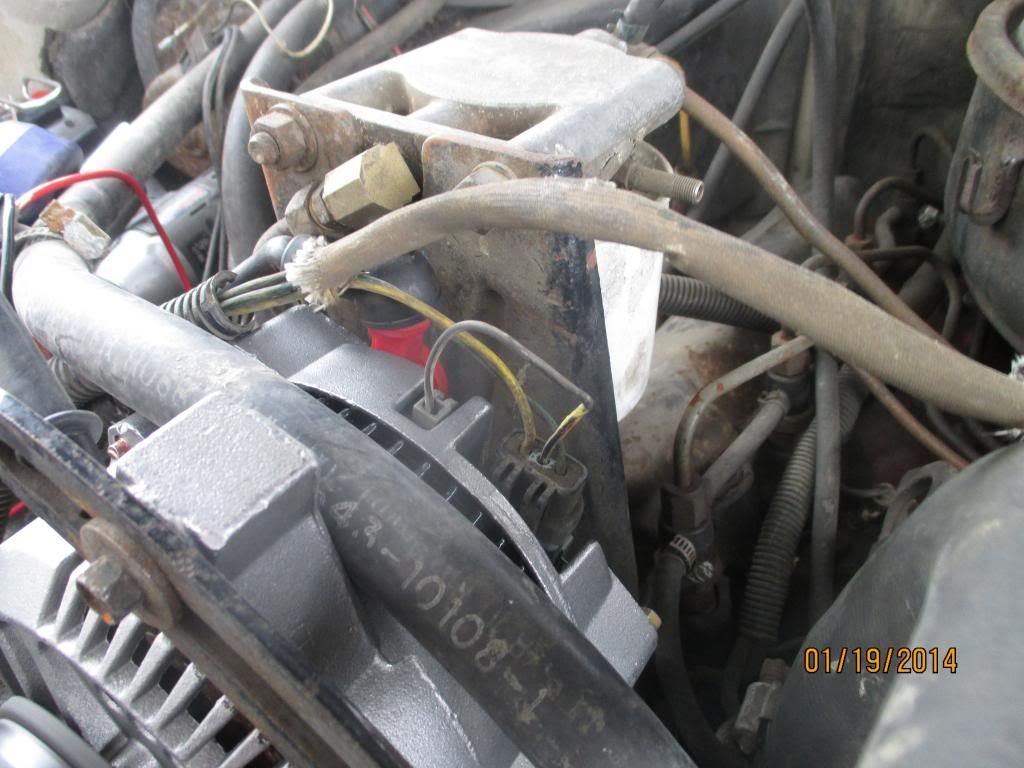
The large connector that sends power to the battery can be cut at the fusible link and wrapped if you want to save time do not cut the yellow from the fusible link it gives you the battery power. The green and yellow stays where put in the little connector also.
I mounted my fuse holder on the inner fender since I have all this extra room. The cable that runs from the alternator to the fuse block is actually from a mid 2000 Crown vic. The cable already has the boot for the alternator and the police model I found had a very large cable compared to a regular model.
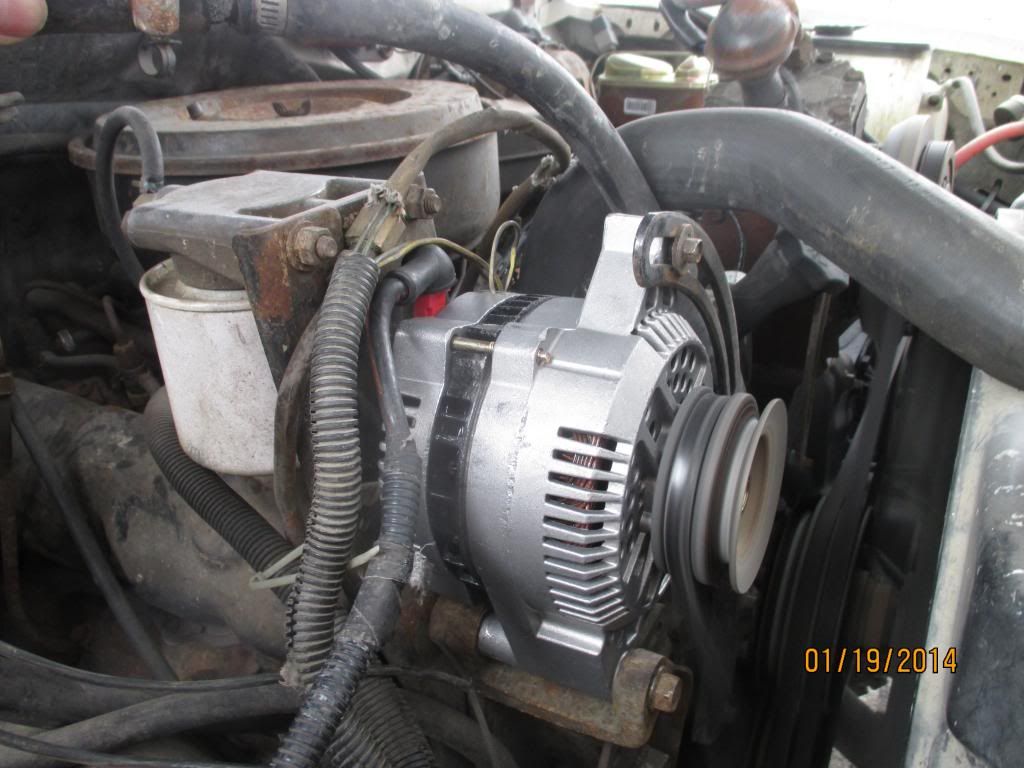
The alternator I used was a reman unit from ebay I cost $70 shipped to my door. I had to reclock the case so the charge post was pointing up. Reclocking the alternator is simple all you need to do is remove the 3 bolts holding the case together and carefully rotate the front of the case until you get everything closer to where you need it. I am not happy with the larger case on my truck. The belt for the vacuum pump is to short now. I really could use the case that has the 7" spacing.
Nice and steady voltage with the heater on full blast and the lights on also. I notice the volage gauge in the cab dips when you start turning things on, but the voltage meter here stays right on 14.8

Thanks OP your thread got me in the ballpark I can start my own thread but yours had so much good info it could only be made better with pictures from a truck with the internal regulator setup like mine.
Newer style alternator is almost completely wired correctly for the regulator. the 3 pin connector needs the jumper wire in the middle installed.

The large connector that sends power to the battery can be cut at the fusible link and wrapped if you want to save time do not cut the yellow from the fusible link it gives you the battery power. The green and yellow stays where put in the little connector also.

I mounted my fuse holder on the inner fender since I have all this extra room. The cable that runs from the alternator to the fuse block is actually from a mid 2000 Crown vic. The cable already has the boot for the alternator and the police model I found had a very large cable compared to a regular model.

The alternator I used was a reman unit from ebay I cost $70 shipped to my door. I had to reclock the case so the charge post was pointing up. Reclocking the alternator is simple all you need to do is remove the 3 bolts holding the case together and carefully rotate the front of the case until you get everything closer to where you need it. I am not happy with the larger case on my truck. The belt for the vacuum pump is to short now. I really could use the case that has the 7" spacing.
Nice and steady voltage with the heater on full blast and the lights on also. I notice the volage gauge in the cab dips when you start turning things on, but the voltage meter here stays right on 14.8

Thanks OP your thread got me in the ballpark I can start my own thread but yours had so much good info it could only be made better with pictures from a truck with the internal regulator setup like mine.
#13
02-10-2014, 04:40 PM

Senior User
Join Date: May 2011
Location: Morgantown, WV
Posts: 497
Likes: 0
Received 0 Likes
on
0 Posts
I replaced my alt with a stock one (70amp) and a new regulator and the new pigtail harness for the VR. I also rewired the whole charging system. Long story short, I couldnt get any voltage to charge my batteries, took everything back and got the 3G which is what I wanted to do from the beginging. wired it in and no problems now, with the lights on and heater blowing on high, still charging at 13.5v. Thanks to this thread I was able to do it. I did it before in my last truck ('87 F150 4.9L) about a year ago.
#14
02-10-2014, 05:37 PM
Senior User
Join Date: Dec 2011
Location: Rockland Ontario
Posts: 484
Likes: 0
Received 0 Likes
on
0 Posts

