HIO Silver's Lo-Buck Bumpside Build
#361
 01-09-2014, 03:45 PM

Hotshot
!!  !!
!!
Got the rivets out the other night..... just gotta drill the other two mounting holes on the passenger side. I took "before" measurements from the fender to the ground and fender to the axle center line. The latter will account for any difference in tire height which most guys don't think about.
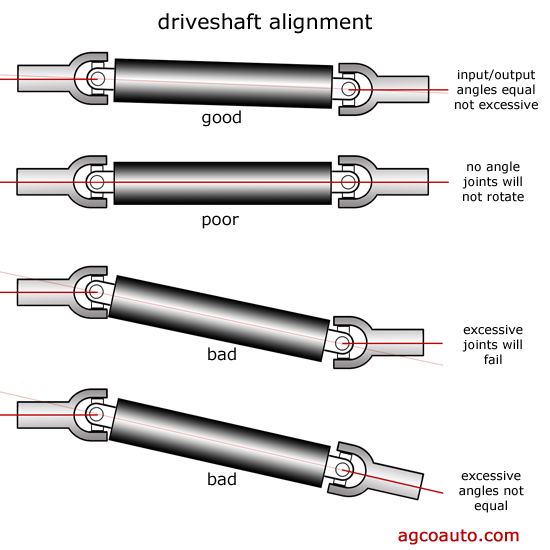
Also measured the pinion angle before doing the work. After thinking about it more, I don't think it will matter on rigs with a two-piece driveshaft because the coupling shaft angle (the driveshaft section forward of the carrier bearing) doesn't change and the angle of the rear driveshaft can be accommodated by the U-joint at the axle. What is wrong with my theory??
!!Got the rivets out the other night..... just gotta drill the other two mounting holes on the passenger side. I took "before" measurements from the fender to the ground and fender to the axle center line. The latter will account for any difference in tire height which most guys don't think about.
Also measured the pinion angle before doing the work. After thinking about it more, I don't think it will matter on rigs with a two-piece driveshaft because the coupling shaft angle (the driveshaft section forward of the carrier bearing) doesn't change and the angle of the rear driveshaft can be accommodated by the U-joint at the axle. What is wrong with my theory??
#363
01-09-2014, 05:42 PM
#364
01-09-2014, 06:14 PM
Hotshot
And ah, as far as the misfiring dendrites etc is concerned.......Vitamins, Sleep, and.........


#365
01-11-2014, 03:13 PM
This is getting interesting...
'Finished up the full spring hanger flip and netted a total of 5 inches of drop - it's now 13 inches to the axle center line. The pinion angle is waaaaay outta whack so some shimming will be required. There's two inches of travel between the axle tube and the stock bump stop. It'll get trimmed a little. The overload spring is still installed.

As with most anything endeavor, there is no free lunch. The hanger flip brings on another issue, besides the pinion angle, and that is with the Flexo-o-matic spring system. Changing the leaf spring's geometry leans back the Flexomatic bracket and it is no longer braced against the leafs to start taking on an applied load. See the gap? It appears the springs would need to compressed up to the bumpstop before the Flexomatic bracket makes contact. Shimming will be required here too. I'll figure that out another day.

'Finished up the full spring hanger flip and netted a total of 5 inches of drop - it's now 13 inches to the axle center line. The pinion angle is waaaaay outta whack so some shimming will be required. There's two inches of travel between the axle tube and the stock bump stop. It'll get trimmed a little. The overload spring is still installed.
As with most anything endeavor, there is no free lunch. The hanger flip brings on another issue, besides the pinion angle, and that is with the Flexo-o-matic spring system. Changing the leaf spring's geometry leans back the Flexomatic bracket and it is no longer braced against the leafs to start taking on an applied load. See the gap? It appears the springs would need to compressed up to the bumpstop before the Flexomatic bracket makes contact. Shimming will be required here too. I'll figure that out another day.
#366
01-11-2014, 03:47 PM
Hotshot
Well Hio, my 1st rection was a Ford Super Duty's rear spring insulator. P/N 2c3z5586a. This would be nylon like you would want there for when the bracket slides a tad on the spring as it applies and retracts. But it is only 1/8" thick. So then it hit me:
Energy Suspension 9-9102G - Energy Suspension Bump Stops

<INPUT id=compareCheck_ENS-9-9102G type=checkbox name=Compare><LABEL style="DISPLAY: inline" id=labelText_ENS-9-9102G for=compareCheck_ENS-9-9102G>Compare</LABEL>
Bushings, Bump Stops, Polyurethane, Black, Disk, 2 in. Diameter, .687 in. Tall, Universal, Pair
Part Number: ENS-9-9102G More Detail...
Estimated Ship Date: 1/13/2014 (if ordered today)
$8.97
<FORM id=addtoForm_ENS-9-9102G method=post action="">
<FIELDSET>
</FIELDSET></FORM>
Energy Suspension 9-9102G - Energy Suspension Bump Stops
<INPUT id=compareCheck_ENS-9-9102G type=checkbox name=Compare><LABEL style="DISPLAY: inline" id=labelText_ENS-9-9102G for=compareCheck_ENS-9-9102G>Compare</LABEL>
Bushings, Bump Stops, Polyurethane, Black, Disk, 2 in. Diameter, .687 in. Tall, Universal, Pair
Part Number: ENS-9-9102G More Detail...
Estimated Ship Date: 1/13/2014 (if ordered today)
$8.97
<FORM id=addtoForm_ENS-9-9102G method=post action="">
<FIELDSET>
</FIELDSET>
</FORM>
#367
01-11-2014, 04:13 PM

#371
01-19-2014, 11:45 AM
DIY Bumper with Driving Lights ala LMC Truck's
I've liked the look of LMC's driving light bumper but hated the $299 price tag. I can do better and at a significantly lower cost.
Last year at the JY, I was walking by a 67 F250 and noticed the nice patina on the bumper... then I noticed that it had never been hit. $45 later it was coming home with me for this mod - complete with patina'd bumper bolts. Plus the bumper looks the part of the LBB.
It turns out a can of Del Monte peach halves is the same diameter as the lights I'm using. 'Taped the lids on for mock-up.


The lights are off a 90s Pontiac... $10 for the pair. Ford's newer driving lights are either too big or had some weird azz shape. The tape is there to reduce scratching the lenses more than they already are.

Rear layout to see where the lights would bit the contour. It's good... just a lil overhang on top. It'll have a small "eyebrow". Also notice the lack of rust...the OE chromed bumper is flaky rust on the back side.

Front layout. The slag will collect on the back side. I'm gonna need a bigger plasma cutter.

Plasma'ed the holes and left them fat to sneak up with a die grinder. Clearanced the holes holding the grinder at 90� instead perpendicular to the bumper surface for that 'aero' look.

Test fitting to figure out how long the tabs should be. About 1.75 inches long with a 5/16ths hole 1.375 inches up from the bumper.

Marked, drilled, and cut tabs out of 1/8 steel. Assembled the tabs on the light brackets and tack welded. Removed the lights and then fully welded. Applied etching primer from the back to preserve the bumper's patina.


Installed. Need to do a lil bit more clearancing on the passenger side cuz the light is kinda tight and needs to tilt a bit more. Total: $55

Last year at the JY, I was walking by a 67 F250 and noticed the nice patina on the bumper... then I noticed that it had never been hit. $45 later it was coming home with me for this mod - complete with patina'd bumper bolts. Plus the bumper looks the part of the LBB.
It turns out a can of Del Monte peach halves is the same diameter as the lights I'm using. 'Taped the lids on for mock-up.
The lights are off a 90s Pontiac... $10 for the pair. Ford's newer driving lights are either too big or had some weird azz shape. The tape is there to reduce scratching the lenses more than they already are.
Rear layout to see where the lights would bit the contour. It's good... just a lil overhang on top. It'll have a small "eyebrow". Also notice the lack of rust...the OE chromed bumper is flaky rust on the back side.
Front layout. The slag will collect on the back side. I'm gonna need a bigger plasma cutter.
Plasma'ed the holes and left them fat to sneak up with a die grinder. Clearanced the holes holding the grinder at 90� instead perpendicular to the bumper surface for that 'aero' look.
Test fitting to figure out how long the tabs should be. About 1.75 inches long with a 5/16ths hole 1.375 inches up from the bumper.
Marked, drilled, and cut tabs out of 1/8 steel. Assembled the tabs on the light brackets and tack welded. Removed the lights and then fully welded. Applied etching primer from the back to preserve the bumper's patina.
Installed. Need to do a lil bit more clearancing on the passenger side cuz the light is kinda tight and needs to tilt a bit more. Total: $55
#373
01-19-2014, 07:37 PM
Elder User
Join Date: Nov 2009
Location: Mayfield, KY
Posts: 891
Likes: 0
Received 0 Likes
on
0 Posts
#375
01-19-2014, 10:19 PM
Machine... a vintage Westinghouse model circa about ... hmm... about 1990. It's a good one.. I've broken three hand-cranks but this 'un still keeps going.