
Bilstein steering stabilizer installed
#1
 03-15-2012, 10:15 PM

Bilstein steering stabilizer installed
I noticed a few months ago the Monroe steering stabilizer I had for the past few years had a noticeable dent in the bottom but more importantly, after removing it to do some other front end work, it seemed to be losing its stiffness. A few weeks ago I decided it was time to replace it. I wanted to stick to a single stabilizer system since I really don’t have a need for a dual system. After a little bit of research I order a new Bilstein 5100 steering stabilizer. I purchased it from ShockWarehouse.com for $79.95 plus shipping. It appears since then the price has gone up a few dollars.
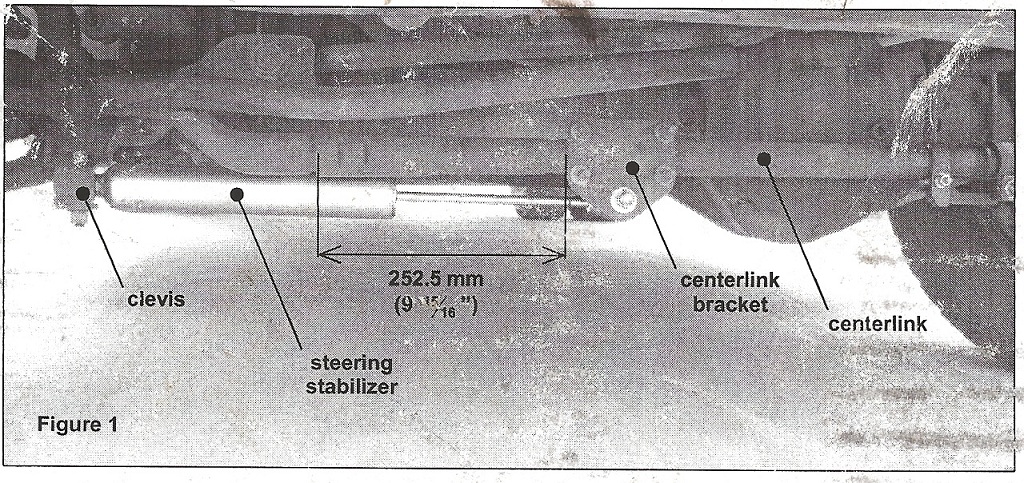
The installation was pretty straight forward and Bilstien included a nice set of directions. The first item in the directions was turning the steering wheel all the way to the left for removal of the old stabilizer and installation of the new. After doing this I removed the old stabilizer. Next I had to make sure centerlink bracket was in the correct position. According to the directions the left edge of the bracket (from the front of the vehicle) had to be 9-15/16” from the edge of the centerlink on the passenger side. They included the nice picture below to illustrate this.
I had to loosen the u-bolts up and adjust my bracket to the indentations furthest from the passenger side on the centerlink and tighten the u-bolts back up. After that it was a matter of getting the open bushing end of the stabilizer into the clevis. Almost right away I realized that the bottom part of the clevis was bent upwards and there was just not enough room to install the new stabilizer. After trying a couple different ways to bend it down I came up with the following. (Yes I know I need to trim by spring u-bolts)
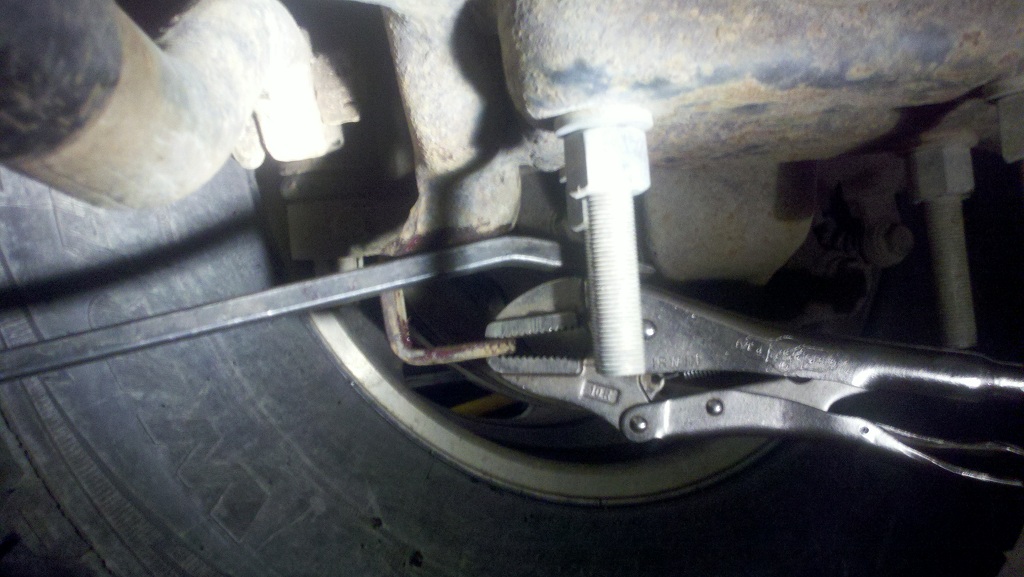
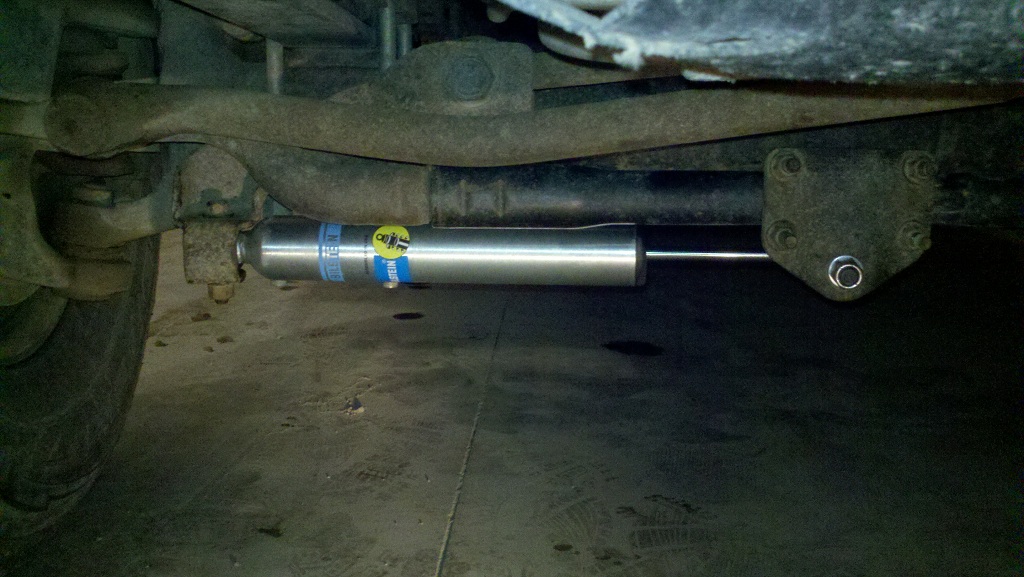
Basically I used the vise grips as a lever and my longest pry bar for force. I was able to get enough downward pressure this way to bend the clevis back into shape. A little grease and the stabilizer slide into place. I then reused the old bolt and nut and hand tighten it for the time being. After that I installed the thread stud end into the centerlink bracket and torque it down to the value in the directions using the supplied washer and jam nut. I then torque the clevis bolt down to the value in the directions and finally torqued the bracket ubolts to 21 ft-lbs.
Finally I started my truck up and turned the wheel to full left lock and then to full right lock and felt for any binding. Happy that there was none I took a few minutes to admire the excellent craftsmanship. It really is a nicely made part but I didn’t buy it to look pretty…
…so I took a 15 mile test drive. Since basically rebuilding the steering system my truck has always handled very well (after I found and replaced a new but defective lower driver’s side ball joint which caused excessive wear on a new pitman-arm-to-drag link end that also had to be replaced) so I was not expecting night and day difference. However, I was very pleased with the way it eliminated a small amount of bump steer I was getting on certain roads. It just seemed like the truck was smoother handling on all road surfaces and provided better on-center stability. Over all it was worth the extra money over a cheaper stabilizer. I am sure it will pit, rust and get bent eventually but when the time comes I'll replace it with another Bilstein. For now though it’s one more item in my quest for the perfect handling and most stable truck I can afford (which isn’t much!).
The installation was pretty straight forward and Bilstien included a nice set of directions. The first item in the directions was turning the steering wheel all the way to the left for removal of the old stabilizer and installation of the new. After doing this I removed the old stabilizer. Next I had to make sure centerlink bracket was in the correct position. According to the directions the left edge of the bracket (from the front of the vehicle) had to be 9-15/16” from the edge of the centerlink on the passenger side. They included the nice picture below to illustrate this.
I had to loosen the u-bolts up and adjust my bracket to the indentations furthest from the passenger side on the centerlink and tighten the u-bolts back up. After that it was a matter of getting the open bushing end of the stabilizer into the clevis. Almost right away I realized that the bottom part of the clevis was bent upwards and there was just not enough room to install the new stabilizer. After trying a couple different ways to bend it down I came up with the following. (Yes I know I need to trim by spring u-bolts)
Basically I used the vise grips as a lever and my longest pry bar for force. I was able to get enough downward pressure this way to bend the clevis back into shape. A little grease and the stabilizer slide into place. I then reused the old bolt and nut and hand tighten it for the time being. After that I installed the thread stud end into the centerlink bracket and torque it down to the value in the directions using the supplied washer and jam nut. I then torque the clevis bolt down to the value in the directions and finally torqued the bracket ubolts to 21 ft-lbs.
Finally I started my truck up and turned the wheel to full left lock and then to full right lock and felt for any binding. Happy that there was none I took a few minutes to admire the excellent craftsmanship. It really is a nicely made part but I didn’t buy it to look pretty…
…so I took a 15 mile test drive. Since basically rebuilding the steering system my truck has always handled very well (after I found and replaced a new but defective lower driver’s side ball joint which caused excessive wear on a new pitman-arm-to-drag link end that also had to be replaced) so I was not expecting night and day difference. However, I was very pleased with the way it eliminated a small amount of bump steer I was getting on certain roads. It just seemed like the truck was smoother handling on all road surfaces and provided better on-center stability. Over all it was worth the extra money over a cheaper stabilizer. I am sure it will pit, rust and get bent eventually but when the time comes I'll replace it with another Bilstein. For now though it’s one more item in my quest for the perfect handling and most stable truck I can afford (which isn’t much!).

 Very nice detailed write up! Glad to hear that the Bilstein is working for you.
#4
03-16-2012, 04:31 PM

#6
04-03-2012, 11:51 PM
#7
04-04-2012, 05:53 AM
More Turbo
Trending Topics
#8
04-04-2012, 07:10 AM
EDIT: Another thought was did you make sure the ubolts on the bracket were tight and properly seated in the indentations on the centerlink?
#9
04-04-2012, 03:13 PM
Dang!!Rain and cold..Anyways, I ran out and took the measurement. I think when I did the install, I looked at the picture toooo closely which showed the measurement started from the very right edge of the first indentation. When I start from the center of the first indentation, it's off by 4/16" too far and the u-bolt of the bracket is not seated in the indentation of the centerlink. Will re-do after the rain stop. Thank you for pointing that out.
#10
04-04-2012, 09:19 PM
#11
04-05-2012, 05:46 PM
OK. I re-position the u-bolt(passenger side) in the indentation on the centerlink. Took a test drive. No more popping. However, the measurement is only 9 10/16". Maybe I have the wrong bracket. It's not the original; I bought it off the internet. It measures almost 5" in length. If you could measure your bracket or the length from the left edge of the bracket to the center of the hole and report back for comparison; would be much appreciated. Anyhow; I'm happy the way it is. Thanks again.
-kila
-kila
#12
04-06-2012, 10:29 AM
Finally took some measurements for you. The bracket is 4 1/2" wide, from center of ubolt to ubolt is 3 3/8" and from center of stabilizer bolt to passenger side edge of bracket is 2 5/8". Also when I measure from the edge of of the stabilizer bracket to the last indentation on the passenger side of the center link I get roughly 9 5/8" if I go by the driver's side edge of the indentation. It appears it's all good once you got the ubolts line up with the indentations.
#13
04-07-2012, 03:35 AM
#14
04-07-2012, 06:20 AM
Interesting. I end up with the same measurement going by the first indentation but using the closer ubolt indentations on the centerlink. I don't have any issue but I would think I am over compressing mine. I noticed your photo is higher quality than mine an much easier to see that they want you to go by the edge of the centerlink where it screws into the out link and NOT the first indentation on the passenger side. I'll correct mine and double check the measurements and update the instructions in my first post.
#15
04-07-2012, 12:48 PM
Side question - my new purchase F250 has one of those stabilizers and I do have popping sound even on flat driving that I can not find source for. Have new sway bar links, bushings look good, lifted whole front and found to play anywhere, so how can I test this stabilizer for making the noise on the road?
BTW my dually doesn't have the stabilizer and tracks like go-cart, the F250 likes to wander on the road with the stabilizer. Than F250 is 4WD
BTW my dually doesn't have the stabilizer and tracks like go-cart, the F250 likes to wander on the road with the stabilizer. Than F250 is 4WD