
Restoring my '79 LWB F100 - Build Thread

#32
 12-06-2013, 04:42 AM
Join Date: Mar 2012
Location: Geelong, Australia
Posts: 68
Likes: 0
Received 0 Likes
on
0 Posts
Bit of an update on what's been going on lately.
After the 2nd engine failed the leakdown test I decided I might as well get it rebuilt and go with the plan of fitting it to my driving ute while I do the other ute. The Cleveland in my driver at the moment is getting very close to dying.
The plan is to build it all the way I'd planned with the exception of the alloy heads, they'll have to come later as the budget allows.
On the recommendation of my mechanic I went to North Geelong Engine Reconditioners and had a chat to a bloke called Alan. They've built quite a few Clevelands for drag and sprint cars, as well as street cars, and Alan seemed to know what works for Clevelands.
First mission was to find a standard block, the block I had was 40 thou out already. The accepted wisdom of the engine builder and from what I've read on the forums is that 30 thou is the maximum for a Cleveland block. Standard blocks are getting harder to come by but I found a Ford dismantler close by and he had a couple of blocks he thought should be standard bore. I got one for $200 and hauled it over to the engine reconditioner, they cleaned it and bored it but there was a concern in a couple of cylinders that after taking 30 thou out of the cylinders a couple of rust spots hadn't cleaned up well enough.
Verdict? Scrap that block as well and start again (the engine shop looked after me as far as cost for the work they'd done already so that was much appreciated). Off to the dismantler to get the second block he had. I should have gotten that one in the first place because it had been stored with a carby and manifold on it so the bores were still nice and oily. It turned out to be a standard bore as well so that was a relief.
In the meantime the engine shop informed me that the 2V heads I'd given them had a problem in that one of them was cracked so no good. I had noticed that when I was messing around getting the engine running in the ute shortly after I'd bought it that the radiator had started pushing coolant out (coolant? If you call filthy rusty water coolant) as soon as the engine started to warm up, I'm guessing because of the crack in one of the heads.
Anyhew, into the bin they went as well. A comrade at my work told me he could get his hands on a set of 2V heads for free and they seemed to be OK as far as he knew. At this point I had been contemplating getting a set of closed chamber 302 heads to put on as that seemed to be a common method of upping the compression for LPG engines.
The engine builder advised against it, his theory is that open chamber heads work better for straight gas and we could get the compression we were after (he advised aiming for about 11:1) by shaving the 2V open chamber heads.
So that's what we did, the second set of heads came up OK, they already had valve seat inserts fitted so that was a bit of a bonus.
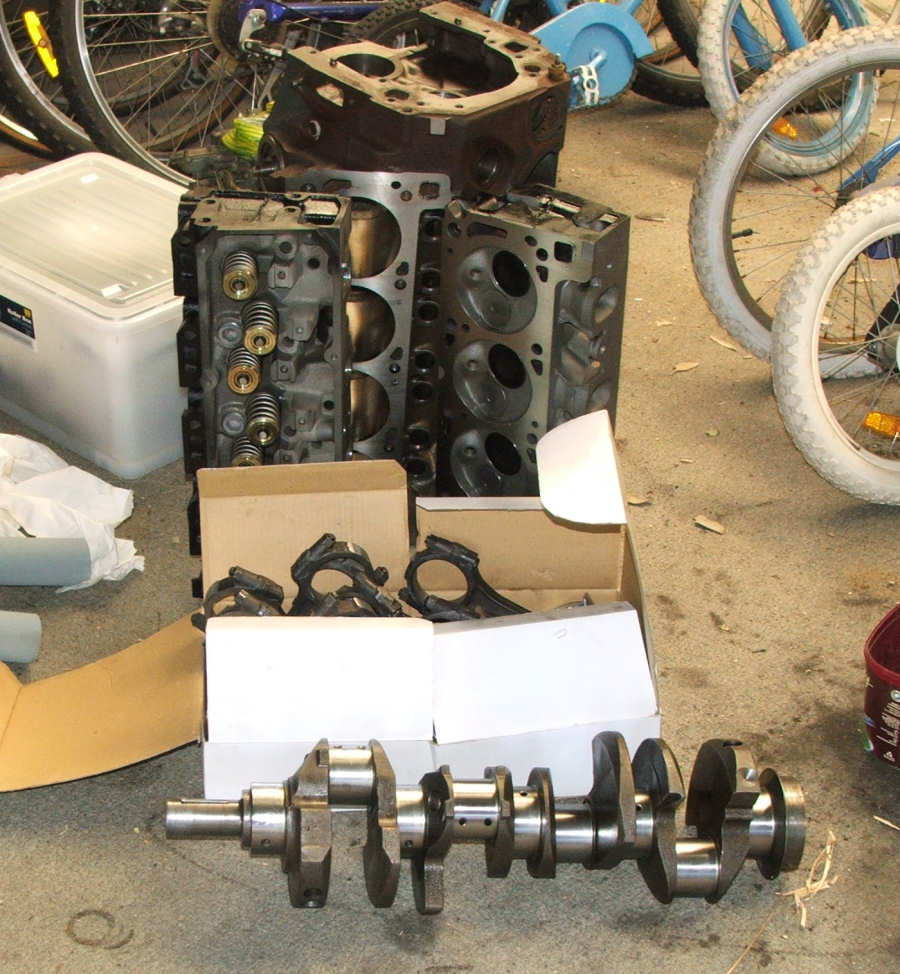
So here's what I've got at the moment;
The block has been bored out 20 thou and the deck zeroed.
The engine had a 4MAB crank fitted (the crank, con rods and push rods are the only bits that are usable from the original engine, expensive caper this motor building!) so it's been reground.
There's a set of flat top pistons to be fitted and the crank, rods and pistons have been balanced.
I've bought a new flex plate and harmonic balancer, both have been balanced as well.
The cam we've decided on is a Crow 21666.
The heads have been reconditioned for gas, new valves fitted and new valve springs as well.
I've gotten a new Melling oil pump and pump drive shaft, new timing case cover and a new set of rockers.
There's also an Edelbrock Airgap manifold for up top and a Holley 600 squarebore throttle body, I'll be purchasing an Impco 425 mixer as well shortly.
The rocker covers and sump have been sand blasted and resprayed flat black, I even bought myself a set of panel beating tools and had a go at knocking out some little dings in them! With mixed success admittedly but you have to start somewhere. I've also blasted and painted all the belt pulleys and air con and alternator brackets.
I'm going to fit a set of headers, I'm thinking of a set of mandrel bent Genies.
I'm going to assemble the engine but under the watchful eye of a friend who is quite experienced at building motors (Chevs admittedly but it'll do him some good to work on a real motor for a change!) so I'm looking forward to that. I've also gotten a copy of 'How to rebuild Ford V8 engines' by Tom Monroe. It was recommended by quite a few blokes in these forums and I've been studying it closely. Very good book.
Having a new motor fitted means I can finally fit my $1100 Aussie Desert Coolers radiator that's been sitting on the shelf for two years, but I'll also be fitting an inline radiator hose filter as well to catch any nasties before they can clog the radiator core.
So that's where I'm at right now, I'm getting somewhere in the vicinity of $5000 so far, I should top out at about $6000 all up with headers and a few more bits and pieces that I need.
Hopefully it will be a good, reliable, strong motor.
There's a couple of pics below of all the bits and pieces, it can be a little difficult to see where the money went!

After the 2nd engine failed the leakdown test I decided I might as well get it rebuilt and go with the plan of fitting it to my driving ute while I do the other ute. The Cleveland in my driver at the moment is getting very close to dying.
The plan is to build it all the way I'd planned with the exception of the alloy heads, they'll have to come later as the budget allows.
On the recommendation of my mechanic I went to North Geelong Engine Reconditioners and had a chat to a bloke called Alan. They've built quite a few Clevelands for drag and sprint cars, as well as street cars, and Alan seemed to know what works for Clevelands.
First mission was to find a standard block, the block I had was 40 thou out already. The accepted wisdom of the engine builder and from what I've read on the forums is that 30 thou is the maximum for a Cleveland block. Standard blocks are getting harder to come by but I found a Ford dismantler close by and he had a couple of blocks he thought should be standard bore. I got one for $200 and hauled it over to the engine reconditioner, they cleaned it and bored it but there was a concern in a couple of cylinders that after taking 30 thou out of the cylinders a couple of rust spots hadn't cleaned up well enough.
Verdict? Scrap that block as well and start again (the engine shop looked after me as far as cost for the work they'd done already so that was much appreciated). Off to the dismantler to get the second block he had. I should have gotten that one in the first place because it had been stored with a carby and manifold on it so the bores were still nice and oily. It turned out to be a standard bore as well so that was a relief.
In the meantime the engine shop informed me that the 2V heads I'd given them had a problem in that one of them was cracked so no good. I had noticed that when I was messing around getting the engine running in the ute shortly after I'd bought it that the radiator had started pushing coolant out (coolant? If you call filthy rusty water coolant) as soon as the engine started to warm up, I'm guessing because of the crack in one of the heads.
Anyhew, into the bin they went as well. A comrade at my work told me he could get his hands on a set of 2V heads for free and they seemed to be OK as far as he knew. At this point I had been contemplating getting a set of closed chamber 302 heads to put on as that seemed to be a common method of upping the compression for LPG engines.
The engine builder advised against it, his theory is that open chamber heads work better for straight gas and we could get the compression we were after (he advised aiming for about 11:1) by shaving the 2V open chamber heads.
So that's what we did, the second set of heads came up OK, they already had valve seat inserts fitted so that was a bit of a bonus.
So here's what I've got at the moment;
The block has been bored out 20 thou and the deck zeroed.
The engine had a 4MAB crank fitted (the crank, con rods and push rods are the only bits that are usable from the original engine, expensive caper this motor building!) so it's been reground.
There's a set of flat top pistons to be fitted and the crank, rods and pistons have been balanced.
I've bought a new flex plate and harmonic balancer, both have been balanced as well.
The cam we've decided on is a Crow 21666.
The heads have been reconditioned for gas, new valves fitted and new valve springs as well.
I've gotten a new Melling oil pump and pump drive shaft, new timing case cover and a new set of rockers.
There's also an Edelbrock Airgap manifold for up top and a Holley 600 squarebore throttle body, I'll be purchasing an Impco 425 mixer as well shortly.
The rocker covers and sump have been sand blasted and resprayed flat black, I even bought myself a set of panel beating tools and had a go at knocking out some little dings in them! With mixed success admittedly but you have to start somewhere. I've also blasted and painted all the belt pulleys and air con and alternator brackets.
I'm going to fit a set of headers, I'm thinking of a set of mandrel bent Genies.
I'm going to assemble the engine but under the watchful eye of a friend who is quite experienced at building motors (Chevs admittedly but it'll do him some good to work on a real motor for a change!) so I'm looking forward to that. I've also gotten a copy of 'How to rebuild Ford V8 engines' by Tom Monroe. It was recommended by quite a few blokes in these forums and I've been studying it closely. Very good book.
Having a new motor fitted means I can finally fit my $1100 Aussie Desert Coolers radiator that's been sitting on the shelf for two years, but I'll also be fitting an inline radiator hose filter as well to catch any nasties before they can clog the radiator core.
So that's where I'm at right now, I'm getting somewhere in the vicinity of $5000 so far, I should top out at about $6000 all up with headers and a few more bits and pieces that I need.
Hopefully it will be a good, reliable, strong motor.
There's a couple of pics below of all the bits and pieces, it can be a little difficult to see where the money went!
#33
12-08-2013, 02:11 AM
Senior User
Join Date: Jun 2012
Location: South Africa, Cape Town
Posts: 174
Likes: 0
Received 0 Likes
on
0 Posts
#35
12-11-2013, 06:46 AM
Join Date: Mar 2012
Location: Geelong, Australia
Posts: 68
Likes: 0
Received 0 Likes
on
0 Posts
#36
12-11-2013, 11:32 AM

Elder User
Join Date: Dec 2010
Location: Liberty Hill, Tx
Posts: 618
Likes: 0
Received 0 Likes
on
0 Posts
#37
12-15-2013, 05:37 AM
Join Date: Mar 2012
Location: Geelong, Australia
Posts: 68
Likes: 0
Received 0 Likes
on
0 Posts
Have had a couple of minor hiccups the last couple of weeks.
My brake booster failed, I've never had it happen in any of my vehicles before and it took me a couple of days to figure out what the strange hissing noise was when I had my foot on the brake.
I tootled off to my brake and clutch bloke and had a chat with him and we decided I'd pull it out and drop it off to be refurbished. No worries I thought, until the next day when I went to put some gas in my ute and for some reason couldn't. Turns out the fill limiter valve had stuck shut and I couldn't fill the tank.
So with just enough in the tank to get it to the mechanics I took it in, he had a look and told me that because of the age of my LPG tank (it had been already been tested at 10 years and only had two years to go before it needed testing again) we might struggle to find a new valve. He was right, he called me a day later and gave me the sad news.
In went a new tank, out went a thousand dollars from my wallet and off I went home straight into the shed to pull the brake booster out. I couldn't do a changeover with it, because of its age the booster people don't have them on the shelf so I had to wait a couple of days for it to be done.
Being without a vehicle for a week and a half two weeks before Christmas has got whiskers on it but I took the opportunity to give the master cylinder a good scrub and painted the cylinder and lid with some flat black engine enamel I had in the shed. It came up looking alright and the booster got a spray when it was in the shop too.


So anyway, new LPG tank and good brakes again but the engine rebuild budget has had a pounding so it looks like I might have to delay that project for a few weeks. Hopefully not too long.
My brake booster failed, I've never had it happen in any of my vehicles before and it took me a couple of days to figure out what the strange hissing noise was when I had my foot on the brake.
I tootled off to my brake and clutch bloke and had a chat with him and we decided I'd pull it out and drop it off to be refurbished. No worries I thought, until the next day when I went to put some gas in my ute and for some reason couldn't. Turns out the fill limiter valve had stuck shut and I couldn't fill the tank.
So with just enough in the tank to get it to the mechanics I took it in, he had a look and told me that because of the age of my LPG tank (it had been already been tested at 10 years and only had two years to go before it needed testing again) we might struggle to find a new valve. He was right, he called me a day later and gave me the sad news.
In went a new tank, out went a thousand dollars from my wallet and off I went home straight into the shed to pull the brake booster out. I couldn't do a changeover with it, because of its age the booster people don't have them on the shelf so I had to wait a couple of days for it to be done.
Being without a vehicle for a week and a half two weeks before Christmas has got whiskers on it but I took the opportunity to give the master cylinder a good scrub and painted the cylinder and lid with some flat black engine enamel I had in the shed. It came up looking alright and the booster got a spray when it was in the shop too.
So anyway, new LPG tank and good brakes again but the engine rebuild budget has had a pounding so it looks like I might have to delay that project for a few weeks. Hopefully not too long.
#38
01-04-2014, 01:01 AM
Join Date: Mar 2012
Location: Geelong, Australia
Posts: 68
Likes: 0
Received 0 Likes
on
0 Posts
Nearly good to go with re-assembling my new engine, have just gotten a second hand Impco 425 mixer so I need to give it a clean and check and then I've pretty much gotten all the components I need.
I'm also just about to fit the Cortina Ghia dash cluster I got a little while ago. It doesn't have an idiot light for oil pressure, just the pressure gauge so I'm making up a short braided line and then a T-piece so I can fit the new VDO pressure sender which suits the Cortina cluster but still have the stock idiot light sender as well. I'll just put a little LED in the dash somewhere.
Hopefully I'll have that fitted this week so I'll post up a pic or two.
Just as an aside, for Christmas this year my son said that a new bike would be good. Earlier in this thread I posted about a little rebuild I did on his sister's old bike for him to have. He outgrew that one and thought a new bike would be great but wanted it to look like his old one.
My fault I guess, I was the one who had to put together something painted/airbrushed and not easily replaced. I bought a second hand alloy framed BMX off a bloke I know, it was in pretty good condition already with a few good bits on it. I then stripped it, cleaned everything, repacked all the bearings and got a set of high rise aftermarket bars for it.
Then I painted the frame and forks satin black and gave them to my buddy to do his airbrushing on. He did the flames and also some old school pinstriping on the down tube under the seat.
It came up looking a treat and my son was pretty happy Christmas morning. Only problem is that the first bike I built for him cost about $80, this one cost about $350 in total. I'm a little worried about what the next one will cost to build in a couple of years when he needs to upgrade!
 nice work on the bike.
#40
01-04-2014, 03:03 AM

New User
Join Date: Jul 2013
Location: Kalgoorlie, Australia
Posts: 15
Likes: 0
Received 0 Likes
on
0 Posts
Hey mate,
How did your brake guy go with getting parts for the brake booster?
Do you know if they are the same as any other old fords, or have the same parts?
I'm in Australia and would like to replace/rebuild my master cylinder and brake booster. Could get the parts from America (although not sure if theirs is the same), but would prefer it if there were parts available locally.
Thanks!
#41
01-04-2014, 11:49 PM
Join Date: Mar 2012
Location: Geelong, Australia
Posts: 68
Likes: 0
Received 0 Likes
on
0 Posts
Thanks, it's my buddy with the airbrush who has the talent though - all I did was clean, grease and paint.
The clutch and brake people I go to sent it off to whoever they deal with for brake boosters, they didn't rebuild it themselves. I don't know who they sent it to but I know they had to rebuild it because they didn't have a changeover unit. If you want I'll call my brake bloke and find out the name of the business who does their boosters?
Hey mate,
How did your brake guy go with getting parts for the brake booster?
Do you know if they are the same as any other old fords, or have the same parts?
I'm in Australia and would like to replace/rebuild my master cylinder and brake booster. Could get the parts from America (although not sure if theirs is the same), but would prefer it if there were parts available locally.
Thanks!
How did your brake guy go with getting parts for the brake booster?
Do you know if they are the same as any other old fords, or have the same parts?
I'm in Australia and would like to replace/rebuild my master cylinder and brake booster. Could get the parts from America (although not sure if theirs is the same), but would prefer it if there were parts available locally.
Thanks!
#42
01-04-2014, 11:58 PM
Mountain Pass
#43
01-06-2014, 01:36 AM
New User
Join Date: Jul 2013
Location: Kalgoorlie, Australia
Posts: 15
Likes: 0
Received 0 Likes
on
0 Posts
#44
01-07-2014, 05:27 AM
Join Date: Mar 2012
Location: Geelong, Australia
Posts: 68
Likes: 0
Received 0 Likes
on
0 Posts
Progress of sorts today.
I'm still working on fitting the Cortina Ghia dash cluster. I'd made up the braided line set up that I mentioned earlier. I took the stock sender out and put it all together.

I screwed it into the motor and clamped the t-piece on the inner guard. I'd also taken the fuel pump out (the vehicle will be straight LPG from now on) and knocked up a block off from some 3mm plate. I've got a fancy alloy block off plate but I'll save that for the new motor.
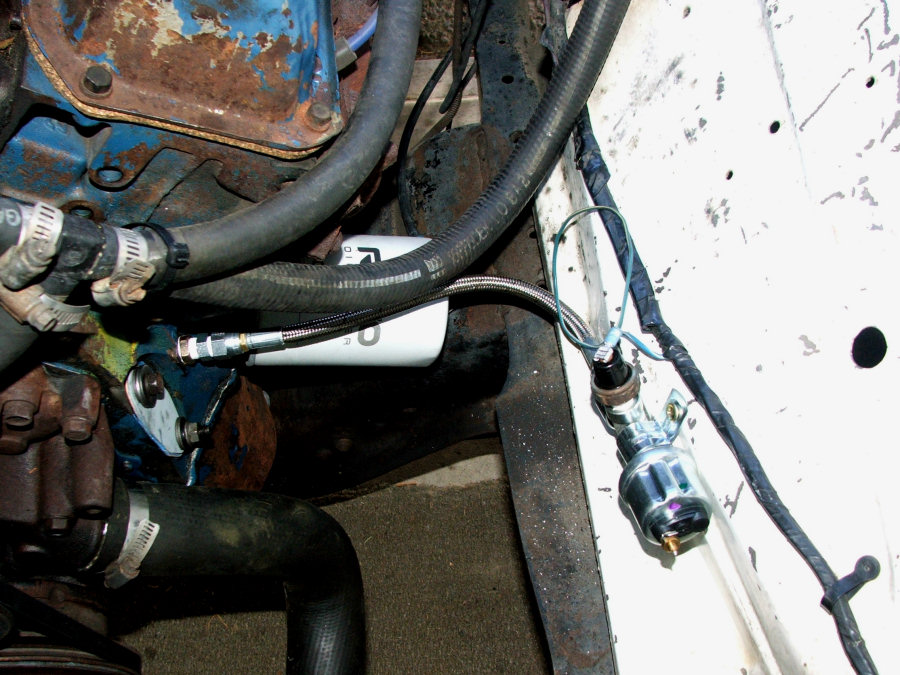
All good so far. I ran the motor and no oil leaks.
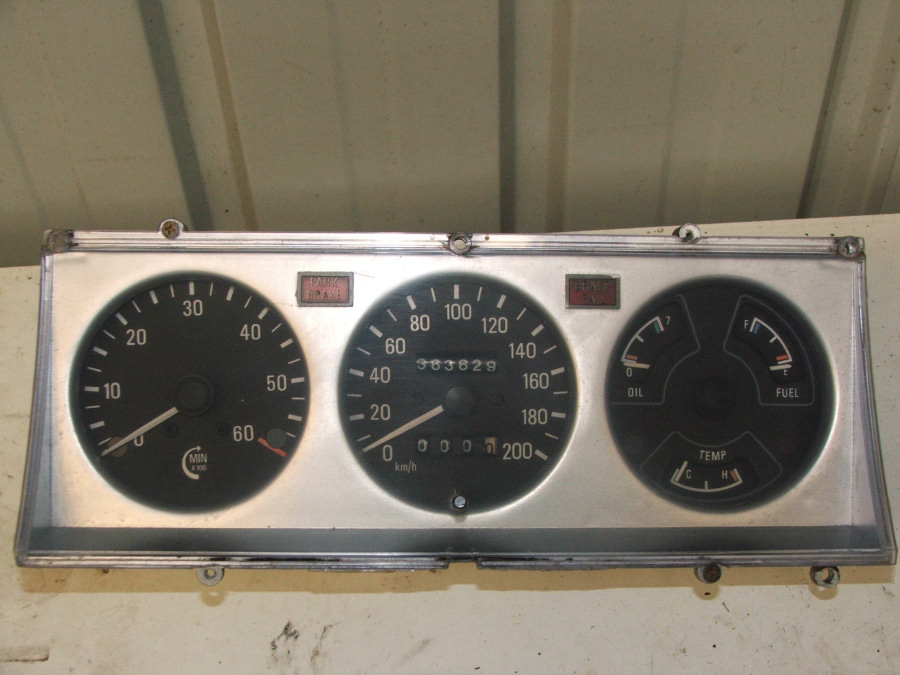
I changed over the Ghia dash cluster with my stock one and put it all back in and started the ute. I changed over the oil pressure sender wire to the VDO sender and the oil pressure gauge seemed to work OK but the temp. gauge doesn't work.
So, out with the fancy and back in with the plain. I'm going to have to get the Ghia cluster repaired, the instrument place I've been dealing with aren't answering their phone so maybe they're still on their Christmas break. When they come back I'll send it to to them.
I'm still working on fitting the Cortina Ghia dash cluster. I'd made up the braided line set up that I mentioned earlier. I took the stock sender out and put it all together.
I screwed it into the motor and clamped the t-piece on the inner guard. I'd also taken the fuel pump out (the vehicle will be straight LPG from now on) and knocked up a block off from some 3mm plate. I've got a fancy alloy block off plate but I'll save that for the new motor.
All good so far. I ran the motor and no oil leaks.
I changed over the Ghia dash cluster with my stock one and put it all back in and started the ute. I changed over the oil pressure sender wire to the VDO sender and the oil pressure gauge seemed to work OK but the temp. gauge doesn't work.
So, out with the fancy and back in with the plain. I'm going to have to get the Ghia cluster repaired, the instrument place I've been dealing with aren't answering their phone so maybe they're still on their Christmas break. When they come back I'll send it to to them.
#45
01-10-2014, 05:11 AM
Join Date: Mar 2012
Location: Geelong, Australia
Posts: 68
Likes: 0
Received 0 Likes
on
0 Posts
Still plugging away.
Instead of fannying about waiting for my instrument people to come back I've taken the cluster to a local Geelong business to have them fix the temp. gauge. They're also going to go right over all the other gauges and check the tacho calibration as well. I'm in a little bit of a hurry with it because I don't want to install a new motor without having a good oil pressure gauge. Hopefully I'll get the cluster back next week and get it installed.
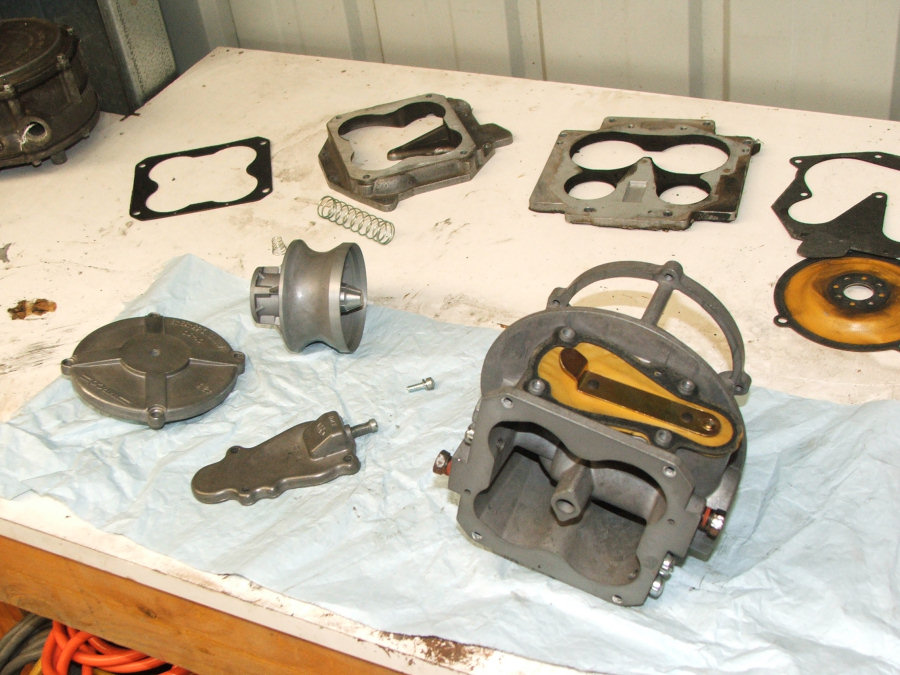
I've been umming and aahing about whether to buy a brand new Impco mixer or use the second hand one I've got but after talking to the bloke at Impco the other day he ran me through what to check in the mixer to make sure it's all good.
I pulled it apart today and gave it a good clean and checked that both the main and idle diaphragm's were OK. It's got the newer yellow silicone diaphragms in it so that's OK. The job went well, checked everything I needed to check and re-assembled it. They are actually a pretty simple bit of gear.
The plan for this weekend is to remove the fuel tank out of my driver ute in preparation for installing a doughnut LPG tank I've got. While I'm under there I'm going to identify and trace the fuel level sender wiring back because I'm going to change the pressure transducer in my LPG tank to one that's suitable for the stock fuel gauge in the dash so I can use that for the gas level and ditch the daggy little aftermarket fuel gauge so I'll need to splice into the wiring loom underneath somewhere.
Instead of fannying about waiting for my instrument people to come back I've taken the cluster to a local Geelong business to have them fix the temp. gauge. They're also going to go right over all the other gauges and check the tacho calibration as well. I'm in a little bit of a hurry with it because I don't want to install a new motor without having a good oil pressure gauge. Hopefully I'll get the cluster back next week and get it installed.
I've been umming and aahing about whether to buy a brand new Impco mixer or use the second hand one I've got but after talking to the bloke at Impco the other day he ran me through what to check in the mixer to make sure it's all good.
I pulled it apart today and gave it a good clean and checked that both the main and idle diaphragm's were OK. It's got the newer yellow silicone diaphragms in it so that's OK. The job went well, checked everything I needed to check and re-assembled it. They are actually a pretty simple bit of gear.
The plan for this weekend is to remove the fuel tank out of my driver ute in preparation for installing a doughnut LPG tank I've got. While I'm under there I'm going to identify and trace the fuel level sender wiring back because I'm going to change the pressure transducer in my LPG tank to one that's suitable for the stock fuel gauge in the dash so I can use that for the gas level and ditch the daggy little aftermarket fuel gauge so I'll need to splice into the wiring loom underneath somewhere.