Rear axle maintenance
#1
 02-18-2012, 11:00 PM

Rear axle maintenance
This covers bearings, seals and oil. Replacing rear axle bearings and seals is not something you do everyday, but you should get this done at least once or twice every quarter-million miles.
****** supplies & tools ******
- Bearing and seal kit
- Gasket
- Bolt, cross pin retainer
- Diff oil
- Friction modifier, for limit slip diffs (aka positraction)
- floor jack and stands
- Socket, something to remove the wheels
- Socket, 13mm for diff cover bolts
- Socket, 5/16 for cross pin retainer bolt
- 3/8 socket wrench, for removing diff oil plug
- claw hammer, to remove axle end seals
- Puller, Rear axle bearing
- Slide hammer, 2-1/2 lbs ok, 5lbs preferred
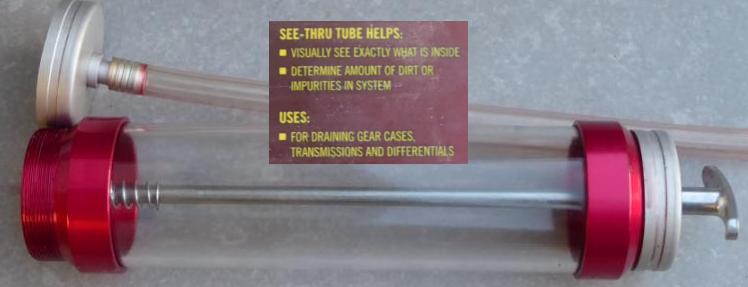
- Tube, 1/4" between oil bottle and diff
- Bucket & floor pan
**** Do it ********
It's good to know what rear end you have. At a minimum you need to know whether the differential is open or limited-slip (aka posi-traction in Ford-speak). {corrected by xlt4wd90, post#2} This influences the oil you put in.
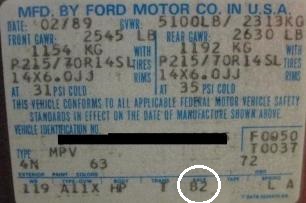
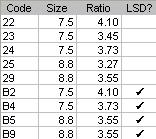
You can read the axle code (B2) off the driver's door frame and cross it thru a chart...
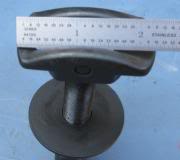
...or you can get the same information off a tag on the differential.
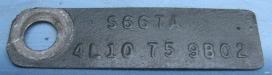
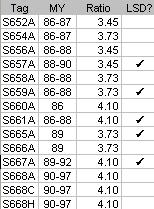
In this example we have a 1989 axle, 4.10 gear ratio, limited slip, 7.5" size diff as provided by Mr. Eddie B.
Good entertainment in a shorty.
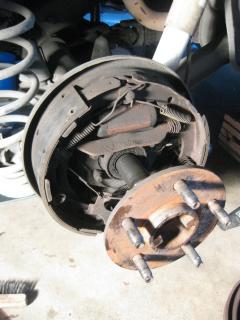
The Aerostar has a continuous (aka "solid") axle that consists of two half-shafts inside a hollow tube with the differential in the middle.
The entire axle is filled with gear oil and sealed at both wheals and at the drive shaft.
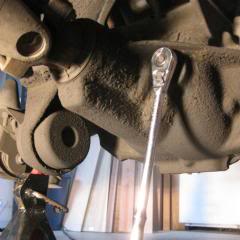
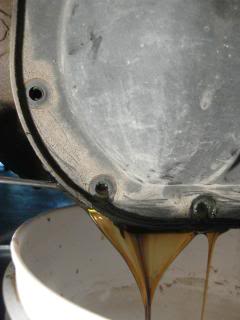
The differential is similar to the auto trans in that one has to unbolt a large cover in order to drain the oil.
One astute observation is that you don't want to remove the oil and only later find out you can't get the filler plug unscrewed.
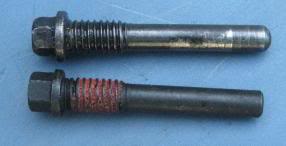
There is something called a cross-pin that is so important, there is a special retainer bolt to retain it in place.
Other diy authors have commented that the retainer bolt is frequently busted.
In my case, the retainer bolt was in good health but I had another on hand just in case.
One benefit to getting a new cross-pin retainer bolt, is that it comes with new locking compound.
Other diy write-ups indicate that the cross-pin slides out. Well, mine made is half way.
The important achievement is for the center of the gear set be vacated so that the axle shafts can be slid inward.
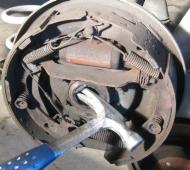
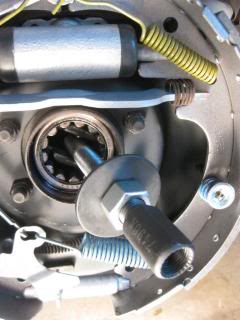
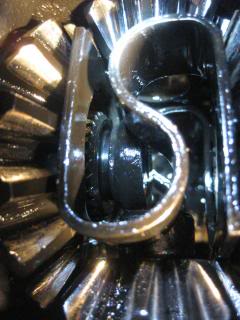
Here we remove the retainer bolt...
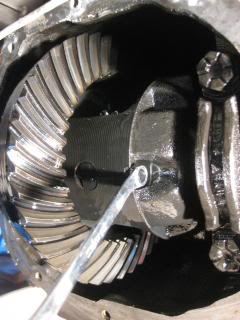
...then slide the cross-pin out of the center.

Sliding the axle shafts inward pushes a C-washer out of its cavity.
This C-washer is all that prevents your half-shaft and wheel from departing your vehicle in a sharp turn.
As noted by other diy authors, this C-washer is very slick.
I'll wager you don't be able to extract it using pliers or tweezers.
However, I found (twice) that you can rotate it around the shaft and push it off the other side.
It then (someway, somehow) falls through the gear set and lands in the bottom of the case.
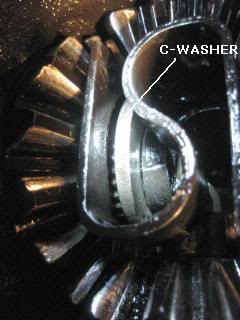
With the c-washer removed, the axle half-shaft flys out the end of the axle. Scary.
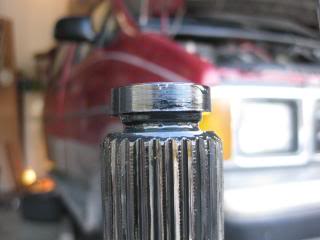
You'll inspect the half-shaft spline end (note the o-ring) and the bearing contact surface.

It was found that a claw hammer could be used to remove the axle end seal.
This did not seem to damage the axle, but I wouldn't be surprised if it did.
Several methods were tried for removing the bearing, but it was found that a slide hammer and "rear axle bearing puller" is necessary to remove the bearing.
I used OTC 1156 and 7496.
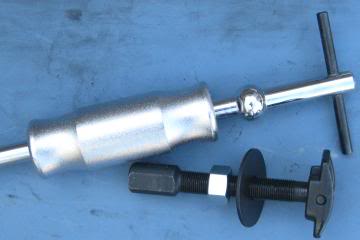
The 7496 bearing puller was a little too large to fit inside the axle tube.
Although this will fit in the end of the tube (2-3/8"), you must account for two step downs, one for the seal, one for the bearing.
The tool was ground down to the 2-1/16 diameter of the axle on the far side of the bearing.
The bearing removal by slide hammer was violent. Shattered the bearing and left shrapnel inside the axle.
A magnet was dragged thru the soup to retrieve and account for all the pieces.
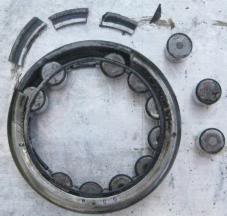
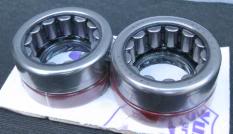
A kit included bearings and seals for both sides.
Although these can be knocked into place with a block and mallet, it was found that tiny hammer taps around the circle would also do the trick.
In either case, use the original bearing as a driver.
The axle half-shaft is slid back into place...
...the C-washer is installed into the groove, then the shaft is backed out pulling the c-washer back into its recess.
The cross pin slides back into place.
If you are reusing your original cross pin retainer bolt, apply new locking compound, so you don't have to crank down so hard on the small-ish bolt.
Bolt up the gasket & cover, then add gear oil.
If you have an LSD, add friction modifier, to make the oil more slippery, so the LSD doesn't bind up and make strange noises.
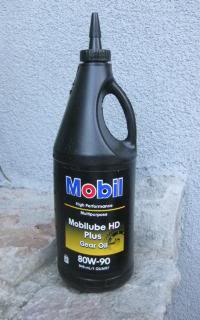
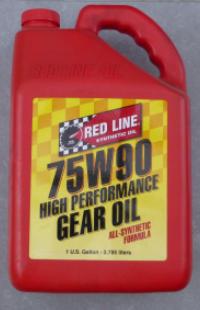
In this project I applied directly from the bottle.
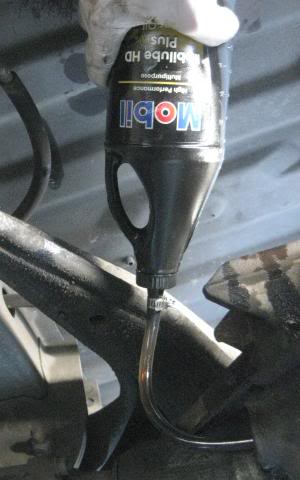
Later in life I got myself a suction gun, which also works as an injection gun.
****** supplies & tools ******
- Bearing and seal kit
- Gasket
- Bolt, cross pin retainer
- Diff oil
- Friction modifier, for limit slip diffs (aka positraction)
- floor jack and stands
- Socket, something to remove the wheels
- Socket, 13mm for diff cover bolts
- Socket, 5/16 for cross pin retainer bolt
- 3/8 socket wrench, for removing diff oil plug
- claw hammer, to remove axle end seals
- Puller, Rear axle bearing
- Slide hammer, 2-1/2 lbs ok, 5lbs preferred
- Tube, 1/4" between oil bottle and diff
- Bucket & floor pan
**** Do it ********
It's good to know what rear end you have. At a minimum you need to know whether the differential is open or limited-slip (aka posi-traction in Ford-speak). {corrected by xlt4wd90, post#2} This influences the oil you put in.
You can read the axle code (B2) off the driver's door frame and cross it thru a chart...
...or you can get the same information off a tag on the differential.
In this example we have a 1989 axle, 4.10 gear ratio, limited slip, 7.5" size diff as provided by Mr. Eddie B.
Good entertainment in a shorty.
The Aerostar has a continuous (aka "solid") axle that consists of two half-shafts inside a hollow tube with the differential in the middle.
The entire axle is filled with gear oil and sealed at both wheals and at the drive shaft.
The differential is similar to the auto trans in that one has to unbolt a large cover in order to drain the oil.
One astute observation is that you don't want to remove the oil and only later find out you can't get the filler plug unscrewed.
There is something called a cross-pin that is so important, there is a special retainer bolt to retain it in place.
Other diy authors have commented that the retainer bolt is frequently busted.
In my case, the retainer bolt was in good health but I had another on hand just in case.
One benefit to getting a new cross-pin retainer bolt, is that it comes with new locking compound.
Other diy write-ups indicate that the cross-pin slides out. Well, mine made is half way.
The important achievement is for the center of the gear set be vacated so that the axle shafts can be slid inward.
Here we remove the retainer bolt...
...then slide the cross-pin out of the center.
Sliding the axle shafts inward pushes a C-washer out of its cavity.
This C-washer is all that prevents your half-shaft and wheel from departing your vehicle in a sharp turn.
As noted by other diy authors, this C-washer is very slick.
I'll wager you don't be able to extract it using pliers or tweezers.
However, I found (twice) that you can rotate it around the shaft and push it off the other side.
It then (someway, somehow) falls through the gear set and lands in the bottom of the case.
With the c-washer removed, the axle half-shaft flys out the end of the axle. Scary.
You'll inspect the half-shaft spline end (note the o-ring) and the bearing contact surface.
It was found that a claw hammer could be used to remove the axle end seal.
This did not seem to damage the axle, but I wouldn't be surprised if it did.
Several methods were tried for removing the bearing, but it was found that a slide hammer and "rear axle bearing puller" is necessary to remove the bearing.
I used OTC 1156 and 7496.
The 7496 bearing puller was a little too large to fit inside the axle tube.
Although this will fit in the end of the tube (2-3/8"), you must account for two step downs, one for the seal, one for the bearing.
The tool was ground down to the 2-1/16 diameter of the axle on the far side of the bearing.
The bearing removal by slide hammer was violent. Shattered the bearing and left shrapnel inside the axle.
A magnet was dragged thru the soup to retrieve and account for all the pieces.
A kit included bearings and seals for both sides.
Although these can be knocked into place with a block and mallet, it was found that tiny hammer taps around the circle would also do the trick.
In either case, use the original bearing as a driver.
The axle half-shaft is slid back into place...
...the C-washer is installed into the groove, then the shaft is backed out pulling the c-washer back into its recess.
The cross pin slides back into place.
If you are reusing your original cross pin retainer bolt, apply new locking compound, so you don't have to crank down so hard on the small-ish bolt.
Bolt up the gasket & cover, then add gear oil.
If you have an LSD, add friction modifier, to make the oil more slippery, so the LSD doesn't bind up and make strange noises.
In this project I applied directly from the bottle.
Later in life I got myself a suction gun, which also works as an injection gun.
Last edited by RojoStar; 05-05-2018 at 10:00 AM. Reason: PB pic link repair
#2
02-19-2012, 03:49 AM

Great writeup.
If it was a limited slip differential, I would also replace the clutch packs since I'm getting so deep into the rear end. Ford sells a complete kit that includes new clutch and steel plates for both sides, retaining bolt for the cross pin, shims, and a bottle of friction modifier for the lube. A popular modification is to re-use one of the old clutch plates, as it's only worn on half of once of its faces, in place of one of the new steel plates, and change the order of the steel/clutch plates. This adds 1.5 more friction interface, almost 20% more than stock, making the lock-up more effective.
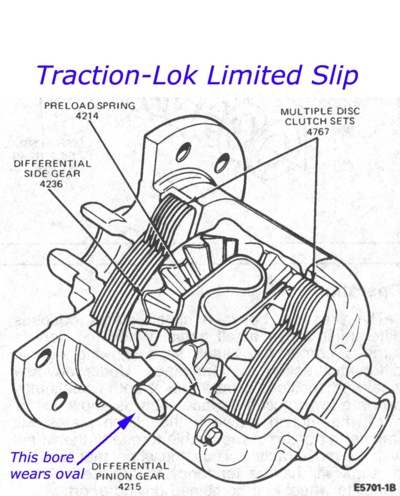
By the way, the phrase "Posi-Traction" is a GM trade name for their LSDs. Ford speak is "Traction-Lock".
If it was a limited slip differential, I would also replace the clutch packs since I'm getting so deep into the rear end. Ford sells a complete kit that includes new clutch and steel plates for both sides, retaining bolt for the cross pin, shims, and a bottle of friction modifier for the lube. A popular modification is to re-use one of the old clutch plates, as it's only worn on half of once of its faces, in place of one of the new steel plates, and change the order of the steel/clutch plates. This adds 1.5 more friction interface, almost 20% more than stock, making the lock-up more effective.
By the way, the phrase "Posi-Traction" is a GM trade name for their LSDs. Ford speak is "Traction-Lock".
#3
02-19-2012, 08:08 AM
Ford faux pas
Typical freshman. Am I banned now?

Scope: Diff rebuild is another writeup and includes bearings & seals.
While back there I did attempt a go-no-go test of the clutch pack using a torque bar, however, the readings were off scale (>100lbft).
As an example, in BMW land my clutch-based LSD would pass 80 lb-ft from side to side.
Anyone have similar numbers for the Traction-Lock 7.5?
Last edited by RojoStar; 05-05-2018 at 10:17 AM. Reason: PB pic link repair
#4
02-19-2012, 02:12 PM
Ford usually specs about 40 lbs-ft break-away torque for all their Traction-Lock diffs. At least that was the case for my old 9" and the newer 8.8". It seems kind of loose compared to BMW's. But in general, if you lift one rear wheel off the ground and leave the transmission in neutral, you should be able to turn that wheel by hand.
#5
04-23-2012, 10:44 AM

Great post and great responses. I have question. I have a 92 Ford Bronco with an 8.8" diff. I followed your procedure over the weekend. I changed the axle bearings and seals.
The repair went flawlessly and made sure the axles were put back in exactly in the same position that they came out. I refilled the diff with 80w90 but did not put in any anti-slip additive (saw a post that 4oz. should be added), not sure if it is needed or not.
My problem now is I have a hollowing noise (faster i go the louder it gets) that sounds like it is coming out of the transmission, I'm sure the sound is being transferred from the diff. The truck drives fine, does not feel like there is any type of drag from something going in wrong. Any suggestions? Thanks
#6
04-23-2012, 02:04 PM
#7
04-24-2012, 08:38 AM
Nice write up. However, there is one other issue that might come up and I'm not sure if a DIYer can handle it cause I'm not sure of the procedure. There are what is known as axle saver bearings, and they ride on a different portion of the axle. I have had them installed in my other van, they are just a wider heavier duty bearing that distributed the load force, but I think the axle housing itself must by modified to accommodate the improved bearing. I have never personally installed such bearings, but I have had that done on my previous van.
Trending Topics
#8
04-24-2012, 04:40 PM

Nice write up. However, there is one other issue that might come up and I'm not sure if a DIYer can handle it cause I'm not sure of the procedure. There are what is known as axle saver bearings, and they ride on a different portion of the axle. I have had them installed in my other van, they are just a wider heavier duty bearing that distributed the load force, but I think the axle housing itself must by modified to accommodate the improved bearing. I have never personally installed such bearings, but I have had that done on my previous van.
#9
04-24-2012, 05:22 PM
can't add any *****s to aero's halo but thanks again Aero for all you're hard earned paid in blood Aero knowledge.
I use crocus cloth to clean and smooth up the "new" bearing race area on the shaft when putting in one of the mod. axle shaft offset bearing kits. Timken still makes them.
someday our vans may be collectors items or real antiques.
"great grandpa, what you going to do with that old funny looking bus van thingy parked out under the tarp at the back of the shop?, is that a real car?"
#10
04-24-2012, 08:22 PM
 Sorry!!!!!
#11
05-07-2012, 10:50 AM
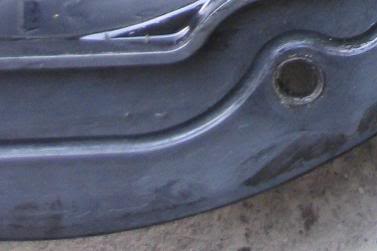
Here's a pic I PhotoShopped & posted back in 2002 but which some upgrade of the board screwed up -- which is why I host my own pics now. I also posted it again in 2007 in this thread, and later in this thread, where I asked the question, "does anyone have the 4.10 Trac-Loc diff in a pre-90 van with a B2 code?".
You've got the first one I've seen -- all the others I've seen (five) are code A2, which member bozzzz94 surmises are Canadian diffs.
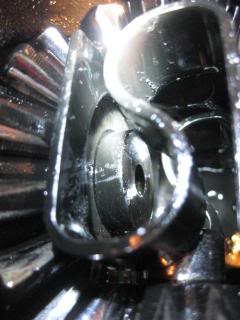
There's a high failure rate of the ring gear carrier in 4.10 diffs in the area marked "this bore wears oval" above. Seems to only happen in the 4.10s, AFAIK. I've had two wear there. Symptom is vibration/rattle noise on coast, which disappears on accel or decel.
The worn bore allows the pinion gear axle to move, which breaks the retaining bolt. Or so I surmise.
I've had pinion bearing wear on one of them too, but it was at over 300k miles. Many of my 7.5" rears seem pretty noisy, all things considered. My '97s isn't silent at 135k

You've got the first one I've seen -- all the others I've seen (five) are code A2, which member bozzzz94 surmises are Canadian diffs.
There's a high failure rate of the ring gear carrier in 4.10 diffs in the area marked "this bore wears oval" above. Seems to only happen in the 4.10s, AFAIK. I've had two wear there. Symptom is vibration/rattle noise on coast, which disappears on accel or decel.
The worn bore allows the pinion gear axle to move, which breaks the retaining bolt. Or so I surmise.
I've had pinion bearing wear on one of them too, but it was at over 300k miles. Many of my 7.5" rears seem pretty noisy, all things considered. My '97s isn't silent at 135k
#12
06-05-2012, 08:29 PM
A follow-up.
I got a callback for seepage on the differential seal. I was too nonchalant on the first round regarding sealant.
The issue is that since there is no level check, unless you have zero seepage, there is no way of knowing how much oil is left inside.
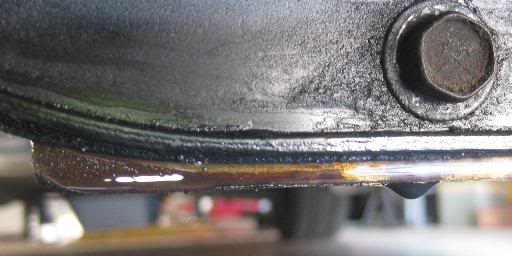
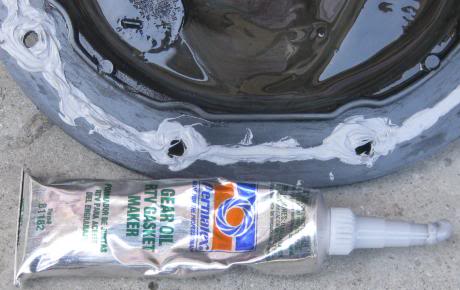
I opened it several times and the final word is...
1) Clean out the groove on the plastic cover.
2) Apply sealant to the groove and around the bolt holes.
3) Lay the paper/felt gasket on cover and align.
4) Spread sealant out onto the gasket, against the curb and around the bolt holes.
5) Install.
Originally, I installed the gasket without using sealant. Failed.
I got a callback for seepage on the differential seal. I was too nonchalant on the first round regarding sealant.
The issue is that since there is no level check, unless you have zero seepage, there is no way of knowing how much oil is left inside.
I opened it several times and the final word is...
1) Clean out the groove on the plastic cover.
2) Apply sealant to the groove and around the bolt holes.
3) Lay the paper/felt gasket on cover and align.
4) Spread sealant out onto the gasket, against the curb and around the bolt holes.
5) Install.
Originally, I installed the gasket without using sealant. Failed.
Last edited by RojoStar; 05-05-2018 at 10:19 AM. Reason: PB pic link repair
#13
06-06-2012, 04:33 AM
I thought you check the level by sticking your pinky into the fill hole and just feel for lube? Generally, you park on a level surface, and fill through the hole until it starts seeping out. Check it once every couple of years. Unless, the square hole in the plug is worn out, and you can't pull it out.
#14
06-06-2012, 04:16 PM
If the square in the fill/check plug is stripped, chasing it around with a cold chisel can usually remove it. I've had to remove a few that way. NAPA has (had) replacement magnetic 3/8 MNPT plugs for replacement.
That plug should be taped upon reinstall, or it will weep slightly. Not enough to worry about the oil level, but messy and collects dirt. I always clean around the plug with a small welder's wire brush and aerosol cleaner before I remove it, to prevent any crud from getting in.
I never use a gasket on the pumpkin cover. Make the surfaces clean enough to eat off of, leave no trace of oil, and RTV back in place. Never a leak.
#15
06-06-2012, 06:26 PM
I also found that if you use a lot of tape, you don't have to tighten the pulg as much to make it seal and hold, so you reduce the chance of it getting stuck in there the next time you have to open it.
The last time I installed a Fel-Pro oil pan gasket, they recommended using Permatex UltraBlue RTV sealant. It is supposed to be more oil resistant than other types.
The last time I installed a Fel-Pro oil pan gasket, they recommended using Permatex UltraBlue RTV sealant. It is supposed to be more oil resistant than other types.