55 239 Y-Block Restoration Thread
#61
 03-31-2012, 09:49 PM


Set the points at .014-.016 for a 272. I would think a 239 will be quite happy at those settings. Point gap is not something that has to be dead accurate to get her fired up. Sometimes it is easier to get that big old socket wrench on the crank pulley to bring it up to top of the distributor cam lobe. Good luck, we're waiting to hear her run.
#62
03-31-2012, 10:03 PM
Wayne, awesome info. Now I have another tool I have an excuse to buy. 
To follow up.
Here is a thread on hooking up a dwell: https://www.ford-trucks.com/forums/9...o-hook-up.html
Here are the distributor settings from the 54-55 Shop Manual:

Hopefully I will get a chance to try some of this out tomorrow.
To follow up.
Here is a thread on hooking up a dwell: https://www.ford-trucks.com/forums/9...o-hook-up.html
Here are the distributor settings from the 54-55 Shop Manual:
Hopefully I will get a chance to try some of this out tomorrow.
#63
03-31-2012, 10:09 PM
Every time I try to start her up, I have my son hold the video camera. I have a bunch of short videos of frustration.
I will post that video as soon as it happens, after I stop bouncing off the walls.
This engine has been quiet for 40 years...man I was just 3 or 4 when it last ran.
#64
04-12-2012, 04:17 PM
I haven't had a chance to spend any time in the garage lately, but i think I have the points set correctly. I will want to double check.
As I was putting the distributor cap back on I noticed the rotor is a bit loose. Should it be on there tight or have some play?
Here is a video of how much play it has.
Y-Block Rotor - YouTube
As I was putting the distributor cap back on I noticed the rotor is a bit loose. Should it be on there tight or have some play?
Here is a video of how much play it has.
Y-Block Rotor - YouTube

#67
04-12-2012, 08:10 PM
Fleet Owner
#68
04-12-2012, 09:35 PM
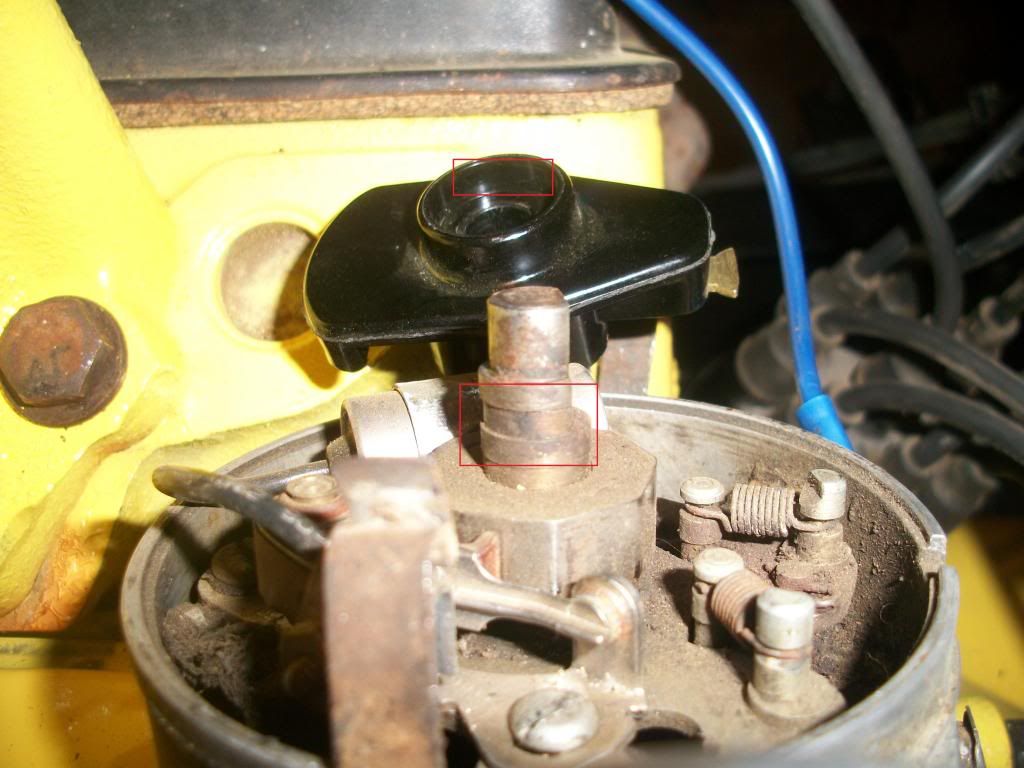
I love pictures so this might explain.
The red box on the dizzy matches up with the red box on the rotor. Notice the 'notch' not sure what else to call it. It looks like the perfect place for a clip. Now the NAPA photos of the part doesn't show any clip that comes with the rotor though....
#69
04-13-2012, 09:18 AM
Well that may be it. There is a recessed band on the dizzy shaft that meets up with the base of the rotor when you put it on. I'm guessing there should be some clip that goes in there to hold it steady.
I love pictures so this might explain.
The red box on the dizzy matches up with the red box on the rotor. Notice the 'notch' not sure what else to call it. It looks like the perfect place for a clip. Now the NAPA photos of the part doesn't show any clip that comes with the rotor though....
I love pictures so this might explain.
The red box on the dizzy matches up with the red box on the rotor. Notice the 'notch' not sure what else to call it. It looks like the perfect place for a clip. Now the NAPA photos of the part doesn't show any clip that comes with the rotor though....
#70
04-14-2012, 12:16 PM
#71
04-24-2012, 10:19 PM
How do Points work
Well, I haven't had time to spend on my truck for the past couple of weeks. Track season has me all over the place, Middle School and High School track with Wednesday night baseball as well....
I have been pondering my points and trying to better understand their operation so I can more effectively troubleshoot my problem.
Be sure to correct me if I'm wrong and I will edit this post so I have it straight and anyone else that finds this thread looking for answers will be on the right track.
Let's start with the picture:
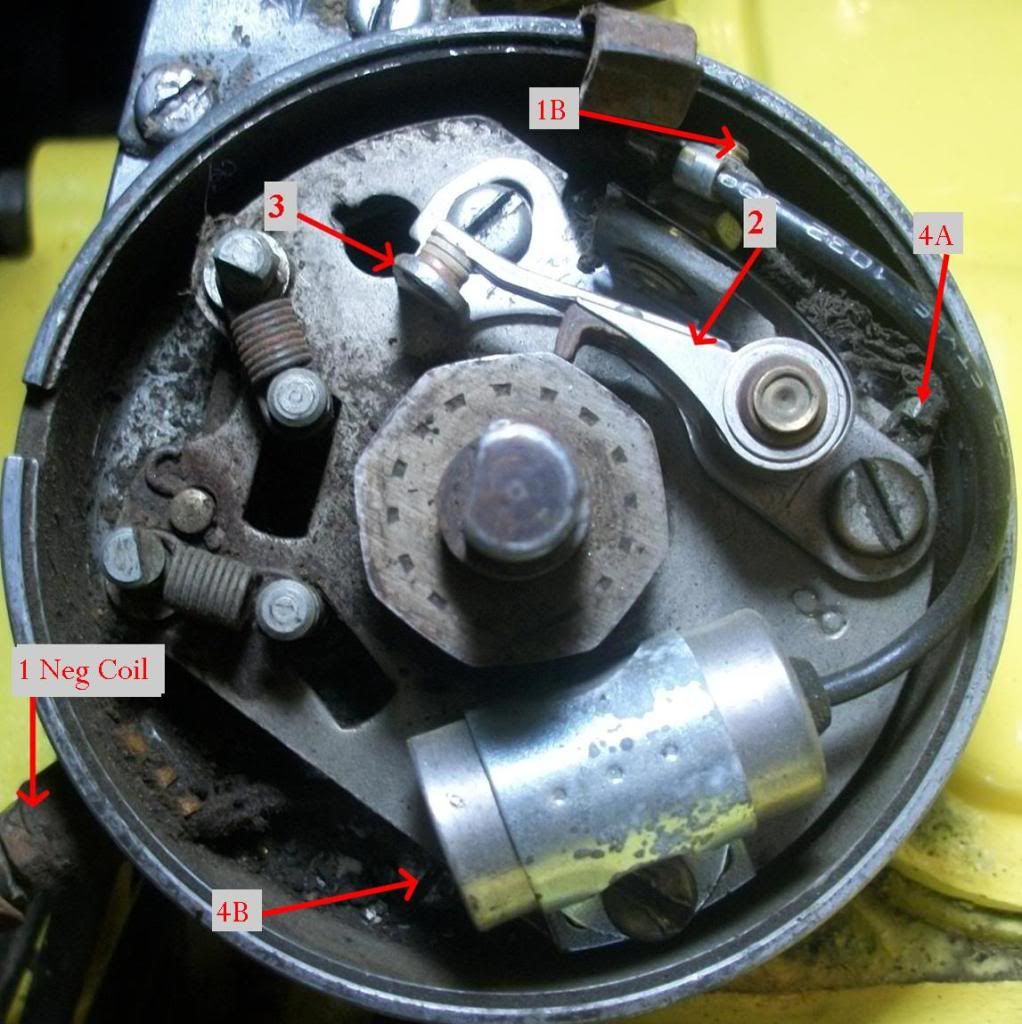
Here is how I see the function.
The battery goes to the + wire of the coil and the -wire goes to #1 in the drawing. When the points are closed it completes the ground and the charges the primary. When the points open, it breaks the ground and that powers the secondary and sends spark.
Simple enough. In the drawing, 1 Neg Coil is wired directly to 1B. Between 2 and 3 is where the ground is interrupted. 3 and 4A are connect via the points. 4A and 4B are connected by a wire. 4B is the ground point to the engine. Notice that 4B is pointing to a screw that attaches a wire to the dizzy base.
So, since I have spark at the coil my problem is confined to 1) bad plugs 2) bad wires 3) bad distributor cap 4) bad points 5) bad connections in 1 through 4 in the picture.
Let's focus on 4 and 5. The wires under the spark advance are very old, is there a place to get those or do I just get plain wire and replace? If I do that, are there tricks to removing the spark advance?
OK I really think the problem is at 4) bad points. If I put an ohm meter at any point between 1 and 4B I should get little to no resistance when the points are closed, correct? Currently I get that for the most part, except for between 2 and 3 in the drawing. When points are closed I get an open circuit. I would think that would indicate I have a problem with the points. This seems odd since they are basically new. I bought them about 10 years ago when I was planning on just getting the engine running (and before baby #3)
What do you guys think?
I have been pondering my points and trying to better understand their operation so I can more effectively troubleshoot my problem.
Be sure to correct me if I'm wrong and I will edit this post so I have it straight and anyone else that finds this thread looking for answers will be on the right track.
Let's start with the picture:
Here is how I see the function.
The battery goes to the + wire of the coil and the -wire goes to #1 in the drawing. When the points are closed it completes the ground and the charges the primary. When the points open, it breaks the ground and that powers the secondary and sends spark.
Simple enough. In the drawing, 1 Neg Coil is wired directly to 1B. Between 2 and 3 is where the ground is interrupted. 3 and 4A are connect via the points. 4A and 4B are connected by a wire. 4B is the ground point to the engine. Notice that 4B is pointing to a screw that attaches a wire to the dizzy base.
So, since I have spark at the coil my problem is confined to 1) bad plugs 2) bad wires 3) bad distributor cap 4) bad points 5) bad connections in 1 through 4 in the picture.
Let's focus on 4 and 5. The wires under the spark advance are very old, is there a place to get those or do I just get plain wire and replace? If I do that, are there tricks to removing the spark advance?
OK I really think the problem is at 4) bad points. If I put an ohm meter at any point between 1 and 4B I should get little to no resistance when the points are closed, correct? Currently I get that for the most part, except for between 2 and 3 in the drawing. When points are closed I get an open circuit. I would think that would indicate I have a problem with the points. This seems odd since they are basically new. I bought them about 10 years ago when I was planning on just getting the engine running (and before baby #3)
What do you guys think?
Last edited by Harrier; 04-24-2012 at 10:48 PM. Reason: Better picture
#72
04-25-2012, 06:55 AM
luck.

It does appear that you have a point problem. The only time you should have a circuit thru the points is when they're closed. It is not uncommon for points to get an insulating coating, oxidation, when they're not used. I have run into this on tractors that sit unused. Sometimes running a dollar bill between the points will break the oxidation to where they'll conduct. A very fine grit paper or point file may be required to break the film.
To test: Have power to the primary wire and turn engine to close points. Use an insulated tool to open and close the movable point arm. You should see a spark at the points if they are working.
#73
04-25-2012, 09:04 PM
Thanks Ray, I will try that. I figured that there was a problem there. It threw me since the points have never really been used, but they have been sitting there for a long time. Looking closely at the wires under the spark advance, I really need to replace those as well. Might as well get that done while I'm in there.
Now, when will I get a chance to do that....kids are keeping me busy, but it is time I wouldn't miss for the world.
Now, when will I get a chance to do that....kids are keeping me busy, but it is time I wouldn't miss for the world.
#74
04-29-2012, 07:39 PM
Well, I got some sandpaper and cleaned the points. Well that sure helped with the resistance. I didn't think of them getting corroded since they were sitting together for several years. I had stolen my father-in-laws battery off his Allis, but I had to return that the other day. I'm too tired this evening to pull the battery out of my truck. So, since he moved the Allis, I think I can steal the battery back for a little bit, tomorrow.
At least I'm getting closer. I don't have any track, baseball or massage Monday evening, so I'm hoping to spend a little time in the garage.
At least I'm getting closer. I don't have any track, baseball or massage Monday evening, so I'm hoping to spend a little time in the garage.
#75
04-29-2012, 11:07 PM
