55 239 Y-Block Restoration Thread
#46
 02-29-2012, 06:13 AM

Flybear2000, I would love to get the measurements for you. I won't be home much for the next couple of days, but I will get a bunch of pictures taken with lots of measurement as soon as I can.
By the way, welcome to FTE. We would love to see pictures of your truck. Start another thread and let us see what you have. We love pictures.
By the way, welcome to FTE. We would love to see pictures of your truck. Start another thread and let us see what you have. We love pictures.
#47
02-29-2012, 08:03 AM


Upcoming Pics
I noticed that on this site. I will be uploading some very soon, just need some time to get better pictures than what I have so far. The only thing I have done to this truck since we bought it is work on it, and the only pictures I have are the pics of when I removed the radiator to replace it and discovered the cross member issue. Thanks for the welcome, take care and thanks for getting the measurements for me, will be looking forward to having some information I can work with.
Michael F. "BEAR" Cooper
Flybear2000
Michael F. "BEAR" Cooper
Flybear2000

#49
03-02-2012, 05:23 PM
Well now I'm a little confused. Here is the wiring diagram. Notice that it looks like that cylinder 1 is closest to the driver.....what's up? I would think the schematic would be more accurate since it came out of the Ford Manual but a schematic doesn't necessarily show exact placement....What do you experts think?

#50
03-02-2012, 05:58 PM

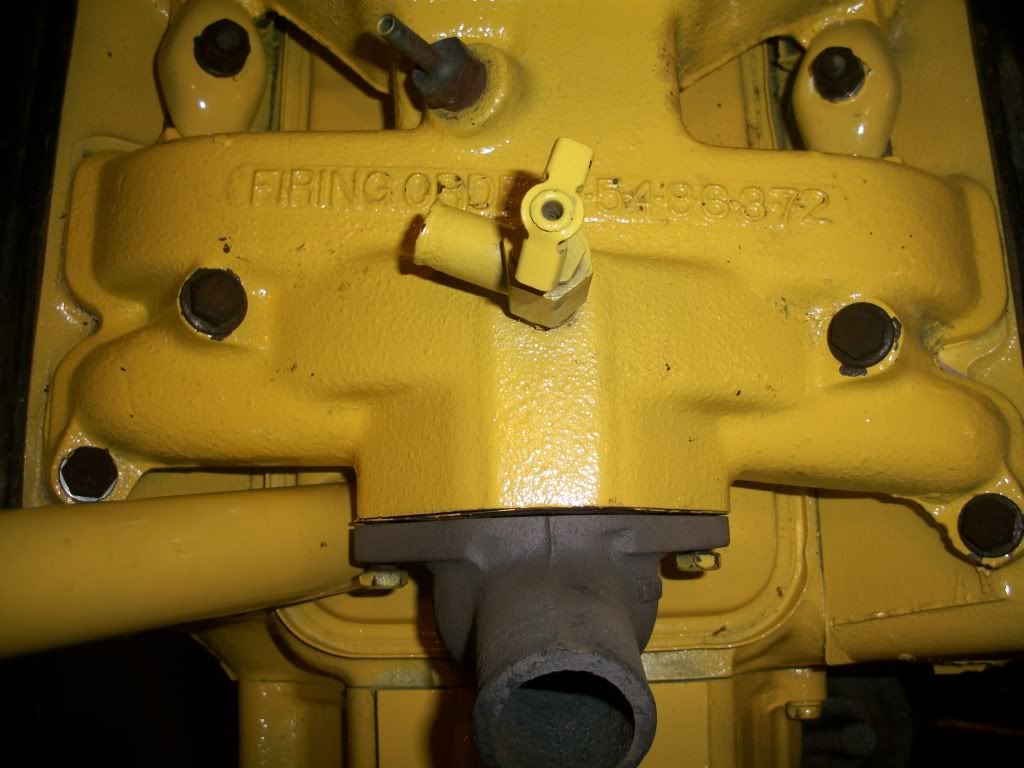
Forget that pictorial so far as cylinder numbering. Number one cylinder is the front on the passenger side and runs 1-2-3-4 front to back on the passenger side. Going to the driver side we have 5-6-7-8 front to back. Cylinder number are on the intake manifold runners near that feed the cylinders on the 272-312 CID engines. Firing order is 1-5-4-8-6-3-7-2 on the engines I mention and I would suspect the 239 Y block is the same.
#51
03-03-2012, 06:43 AM
I feel like I'm asking a bunch of dumb questions here but how else is one to learn.
Years ago when I was looking at just getting the engine running I replaced the distributor cap and spark plug wires. Well, I replaced them exactly as they were on the old distributor cap and actually labeled them. This was before I knew the cylinder numbering. I seemed to have lost my notes on how I numbered the cylinders so I don't know for sure if I have the wires on the correct side. I do I confirm which wire goes to which cylinder?
Years ago when I was looking at just getting the engine running I replaced the distributor cap and spark plug wires. Well, I replaced them exactly as they were on the old distributor cap and actually labeled them. This was before I knew the cylinder numbering. I seemed to have lost my notes on how I numbered the cylinders so I don't know for sure if I have the wires on the correct side. I do I confirm which wire goes to which cylinder?
#52
03-03-2012, 07:11 AM
The number 1 location should be marked on the distributor cap and should be pointed toward the firewall of the truck as the engine is installed. Insert the wire to number one plug therein and route the wire to the front plug on the passenger side which is number 1. The internals of the distributor rotates CCW so the wire to the second cylinder in the firing order goes into that hole to the left on number 1. Follow the distributor cap holes CCW with the wires to the plugs in the firing order, number five. Follow the holes, insert wires and continue with the known firing order and plug placement.
#53
03-03-2012, 07:40 AM
Ray you are a lifesaver.... Well, I just ran out real quick and couldn't find any markings on the distributor cap. I pulled a couple of wires in the location you suggested but didn't see anything. The cap only goes on one way...
I just looked at the wiring diagram and it looks to be accurate if the distributor rotates clockwise not CCW....
I just looked at the wiring diagram and it looks to be accurate if the distributor rotates clockwise not CCW....
#55
03-03-2012, 09:18 PM
Very interesting Greg, my intake doesn't have the cylinder numbers.
I wonder if they added this later years since my 239 is the first year of the Y-Block.
I think I figured out my spark plug wire numbering. My new starter is working great. Now I have to get spark to the plugs.
Any tips on wiring the coil and testing spark for a newbie? It should be just wire the positive to the battery and ground the negative to the block, correct?...by the way, I'm converting to 12V negative ground.

#57
03-31-2012, 05:36 PM
I just want to add my two cents worth, whenever you are working on any vehicle, just remember that when you are looking at diagrams like this they always orientate them left and right as you sit in the drivers seat, example cylinders 1234 are on passenger side as you sit facing forward from drivers seat, and 5678 are on drivers side as you site in drivers seat. They did it this way to keep from getting confused as to what side you are talking about when describing a vehicle issue. It is done the same way with planes and in the military. Just watch out, sometimes when describing engine banks they switch and go as if facing the front of engines with newer cars, comes from sales people and techs not being taught correctly.
#58
03-31-2012, 07:52 PM
I get so much information from asking questions here.
If you have a Y-block a good book is "Ford Y-Block How to Repair and Rebuild the 1954-62 Ford OHV V-8" by James Eickman
Here is a great site Earl's world with lots of good info: http://www.clubfte.com/users/earl/index.html
Get yourself a shop manual. Here is a link to one on Amazon: Amazon.com: 1956 FORD PICKUP TRUCK Shop Service Repair Manual Book: Automotive
I highly recommend this book. 1948-56 Ford Truck Master Parts Catalog CD - HiPo Parts Garage It's the best $22 you will spend.
This site has some good info, scoll down to the bottom for technical info: FORD Y
There are no dumb questions around here. If you have never done it before, you can't know the answer with research and asking the experts. Experts abound here and they are more than willing to help the inexperienced guys like me.
By the way, if you show pictures of your truck everyone will love you more.
Start up a thread and ask away.
#59
03-31-2012, 08:21 PM
I haven't had much time to work on things the last week or two. My oldest two are in track and one is in baseball as well, so I've been running all over.
I got a new coil and it seems to be working fine. I finally pulled my head out of my tail and pulled the distributor cap and saw that the points don't seem to be opening when the engine spins. I'm starting to research on how to properly set these, but if you guys have quick tips I would appreciate it.
Here are my points:
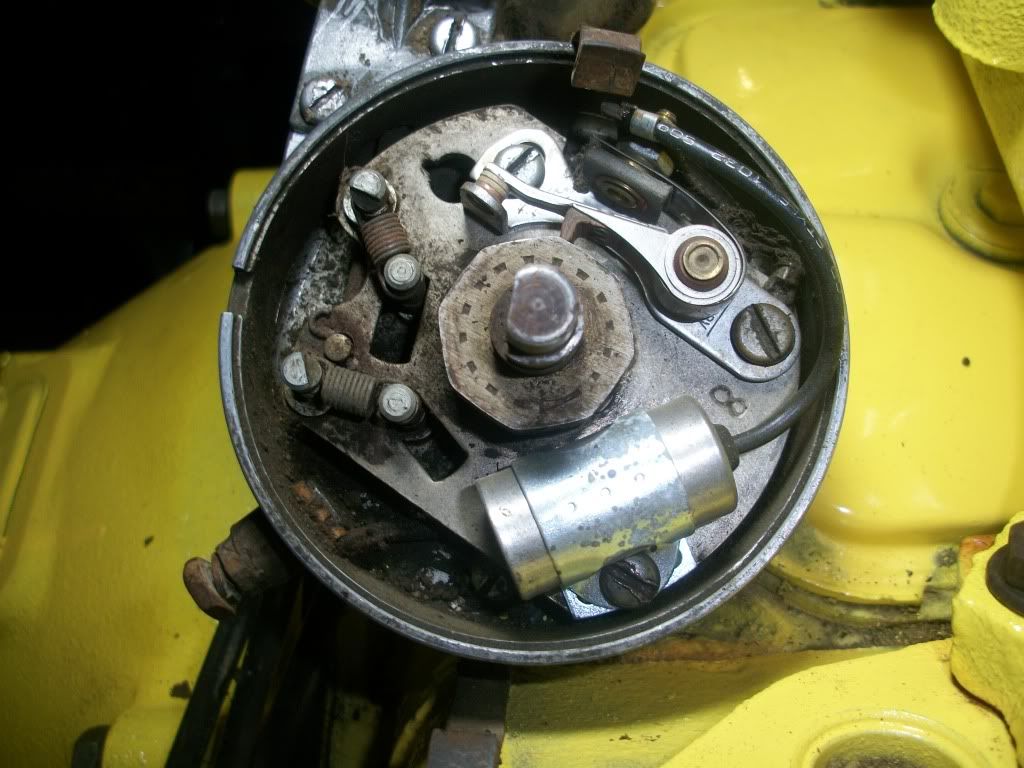
Looking at the picture I noticed more. I should just be able to use the screw at 12 O'Clock and adjust them there, correct?
Now, should I get them on the high spot of the distributor and adjust the gap there?
Hey wrmckay; these are the kind of questions I'm talking about. I'm sure tons of guys here are saying.."Well, duh! " but they are always polite to guys like me.
I got a new coil and it seems to be working fine. I finally pulled my head out of my tail and pulled the distributor cap and saw that the points don't seem to be opening when the engine spins. I'm starting to research on how to properly set these, but if you guys have quick tips I would appreciate it.
Here are my points:
Looking at the picture I noticed more. I should just be able to use the screw at 12 O'Clock and adjust them there, correct?
Now, should I get them on the high spot of the distributor and adjust the gap there?
Hey wrmckay; these are the kind of questions I'm talking about. I'm sure tons of guys here are saying.."Well, duh!
" but they are always polite to guys like me.
#60
03-31-2012, 09:40 PM
It's been a lot of years since I've set points, I hope I did it right.
