55 239 Y-Block Restoration Thread
#136
 01-25-2013, 09:37 PM


That was a good read whole thing. I m about to start my 272 from f 56 f100 have block ALREADY at chassis have everything on it to get it fire up carb is on exhaust etc I have to set distributor tomorrow have #1 compression tdc on damper at the pointer ready to set dist any advise before I do this and try to start engine thanks .
#137
01-25-2013, 09:53 PM

That was a good read whole thing. I m about to start my 272 from f 56 f100 have block ALREADY at chassis have everything on it to get it fire up carb is on exhaust etc I have to set distributor tomorrow have #1 compression tdc on damper at the pointer ready to set dist any advise before I do this and try to start engine thanks .
I didn't set my distributor, I left it how it was when it was parked. But once you get it set properly, you should be good to go. These engines are pretty straightforward. You need spark, fuel, and compression. Of course the spark has to be at the proper time. Hence getting your distributor set properly. It should fire on up.
I would suggest taking a video. It's so fun to see these fire up and run when you are getting them fired up for the first time. No telling how many times I have watched my own video.
#138
01-26-2013, 11:13 PM
#139
01-27-2013, 09:08 AM
I hooked a wire from the poitive coil stud to the positive on the battery, the negative goes to the distributor I hooked the negative battery post to the engine block. I think I just hooked it to a bellhousing bolt. Then put power to the starter and check for spark. You could remove the coil wire from the distributor and check for spark there first then troubleshoot from there.
#140
01-27-2013, 09:39 AM
I hooked a wire from the poitive coil stud to the positive on the battery, the negative goes to the distributor I hooked the negative battery post to the engine block. I think I just hooked it to a bellhousing bolt. Then put power to the starter and check for spark. You could remove the coil wire from the distributor and check for spark there first then troubleshoot from there.
#141
01-27-2013, 10:33 AM
Fleet Owner
That is what I did connected coil post that says bat to positive s battery. The post on coil that says dist. To the distributor then negative of battery to engine block then powered the starter engine cranked but notice no spark coming out from center hole of coil some told me to check points and condenser also the resistor but no sure how to properly do this do you have any idea of this
#142
02-16-2013, 10:05 PM
Well, it's been a while since I have done anything.
I first tried attaching the transmission to the engine with the engine on the cherry picker. Well that didn't work so well for me. So I put it back on the frame. Then I tried hoisting the transmission into place and was getting frustrated. The cab was moved back on the frame, but it was still in the way. So....I removed the cab. Gwen hasn't tried to park her car in the garage, so it OK right????

Now I have room.
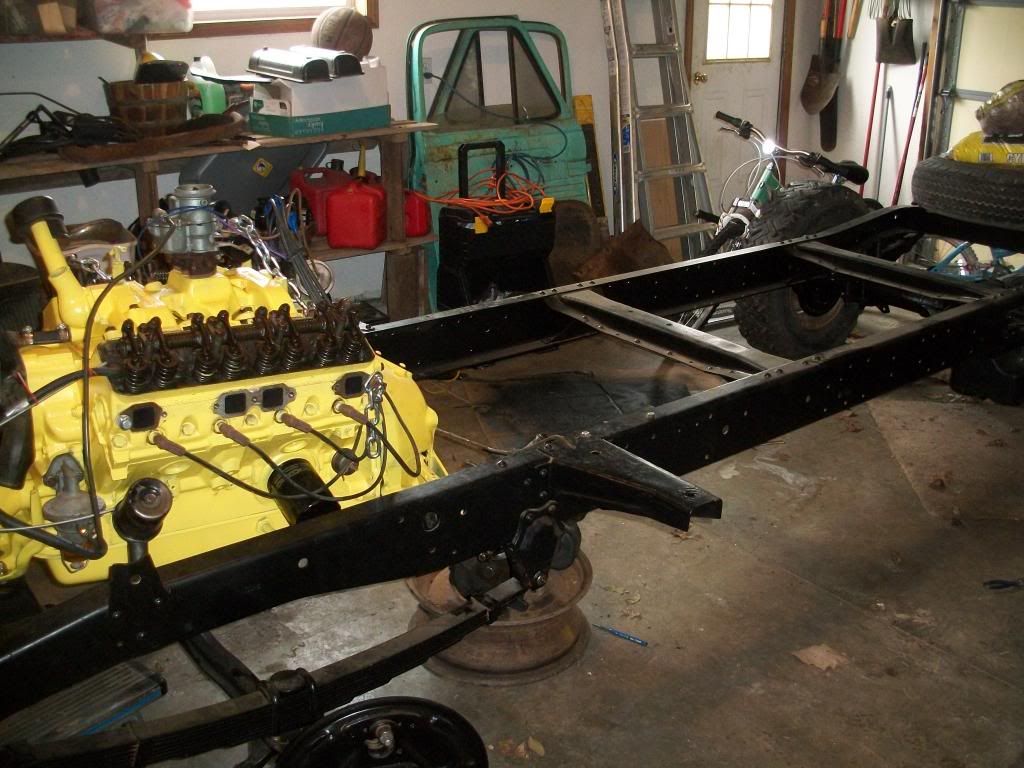
I need to get some gear oil for the trans as well as the read diff. My manual says the read diff takes 1/2 a gallon. I couldn't locate that info on the transmission. Does anyone know? If I can get by with buying only a gallon for now that would be cool.
I'm going to take Ross's idea and loosen the clutch plate so I can wiggle things around more. I'm hoping I can get this done on Monday. (I'm a State worker, so I have the day off.)
I first tried attaching the transmission to the engine with the engine on the cherry picker. Well that didn't work so well for me. So I put it back on the frame. Then I tried hoisting the transmission into place and was getting frustrated. The cab was moved back on the frame, but it was still in the way. So....I removed the cab. Gwen hasn't tried to park her car in the garage, so it OK right????
Now I have room.
I need to get some gear oil for the trans as well as the read diff. My manual says the read diff takes 1/2 a gallon. I couldn't locate that info on the transmission. Does anyone know? If I can get by with buying only a gallon for now that would be cool.
I'm going to take Ross's idea and loosen the clutch plate so I can wiggle things around more. I'm hoping I can get this done on Monday. (I'm a State worker, so I have the day off.)
#143
02-16-2013, 10:13 PM
My son and his friends wanted to see the engine run, so I lit it up. (After charging the battery....his friends had left by then.)
Well check out the video. I noticed smoke coming out of some of the push rod shafts. That worries me. Is this cause for alarm. I'm thinking, since it has sat, I should have put some oil down the push rod shafts for extra lubricant. Could it be something else? Is there an easy way to check oil pressure with my engine at this state?
I also plan on getting the radiator on asap. I have some water in the block at this time. Capacity is 22 quarts, so I need a lot more once it's all hooked up.
This summer, I hope to be able to run the engine more and tune it up some. (Outside the garage, so Gwen doesn't yell about the whole house smelling.)
#144
02-16-2013, 10:30 PM
#145
02-17-2013, 12:21 AM
I just changed the rear seal and put 3.5 quarts of VR1 60W in Albatross' 4-syn (T98) and nothing came out the top "fill to this line" hole. Once I added another 0.5 qt., the top hole began to weep. So, just about 4 qts. is good for a T98. Do not use sulphur-bearing "hypoid" oil in a transmission with brass synchronizers.
BTW: overfilling will cause a clear indication of rear seal integrity (or lack thereof). Don't ask how I know this to be true..
BTW: overfilling will cause a clear indication of rear seal integrity (or lack thereof). Don't ask how I know this to be true..
#146
02-24-2013, 04:06 PM
Success today. I got the transmission installed. I didn't read Ray's suggestion carefully enough and I finally wised up and used those double threaded studs as alignment studs, and while holding my tongue just right it slid in.
I used a series of extensions and sockets to get the clutch aligned. The clutch alignment tool cost only $5 through O'Reilly but they don't ship to store on that part and shipping was $15. I figured I needed it, but it was actually just the angle of the transmission was off slightly which the alignment studs fixed.
I will get pictures shortly.
Next I will install the pedals and master cylinder and start bending brake lines....Hopefully I won't have to throw away too many in my learning process.
#147
02-24-2013, 07:08 PM
One thing I did that maybe was odd was loosen the clutch fork from the bell housing. I was having issues getting that all lined up, so I pulled the clutch fork back out of the way and put the throw out bearing on the transmission. I used the transmission inspection cover to help get the clutch fork back in place.

I just threw the shifter back on, just because. I need to clean it up as well as the transmission some.
I just threw the shifter back on, just because. I need to clean it up as well as the transmission some.
#148
02-24-2013, 07:40 PM

[quote=Harrier;12879394]One thing I did that maybe was odd was loosen the clutch fork from the bell housing. I was having issues getting that all lined up, so I pulled the clutch fork back out of the way and put the throw out bearing on the transmission. I used the transmission inspection cover to help get the clutch fork back in place.
While you have the shifter out and accessible, examine the small pin that goes in horizontally from the driver side for wear. lubrication does not make its way up there so it is common for them to wear and make for a sloppy shift.
While you have the shifter out and accessible, examine the small pin that goes in horizontally from the driver side for wear. lubrication does not make its way up there so it is common for them to wear and make for a sloppy shift.
#149
02-24-2013, 08:03 PM
And check the hole in the shift rod for elongation. It can be welded and re-sized or possibly sleeved. If needed, of course. I slathered mine in moly grease.
#150
03-26-2013, 09:05 PM
I made some progress recently. I got some gasket material and made some gaskets for the transmission. I also got it filled with oil. The T-98 transmission took slightly under a gallon of oil. It was easy filling it with the top off. I kept the fill plug hole open and made sure I was right at the edge of the hole.
I started putting the clutch and brake pedals on and discovered something. Notice in this picture, the bolt. It connects the Clutch Pivot Bracket to the transmission and it pivots on that bolt. It looked odd to me and had a funny washer. I discovered it was leather. No telling where they got the piece used as a pivot.(The piece right next to the two nuts on the end.) It's pretty thick, it must have come off of some farm equipment.
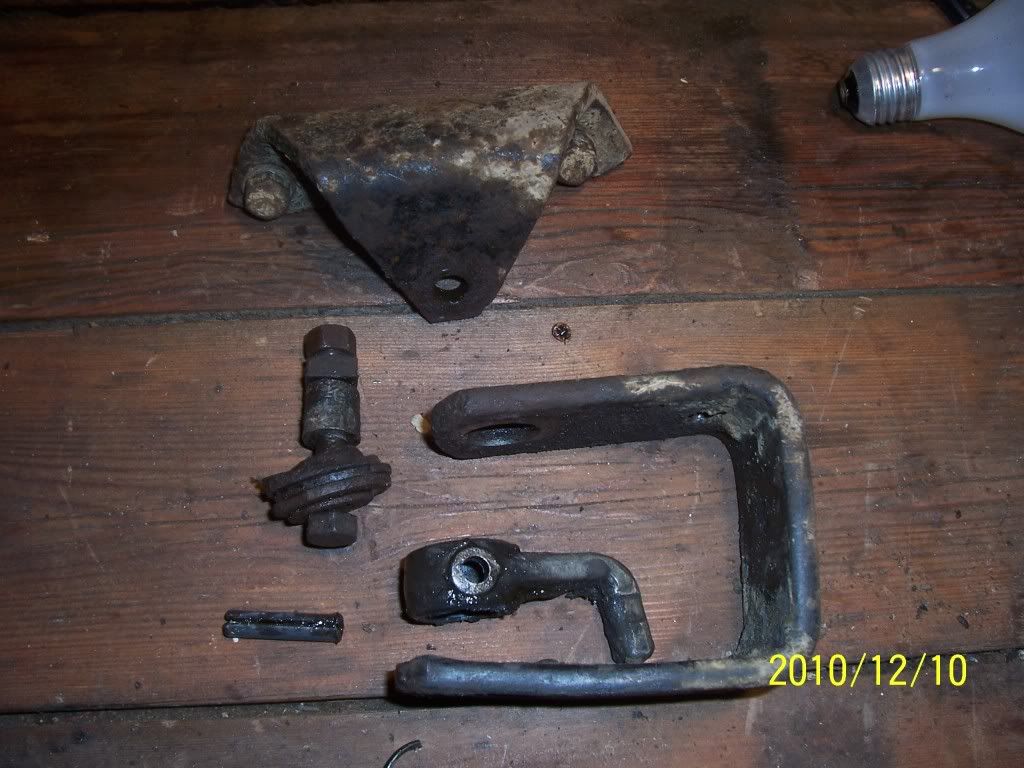
Well, the diagrams didn't quite fit what I had and when I looked closer at the Midfifty catalog, I noticed the clutch shoulder bolt. Well that explains it, something happened and they had to replace the shoulder bolt with what I have now. I kind of like using what I have, but in this case I think I will get a new shoulder bolt. Being able to shift and brake are kind of important.
Also the spacer spring was missing on my truck. So what does that spring do exactly? It seemed to work without it. I will get one, but it is interesting that the truck was repaired without one sometime in its history.
I started putting the clutch and brake pedals on and discovered something. Notice in this picture, the bolt. It connects the Clutch Pivot Bracket to the transmission and it pivots on that bolt. It looked odd to me and had a funny washer. I discovered it was leather. No telling where they got the piece used as a pivot.(The piece right next to the two nuts on the end.) It's pretty thick, it must have come off of some farm equipment.
Well, the diagrams didn't quite fit what I had and when I looked closer at the Midfifty catalog, I noticed the clutch shoulder bolt. Well that explains it, something happened and they had to replace the shoulder bolt with what I have now. I kind of like using what I have, but in this case I think I will get a new shoulder bolt. Being able to shift and brake are kind of important.
Also the spacer spring was missing on my truck. So what does that spring do exactly? It seemed to work without it. I will get one, but it is interesting that the truck was repaired without one sometime in its history.