Oil Pressure Gauge installation using Oil Cooler test port.
#1
 01-08-2012, 09:35 PM

Oil Pressure Gauge installation using Oil Cooler test port.
I finally got around to installing the sensor for the low oil pressure system in the 6.0.
There are other ways to do it such as with the aftermarket oil filter cap that has a threaded hole in the top for a pressure sensor.
I purchased the correct fitting (to replace the quick-connect fitting that is in the OEM oil cooler) from Summit Racing.
Summit Part no. MRF-MP-3071 (6AN O-ring w/ 1/8" NPT Center) $7.95
You will also need your choice of flexible hose to remote-position the sending unit. I used a 36" grease line from Tractor Supply. It is thermoplastic and has 1/8" NPT male ends, a strain relief on one end, and a very high working pressure rating. $9.95
Other fittings needed for my installation are all standard 1/8" NPT.
(1) 2" nipple
(1) 90deg fitting (I had a T so I used it)
(1) coupling
Tools required are all metric
Deep 18mm socket to remove the quick connect from the oil cooler
15mm socket for 4 fan stator bolts
8mm-14mm for various bolts
'Crows Foot' wrenches, get a set from auto parts store 10mm-19mm
I started by removing the air filter assembly and the fan shroud. The fan shroud is secured at the top with a bolt on the left and right. There are 2 tabs at the bottom that hold the shroud in place. Loosen the 2 hoses from the top of the radiator. They can be pushed out of the way later when lifting up the fan shroud. Remove the radiator support brackets (4 8mm bolts) and put them aside. The radiator can be tilted forward allowing the Fan Shroud to be lifted out. The hardest part is getting the shroud up past the radiator fittings for the hoses. The shroud then just lifts up and out.
 CLICK ANY OF THE PICS FOR FULL SIZE IMAGES
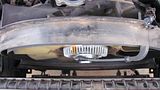
Next unbolt the fan stator. 4 15mm bolts. 2 from top side and 2 from underneath.
The stator when unbolted will move forward enough to allow access to the quick connect fitting on the front of the oil cooler.

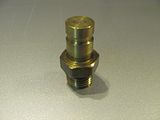
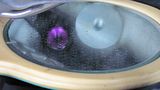
Pull off the black rubber cover. Use a deep socket 18mm to unscrew the test port fitting. Mine was not very tight and came loose with very little effort. This is what it looks like removed.
This what the oil cooler looks like with the fitting removed

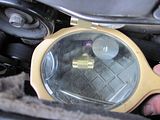
The new fitting can be installed now. I used a deep socket and paper towel to wedge the fitting in the socket.
With the new fitting installed.
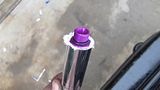
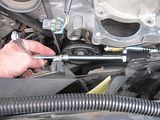
I started the 2" nipple into the "T" fitting and used teflon tape. Then I started the assembly into the adapter that I previously installed in the oil cooler.

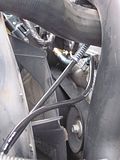
I tightened it up and went on to the line to the sending unit. Teflon tape and screw it in. A 12mm 'Crows Foot' does the trick.

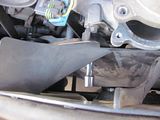
Route the line towards the battery box or wherever you choose to put yours.
Reassemble the fan stator, shroud, intake, radiator hoses, air filter. Complete the wiring to the sending unit.
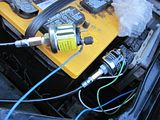
I wrapped both the fuel pressure and oil pressure sending units in bubble wrap and zip tied them tightly closed to keep out water and dirt.
I started the truck to check for leaks and proper operation of the gauge. At idle the oil pressure reads 70 psi. I have not driven the truck to see variations in the pressure readings. I will follow up later with what I see.
There are other ways to do it such as with the aftermarket oil filter cap that has a threaded hole in the top for a pressure sensor.
I purchased the correct fitting (to replace the quick-connect fitting that is in the OEM oil cooler) from Summit Racing.
Summit Part no. MRF-MP-3071 (6AN O-ring w/ 1/8" NPT Center) $7.95
You will also need your choice of flexible hose to remote-position the sending unit. I used a 36" grease line from Tractor Supply. It is thermoplastic and has 1/8" NPT male ends, a strain relief on one end, and a very high working pressure rating. $9.95
Other fittings needed for my installation are all standard 1/8" NPT.
(1) 2" nipple
(1) 90deg fitting (I had a T so I used it)
(1) coupling
Tools required are all metric
Deep 18mm socket to remove the quick connect from the oil cooler
15mm socket for 4 fan stator bolts
8mm-14mm for various bolts
'Crows Foot' wrenches, get a set from auto parts store 10mm-19mm
I started by removing the air filter assembly and the fan shroud. The fan shroud is secured at the top with a bolt on the left and right. There are 2 tabs at the bottom that hold the shroud in place. Loosen the 2 hoses from the top of the radiator. They can be pushed out of the way later when lifting up the fan shroud. Remove the radiator support brackets (4 8mm bolts) and put them aside. The radiator can be tilted forward allowing the Fan Shroud to be lifted out. The hardest part is getting the shroud up past the radiator fittings for the hoses. The shroud then just lifts up and out.
 CLICK ANY OF THE PICS FOR FULL SIZE IMAGES
Next unbolt the fan stator. 4 15mm bolts. 2 from top side and 2 from underneath.

The stator when unbolted will move forward enough to allow access to the quick connect fitting on the front of the oil cooler.

Pull off the black rubber cover. Use a deep socket 18mm to unscrew the test port fitting. Mine was not very tight and came loose with very little effort. This is what it looks like removed.

This what the oil cooler looks like with the fitting removed

The new fitting can be installed now. I used a deep socket and paper towel to wedge the fitting in the socket.

With the new fitting installed.

I started the 2" nipple into the "T" fitting and used teflon tape. Then I started the assembly into the adapter that I previously installed in the oil cooler.


I tightened it up and went on to the line to the sending unit. Teflon tape and screw it in. A 12mm 'Crows Foot' does the trick.


Route the line towards the battery box or wherever you choose to put yours.

Reassemble the fan stator, shroud, intake, radiator hoses, air filter. Complete the wiring to the sending unit.

I wrapped both the fuel pressure and oil pressure sending units in bubble wrap and zip tied them tightly closed to keep out water and dirt.
I started the truck to check for leaks and proper operation of the gauge. At idle the oil pressure reads 70 psi. I have not driven the truck to see variations in the pressure readings. I will follow up later with what I see.
The following users liked this post:
#2
01-08-2012, 10:17 PM


#3
01-08-2012, 11:04 PM


Join Date: May 2008
Location: Patricia, Alberta
Posts: 765
Likes: 0
Received 0 Likes
on
0 Posts
#4
01-09-2012, 09:49 AM
Driving results
I got the Ex on the road this morning for the first time since the install.
Outside temp 55 deg....recent oil change with Rotella T6 5W-40 plus 8 oz REV-X;
Initial start pressure.......................................... 68 psi.
Driving under 1500 RPM during warm-up ................80 psi
While the oil temp was still rising I never saw less than 68 psi
Now I'm wondering if there is a temperature controlled valve somewhere that keeps the oil pressure high and steady until a certain temp is reached. Next time I will watch the EOT on first start to see if they are related to the limited range of pressure after a cold start.
After reaching normal oil temps the pressure fluctuated more like normal. I took some pics and videos while driving.
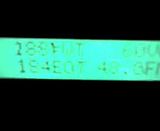
Scangauge temps at idle warmed up after driving
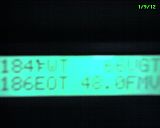 CLICKING ON THE PIC AND VID TAKES YOU TO MY PHOTOBUCKET PAGE. LOTS OF OTHER PICS THERE
Video of oil pressure while driving......it's shaky but you get the idea
Outside temp 55 deg....recent oil change with Rotella T6 5W-40 plus 8 oz REV-X;
Initial start pressure.......................................... 68 psi.
Driving under 1500 RPM during warm-up ................80 psi
While the oil temp was still rising I never saw less than 68 psi
Now I'm wondering if there is a temperature controlled valve somewhere that keeps the oil pressure high and steady until a certain temp is reached. Next time I will watch the EOT on first start to see if they are related to the limited range of pressure after a cold start.
After reaching normal oil temps the pressure fluctuated more like normal. I took some pics and videos while driving.
Scangauge temps at idle warmed up after driving
 CLICKING ON THE PIC AND VID TAKES YOU TO MY PHOTOBUCKET PAGE. LOTS OF OTHER PICS THERE
Video of oil pressure while driving......it's shaky but you get the idea
#5
01-09-2012, 07:11 PM
Join Date: Jun 2007
Location: Winder, Georgia
Posts: 344
Likes: 0
Received 0 Likes
on
0 Posts


#7
06-23-2013, 12:15 PM
Trending Topics
#8
06-23-2013, 12:18 PM
#9
07-09-2013, 08:20 PM

Junior User
Join Date: Sep 2012
Location: Asheville, NC
Posts: 78
Likes: 0
Received 0 Likes
on
0 Posts
Quick question. Isn't the oil pressure test port fitting the same size andnthread as the test port for the fuel pressure? I was thinking they are both 14mm just like a spark plug (which I tried in the oil pressure test port while I was doing my oil cooler change).
If that's the case, one could use the same adaptor for oil pressure and fuel pressure.
If that's the case, one could use the same adaptor for oil pressure and fuel pressure.
#11
07-10-2013, 11:42 AM
Junior User
Join Date: Sep 2012
Location: Asheville, NC
Posts: 78
Likes: 0
Received 0 Likes
on
0 Posts
#12
07-10-2013, 12:32 PM
Junior User
Join Date: Sep 2012
Location: Asheville, NC
Posts: 78
Likes: 0
Received 0 Likes
on
0 Posts
So now I'm perplexed. Most Spark Plugs are 14mm x 1.25 thread but AN-6 is 9/16 x 18 TPI. OP used a AN fitting but the 6.0 is metric. So which is correct, AN-6 or 14mm x 1.25? I'm leaning toward 14mm.
As long as it doesn't leak I guess it's all good - and they must be quite similar, but which is right?
Am I being too nit picky here?
As long as it doesn't leak I guess it's all good - and they must be quite similar, but which is right?
Am I being too nit picky here?
#13
07-10-2013, 03:51 PM
 they may be close but I would want to use the correct thread also. As far as I know everything on the truck is metric now. I think we are finically over the mix n match of the last couple of decades.
#14
08-25-2014, 08:28 AM

Freshman User
Join Date: Nov 2013
Location: Gardnerville, NV
Posts: 28
Likes: 0
Received 0 Likes
on
0 Posts
Great post good info.
I finally got around to installing the sensor for the low oil pressure system in the 6.0.
There are other ways to do it such as with the aftermarket oil filter cap that has a threaded hole in the top for a pressure sensor.
I purchased the correct fitting (to replace the quick-connect fitting that is in the OEM oil cooler) from Summit Racing.
Summit Part no. MRF-MP-3071 (6AN O-ring w/ 1/8" NPT Center) $7.95
You will also need your choice of flexible hose to remote-position the sending unit. I used a 36" grease line from Tractor Supply. It is thermoplastic and has 1/8" NPT male ends, a strain relief on one end, and a very high working pressure rating. $9.95
Other fittings needed for my installation are all standard 1/8" NPT.
(1) 2" nipple
(1) 90deg fitting (I had a T so I used it)
(1) coupling
Tools required are all metric
Deep 18mm socket to remove the quick connect from the oil cooler
15mm socket for 4 fan stator bolts
8mm-14mm for various bolts
'Crows Foot' wrenches, get a set from auto parts store 10mm-19mm
I started by removing the air filter assembly and the fan shroud. The fan shroud is secured at the top with a bolt on the left and right. There are 2 tabs at the bottom that hold the shroud in place. Loosen the 2 hoses from the top of the radiator. They can be pushed out of the way later when lifting up the fan shroud. Remove the radiator support brackets (4 8mm bolts) and put them aside. The radiator can be tilted forward allowing the Fan Shroud to be lifted out. The hardest part is getting the shroud up past the radiator fittings for the hoses. The shroud then just lifts up and out.
CLICK ANY OF THE PICS FOR FULL SIZE IMAGES
Next unbolt the fan stator. 4 15mm bolts. 2 from top side and 2 from underneath.
The stator when unbolted will move forward enough to allow access to the quick connect fitting on the front of the oil cooler.
Pull off the black rubber cover. Use a deep socket 18mm to unscrew the test port fitting. Mine was not very tight and came loose with very little effort. This is what it looks like removed.
This what the oil cooler looks like with the fitting removed
The new fitting can be installed now. I used a deep socket and paper towel to wedge the fitting in the socket.
With the new fitting installed.
I started the 2" nipple into the "T" fitting and used teflon tape. Then I started the assembly into the adapter that I previously installed in the oil cooler.
I tightened it up and went on to the line to the sending unit. Teflon tape and screw it in. A 12mm 'Crows Foot' does the trick.
Route the line towards the battery box or wherever you choose to put yours.
Reassemble the fan stator, shroud, intake, radiator hoses, air filter. Complete the wiring to the sending unit.
I wrapped both the fuel pressure and oil pressure sending units in bubble wrap and zip tied them tightly closed to keep out water and dirt.
I started the truck to check for leaks and proper operation of the gauge. At idle the oil pressure reads 70 psi. I have not driven the truck to see variations in the pressure readings. I will follow up later with what I see.
There are other ways to do it such as with the aftermarket oil filter cap that has a threaded hole in the top for a pressure sensor.
I purchased the correct fitting (to replace the quick-connect fitting that is in the OEM oil cooler) from Summit Racing.
Summit Part no. MRF-MP-3071 (6AN O-ring w/ 1/8" NPT Center) $7.95
You will also need your choice of flexible hose to remote-position the sending unit. I used a 36" grease line from Tractor Supply. It is thermoplastic and has 1/8" NPT male ends, a strain relief on one end, and a very high working pressure rating. $9.95
Other fittings needed for my installation are all standard 1/8" NPT.
(1) 2" nipple
(1) 90deg fitting (I had a T so I used it)
(1) coupling
Tools required are all metric
Deep 18mm socket to remove the quick connect from the oil cooler
15mm socket for 4 fan stator bolts
8mm-14mm for various bolts
'Crows Foot' wrenches, get a set from auto parts store 10mm-19mm
I started by removing the air filter assembly and the fan shroud. The fan shroud is secured at the top with a bolt on the left and right. There are 2 tabs at the bottom that hold the shroud in place. Loosen the 2 hoses from the top of the radiator. They can be pushed out of the way later when lifting up the fan shroud. Remove the radiator support brackets (4 8mm bolts) and put them aside. The radiator can be tilted forward allowing the Fan Shroud to be lifted out. The hardest part is getting the shroud up past the radiator fittings for the hoses. The shroud then just lifts up and out.
CLICK ANY OF THE PICS FOR FULL SIZE IMAGESNext unbolt the fan stator. 4 15mm bolts. 2 from top side and 2 from underneath.
The stator when unbolted will move forward enough to allow access to the quick connect fitting on the front of the oil cooler.
Pull off the black rubber cover. Use a deep socket 18mm to unscrew the test port fitting. Mine was not very tight and came loose with very little effort. This is what it looks like removed.
This what the oil cooler looks like with the fitting removed
The new fitting can be installed now. I used a deep socket and paper towel to wedge the fitting in the socket.
With the new fitting installed.
I started the 2" nipple into the "T" fitting and used teflon tape. Then I started the assembly into the adapter that I previously installed in the oil cooler.
I tightened it up and went on to the line to the sending unit. Teflon tape and screw it in. A 12mm 'Crows Foot' does the trick.
Route the line towards the battery box or wherever you choose to put yours.
Reassemble the fan stator, shroud, intake, radiator hoses, air filter. Complete the wiring to the sending unit.
I wrapped both the fuel pressure and oil pressure sending units in bubble wrap and zip tied them tightly closed to keep out water and dirt.
I started the truck to check for leaks and proper operation of the gauge. At idle the oil pressure reads 70 psi. I have not driven the truck to see variations in the pressure readings. I will follow up later with what I see.

Thread
Thread Starter
Forum
Replies
Last Post
Coupleofords
Y-Block V8 (239, 272, 292, 312, 317, 341, 368)
7
07-26-2017 03:21 PM
jcrtulsa
Explorer, Sport Trac, Mountaineer & Aviator
6
05-21-2004 11:38 PM