2 gauge battery charge cable and alternator pigtail write up
#1
 01-03-2012, 05:44 PM

2 gauge battery charge cable and alternator pigtail write up
Hey guys. Just replaced my alternator with a 160 amp alternator. My stock charge cable was getting old and after about 10 minutes of charging the battery would get too hot to keep a good charge on the battery. It did this with the stock alt and the 160 amp alt. So since I upgraded the alternator, I upgraded to a 2 gauge charge cable. My regulator wiring was falling apart as well so I changed it all out.
NOTE: BEFORE TOUCHING ANY OF THE WIRING FOR THIS PROJECT, DISCONNECT BOTH BATTERIES!!!
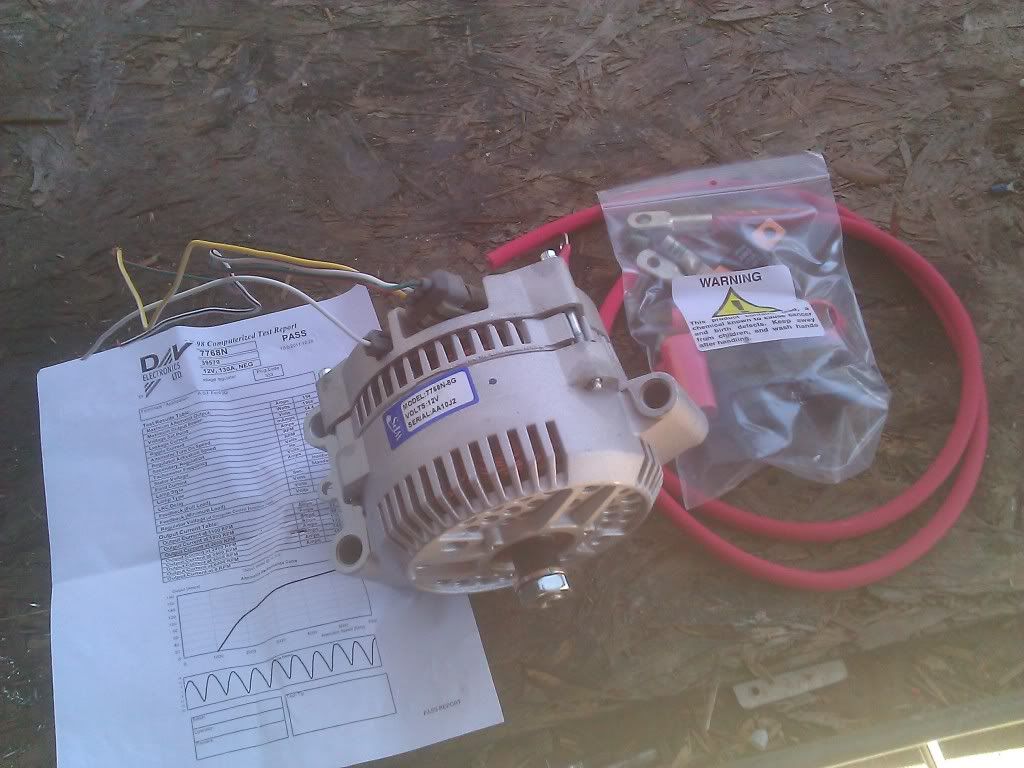
Here's the first picture of the new alternator, new pigtails, new charge cable, and a bag-o-parts to build the charge cable. I got everything from RJM Injection Tech — Welcome. They do mostly Ford gasser stuff, but for this project they had everything I needed.
I forgot to write down what size wrenches and sockets I used, but you will need:
Now I didn't include any pics of the alternator replacement as that's really straight forward. Take the belt off, remove the wiring from the alt, take the 3 bolts off, and the alt comes right off. Swap the old pulley on the new alt. The pulley comes off really easily with an air impact. Install the alt, tighten down 3 mounting bolts, re-install belt and wiring.
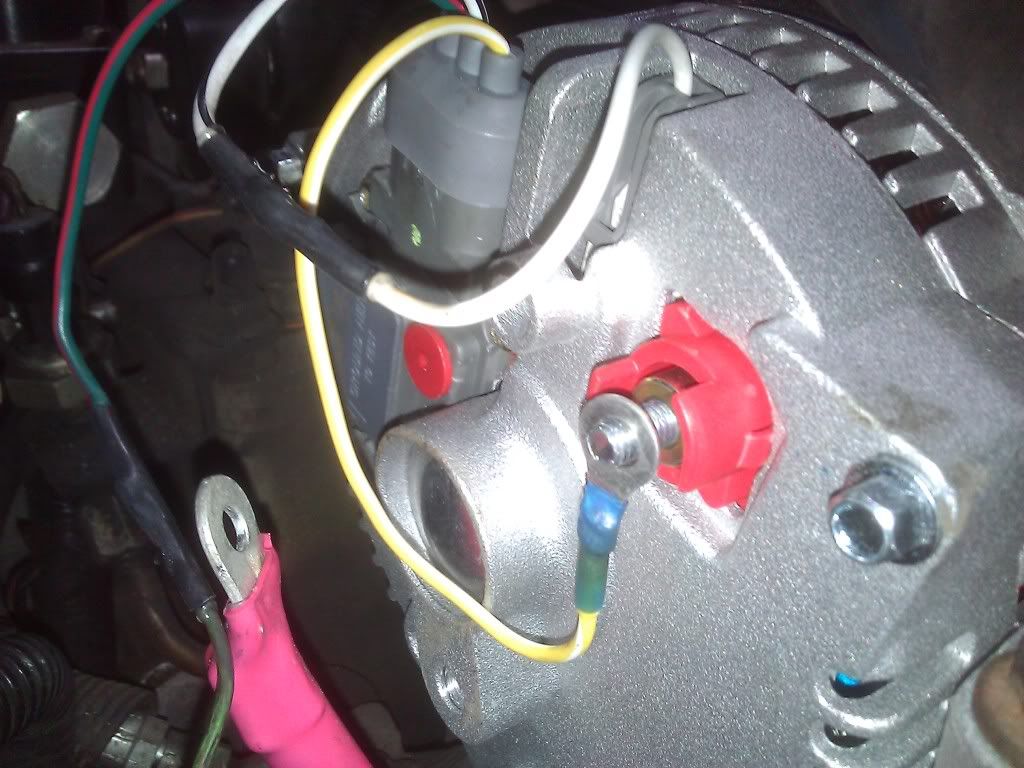
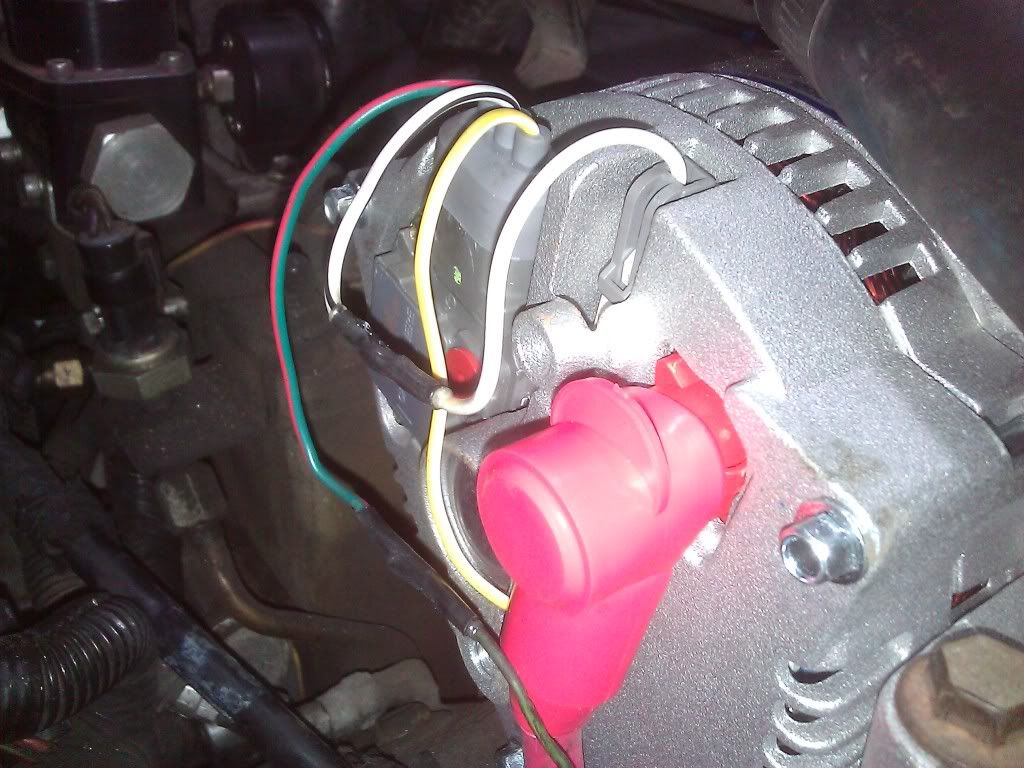
Now then, here's a pic and quick run down of the 3 wire regulator pigtail on the alt. The white wire runs back over to another connector on the alt, the yellow wire runs over with the charge cable to the starter solenoid, and the green wire goes back to the battery light which goes to the ignition. SO, if your battery light goes out, you will get no charge from the alt as the igntion 12v isn't getting to the regulator.

Now, let's replace everything.
The charge cable and the yellow wire from the regulator both run together in the same loom over into a fusible link, then connect to the solenoid. I just cut both the charge cable and yellow wire back to the loom on both sides. It's a PITA to get it all out of the truck. Your not using it anymore, just leave it sitting in the loom unless you just want to pull it out. I just cut it..

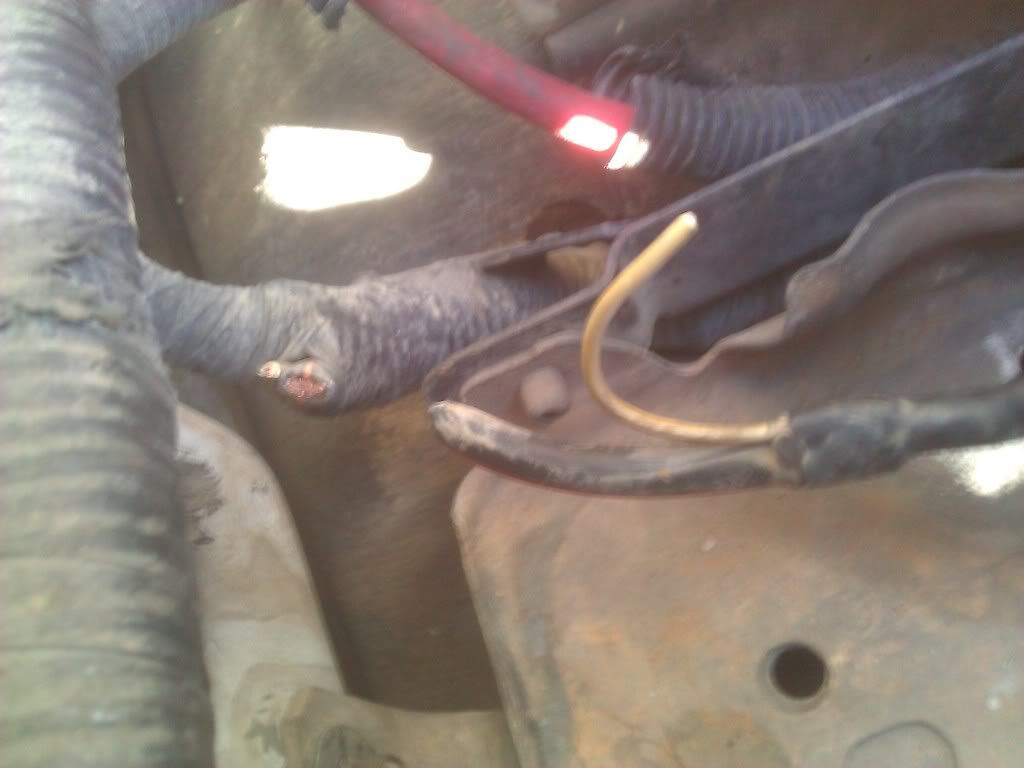

OK, the old charge cable now does nothing and the yellow wire is cut back to the loom on the alternator side.
Now, I installed the new pigtails on the alt. I soldered the connections. What your going to end up doing is rather than having the yellow wire running all the way to the starter solenoid, put a ring terminal connector on it and attach it to the charge cable lug on the alternator. So, if your doing this, your attaching green back to green, white to white, yellow gets a ring terminal and attach straight to charge lug on the alternator.
We're almost done now. The only thing left is to build a new charge cable and mount the fuse holder. There are several ways of doing this.. I'm just going to show my preferred method. This is basically just 2 gauge welding lead with soldered on ring terminals using solder pellets in the connector.
When you order the charge cable kit from RJM Injection, the cable will already have one ring terminal soldered on for the alternator lug, and includes 3 other terminals, solder pellets, adhesive lined heat shrink, mega fuse holder, and 2 mega fuses. There are 3 different size ring terminals. Two terminals are 5/16" for the mega fuse, one is 3/8" for the battery or starter solenoid, and one is 1/4" for the alternator lug.
Here is a link to the charge cable kit- RJM Injection Tech — Alternator Charge Cable Kit
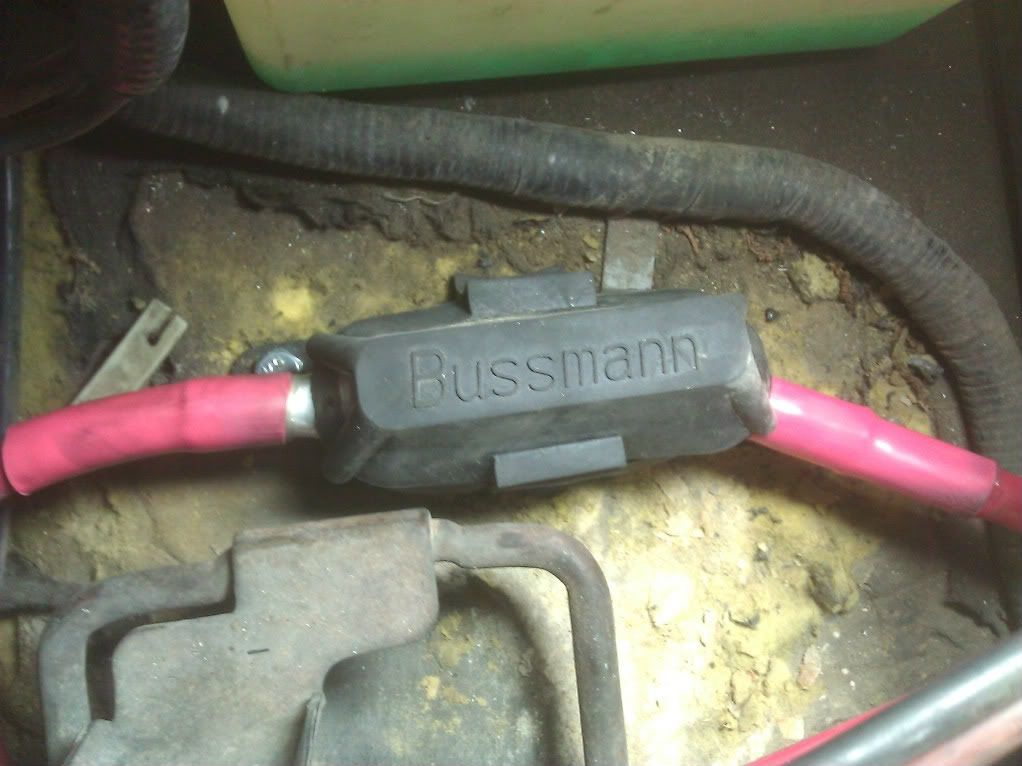
Since the cable comes with the alt terminal soldered on already, I put the cable on the alternator loosely and figured out where I wanted to route the cable. I routed it just like the stock wire ran. Down between the battery tray and coolant bottle. I then ran the cable over by where the bottle jack used to be and mounted the mega fuse holder there. I drilled two holes through the plastic fender well and used two small bolts to bolt down the fuse holder.
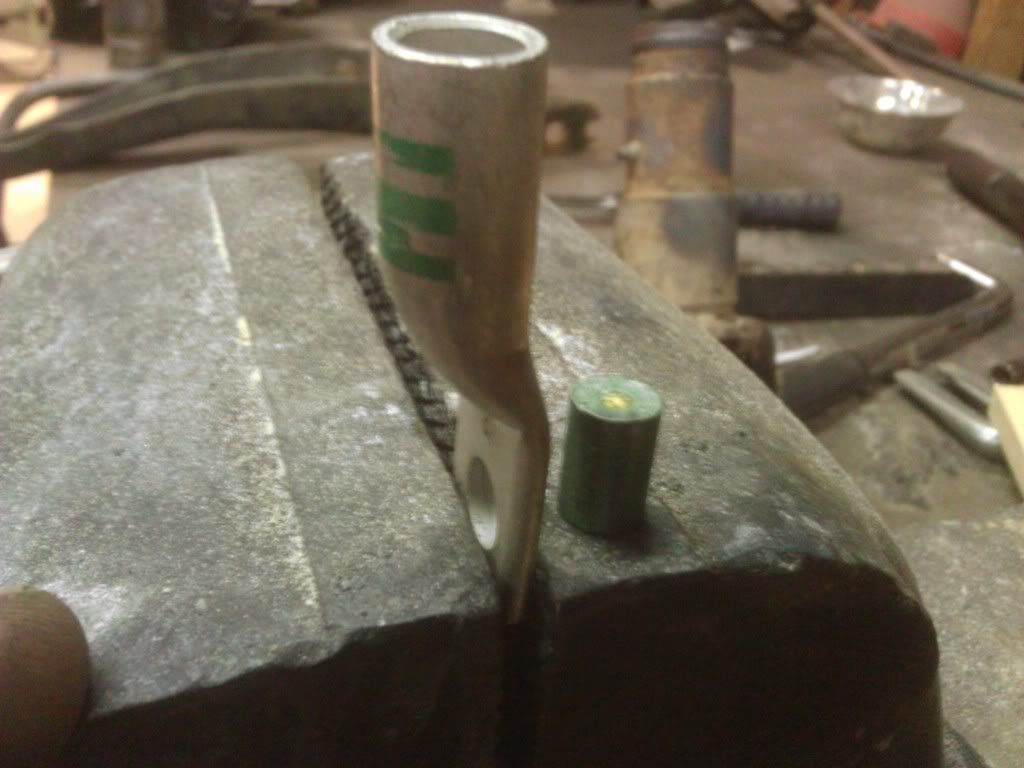
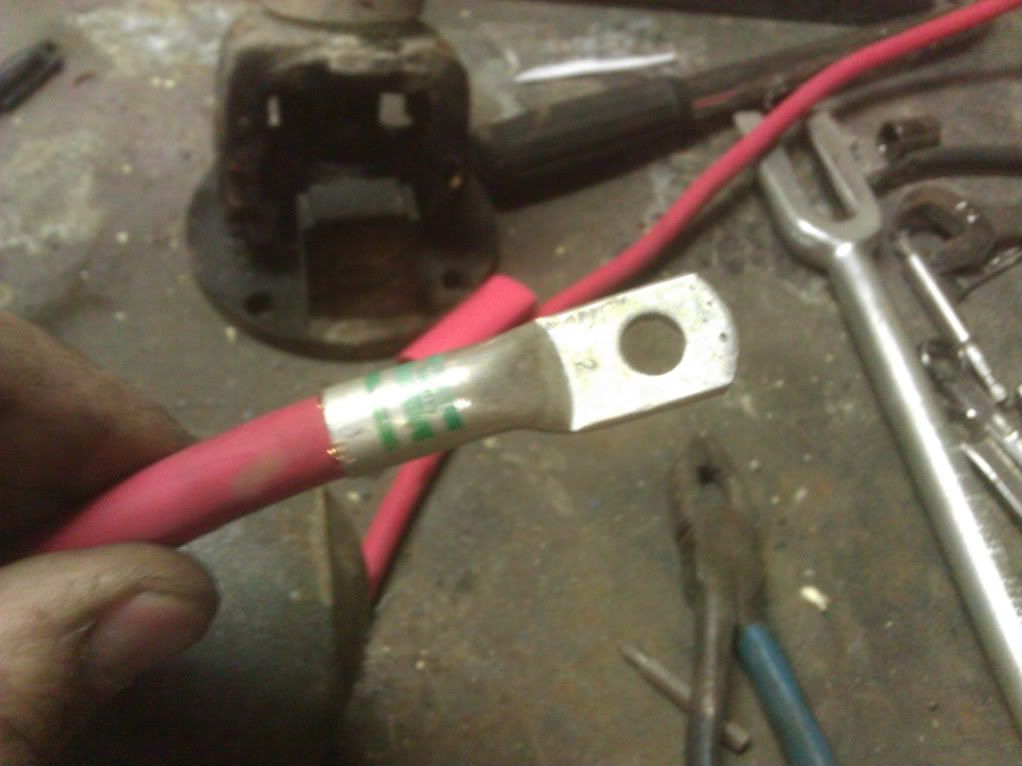
Now you figure out where you need to cut the cable in order to be able to solder on a ring terminal and bolt it to one side of the fuze holder. Cut the wire to length and solder on a 5/16" ring terminal.
Soldering on terminals with solder pellets is EASY. Strip about an 1-1 1/4" of insulation off the wire first. Put the ring terminal in a vice, and drop the solder pellet inside the terminal. Now you will need the torch.. Apply heat with the torch around the outside of the ring terminal, spread the heat around and don't use something hot enough to melt the ring terminal. Once the solder pellet melts, put the stripped wire end in the connector and pull the heat off the terminal. Hold the wire in there for about 5-10 seconds and you should be good to go. Just put heat shrink over it and install that cable in the truck. Here's a couple pics for you.

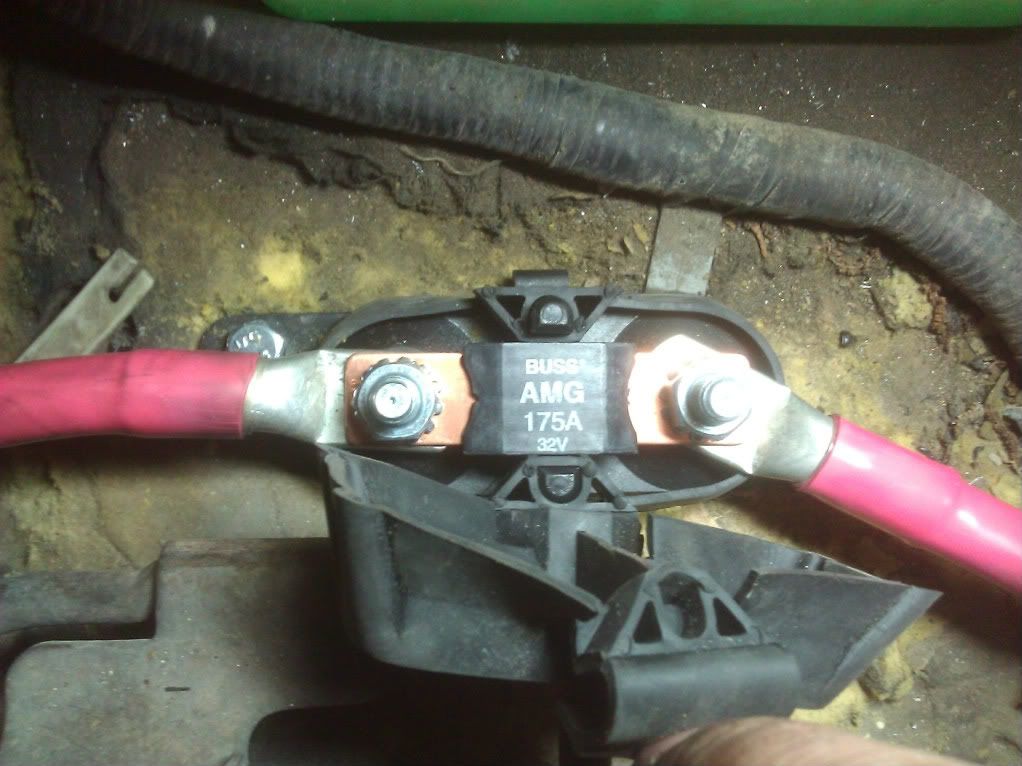
Ok, you just soldered on a 5/16" ring terminal on your charge cable to connect to the fuse holder. So now you should have one cable running from the alternator to one side of the fuse holder. All that's left is to build one more cable to go from the other side of the fuse holder, to the starter solenoid or you can go straight to the passenger side battery if you want. I went to the solenoid.
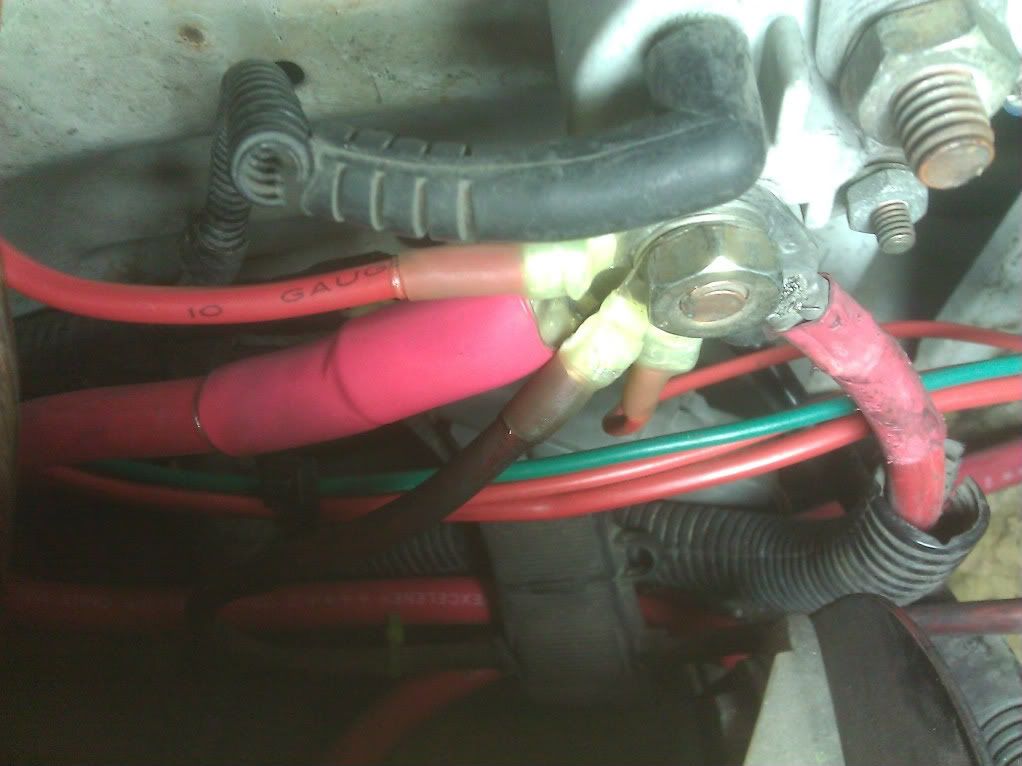
Strip one end of the cable you have left, solder on the other 5/16" terminal. Loosely attach that to the other side of your fuse holder and run the cable over to the solenoid and cut off any excess wire if neccessary. I actually had EXACTLY enough cable to go from the alt, to the fuse holder and back over to the solenoid. Got lucky I didn't need to go an extra couple inches, so pay attention to how much cable your using or get extra from RJM. Solder the 3/8" ring terminal on the solenoid side of the charge cable and put it in the truck. Put the cable in the fuse holder, fuse, then put the nuts on and tighten it down. Install the charge cable wire on the battery side of the solenoid and your done! Couple pics to wrap it up.
I have this done on 2 trucks. On my F-150, I converted it to a 3G alternator like this and wired it up the same way as I did this one. Both setups work great so far.
NOTE: BEFORE TOUCHING ANY OF THE WIRING FOR THIS PROJECT, DISCONNECT BOTH BATTERIES!!!
Here's the first picture of the new alternator, new pigtails, new charge cable, and a bag-o-parts to build the charge cable. I got everything from RJM Injection Tech — Welcome. They do mostly Ford gasser stuff, but for this project they had everything I needed.
I forgot to write down what size wrenches and sockets I used, but you will need:
- set of wrenches
- 3/8" ratchet and 1/2" breaker bar
- 3/8" socket set and 15mm 1/2" socket
- impact wrench
- propane torch(oxygen acetylene torch works really well if you turn it down and watch what your doing)
- heat gun, cigarette lighter, or anything that will shrink heat shrink
- bench vise
- drill and 3/8"? drill bit IIRC.
Now I didn't include any pics of the alternator replacement as that's really straight forward. Take the belt off, remove the wiring from the alt, take the 3 bolts off, and the alt comes right off. Swap the old pulley on the new alt. The pulley comes off really easily with an air impact. Install the alt, tighten down 3 mounting bolts, re-install belt and wiring.
Now then, here's a pic and quick run down of the 3 wire regulator pigtail on the alt. The white wire runs back over to another connector on the alt, the yellow wire runs over with the charge cable to the starter solenoid, and the green wire goes back to the battery light which goes to the ignition. SO, if your battery light goes out, you will get no charge from the alt as the igntion 12v isn't getting to the regulator.
Now, let's replace everything.
The charge cable and the yellow wire from the regulator both run together in the same loom over into a fusible link, then connect to the solenoid. I just cut both the charge cable and yellow wire back to the loom on both sides. It's a PITA to get it all out of the truck. Your not using it anymore, just leave it sitting in the loom unless you just want to pull it out. I just cut it..
OK, the old charge cable now does nothing and the yellow wire is cut back to the loom on the alternator side.
Now, I installed the new pigtails on the alt. I soldered the connections. What your going to end up doing is rather than having the yellow wire running all the way to the starter solenoid, put a ring terminal connector on it and attach it to the charge cable lug on the alternator. So, if your doing this, your attaching green back to green, white to white, yellow gets a ring terminal and attach straight to charge lug on the alternator.
We're almost done now. The only thing left is to build a new charge cable and mount the fuse holder. There are several ways of doing this.. I'm just going to show my preferred method. This is basically just 2 gauge welding lead with soldered on ring terminals using solder pellets in the connector.
When you order the charge cable kit from RJM Injection, the cable will already have one ring terminal soldered on for the alternator lug, and includes 3 other terminals, solder pellets, adhesive lined heat shrink, mega fuse holder, and 2 mega fuses. There are 3 different size ring terminals. Two terminals are 5/16" for the mega fuse, one is 3/8" for the battery or starter solenoid, and one is 1/4" for the alternator lug.
Here is a link to the charge cable kit- RJM Injection Tech — Alternator Charge Cable Kit
Since the cable comes with the alt terminal soldered on already, I put the cable on the alternator loosely and figured out where I wanted to route the cable. I routed it just like the stock wire ran. Down between the battery tray and coolant bottle. I then ran the cable over by where the bottle jack used to be and mounted the mega fuse holder there. I drilled two holes through the plastic fender well and used two small bolts to bolt down the fuse holder.
Now you figure out where you need to cut the cable in order to be able to solder on a ring terminal and bolt it to one side of the fuze holder. Cut the wire to length and solder on a 5/16" ring terminal.
Soldering on terminals with solder pellets is EASY. Strip about an 1-1 1/4" of insulation off the wire first. Put the ring terminal in a vice, and drop the solder pellet inside the terminal. Now you will need the torch.. Apply heat with the torch around the outside of the ring terminal, spread the heat around and don't use something hot enough to melt the ring terminal. Once the solder pellet melts, put the stripped wire end in the connector and pull the heat off the terminal. Hold the wire in there for about 5-10 seconds and you should be good to go. Just put heat shrink over it and install that cable in the truck. Here's a couple pics for you.
Ok, you just soldered on a 5/16" ring terminal on your charge cable to connect to the fuse holder. So now you should have one cable running from the alternator to one side of the fuse holder. All that's left is to build one more cable to go from the other side of the fuse holder, to the starter solenoid or you can go straight to the passenger side battery if you want. I went to the solenoid.
Strip one end of the cable you have left, solder on the other 5/16" terminal. Loosely attach that to the other side of your fuse holder and run the cable over to the solenoid and cut off any excess wire if neccessary. I actually had EXACTLY enough cable to go from the alt, to the fuse holder and back over to the solenoid. Got lucky I didn't need to go an extra couple inches, so pay attention to how much cable your using or get extra from RJM. Solder the 3/8" ring terminal on the solenoid side of the charge cable and put it in the truck. Put the cable in the fuse holder, fuse, then put the nuts on and tighten it down. Install the charge cable wire on the battery side of the solenoid and your done! Couple pics to wrap it up.
I have this done on 2 trucks. On my F-150, I converted it to a 3G alternator like this and wired it up the same way as I did this one. Both setups work great so far.
#2
01-03-2012, 06:03 PM


#7
01-04-2012, 07:11 AM
Post Fiend
Trending Topics
#8
01-04-2012, 11:56 AM
I think it's worth saying, the main reason I did this write up is b/c there has been some talk on here about guys wanting to upgrade to higher amp alternators. IMO if you put a higher amp alternator on your truck, you need to build a larger charge cable to carry the extra amps. So, there it is for the guys that aren't sure about doing it themselves. Thanks for the reps guys!
#9
01-04-2012, 12:16 PM
Posting Guru
Join Date: Dec 2008
Location: Maysville, Kentucky
Posts: 2,347
Likes: 0
Received 0 Likes
on
0 Posts
#10
01-04-2012, 12:31 PM
They are EXTREMELY easy to work with. Drop the solder pellet in the terminal, light the oxygen acetylene torch and turn it down as much as possible and keep the heat moving a bit while keeping an eye on the solder. When the solder is completely melted, stick the wire in and pull the heat away and hold it til the solder dries. Very, very easy and takes all of about 15 seconds to solder on one end.
#11
01-04-2012, 12:33 PM

Hotshot
They are EXTREMELY easy to work with. Drop the solder pellet in the terminal, light the oxygen acetylene torch and turn it down as much as possible and keep the heat moving a bit while keeping an eye on the solder. When the solder is completely melted, stick the wire in and pull the heat away and hold it til the solder dries. Very, very easy and takes all of about 15 seconds to solder on one end.
#12
01-04-2012, 12:45 PM
I propane torch would be perfect. I use oxy/acetylene b/c it's what I have. My propane torch has a busted striker.. A little butane torch does work, I have done it, but it takes probably a good minute to get the solder melted.
#13
01-04-2012, 12:49 PM


#15
01-04-2012, 01:05 PM