99 4x4 front end rebuild advice/suggestions/etc
#1
 10-18-2011, 11:58 PM

99 4x4 front end rebuild advice/suggestions/etc
Looks like I am going to have to do a rebuild on the front end of my truck. Never worked on a torsion bar setup. Any suggestions, advice, tricks, special/helpful tools and what not that you can add would be greatly appreciated.
It failed quickly. Been squeaking for years. Last week it started trying to turn right, always tracked perfectly smooth and straight. Then a slight vibration, then the feeling of a bent rim or axle (thump thump thump) at road speed and weird wear on the outer part of the right tire. Did a jackup and test on it and there was major up and down play in the right front lower ball joint.
It failed quickly. Been squeaking for years. Last week it started trying to turn right, always tracked perfectly smooth and straight. Then a slight vibration, then the feeling of a bent rim or axle (thump thump thump) at road speed and weird wear on the outer part of the right tire. Did a jackup and test on it and there was major up and down play in the right front lower ball joint.

#3
10-21-2011, 06:44 AM
Freshman User
Join Date: Sep 2011
Location: Culpeper, VA
Posts: 44
Likes: 0
Received 0 Likes
on
0 Posts
I'm about to do the same thing in the next coming month... the only advice I can give is to get a manual, and read it before you start. That way you're not half way through it and realize you're missing a tool or something. It doesn't hurt to do a quick search on YouTube as well. There's lots of informational videos and how-to's. Just make sure you don't follow some a** nugget who cuts corners and tries to do it half a**. Good luck, and if you find anything out, let me know. Like I said, I'm going to have to replace both sides of my ball joints and who knows what else. I've got a pretty bad squeak, and I'm not liking it too much.
#4
10-21-2011, 09:35 AM
I'm about to do the same thing in the next coming month... the only advice I can give is to get a manual, and read it before you start. That way you're not half way through it and realize you're missing a tool or something. It doesn't hurt to do a quick search on YouTube as well. There's lots of informational videos and how-to's. Just make sure you don't follow some a** nugget who cuts corners and tries to do it half a**. Good luck, and if you find anything out, let me know. Like I said, I'm going to have to replace both sides of my ball joints and who knows what else. I've got a pretty bad squeak, and I'm not liking it too much.
To me it looks like I can simply unscrew the adjusters now that its up in the air (after marking the adjuster bolt depth) and the tension will come off the torsion bars. Sounds to easy to me!
#5
10-22-2011, 12:24 AM

You don't need to mess with the torsion bars to rebuild the front end, unless you intend on removing the entire A-frame (which isn't required to just replace the ball-joints). For the rest of the ball-joint tools, just go to an O'Reilly store or something similar. Most of these places will lend you a professional puller/presser set for free. They charge your credit card the cost of the set ($250 or whatever), and then refund the full amount when you return the tools. Don't lose the reciept! I did this last year when I rebuilt the front end on my 2004 4x4.
#7
10-23-2011, 05:07 PM
The new title of this thread is "TORSION BARS, EASIER TO WORK ON THAN COIL SPRINGS"
They really are. I jacked truck up, marked the adjustment bolts, backed those off. Took off the torsion bar box (4 bolts for each one on each side), used a jack to take pressure off the stop bar, slipped it out, let jack down, pulled bar out. Just that simple. Will post some pictures eventually. Its really easier than pulling coil springs. Once truck is up in the air it literally takes less than 5 min per side (assuming you use an impact gun).
edit:
@ reddog
Am doing the full control arms upper and lower. those inner bushing/pivots might be making some of the squeeking that I have been dealing with. Figure to get it all the first time.
Trending Topics
#8
10-25-2011, 06:15 PM
Well so far so good. Still have not looked at/pulled the drivers lower control arm, but the rest of them all have 1/32 to 3/32 inch play in them. 
With how its going so far would qualify this as an easy project compared to some stuff I have attempted. Doing the work after I get out of work and tonight replaced the pass side upper control arm and lower control arm in about 20 min.
Question for the group. What is involved in replacing the inner tie rods? They look like they are buried under boots and are part of the rack? Not real sure how to get at them at this point. And those outer tie rods are NOT wanting to unscrew. Am soaking them in the wd40.
#9
10-26-2011, 04:32 PM
Tools to look out for in the project. Going to make a list and then edit it. Mainly stuff thats not as common or really makes things easier.
13/16ths socket
13/16ths box end wrench
breaker bar
impact gun
angle grinder (for end links if rusted on/need replacing)
floor jack (for unbinding the torsion bars)
2lb hand sledge.... multiple uses
Pipe wrench (for loosening tie rods, worked better than the wrenches)
grease gun to grease new joints
also, I swear there are metric and SAE stuff on there....or just very poorly made parts...both are possible.
Replacement lower control arm ball joints on mine were 1 1/16. So dont assume the replacement stuff will be the same size. Maybe just saying a set of big sockets (12/16ths to 1 1/8th) just to make sure.
Suggestion, start out by jacking truck up, jack stands, remove/disconnect sway bars and shocks at the lower control arm. THEN remove the torsion bars. When going back together, complete the job, then torsion bars, then sway bar end links and shocks. The extra travel you get with the sway bar end links and shocks disconnected is significant and makes the torsion bar removal/install much easier.
... to be continued
#10
10-28-2011, 02:33 AM
(note, some of the pics are from the drivers side and were reversed for ease of viewing, they just came out better than the ones from the passenger side)
Start by lifting vehicle, jack stands and wheel chocks just like your dad always told you to.
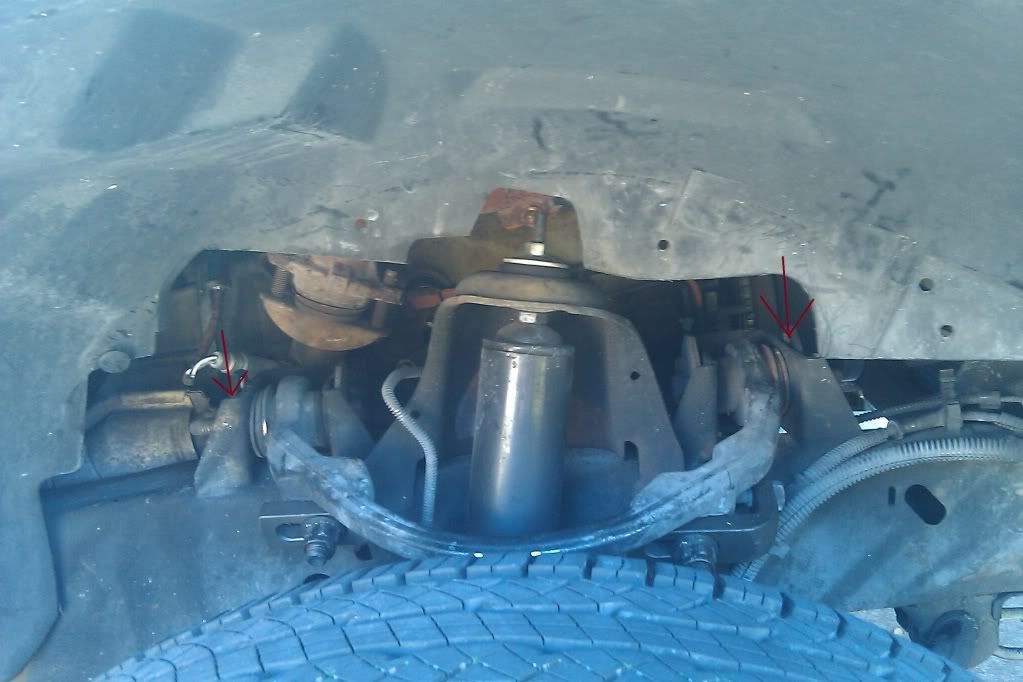
Next up, disconnect the sway bar end links and shocks at the lower control arm. Now move on to torsion bars.
Look under, thats the torque box
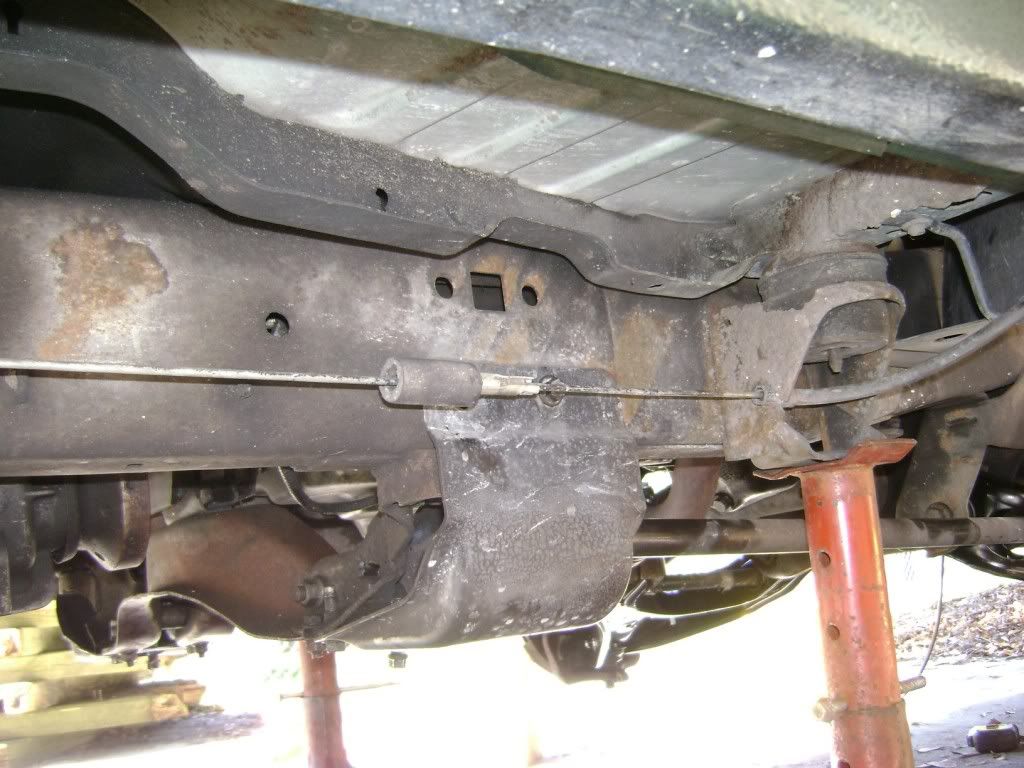
closer look, it needs to come off first. You also need to back off the tension screw. You will need to mark it so you know how far to screw it back in when done. I used white spray paint the day before. You can take the adjuster screw all the way out at this point
torque box off, tension bolt sicking down (painted as you can see)
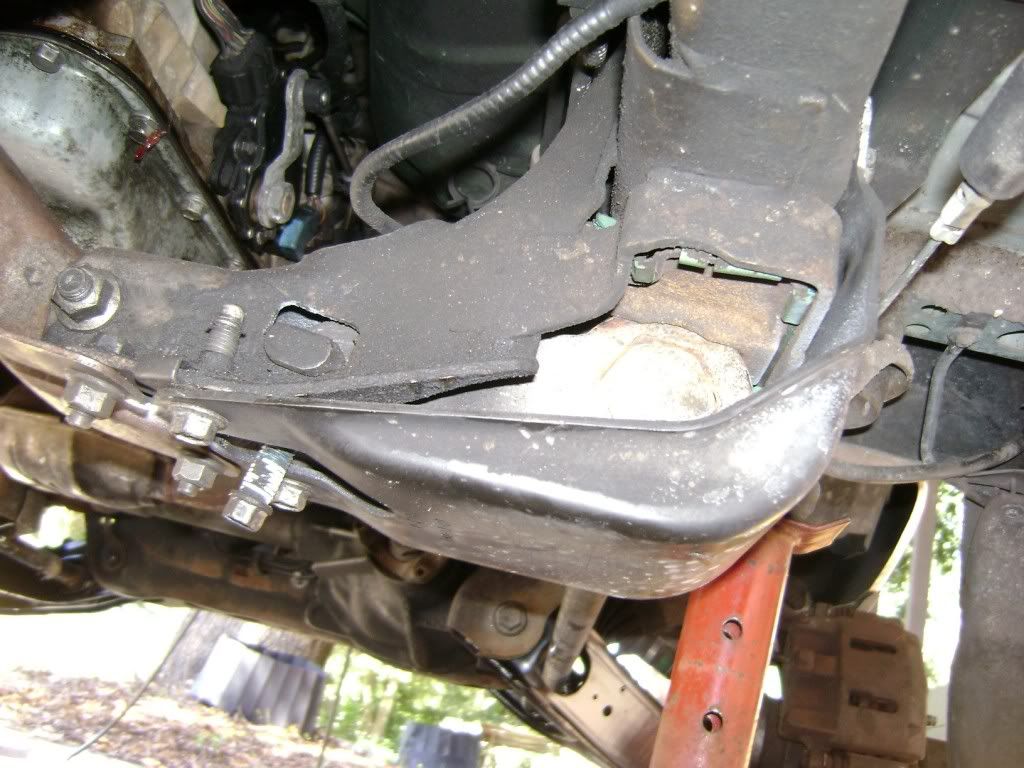
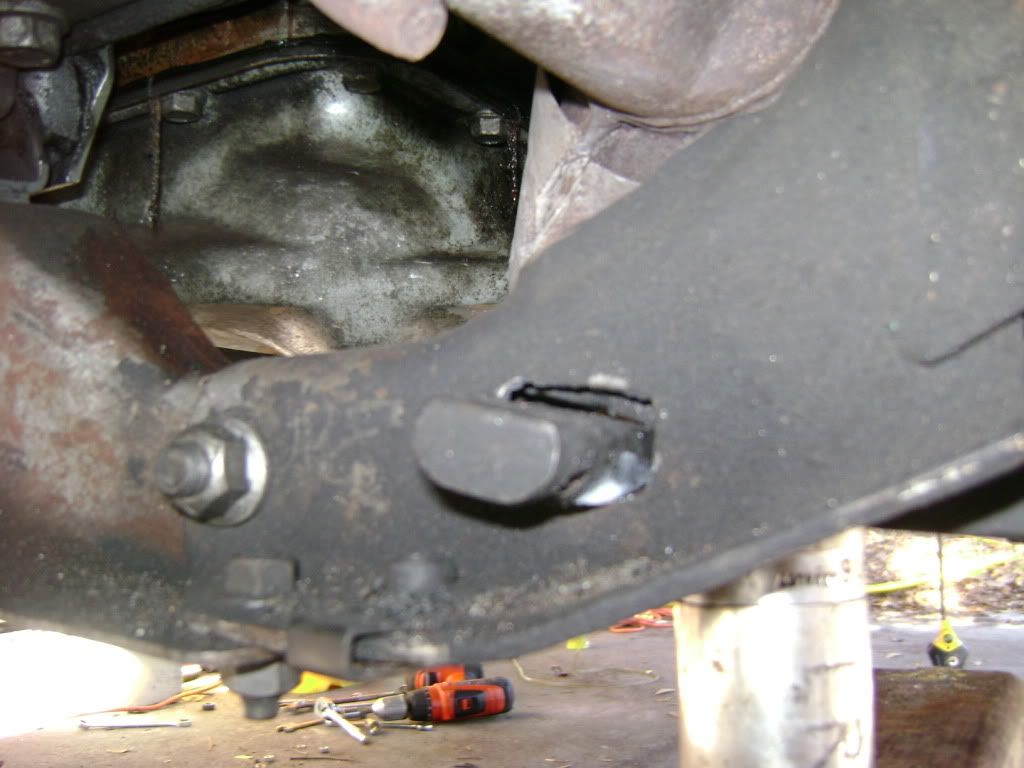
I used a jack, metal cross piece and a big socket that allows the arm to push up into the channel. WARNING, IF WHILE JACKING THE VEHICLE STARTS TO LIFT YOU ARE DOING IT WRONG. Watch those jack stands and ANY lift on the vehicle. If done properly it wont lift it, just the torsion bar "arm" or whatever you call it. In this picture below, I already removed the "key", its the part the adjuster screw screws into. See next picture to get an idea of what it looks like coming out.

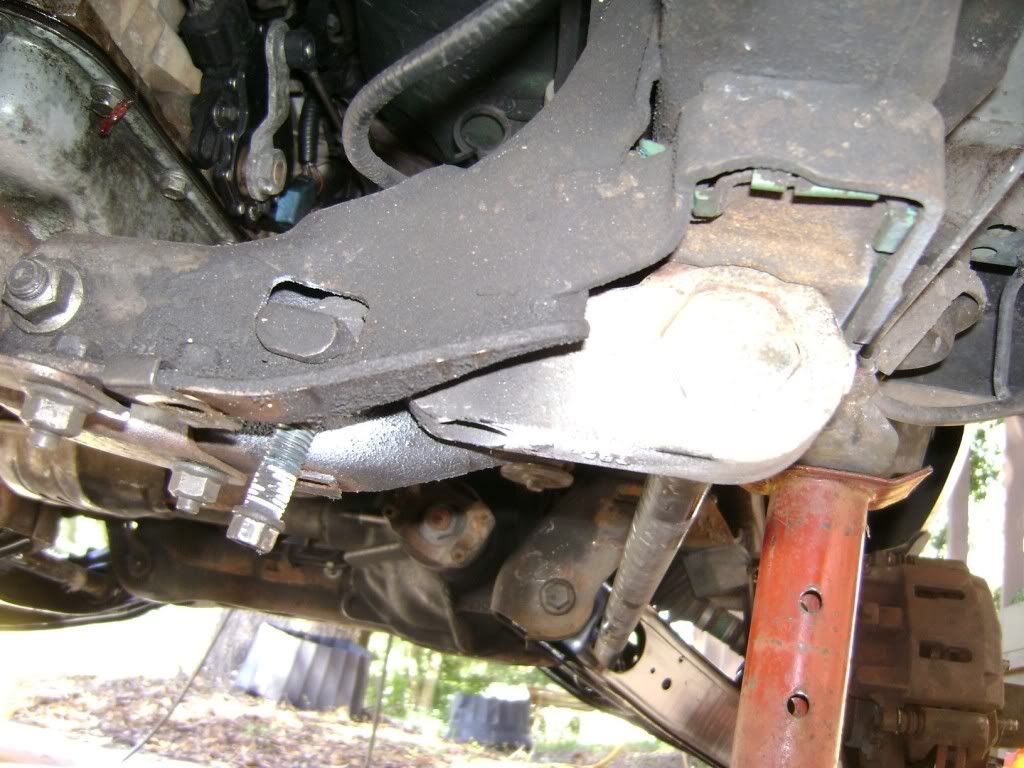
Once tension is off, just pull this little cross piece out.
drop the jack and the torsion bar is now ready to come out. You might need to use a drift and that big hammer I mentioned above from the front of the vehicle.
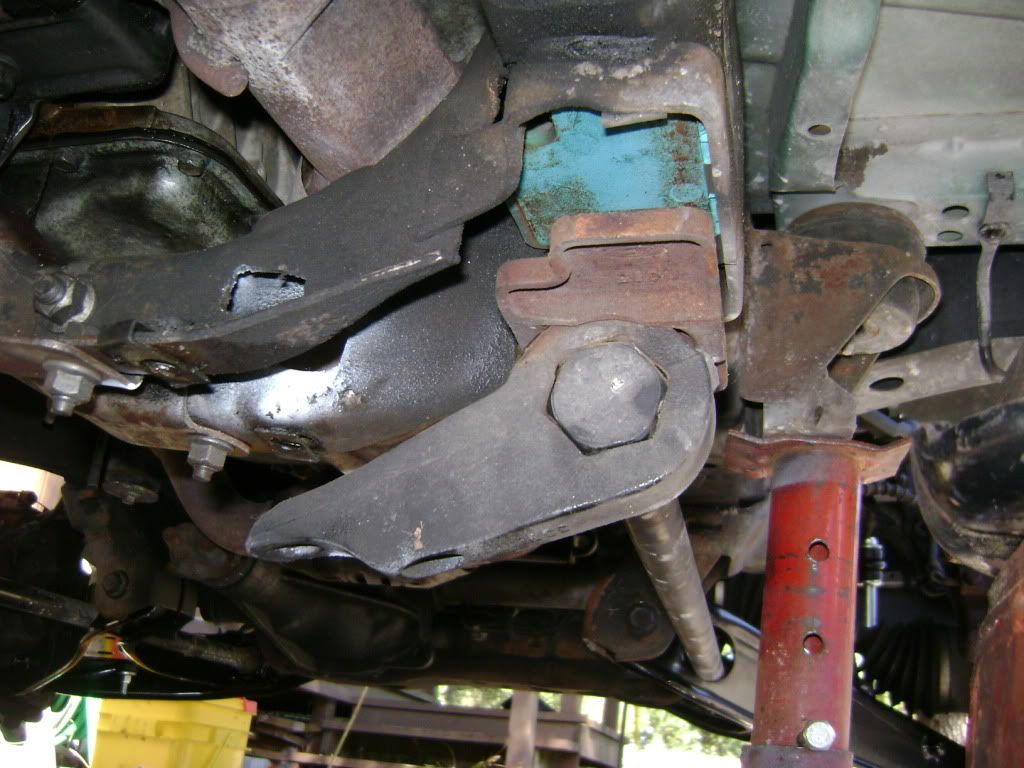
The blue pads you see in the last picture were crumbling on my truck. I would have considered replacing them, but honestly wanted to get done. Have no idea how much they cost, but its something else to keep an eye out for.
Start by lifting vehicle, jack stands and wheel chocks just like your dad always told you to.
Next up, disconnect the sway bar end links and shocks at the lower control arm. Now move on to torsion bars.
Look under, thats the torque box
closer look, it needs to come off first. You also need to back off the tension screw. You will need to mark it so you know how far to screw it back in when done. I used white spray paint the day before. You can take the adjuster screw all the way out at this point
torque box off, tension bolt sicking down (painted as you can see)
I used a jack, metal cross piece and a big socket that allows the arm to push up into the channel. WARNING, IF WHILE JACKING THE VEHICLE STARTS TO LIFT YOU ARE DOING IT WRONG. Watch those jack stands and ANY lift on the vehicle. If done properly it wont lift it, just the torsion bar "arm" or whatever you call it. In this picture below, I already removed the "key", its the part the adjuster screw screws into. See next picture to get an idea of what it looks like coming out.
Once tension is off, just pull this little cross piece out.
drop the jack and the torsion bar is now ready to come out. You might need to use a drift and that big hammer I mentioned above from the front of the vehicle.
The blue pads you see in the last picture were crumbling on my truck. I would have considered replacing them, but honestly wanted to get done. Have no idea how much they cost, but its something else to keep an eye out for.
#11
11-02-2011, 10:30 PM
Ok, adding to this. Went to get aligned today and turns out that you have to change the plates in the upper control arms. Mine had a cammed washer on one side and a wedge on the other to set it to a factory alignment. The wedge has to be removed and a cam washer put in its place.
You need 2 per side.

from rock auto they are $15 per pair (napa was 21 and advance was 16). They are called "Caster Camber Cam Kit; Caster Camber Cam"
this is the old/new with the stock caster plate on the left and the replacement cam washers on the right.
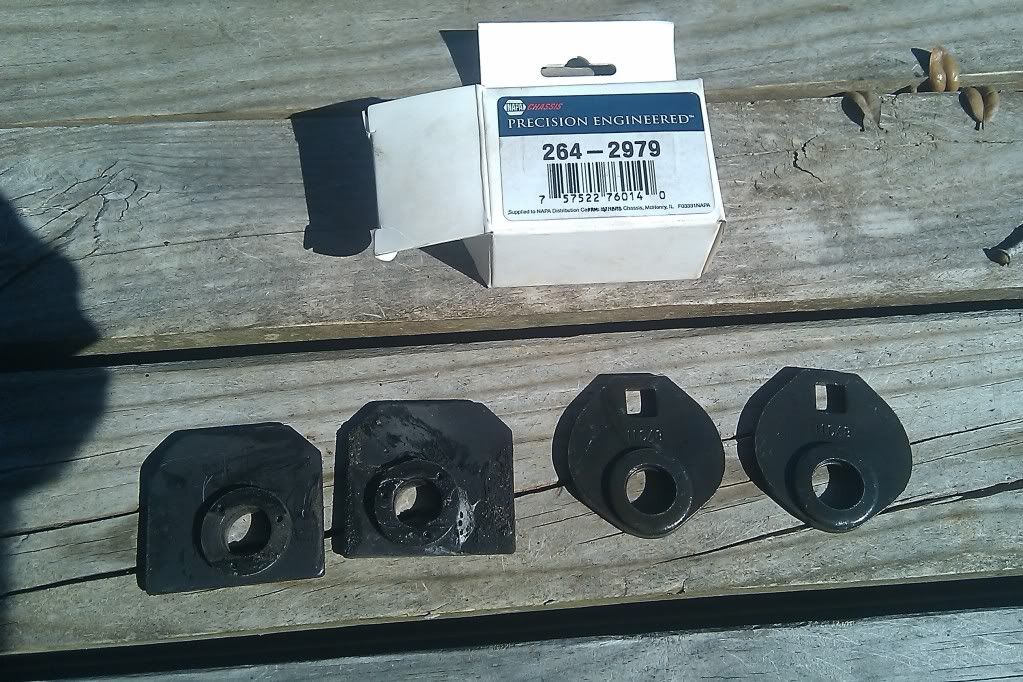
Red arrows show where these go on the outside of the mounts.
EDIT,
Am also going to add angle grinder/saw to remove the sway bar end links. Mine were rusted and the sleeve was stuck so they would not come off. When I went to remove them to do the work the rubber crumbled. If you are getting your parts locally (and can take them back easily) add them to your list and if you dont end up needing them so much the better.
You need 2 per side.
from rock auto they are $15 per pair (napa was 21 and advance was 16). They are called "Caster Camber Cam Kit; Caster Camber Cam"
this is the old/new with the stock caster plate on the left and the replacement cam washers on the right.
Red arrows show where these go on the outside of the mounts.
EDIT,
Am also going to add angle grinder/saw to remove the sway bar end links. Mine were rusted and the sleeve was stuck so they would not come off. When I went to remove them to do the work the rubber crumbled. If you are getting your parts locally (and can take them back easily) add them to your list and if you dont end up needing them so much the better.
#12
11-24-2011, 12:56 AM

First thing is do not mess with the torsion bars to change the ball joints
Jack on the lower control arm and the keeps the pressure on the bar and nothing will fly off and hurt anyone. This is the way to check the ball joints also if you jack on the frame or cross member it will put the ball joints in a bind and appier no play. As for the wheel sitting in check the bearings. If 1 balljoint is bad replace all 4 it will save you a lot of headaches in the long run. The bushings on the lower control arms you should be able to press the out and replace the saving alot of green backs. Not as easy as replacing the whole control arm but if you have the time to spend and enjoy learning do it. As far as the inner tie rod Go to a parts house that rents or loans tools and get a inner tie rod tool the only way to do this without a headache take off the boot and unscrew the old one and put the new one in.
You will be a lot smarter when your done with this.
If you go to a autozone or advanced auto you will be doing this in a year or so if the roads are like the Illinois roads
Remember you get what you pay for
#13
12-27-2011, 08:04 PM
I replaced the whole lower control arm. Through rock auto it was not much more for the whole control arm with ball and bushings installed. I cannot speak to the ease/difficulty of keeping the lower control arm attached and the torsion bars in place when it comes to the whole job.
Mainly wanted to update this with an unexpected side effect to my rebuild. Seems I am getting between 1 and 2 MPG better gas mileage since the rebuild. At first figure I did the math wrong, but seems to be consistent.
#14
09-16-2013, 05:09 PM

I have a few questions, but mainly I'm wondering about removing the torsion bar without any special tools. According to the writeup, it looks like you:
1. removed the torsion bar box, then
2. backed off the adjustment screw after marking it, then
3. jacked up the control arm to release tension on the bar, then
4. removed the adjuster "cross piece", then
5. lowered the jack and removed control arm.
Do I have the sequence correct? Did I leave anything out? What about re-installing the bar...is it just a matter of jacking up the newly-installed arm to get it in proper position? I'm a little concerned about putting it back together properly.
TIA
#15
09-17-2013, 10:11 PM
Yeah, I think so. Like I posted, it was easier to replace the entire control arm with the prices from rock auto. If doing just the ball I dont know about alignment, but I eventually found out the adjustment cam washer/kit I was sold was wrong. They need to be completely round, not like the ones that I pictured that were kinda rounded diamonds.
Going back together is just opposite of the disassembly. reinstall torsion rod, jack up into place, install cross piece/screw adjuster, screw back into basic adjustment, put back on box. Simple.
Going back together is just opposite of the disassembly. reinstall torsion rod, jack up into place, install cross piece/screw adjuster, screw back into basic adjustment, put back on box. Simple.

Thread
Thread Starter
Forum
Replies
Last Post
njfirefighter15
6.0L Power Stroke Diesel
17
08-27-2015 09:39 PM