
automatic shifter rebuild
#16
 10-05-2011, 11:29 PM


automatic shift rebuild
The first poster was not fooling with kid stuff, he was serious, and so am I, if you want to fool around go somewhere else. Don't waste our time with your BS!!! The moderator should find another place for your BS,I would think. If not don't was our time with it, I don't want to read any more of it from you!
#17
10-05-2011, 11:35 PM

I had a simular problem after replacing the prdl. Everything is tight, but finding the right combination is a bear. Everything will work fine for a week, then it won't start, until I put pressure on the shifter. Then I adjust the prndl and everthing is fine......one of these days I will get it perfect. How they get this to work on the line is anyones guess.
Check out my links in this post, that should help, I would bet that your torx screws are loose or sheared, I had one sheared off. https://www.ford-trucks.com/forums/1...l#post10890326
#18
10-05-2011, 11:43 PM
The first poster was not fooling with kid stuff, he was serious, and so am I, if you want to fool around go somewhere else. Don't waste our time with your BS!!! The moderator should find another place for your BS,I would think. If not don't was our time with it, I don't want to read any more of it from you!
That being said, here's a quarter, put it towards a sense of humor!

The following users liked this post:
#19
10-05-2011, 11:50 PM
The moderator has seen the whole thread and proffers that there is nothing BS or offensive in it. Folks on here don't take things as being deadly serious all of the time. We all have a sense of humor and try to convey that through the use of these 


 and so on.
We are all good here so carry on and relax.
and so on. We are all good here so carry on and relax.
The following users liked this post:
#20
10-06-2011, 08:08 PM
Ok. a pic is worth a thousand words. someone please take a picture of these screws under the dash so many has commented on. I have looked all under the dash and have not located them. I am thinking maybe I am just missing them. I fixed the two bushings under the 1/2 clamps that I had to drop the whole colum to get at. But I still can't locate the other 2 that you are supposed to be able to access from under the dash. I think that may stll be my problelm I stll cant get it into 1st and have to wiggle it sometimes to get it to start in park.
#21
10-06-2011, 09:13 PM
#22
10-07-2011, 05:13 PM
I have almost got this thing fixed. Thanks for the picture but I think you have the wrong screws circled. they are up a bit higher I am thinking. anyway mine were tight. I have found out the slop I am getting is at the transmission itself. there is a white plastic slide clip that attaches to a black plastic piece with really fine teeth that slide together to make the fine adjustment. Mine is not in the teeth and just let the linkage slide back and forth with about 1 inch of play that is transfered up to the lever on the column to the shifter lever. When I figure out how to make the adjustment on this linkage on the tranny I will have it licked. thanks if anyone knows how to properly adjust the linkage I am all ears. thanks scott.
#23
12-26-2011, 10:06 PM
Laughing Gas
You've probably got it adjusted by now, but for those doing the adjustment of the main shift cable and not the indicator cable here's the procedure according to my oh so great haynes manual (cough, cough no sarcasm at all... )
)
Put trans shift lever into drive. Undo adjustment clip on trans shift lever and move lever two detents forward (I'm guessing 2 and 1st gear) and then back to drive and reattach clip.
I had to have the wife stay up in the cab and make sure the lever stayed in the "D" position.
Before I tried to adjust my shifter it was pretty tight and precise already. My truck is a 01 F250 with the 4R100. The reason I tried to adjust was to get my truck to shift into first. After adjustment it still won't and it's a a bear to run through the detents on the transmission with the cable still attached even if you have the adjustment clip in the "up" and loose position. I'd like to know if the trans sans shifter cable will run through all the gears.
I plan on removing the cable and running the trans through the gears to see if they'll engage. I'll also jack up the rear and add blocks to the front ones and run it through with the shifter and by the trans lever alone. Really frustrating.
I'm also going to check under the dash at all the items that were previously mentioned in the previous posts.
I beg for the days of rods and levers and NOT cables. My 67 Galaxy has rods and it was super easy to upgrade it to Heim joints to ease the shifting and make it more precise when I upgraded the trans. Not to mention finding the bushings in Granger to replace the ones that disintegrated.
)Put trans shift lever into drive. Undo adjustment clip on trans shift lever and move lever two detents forward (I'm guessing 2 and 1st gear) and then back to drive and reattach clip.
I had to have the wife stay up in the cab and make sure the lever stayed in the "D" position.
Before I tried to adjust my shifter it was pretty tight and precise already. My truck is a 01 F250 with the 4R100. The reason I tried to adjust was to get my truck to shift into first. After adjustment it still won't and it's a a bear to run through the detents on the transmission with the cable still attached even if you have the adjustment clip in the "up" and loose position. I'd like to know if the trans sans shifter cable will run through all the gears.
I plan on removing the cable and running the trans through the gears to see if they'll engage. I'll also jack up the rear and add blocks to the front ones and run it through with the shifter and by the trans lever alone. Really frustrating.
I'm also going to check under the dash at all the items that were previously mentioned in the previous posts.
I beg for the days of rods and levers and NOT cables. My 67 Galaxy has rods and it was super easy to upgrade it to Heim joints to ease the shifting and make it more precise when I upgraded the trans. Not to mention finding the bushings in Granger to replace the ones that disintegrated.
#24
01-15-2012, 12:26 PM

My 2002 7.3l with 195k miles had the same super sloppy PRNDL shifter, so I bought all the replacement parts when I bought the remanufactured auto tranny from FURD.
After I changed the transmission, the PRNDL shifter was SO much more precise. So much so that I have held off on changing the shift tubes and bushings.
My guess is, the transmission-proper also plays a roll in this.
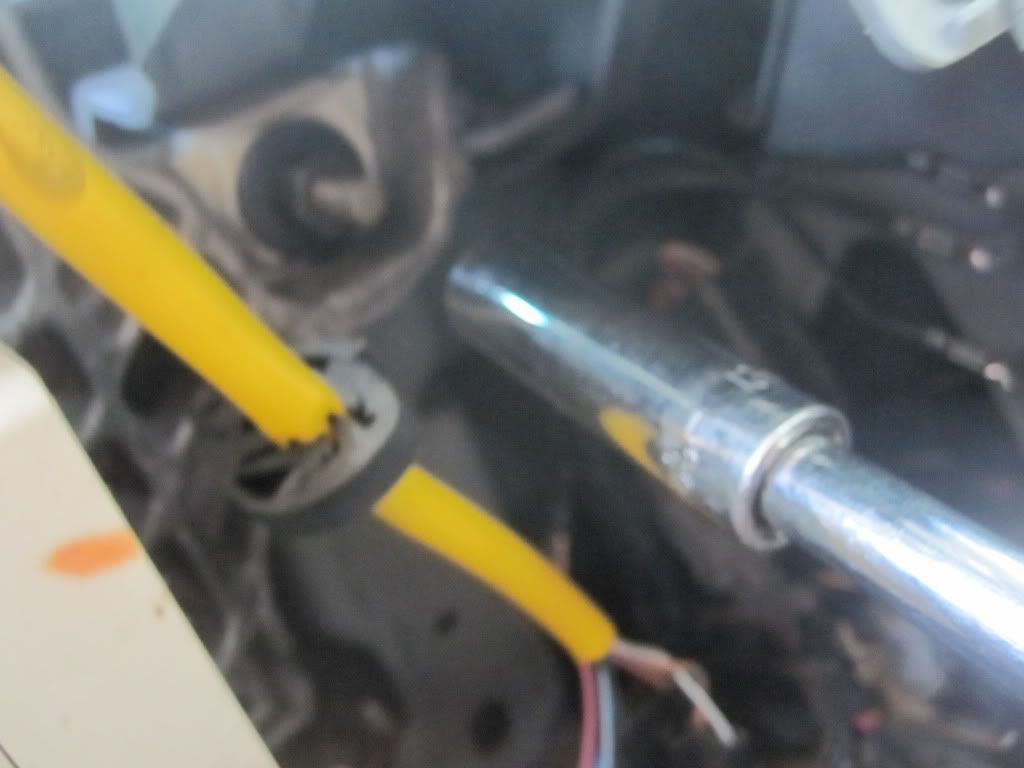
I did not make any cable adjustments on the PRNDL shifter in the cabin when changing the tranny, however the linkage to the shift lever on the tranny has a yellow plastic connector which can be adjusted to draw the cable tighter. I THINK. I appears to have adjustability.
I will take some pics of the steering column as I repair it and post.
Thanks for the help guys.
After I changed the transmission, the PRNDL shifter was SO much more precise. So much so that I have held off on changing the shift tubes and bushings.
My guess is, the transmission-proper also plays a roll in this.
I did not make any cable adjustments on the PRNDL shifter in the cabin when changing the tranny, however the linkage to the shift lever on the tranny has a yellow plastic connector which can be adjusted to draw the cable tighter. I THINK. I appears to have adjustability.
I will take some pics of the steering column as I repair it and post.
Thanks for the help guys.
#25
01-15-2012, 12:32 PM
Parts from the Ford dealer were three times or more as much as aftermarket.
The shift tube and shaft and nylon bushings could have been ordered for $38.00 aftermarket.
The 1/2 clamp which I think can only be order from Ford cost $17.00 and it is a casting also, should be in my opinion, $5.00 tops.
The shift tube and shaft and nylon bushings could have been ordered for $38.00 aftermarket.
The 1/2 clamp which I think can only be order from Ford cost $17.00 and it is a casting also, should be in my opinion, $5.00 tops.
#26
04-11-2012, 11:15 AM
Thanks for the PDF. I converted to JPEG files so I could post online for all to make use of:
http://photobucket.com/shifttubeandbushingRandR
Note that these instructions are for 2003 Excursion and F350 but should be same for all our model years.
Hope it helps. Im about to do mine this weekend...will try remember to take pics.
http://photobucket.com/shifttubeandbushingRandR
Note that these instructions are for 2003 Excursion and F350 but should be same for all our model years.
Hope it helps. Im about to do mine this weekend...will try remember to take pics.
#27
04-16-2012, 04:44 PM
I am using Black Angus's excellent write up and including some pics from the install I did this weekend on my 2002 7.3L.
Its an easy, stress free and fun repair guys. Dont sweat it at all. Will take a few hours.
My truck has 200k miles and a new tranny. The new tranny helped with PRNDL shift accuracy...a lot!...but it wasnt perfect.
Following the instructions, I took pics as I went.
First I took the large panel on the bottom of the dash board off (4 plastic screws, just turn them 90 degrees), as you would to access the fuse box.
Then I took out the 3 phillips head screws from the bottom of the steering column cover (#2 phillips) to remove the plastic cover.

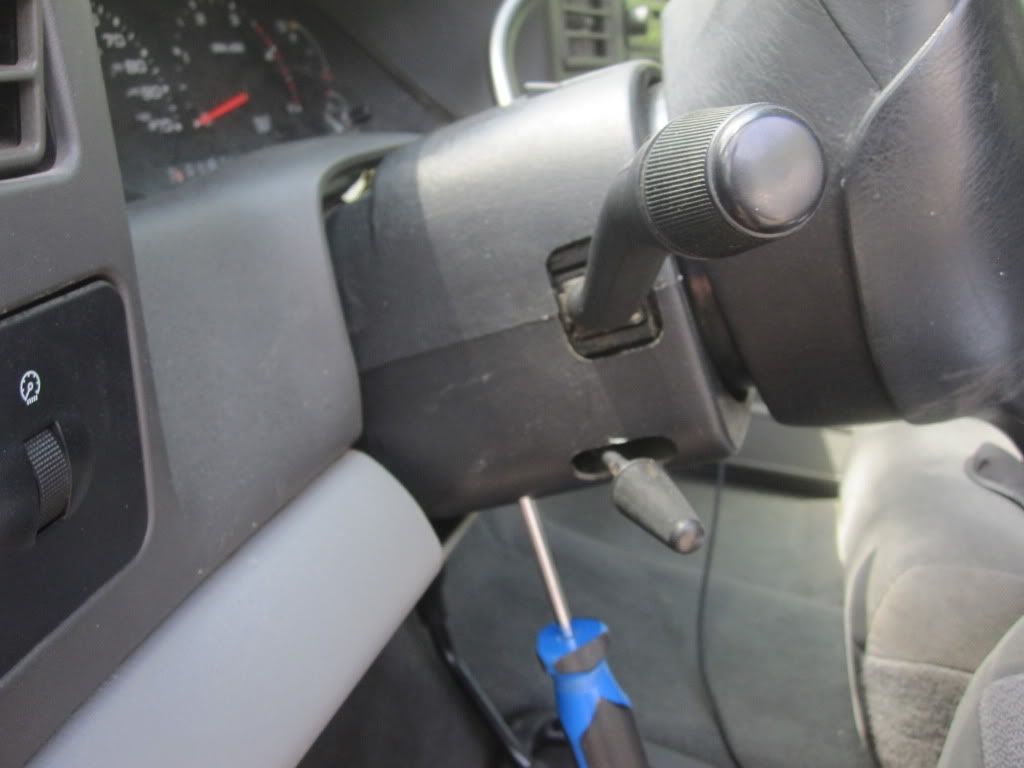
Then unscrewed the tilt wheel lever.....just like a screw....very easy.
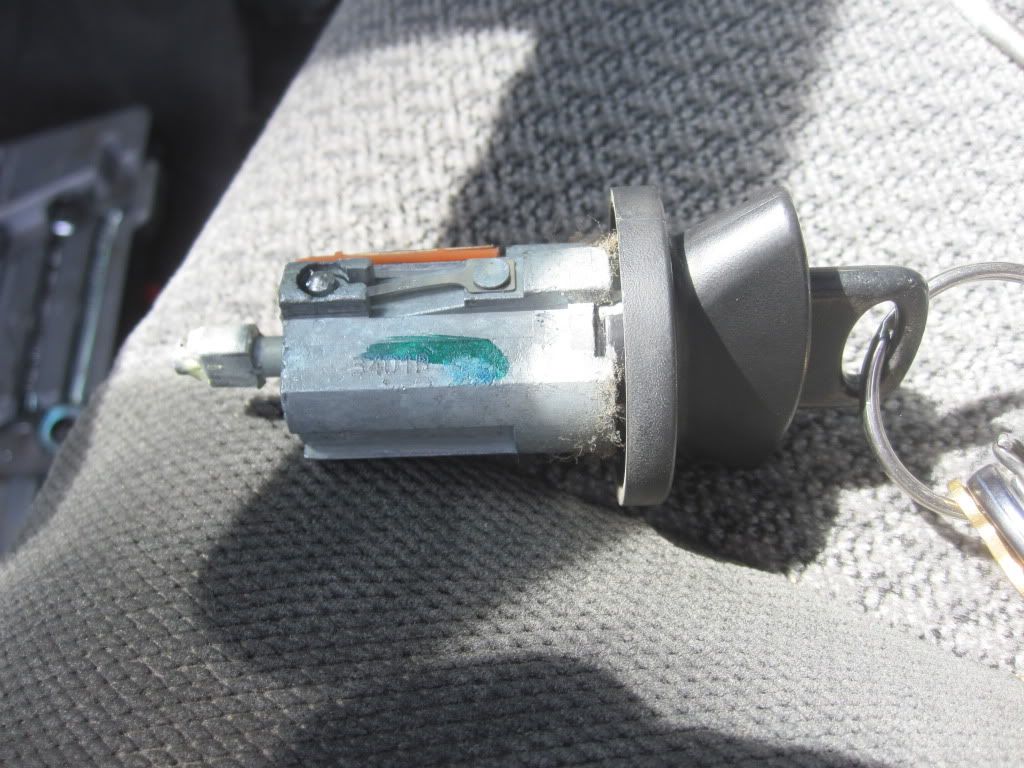
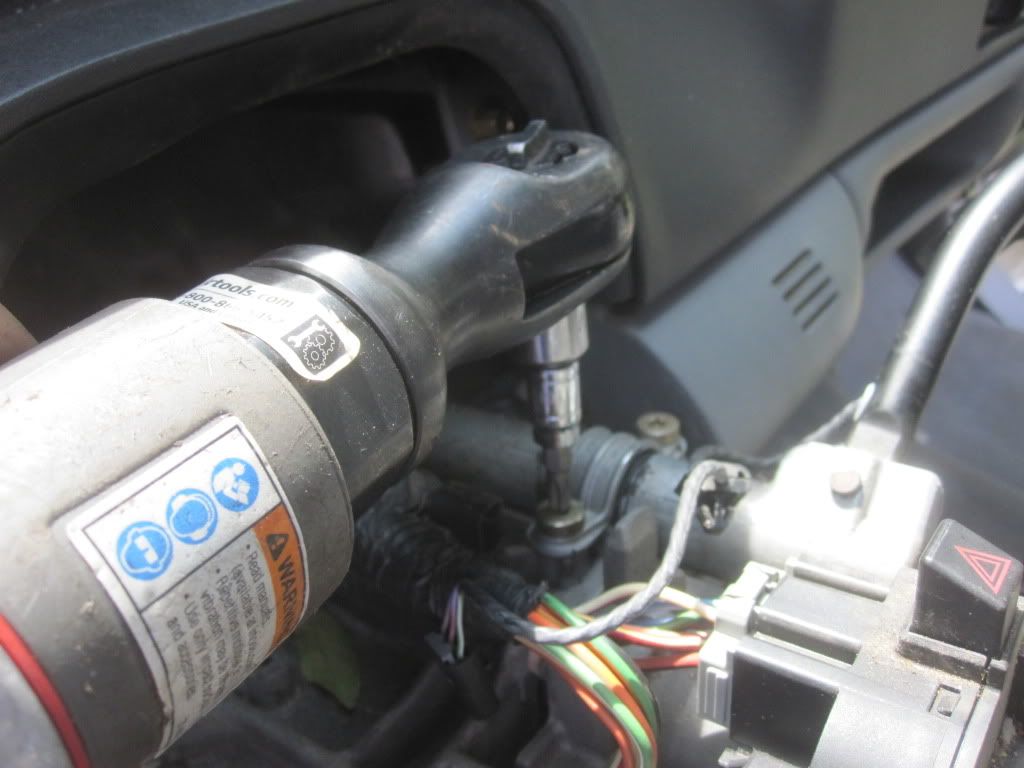
Next is the ignition switch. Under the ignition switch there is a detent ball that you have to press in to release the ignition switch to take it out. The ignition MUST BE IN THE ON POSITION to be able to push the detent ball all the way in!
You push the detent ball and the SOB comes sliding right out.

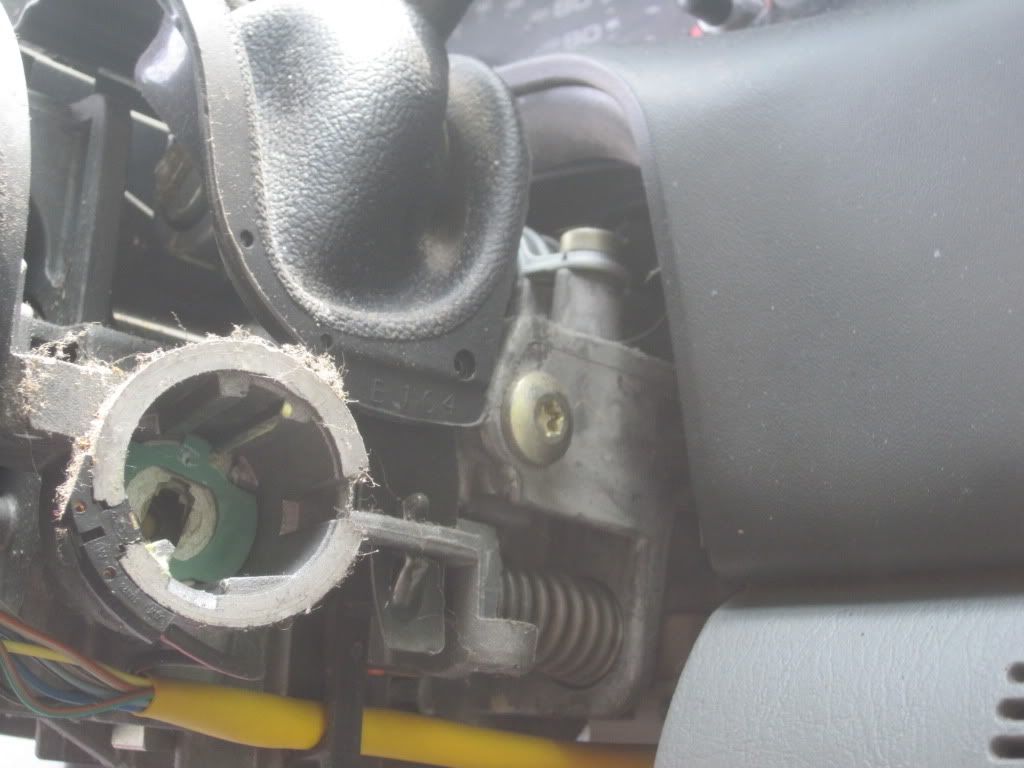
Now with the ignition switch removed you can lift the top plastic cover over the shift lever. After you lift the cover off, put the ignition switch back in and turn it to the off position so you dont run your battery low with all the interior lights on.
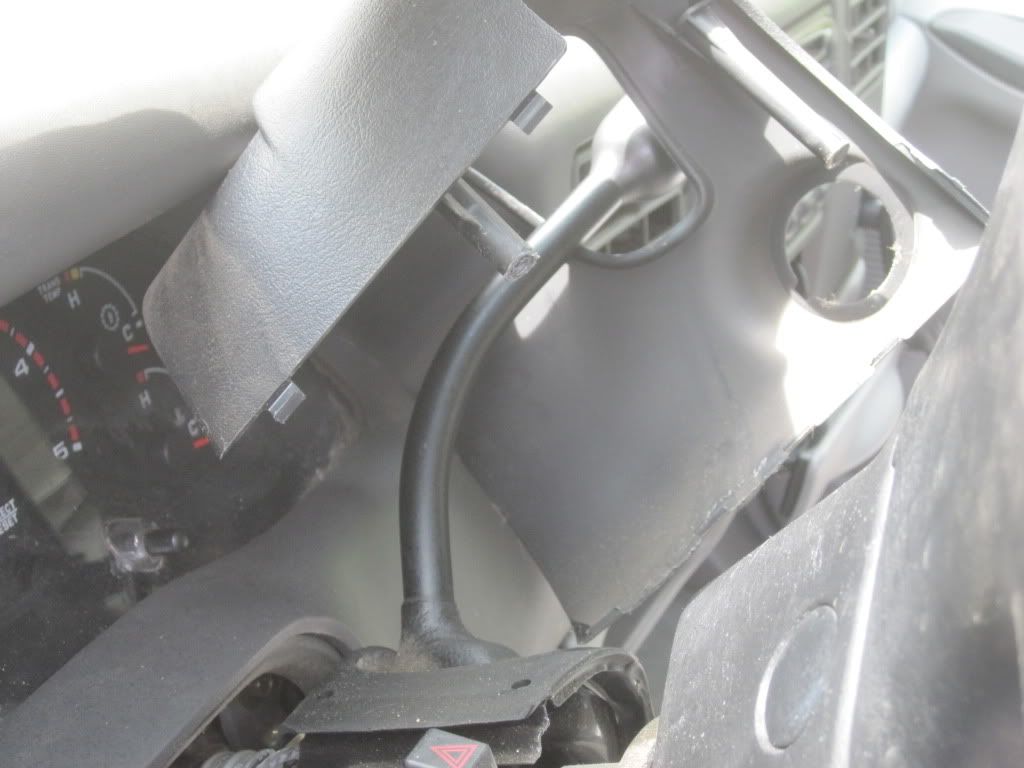
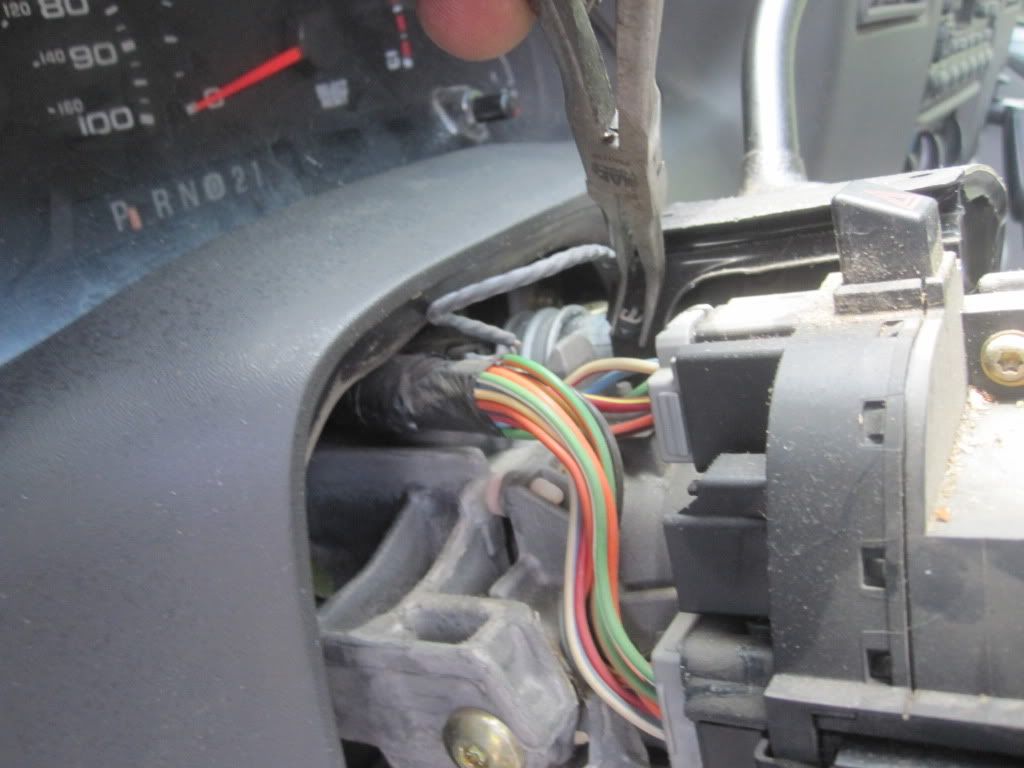
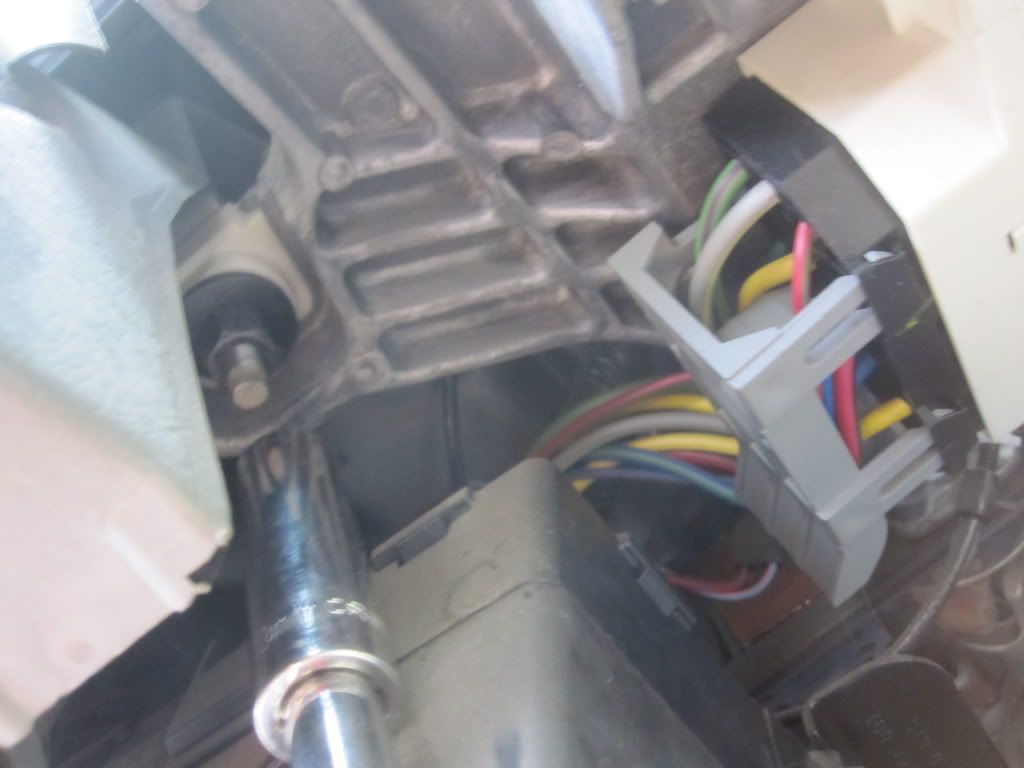
The shift lever has rubber boot on it. There is also an electrical harness attached to the rubber boot which leads to a connector. Lift up the retainer clip of the connector that holds it in and pull it out.


Then lift up or pry up the (2) retaining clips of the rubber boot plus the little black clip that holds the little wiring harness in place (see pic below) and then remove the entire boot.
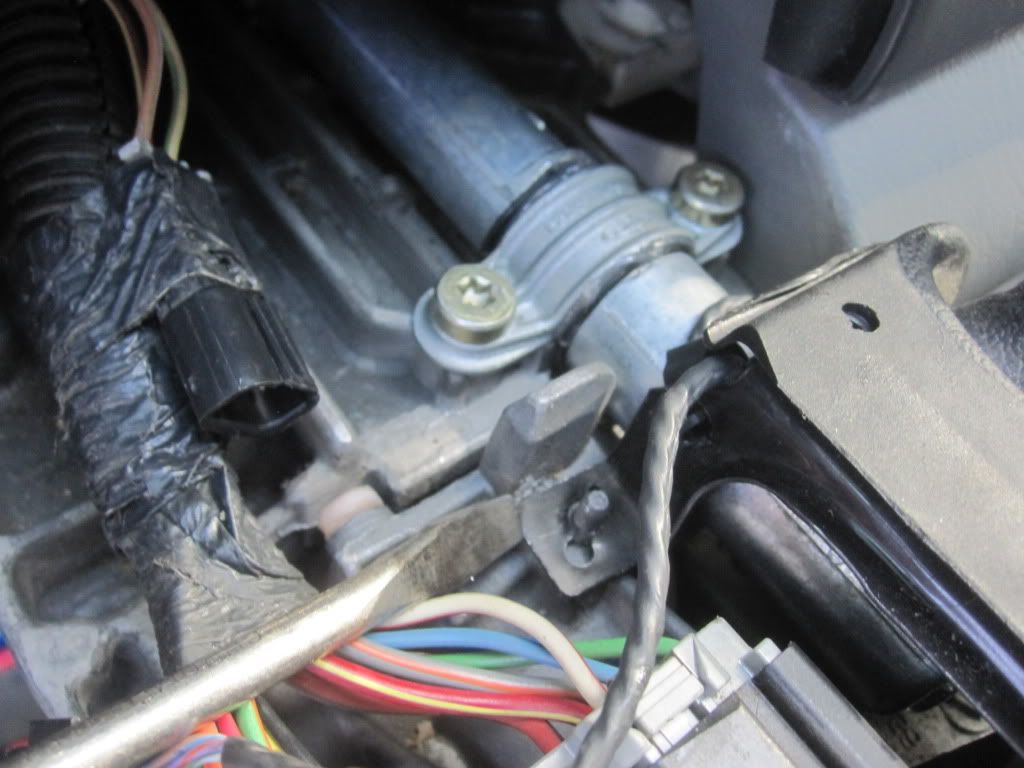

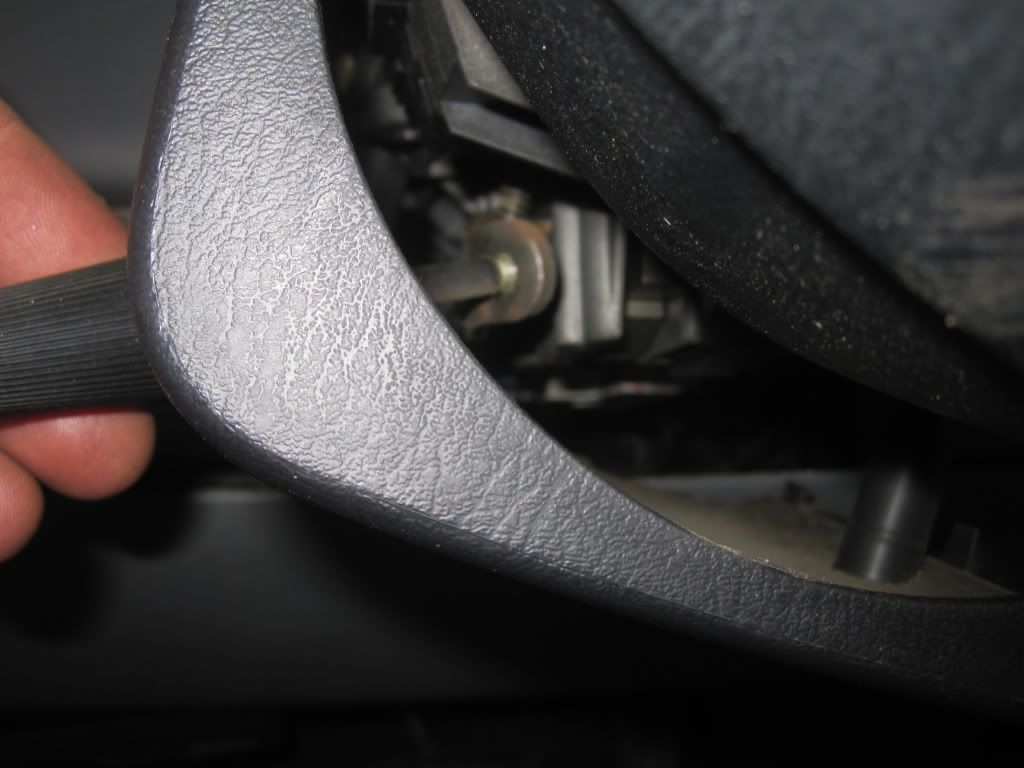
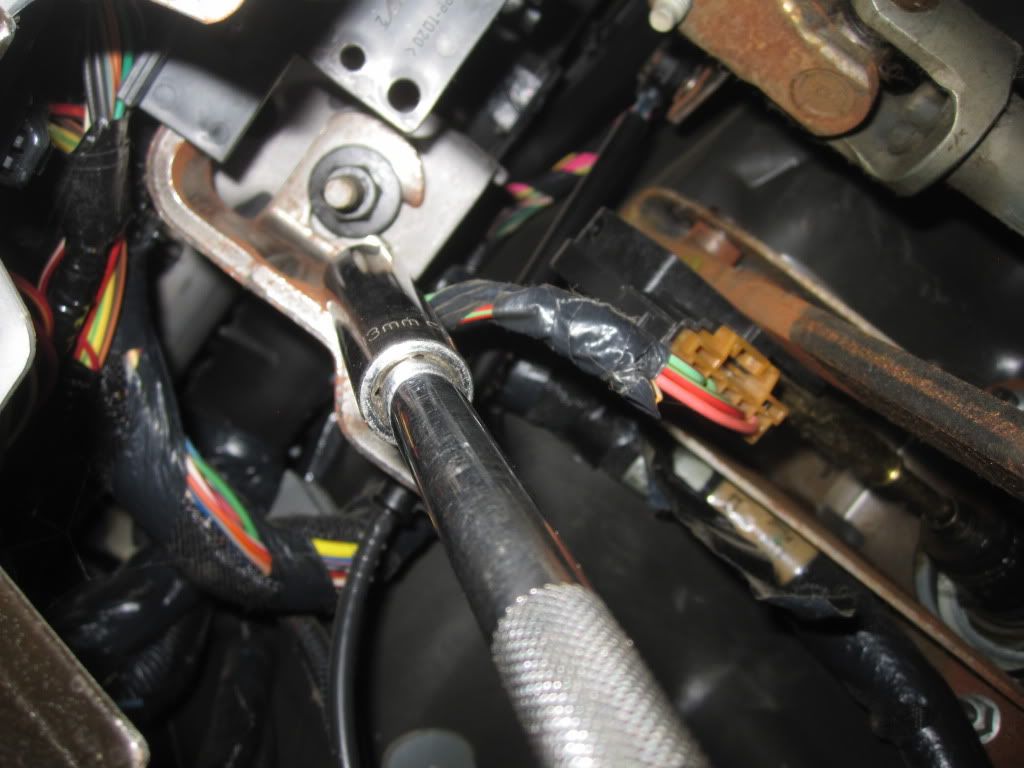
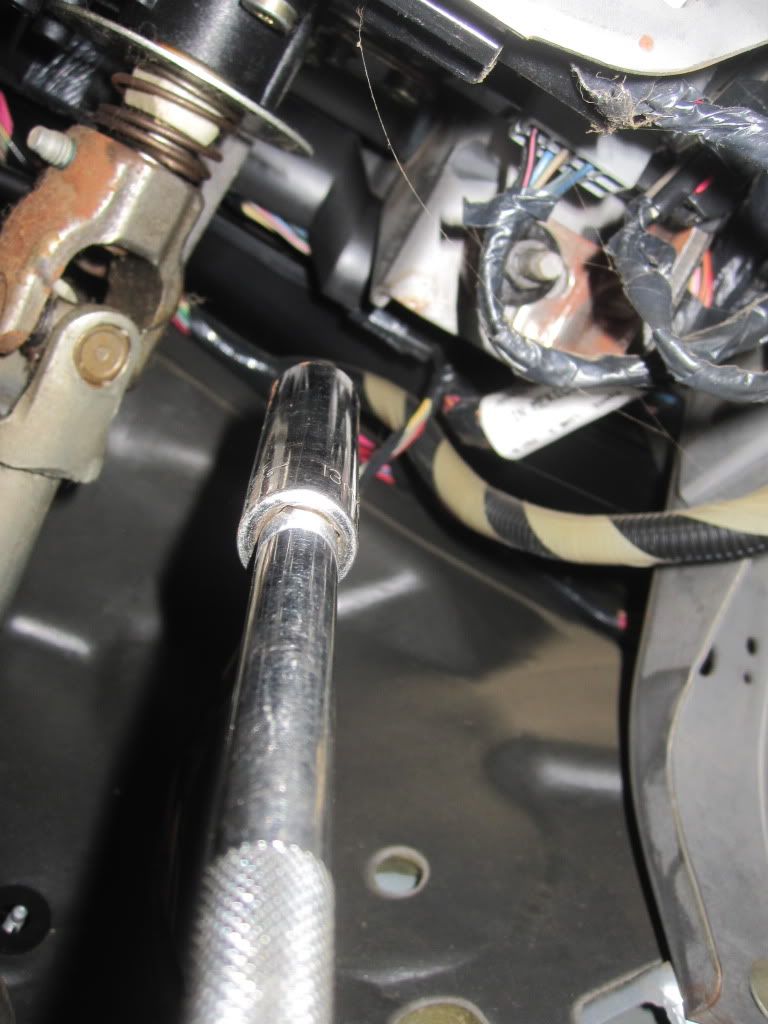
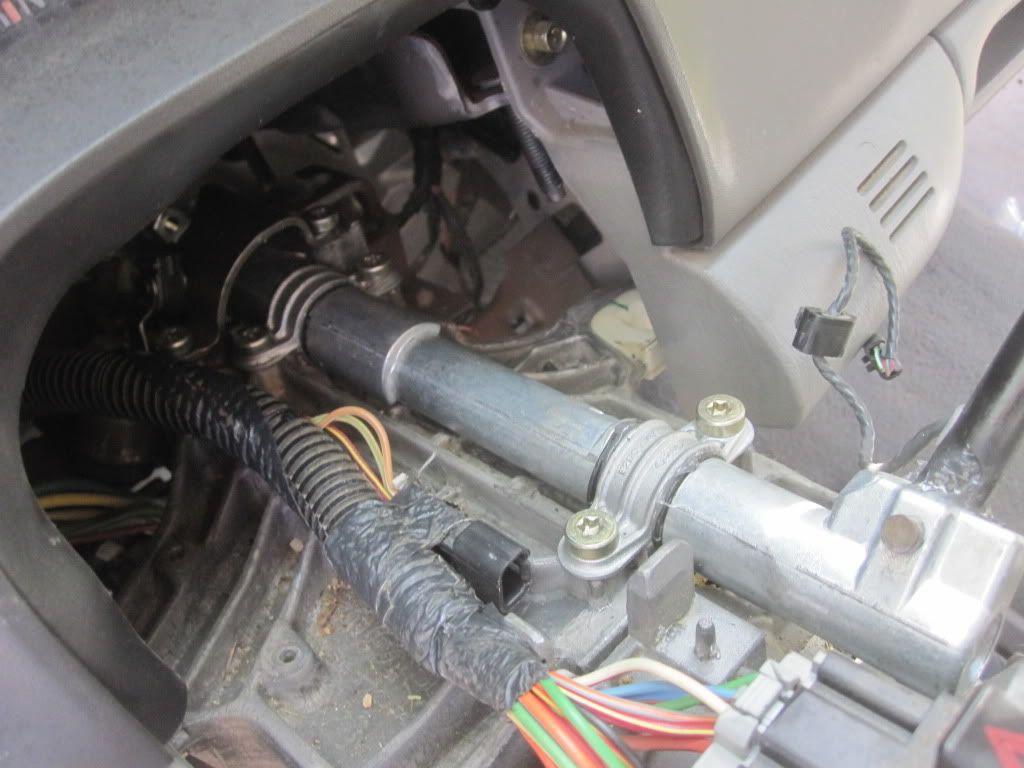
There are 4 nuts 13mm that hold up the steering column, up tight to the dash. You have to lay on your back to see and get to them. Slide your seat forward to stop the steering column from falling downwards when you remove them. Removing the 4 nuts allows you to access the shift tube from up top.
I am sorta pointing to them with the 13mm socket in the pics below.
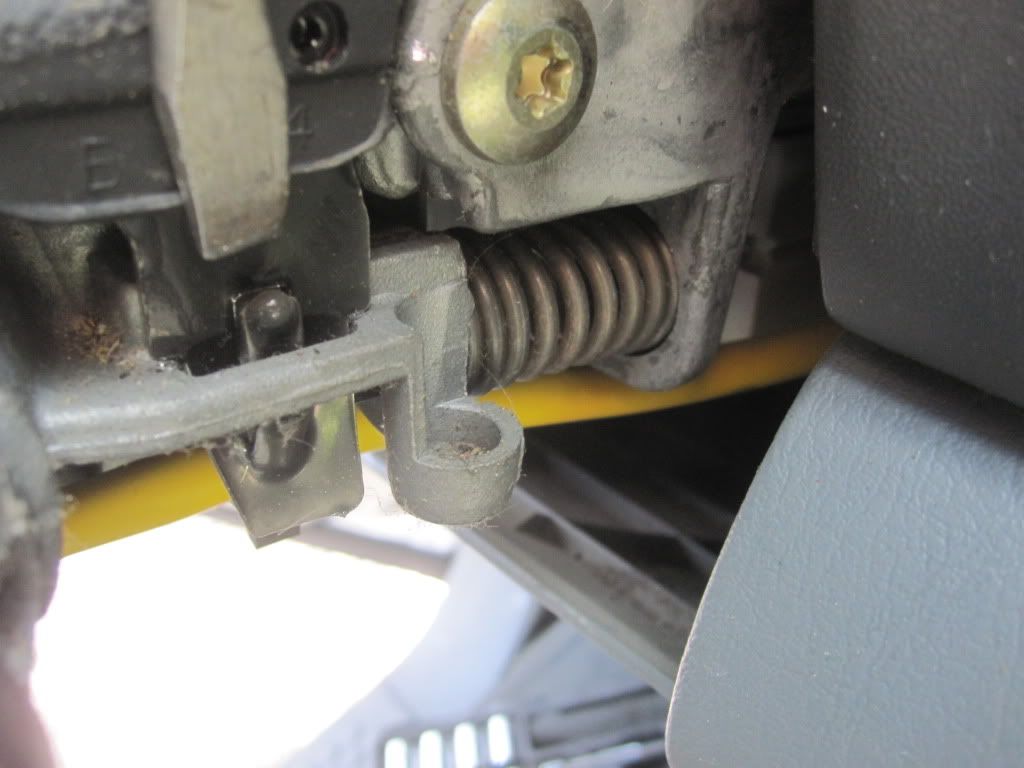
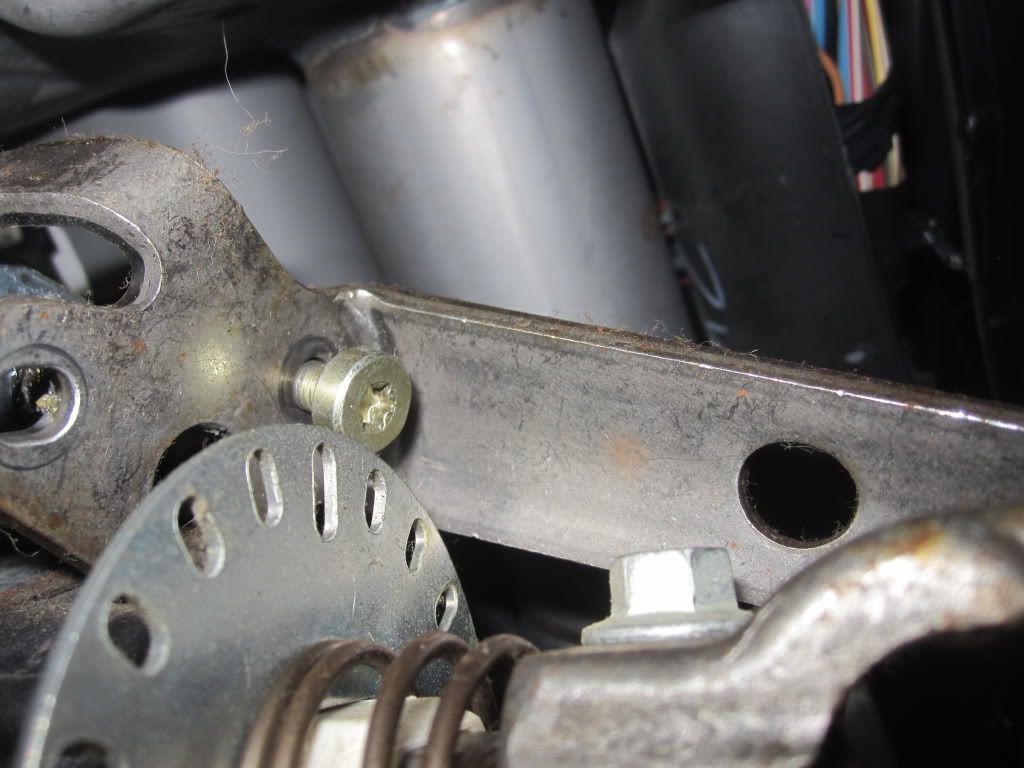
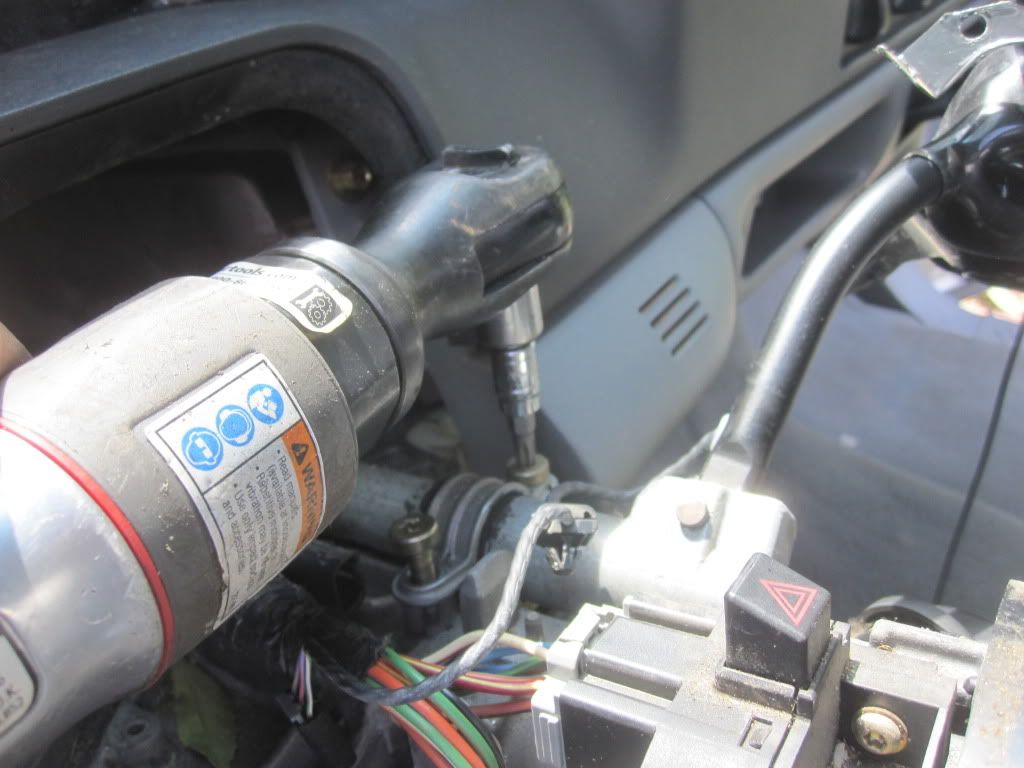
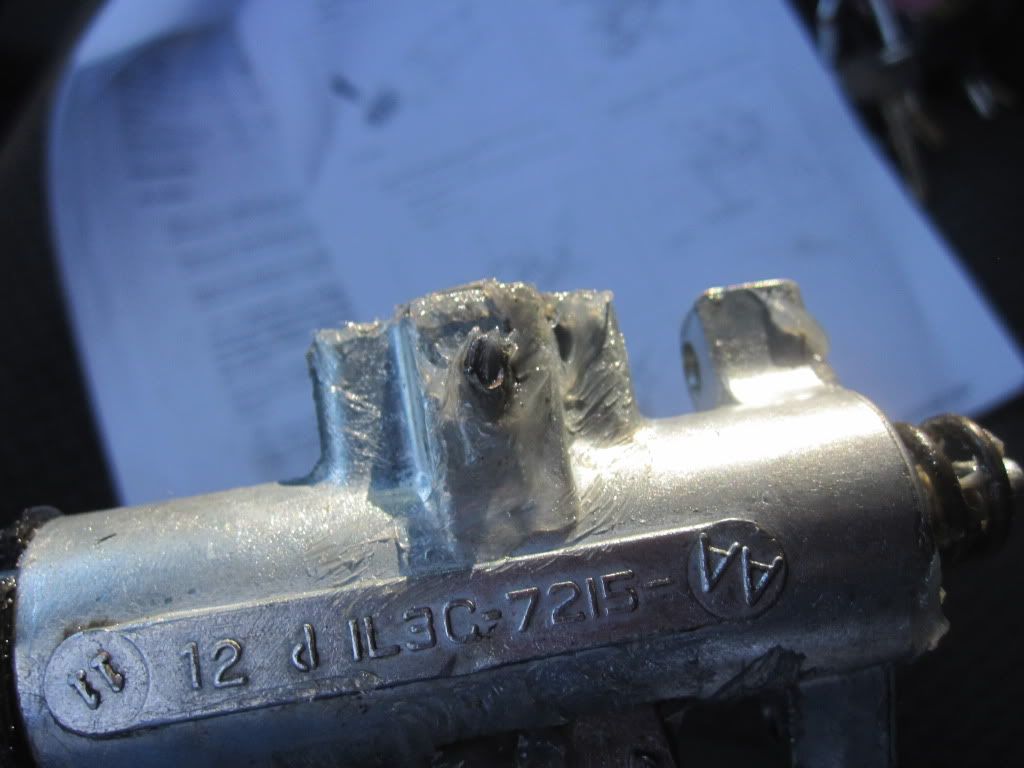
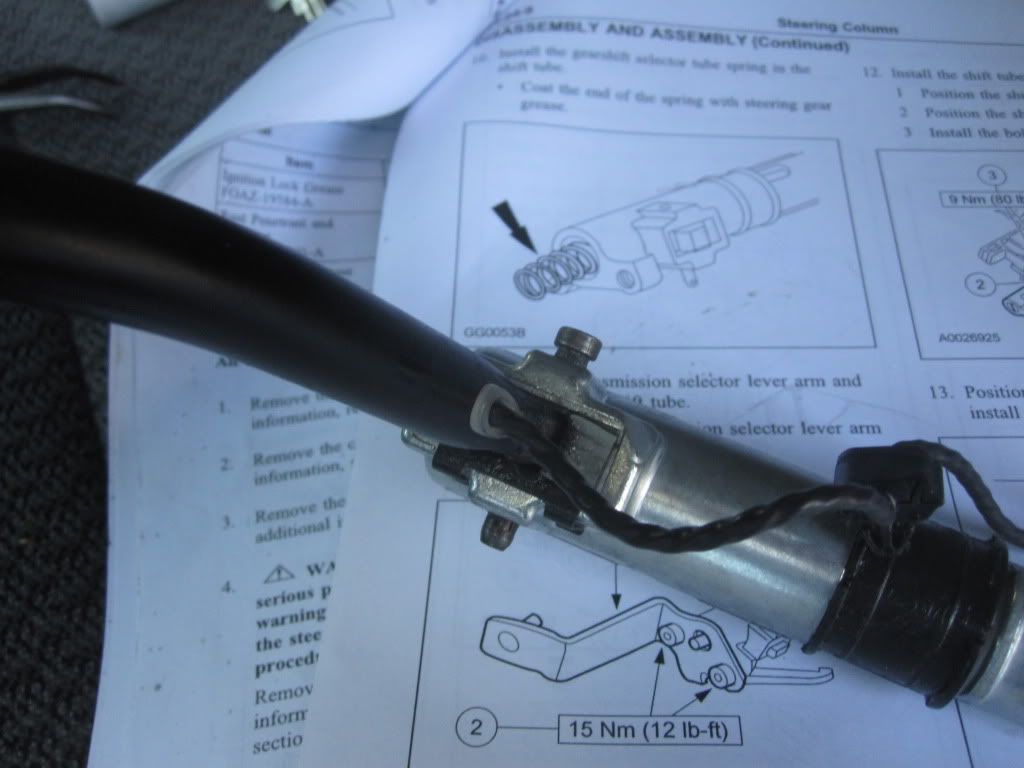
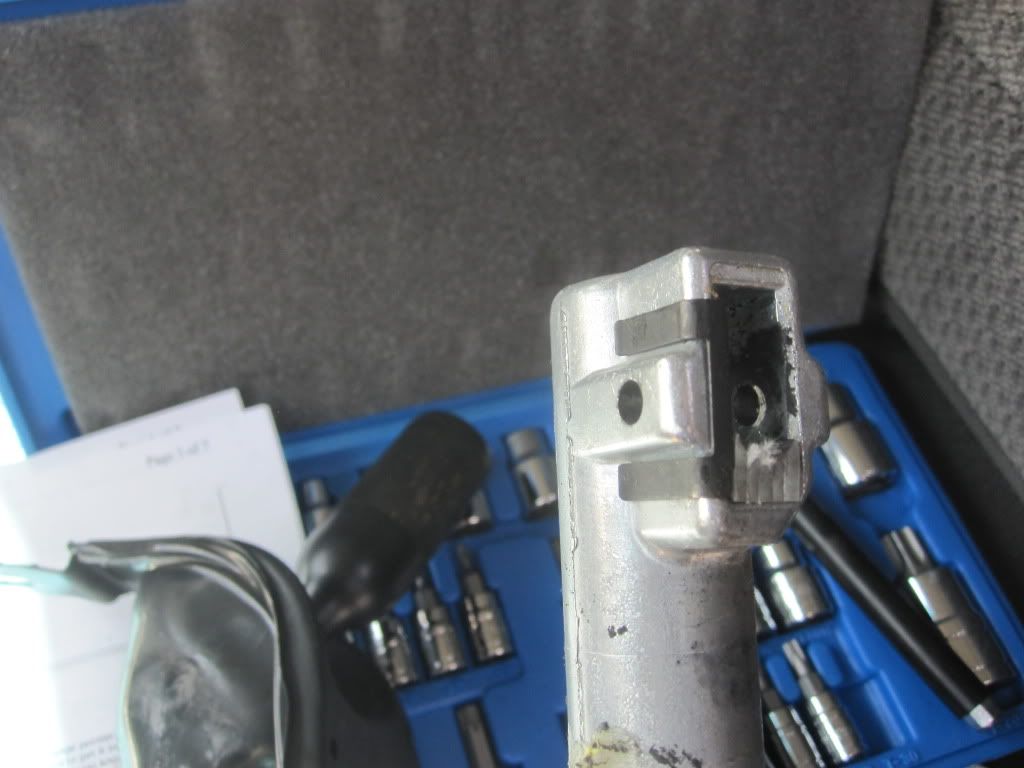
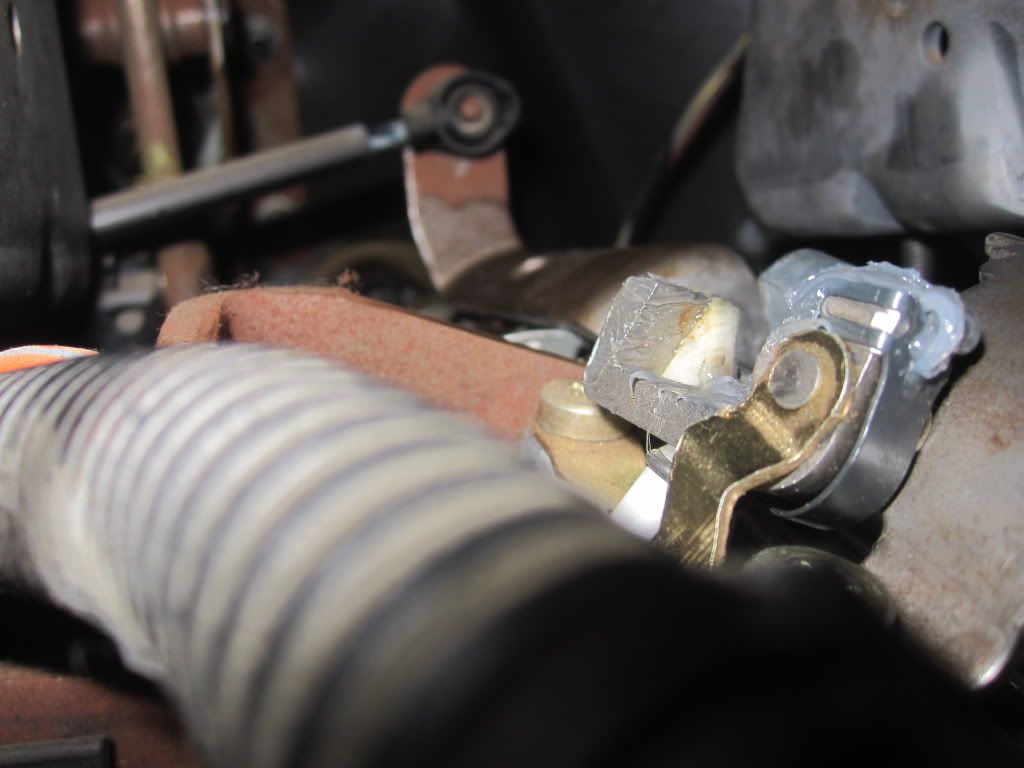
Also you have to remove (2) T30 Torx head screws from the very back of the shift tube when under there. They are easy to find. Same color as other T30s. You can see one of them partially removed below. The other had already been takin out.
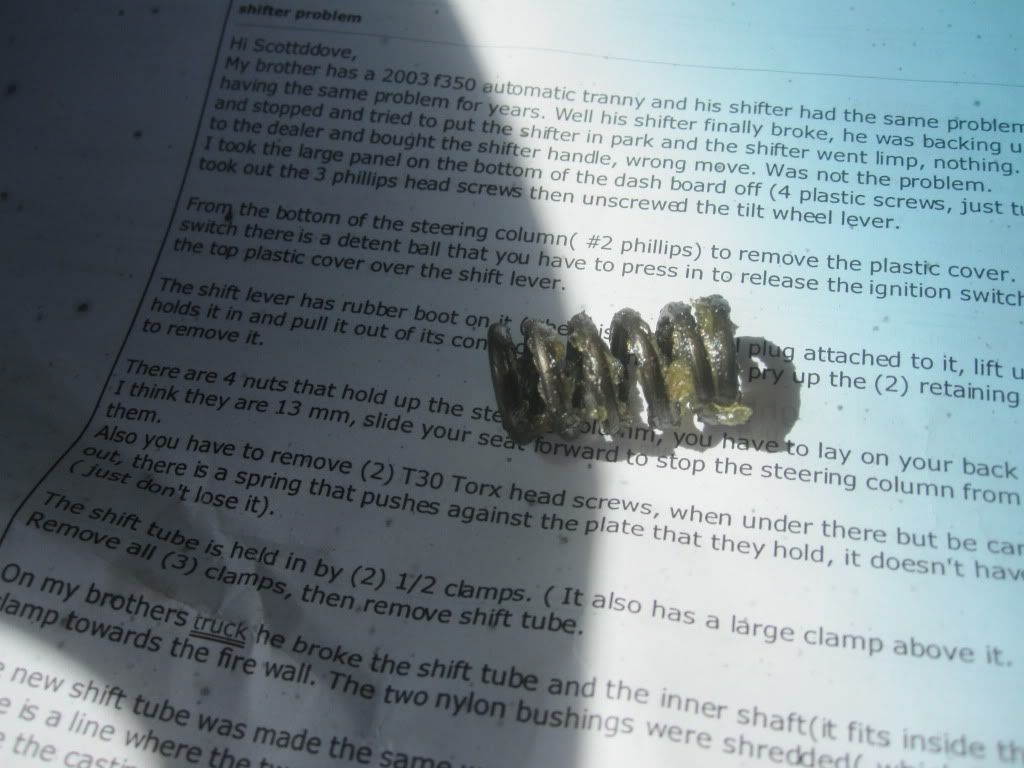
There is a spring that pushes against the plate that those 2 torx screws hold, it doesn't have a lot of pressure on it, just don't lose it. This is the spring I am referring to:
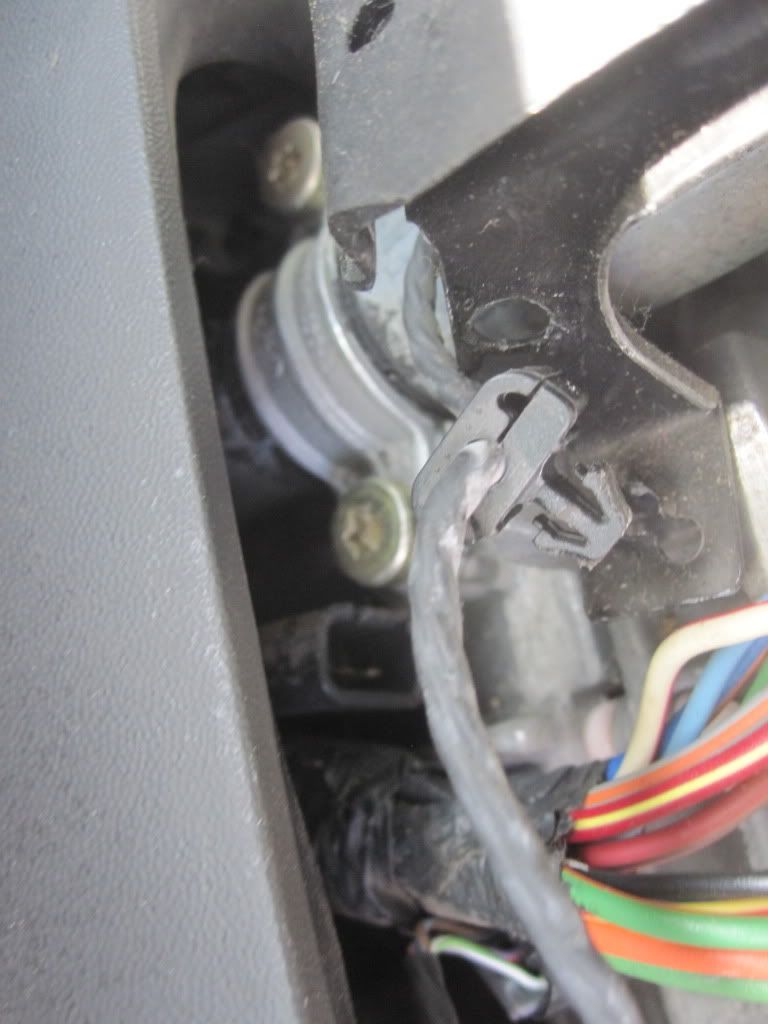
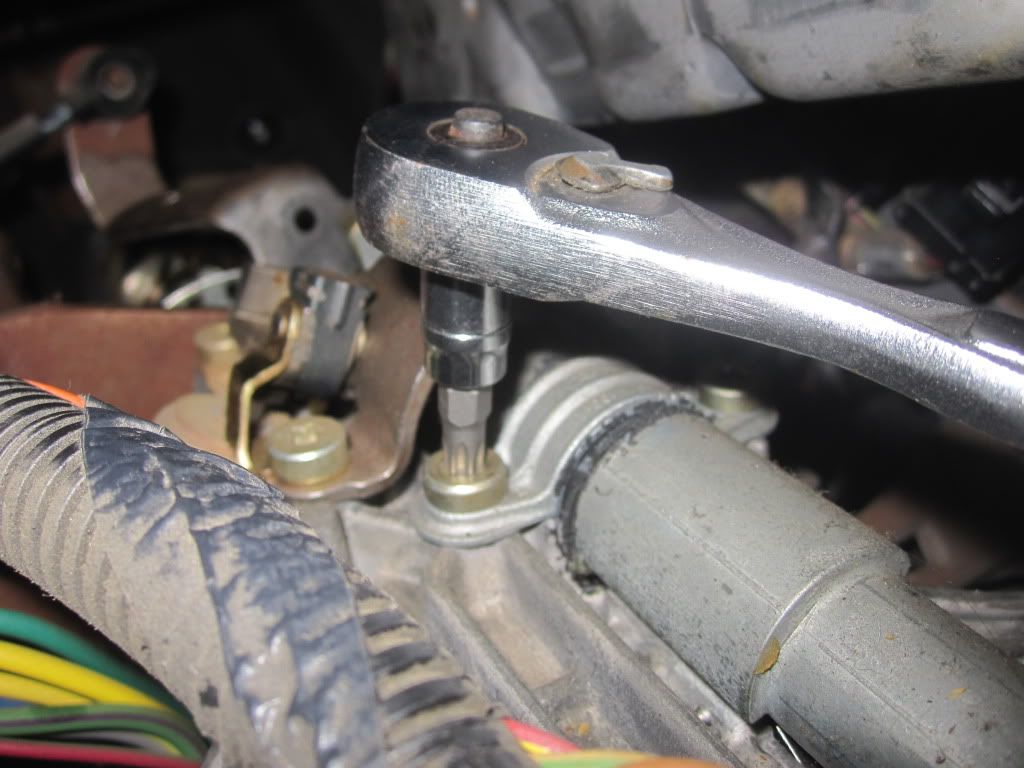
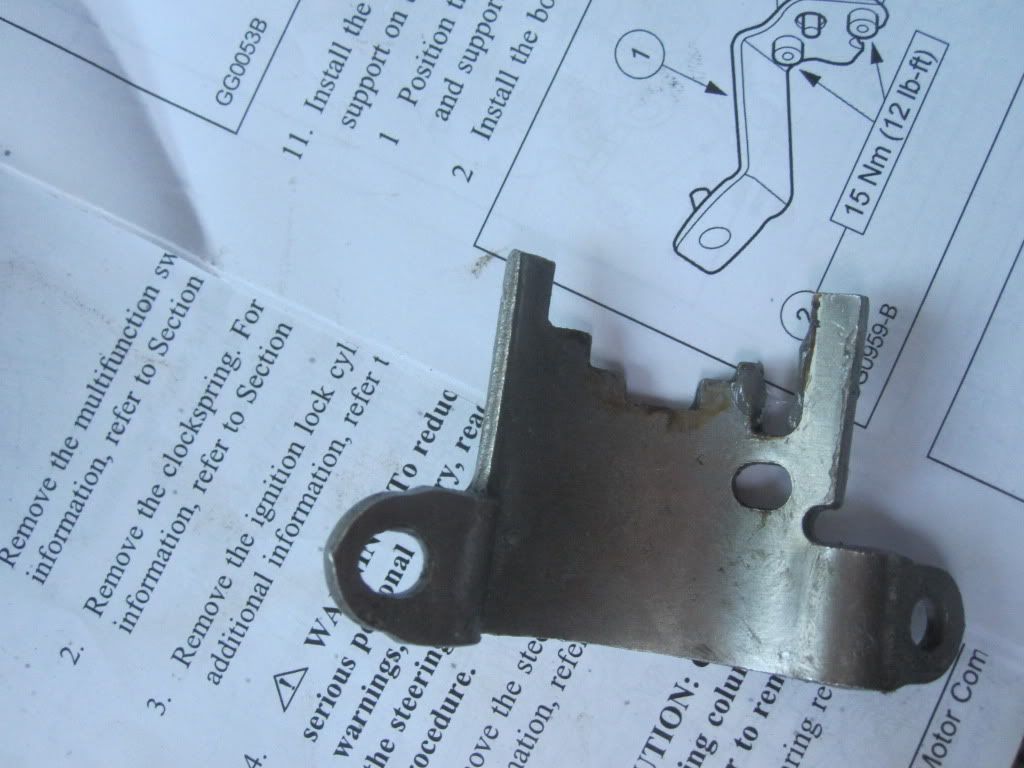
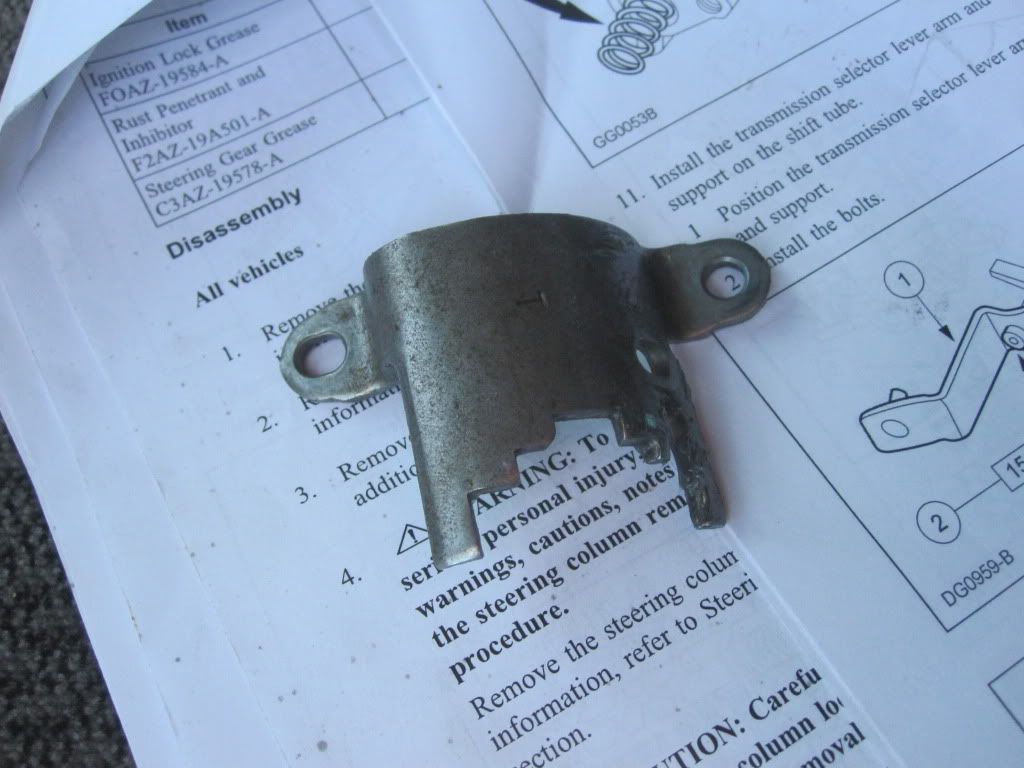
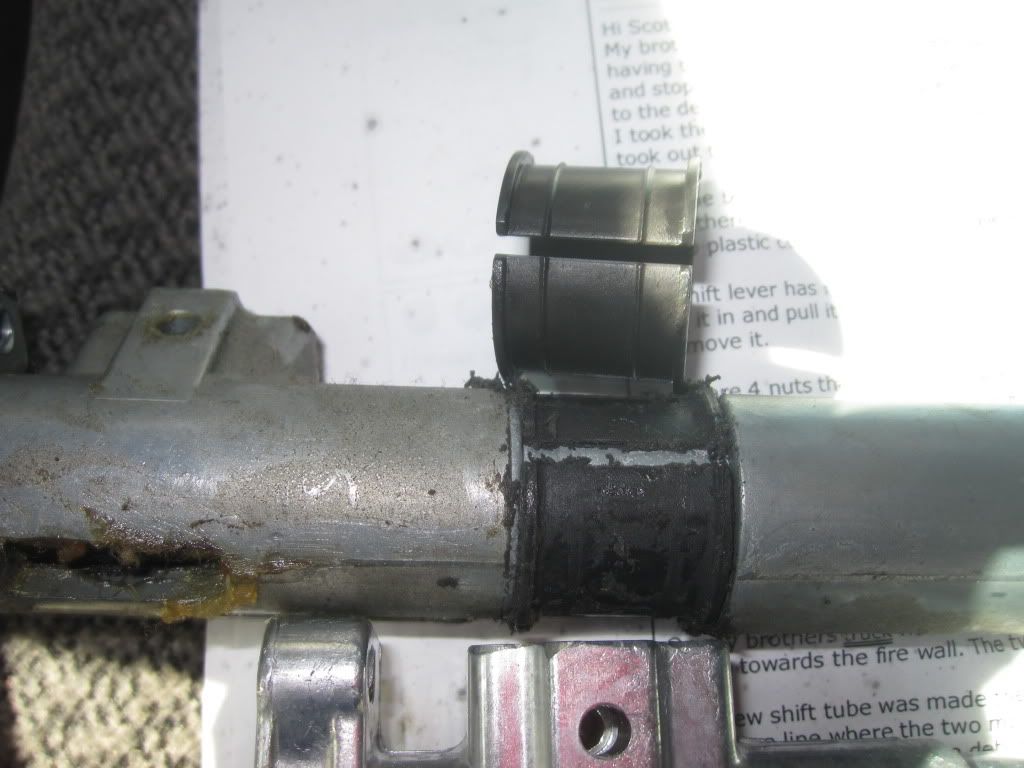
The shift tube is held in by (2) 1/2 clamps, a third steel clamp which is irregularly shaped and a large clamp at the rear which you cannot remove as it is attached to other parts (6 T30 torx bit head screws in total up top). Remove all (3) clamps.
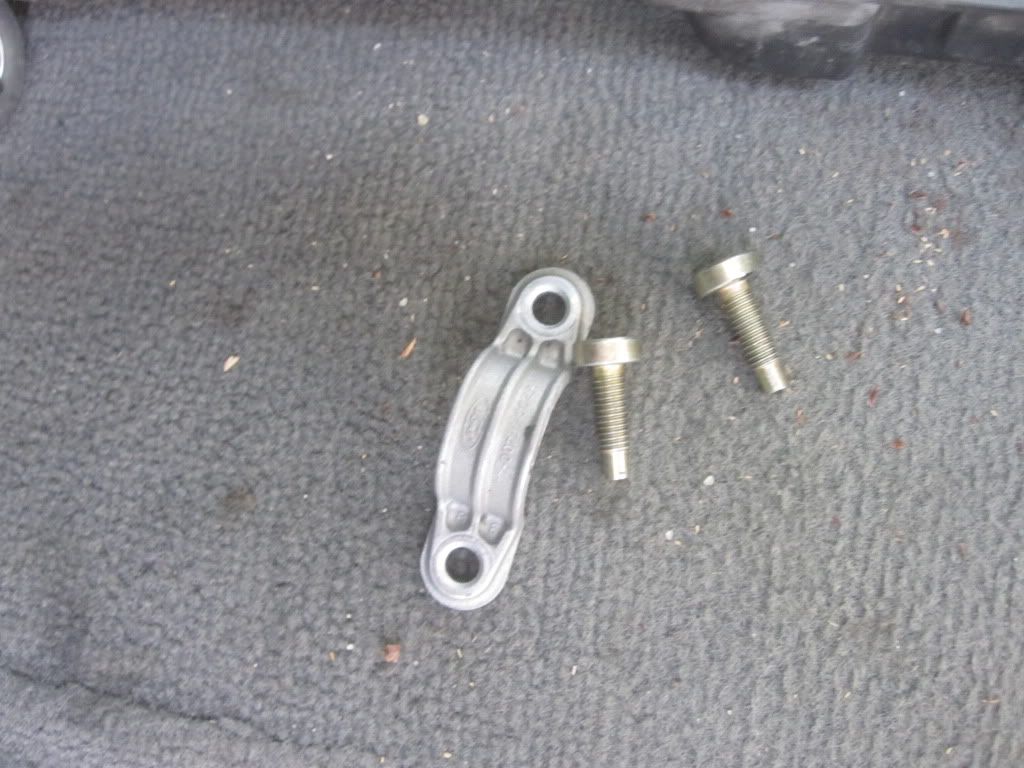
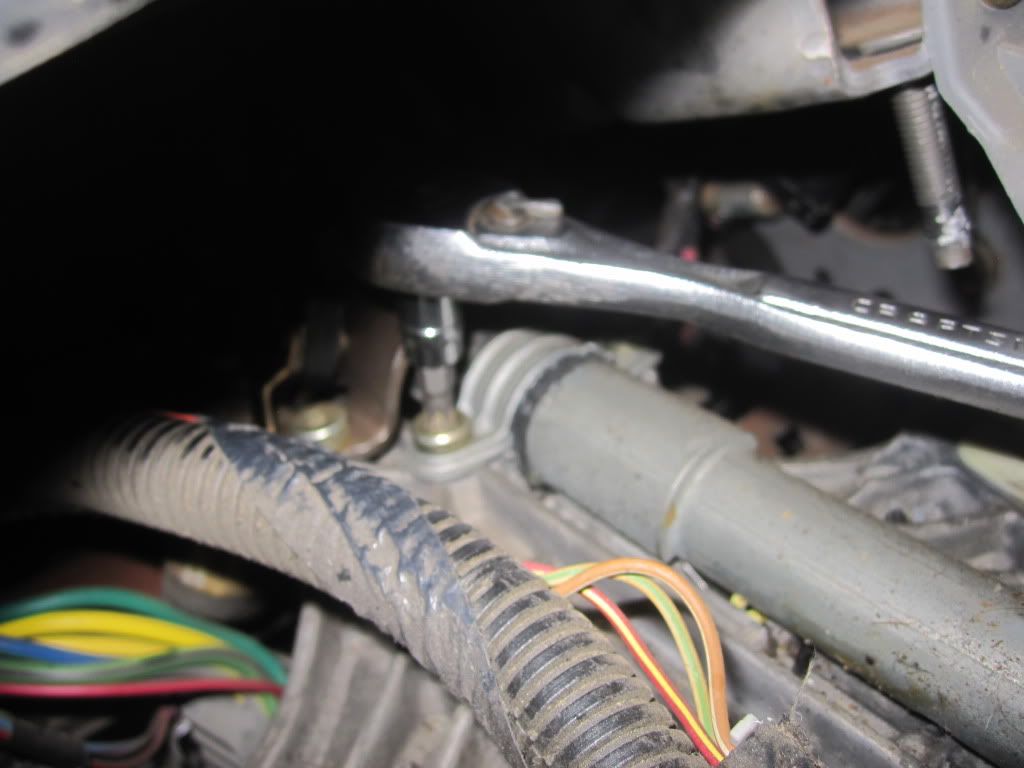
See me loosening the second 1/2 inch clamp? Right behind it is the 3rd clamp...its rusty colored.
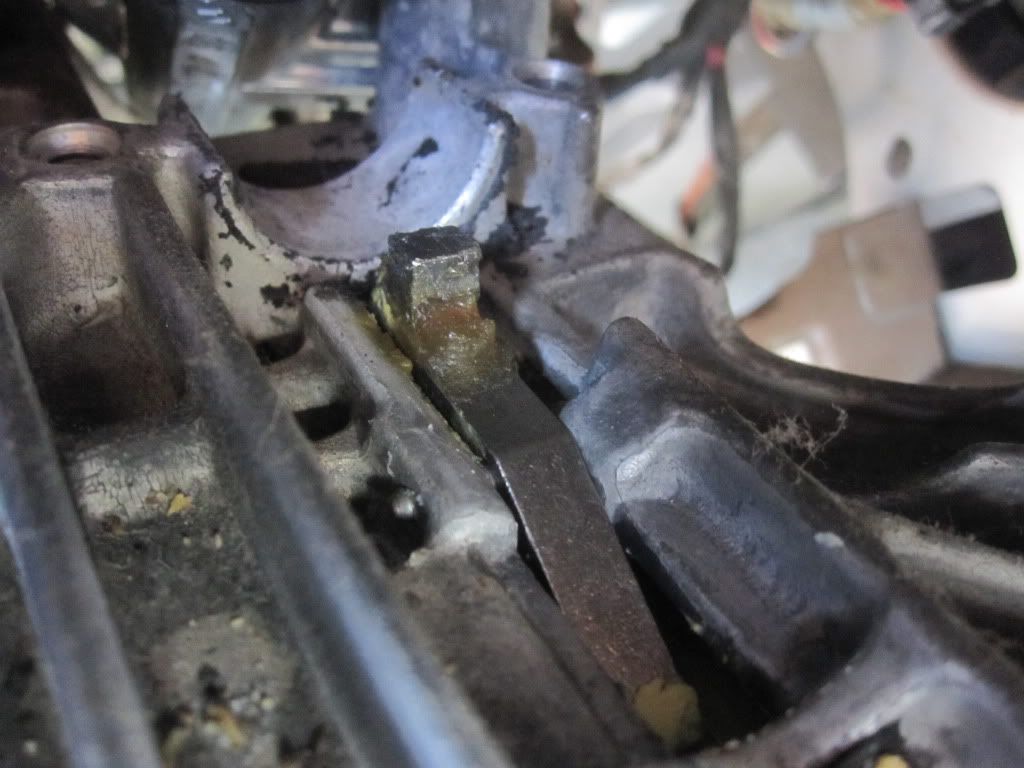
Here is that 3rd clamp removed. The jagged edge faces towards the motor.
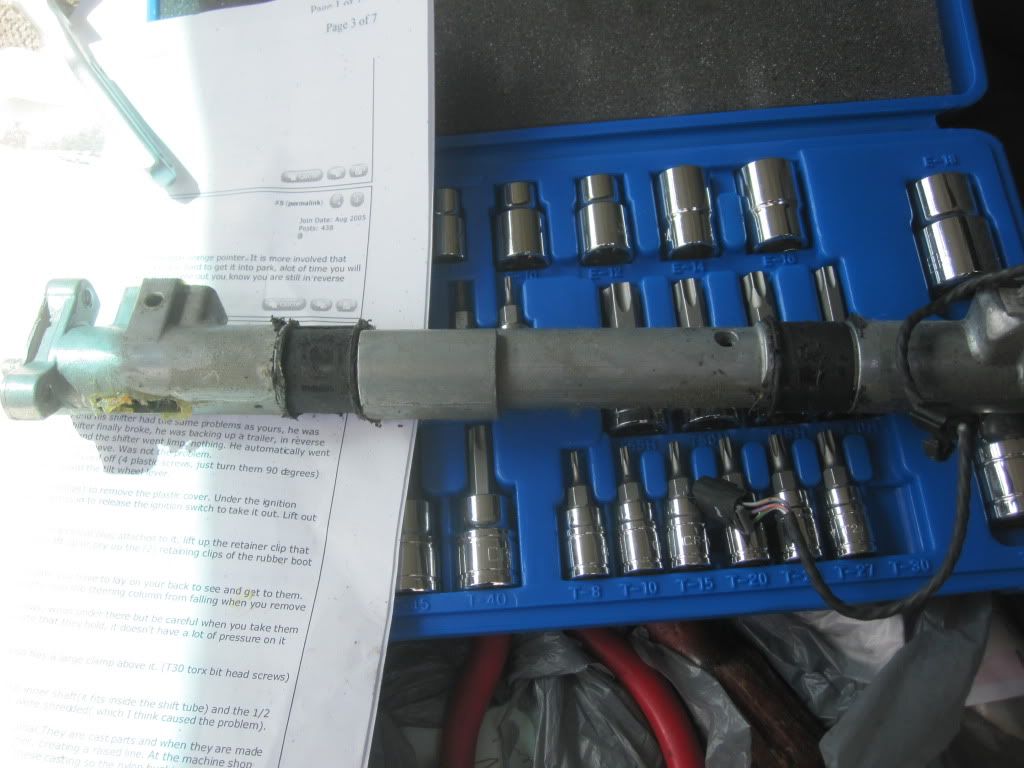
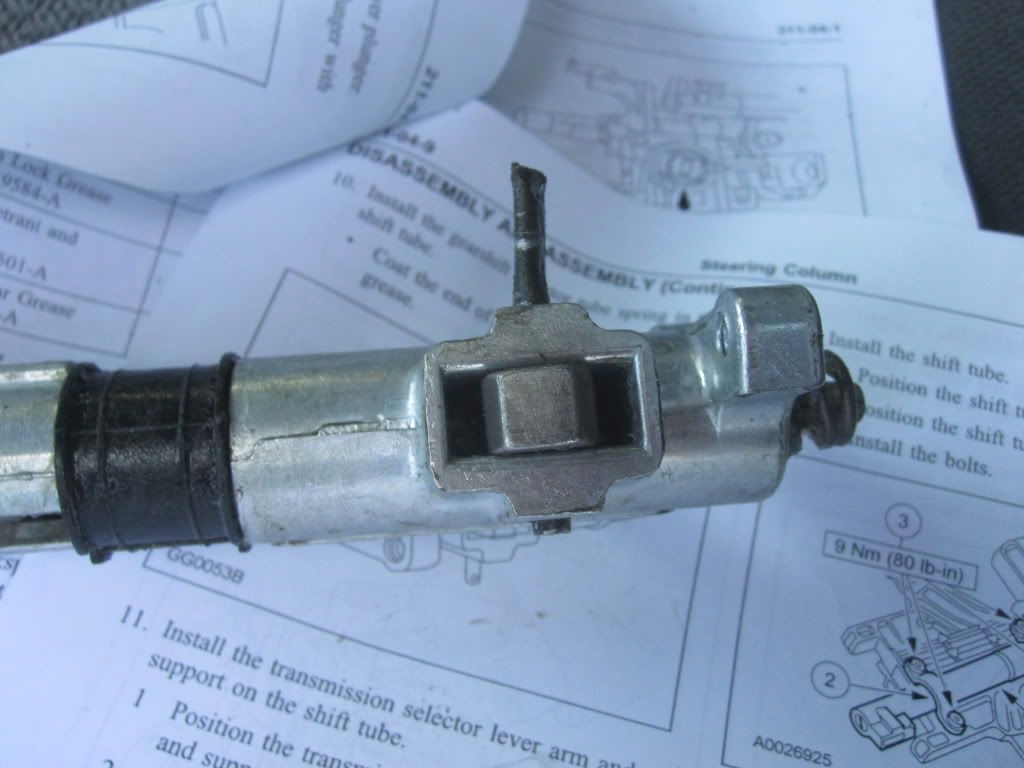
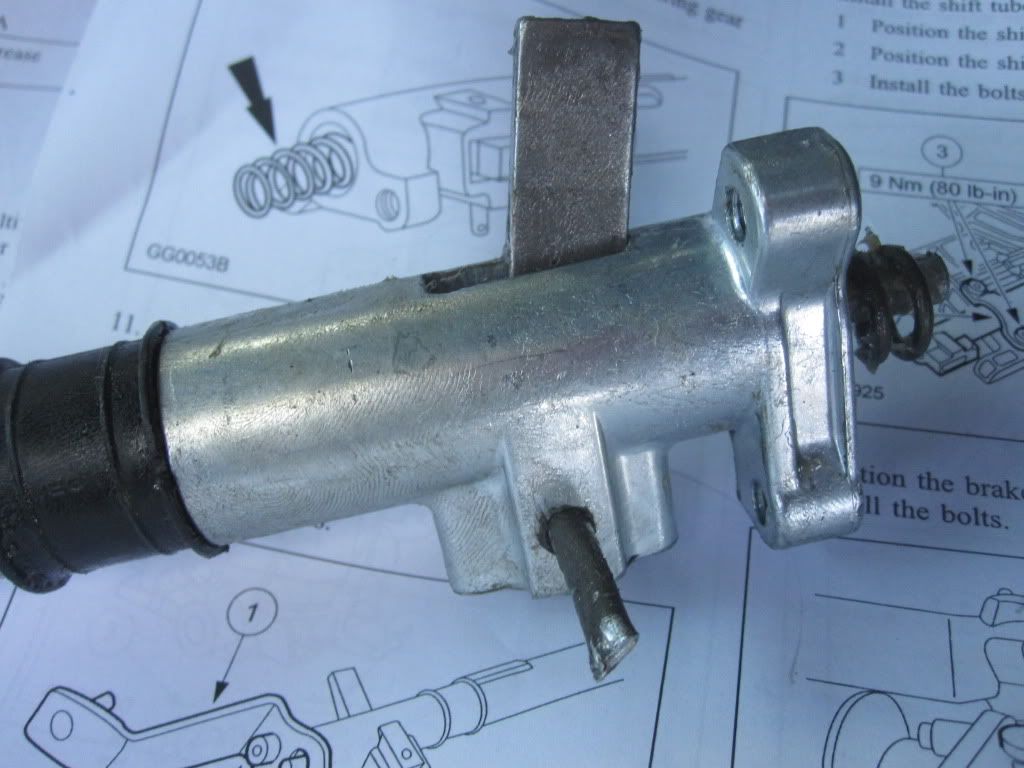
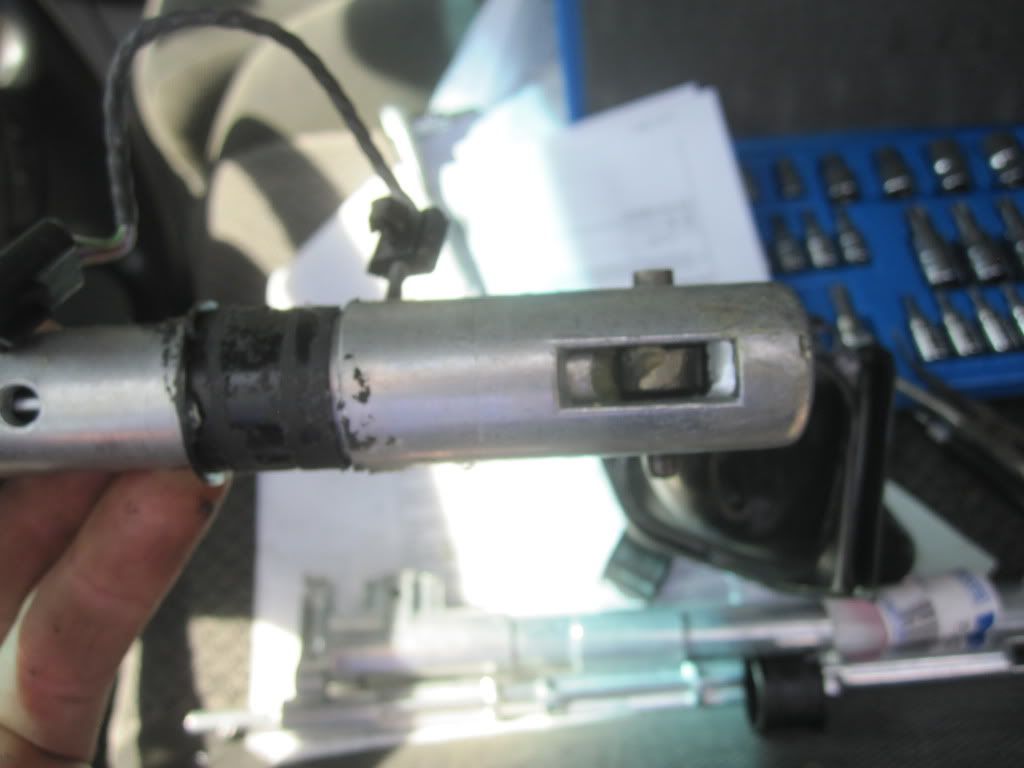
....and here is the entire old shift tube + inner rod + bushings + LEVER ARM all removed. TADDAH! The only thing missing from this pic is the secondary shifter arm that comes out of the bottom end of the shift tube. It's held in place with another pin that goes through the arm. Its flope over and triggers an electrical switch when the tranny is in PARK.
Here is that secondary lever arm. I had to use a peice of 3/16th brake line to make a new pin as I couldnt find the original pin. In fact the secondary arm just fell out when I was removing the shift tube and ended up on the floor. I never did find that pin. I think the darn pin was MIA for way before I took this thing apart. I dont know how that arm stayed in place all this time. The 3/16th brake line fit perfectly and should be strong enough. I crimped it at both ends. Lord knows what FORD charges for that pin...$7?

Here is the little spring as it looks in the back/bottom of the shift tube. Its loaded with lube so it probably wont fall out when you remove the arm.

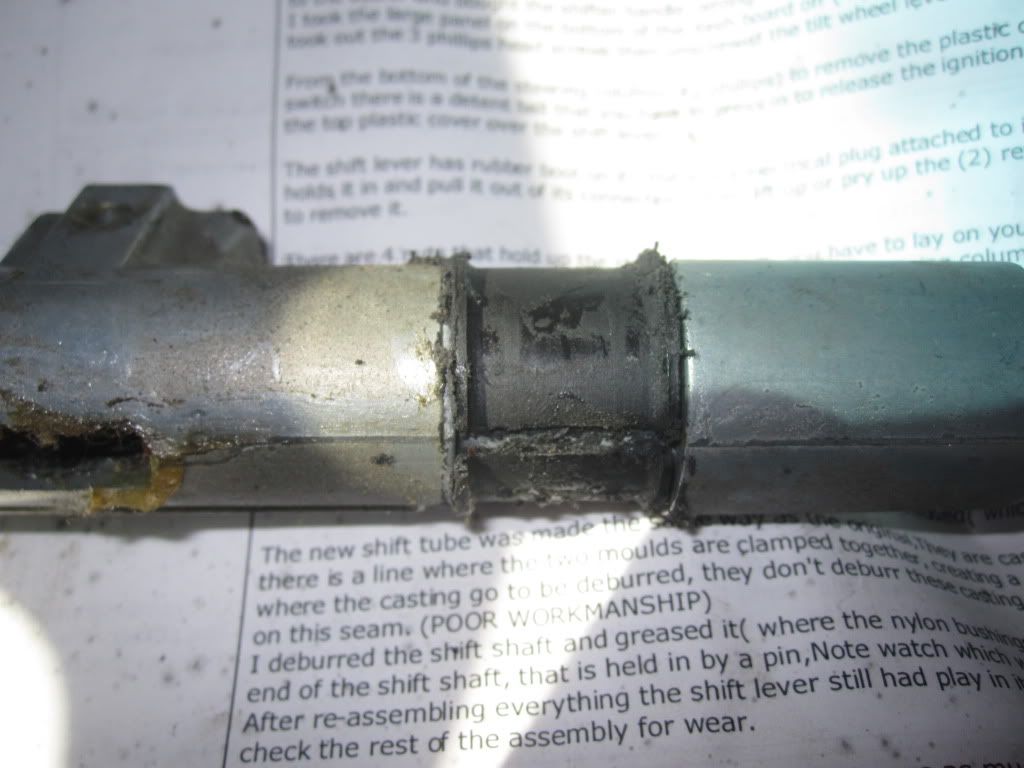
The two nylon bushings in my rack were shredded.
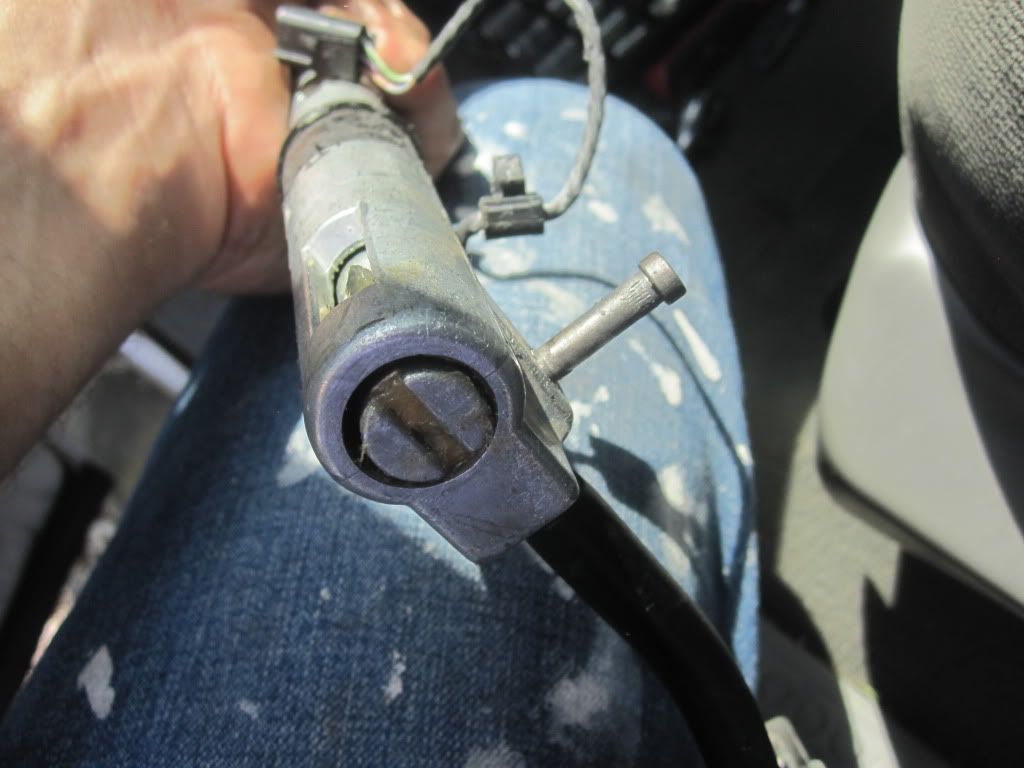
Pull this pin to take out shifter arm lever.
Be careful of this clip with the little soft rubber jimmy jam attached to it. Youll need to remove it and put in the new tube. Note its orientation.
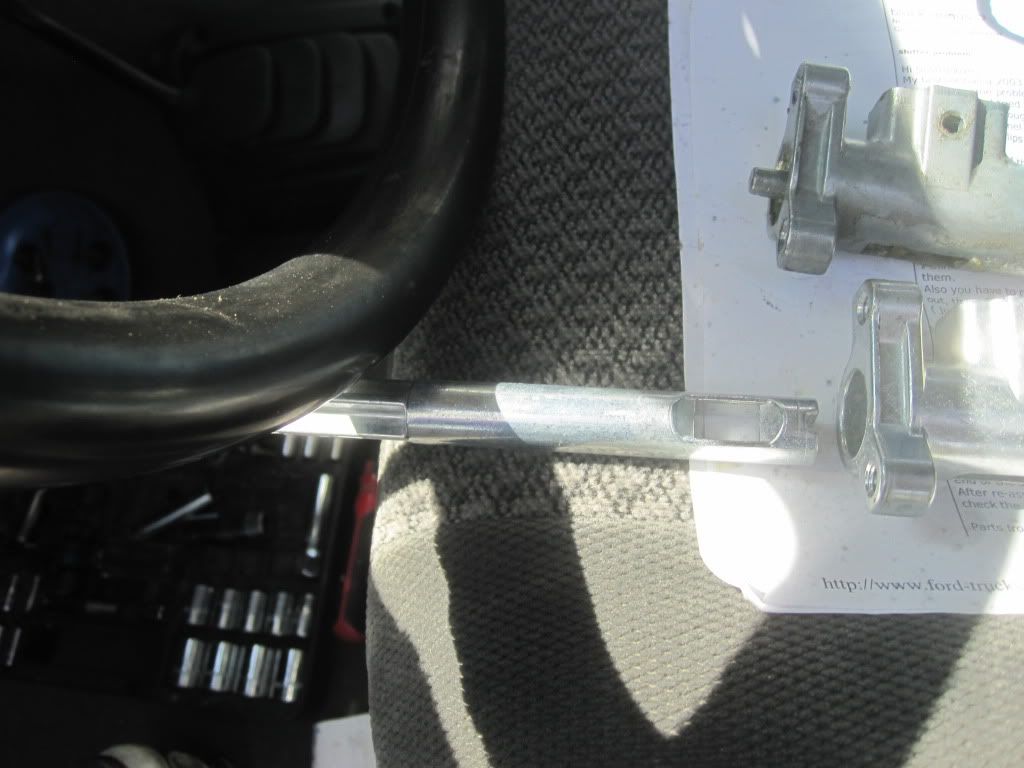
Here is the shiny new tube and inner shaft.
Clip reused on new tube:
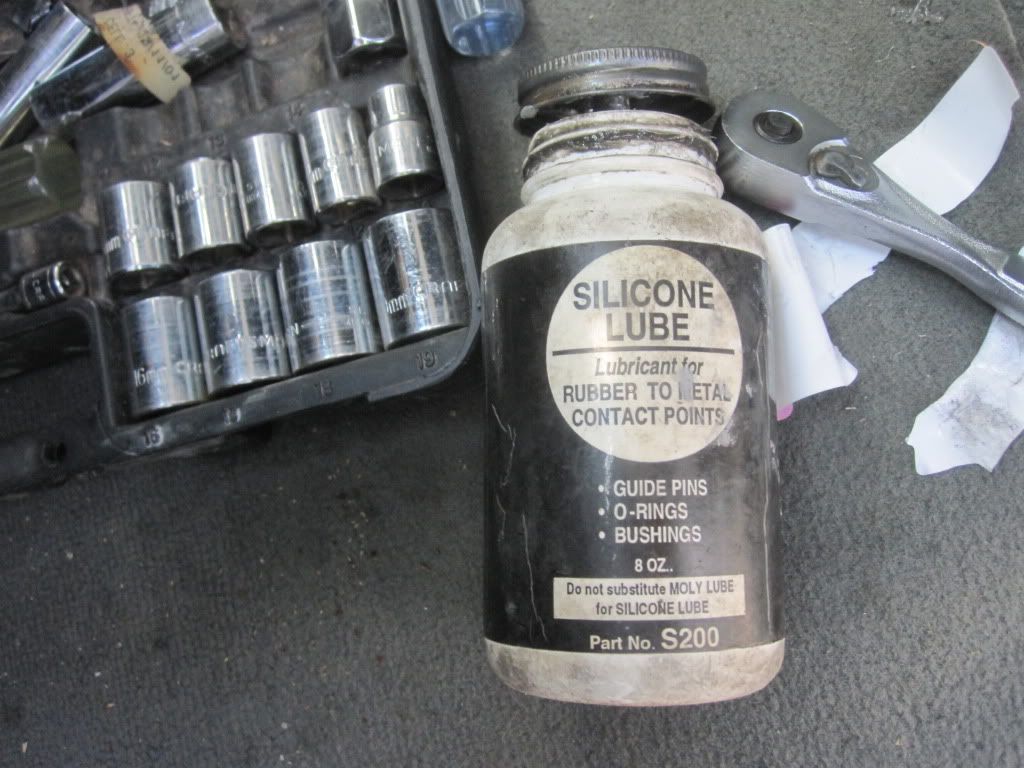
Now grease the shizers out of the inside shaft.
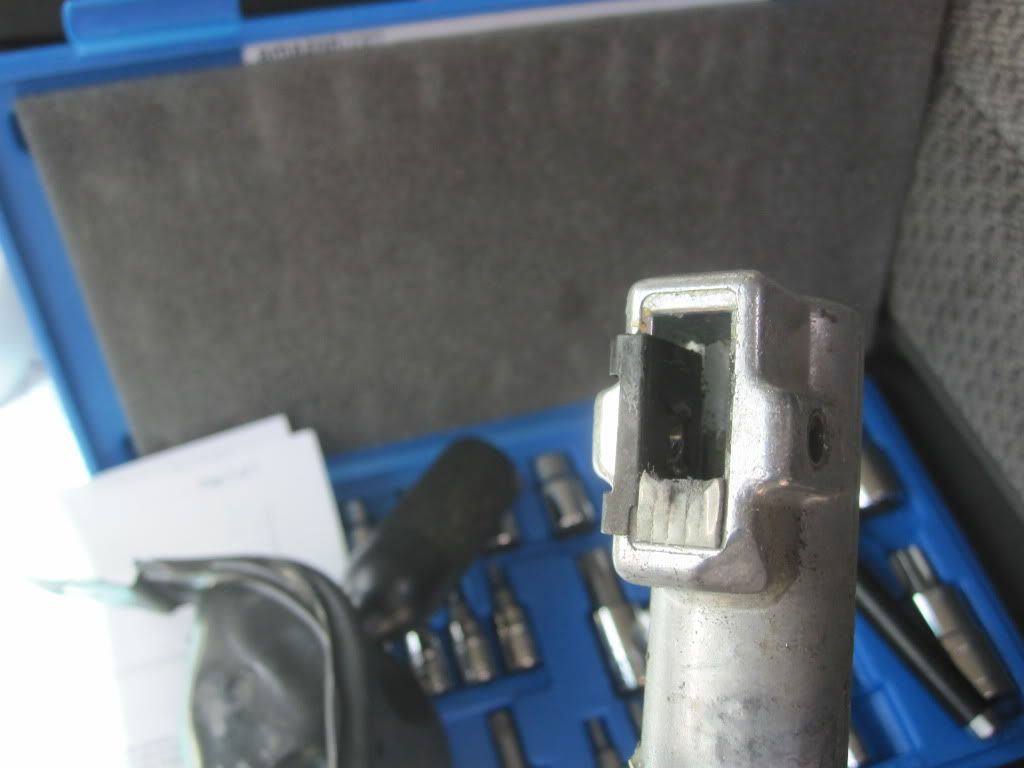
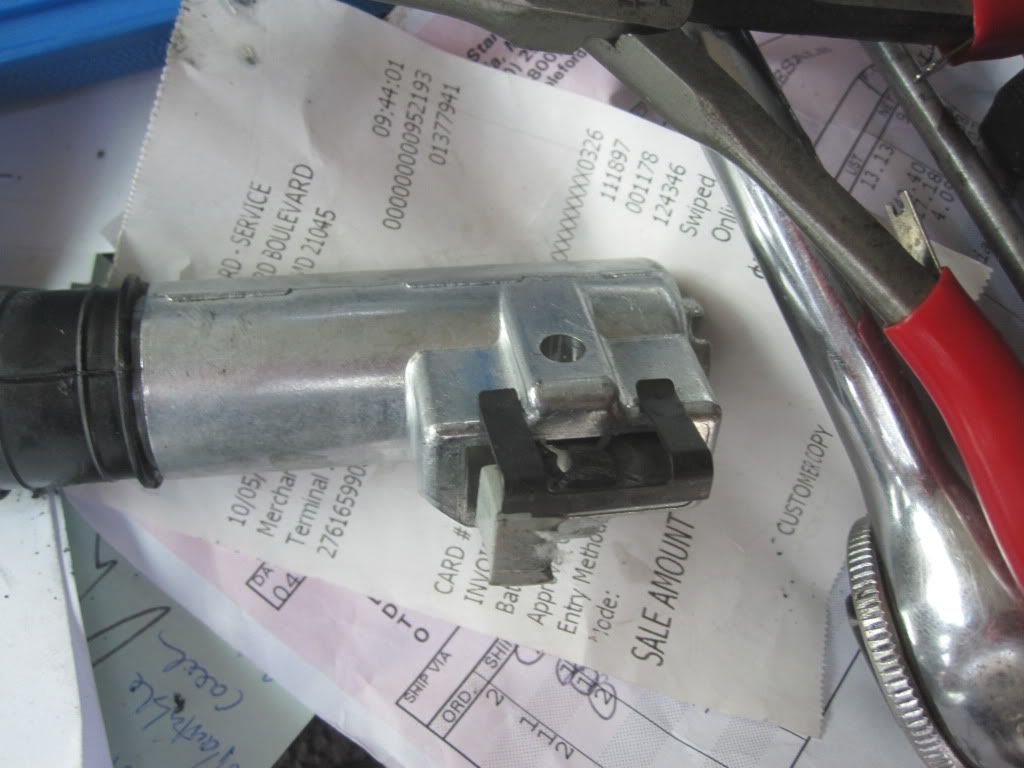
I also greased this "receiver" which is on the column...
and this other part which enters into the new shift tube.
Put the shift lever arm and pin back in. GREAS'EM UP!

Install the two T30s in the back FIRST....its much easier to line up if the shift tube is free. THEN install the 6 torx T30 screws back on on top with the 3 clamps.
Here is the 3rd rusty colored bracket...being tightened down.

Remember that the new INNER SHAFT is installed with the tapered end towards the motor. The spring sits within the tapered section.
Here is a close up of one of the T30s going into the back plate which attaches to the bottom of the shift tube and holds the spring from falling out...among other things.
Here is the new tube, shaft and bushings back in place....I even greased the inside face of the bushings. I didnt debur anything like Black Angus did.
Now ya just put everything else back on.
After re-assembling everything the shift quality is very nice. No play.
BTW I have just put in a new remaned transmission from FORD and that alone made the PRNDL shifting much tighter...so any play/slop in the shifter lever is due to both the SHIFT TUBE AND BUSHINGS as well as the arm that runs to the tranny under the truck. That can be adjusted as well, both under the dash and under the truck.
Tools:
#2 phillips screwdriver
T30 Torx bit 1/4" drive and 2" extention,
13MM deep well 3/8, drive socket, ratchet 3" extention,
Hammer, or even your screw driver to knock out the pin holding in the shifter lever...its not tight.
If you have a 1/4 inch air ratchet you're a lucky duck. 3/8 inch is a bit large for the T30s.
grease
light
flat file to debur if you want.
Its an easy, stress free and fun repair guys. Dont sweat it at all. Will take a few hours.
My truck has 200k miles and a new tranny. The new tranny helped with PRNDL shift accuracy...a lot!...but it wasnt perfect.
Following the instructions, I took pics as I went.
First I took the large panel on the bottom of the dash board off (4 plastic screws, just turn them 90 degrees), as you would to access the fuse box.
Then I took out the 3 phillips head screws from the bottom of the steering column cover (#2 phillips) to remove the plastic cover.
Then unscrewed the tilt wheel lever.....just like a screw....very easy.
Next is the ignition switch. Under the ignition switch there is a detent ball that you have to press in to release the ignition switch to take it out. The ignition MUST BE IN THE ON POSITION to be able to push the detent ball all the way in!
You push the detent ball and the SOB comes sliding right out.
Now with the ignition switch removed you can lift the top plastic cover over the shift lever. After you lift the cover off, put the ignition switch back in and turn it to the off position so you dont run your battery low with all the interior lights on.
The shift lever has rubber boot on it. There is also an electrical harness attached to the rubber boot which leads to a connector. Lift up the retainer clip of the connector that holds it in and pull it out.
Then lift up or pry up the (2) retaining clips of the rubber boot plus the little black clip that holds the little wiring harness in place (see pic below) and then remove the entire boot.
There are 4 nuts 13mm that hold up the steering column, up tight to the dash. You have to lay on your back to see and get to them. Slide your seat forward to stop the steering column from falling downwards when you remove them. Removing the 4 nuts allows you to access the shift tube from up top.
I am sorta pointing to them with the 13mm socket in the pics below.
Also you have to remove (2) T30 Torx head screws from the very back of the shift tube when under there. They are easy to find. Same color as other T30s. You can see one of them partially removed below. The other had already been takin out.
There is a spring that pushes against the plate that those 2 torx screws hold, it doesn't have a lot of pressure on it, just don't lose it. This is the spring I am referring to:
The shift tube is held in by (2) 1/2 clamps, a third steel clamp which is irregularly shaped and a large clamp at the rear which you cannot remove as it is attached to other parts (6 T30 torx bit head screws in total up top). Remove all (3) clamps.
See me loosening the second 1/2 inch clamp? Right behind it is the 3rd clamp...its rusty colored.
Here is that 3rd clamp removed. The jagged edge faces towards the motor.
....and here is the entire old shift tube + inner rod + bushings + LEVER ARM all removed. TADDAH! The only thing missing from this pic is the secondary shifter arm that comes out of the bottom end of the shift tube. It's held in place with another pin that goes through the arm. Its flope over and triggers an electrical switch when the tranny is in PARK.
Here is that secondary lever arm. I had to use a peice of 3/16th brake line to make a new pin as I couldnt find the original pin. In fact the secondary arm just fell out when I was removing the shift tube and ended up on the floor. I never did find that pin. I think the darn pin was MIA for way before I took this thing apart. I dont know how that arm stayed in place all this time. The 3/16th brake line fit perfectly and should be strong enough. I crimped it at both ends. Lord knows what FORD charges for that pin...$7?
Here is the little spring as it looks in the back/bottom of the shift tube. Its loaded with lube so it probably wont fall out when you remove the arm.
The two nylon bushings in my rack were shredded.
Pull this pin to take out shifter arm lever.
Be careful of this clip with the little soft rubber jimmy jam attached to it. Youll need to remove it and put in the new tube. Note its orientation.
Here is the shiny new tube and inner shaft.
Clip reused on new tube:
Now grease the shizers out of the inside shaft.
I also greased this "receiver" which is on the column...
and this other part which enters into the new shift tube.
Put the shift lever arm and pin back in. GREAS'EM UP!
Install the two T30s in the back FIRST....its much easier to line up if the shift tube is free. THEN install the 6 torx T30 screws back on on top with the 3 clamps.
Here is the 3rd rusty colored bracket...being tightened down.
Remember that the new INNER SHAFT is installed with the tapered end towards the motor. The spring sits within the tapered section.
Here is a close up of one of the T30s going into the back plate which attaches to the bottom of the shift tube and holds the spring from falling out...among other things.
Here is the new tube, shaft and bushings back in place....I even greased the inside face of the bushings. I didnt debur anything like Black Angus did.
Now ya just put everything else back on.
After re-assembling everything the shift quality is very nice. No play.
BTW I have just put in a new remaned transmission from FORD and that alone made the PRNDL shifting much tighter...so any play/slop in the shifter lever is due to both the SHIFT TUBE AND BUSHINGS as well as the arm that runs to the tranny under the truck. That can be adjusted as well, both under the dash and under the truck.
Tools:
#2 phillips screwdriver
T30 Torx bit 1/4" drive and 2" extention,
13MM deep well 3/8, drive socket, ratchet 3" extention,
Hammer, or even your screw driver to knock out the pin holding in the shifter lever...its not tight.
If you have a 1/4 inch air ratchet you're a lucky duck. 3/8 inch is a bit large for the T30s.
grease
light
flat file to debur if you want.
#28
06-11-2012, 06:33 PM
Junior User
Join Date: Oct 2006
Location: Murphy, TX
Posts: 85
Likes: 0
Received 0 Likes
on
0 Posts
Wow! A 0 dollar fix for once!

Feels like it's brand new again.

#30
08-15-2012, 06:56 PM