1965 F100 Buildup
#16
 09-18-2011, 09:22 PM

I'm glad you suggested just using sheets of steel to fix those, i didn't really want to spend money for all new floor pieces just for those couple areas. Thanks for the how to pic on the cab brace that doesn't look too bad really to fix.
Front cab mounts are gone. I see CC sells a two piece, DC's website doesn't say whether or not its a 2 piece.
I'm good enough to be dangerous with a welder! haha. But i've only ever done a couple small patches on a beater car i had, never anything structural or as in depth as this. Should i tackle floor first then cab mounts, vica versa? I'd like to keep the truck as together as possible but i figure i'll probably have to take the front clip off for ease of cab mount replacement.
Keith
I would take the cab off if you can. It will make everything ALOT easier to work on. However, if you dont want to, you could leave it on. MIG welding upside down sucks, Ill leave it at that. You will probably want to pull the motor and maybe the inner and outer fenders to do the front cab mounts at least. This will give you enough room to work without wanting to gouge your eyes out trying to get into places.
This is where I would pull the cab to avoid this type of issue. Its only a few wires, 3 hoses, trans linkage, steering column, accelerator cable, and the fuel tank. You can leave the cab pretty much intact internally, but it will be heavy, so get some friends over to lift the cab off. A completely stripped cab is easily lifted by 2 guys, a fully assembled cab, your gonna need 4. Once its off, set it up on some saw horses on the back side of the cab, being careful not to break the rear glass and then you have lots of room to work.
If you leave the cab on, starting with the center cab brace would be your best bet. You need to loosen the rear cab bolts so the cab can move around some. Then jack up the cab then block it up. This will get yourself an inch of breathing room. Then cut out the bad, and weld in the new. The repro center cab braces are pretty easy to put on. Just make sure you pay attention to where the floor meets up with them so you dont end up with the floor too high or low. Mine did not fit perfect, so be prepared to tweak them some. My pics show how I did it, which may or not be right, but it did work out for me. Now is the time to replace the floor over the center cab mount.
After the center support is done, get out a tape measure and square to figure out what the height from the bottom of the front cab mounts to the lip that runs across the firewall where the top edge of the front cab mount sits against and it spot welded to. You need to get the height on the cab mounts the same to get your cab in the right place. If you dont, the fenders, rad support will not all bolt back together correctly. Then completely remove the old front cab mounts with a spot weld cutter and clean everything up so you can weld on it. Now would be a good time to fix any holes you have in the floor so you can set the cab mounts on good steel. Next, set your new cab mounts on the mounting holes in the frame and bolt them in with your old cab bolts and mounts providing they are in good shape. If they are junk, you will need to get new ones, or a suitable replacement. I will tell you, they are not cheap to buy new. Then gently lower the cab into place over the new mounts until they are just touching. Check your height to ensure they in the right place. Now tighten up your rear cab bolts. Check your height again. My measurement was about 8 7/8". Better to have the cab set a hair low in the front. You can always add a shim to get the cab up the right height, but if its too tall your screwed. Once your sure your in the right spot, weld it all together.
Wow that was a book! If you have any other questions, fire away. I probably missed something.
These are the mounts I bought: LMC Truck Parts - Page 23 Part 20 from this page. They dont seem to fit quite right and will require some tweaking to make them right. The ones from DC and other that look like this: http://www.parts123.com/parts123/yb.dll?Parta~ShowPicTxt~Z5Z5Z50000024g~Z5Z5Z57035 are pretty much the factory part. If I had to do it again, I would have bought these. The center support ends are pretty much the same from whoever you buy from as far I as I can tell.
I would buy a decent spotweld cutter set, 2 sets of Wiss aviation tin snips in both right and left hand, and go to Harbor Frieght and get an electric shears to make cutting the sheet steel as painless as possible. Total about $100 and will make your life alot easier.
#17
09-19-2011, 07:10 AM
All great info Keith.
Have fun. Call me with any questions.
If you have the room in garage and helping hands then I'd love to see the cab removed.
Start with cab mounts first. Floor next. You don't want to reinforce something that's out of whack to begin with. While cab is off you can clean up frame and make that nice for when you do the cv swap.
It all snowballs from here buddy.
#18
09-19-2011, 08:53 PM
All great info Keith.
Have fun. Call me with any questions.
If you have the room in garage and helping hands then I'd love to see the cab removed.
Start with cab mounts first. Floor next. You don't want to reinforce something that's out of whack to begin with. While cab is off you can clean up frame and make that nice for when you do the cv swap.
It all snowballs from here buddy.
Have fun. Call me with any questions.
If you have the room in garage and helping hands then I'd love to see the cab removed.
Start with cab mounts first. Floor next. You don't want to reinforce something that's out of whack to begin with. While cab is off you can clean up frame and make that nice for when you do the cv swap.
It all snowballs from here buddy.

But I would still do the floor over the front cab mounts first due to the pics show it looks like the floor over the front cab mounts is shot. Cant weld to rotten or no metal.
#19
11-12-2011, 06:00 PM

Join Date: Feb 2011
Location: Mid Missouri
Posts: 43
Likes: 0
Received 0 Likes
on
0 Posts
Haven't been good about an update. Ran short on cash for a bit, the usual excuses.
But i have made some progress. I've gotten it to run by jumping the starting and the coil. So thats good. I got a new key housing and cylinder or however you want to call it. The housing i got from a part number i found on FTE but Napa gave me the wrong key to go with it. So i tried to turn it over with just a screw driver but i've got NOTHING what so ever. No lights of any kind, nothing. So i've guess i've got to shake the gremlins out of the electrical. I would guess the P/O messed up something because there is all kinds of foolishness done to the wiring. I guess i'll just get a wiring diagram printed out and start going through everything. Is there some other fuse box other than the one on the kickpanel to the left of the steering column? If so i haven't found one.
I also scored a disk brake setup locally off a 76 or something so i'll get my disk upgrade. Guy also threw in the distribution block. I'll get that in a some stage.
I've got the rear brakes taken apart just need to get new stuff and put that back together.
I've got some pictures i'll post up tomorrow.
I'm putting off body work lol
Keith
#20
11-13-2011, 11:49 AM
Update the website I gave you!!
I got thinking about how there is no power to anything.
You may have a bad fuse able link either off of the starter solenoid (it's used as a junction block as well) or on the drivers side inner fender (I think some are there) None of the fuses control the starting or headlights. Only dash and heater/radio.
So when you went from the battery to solenoid, did you attach any other wires to the same place where the battery cable bolted to. (as a hint, at a minimum you should have a big wire from the alt going to that location, sometimes splitting in two before it gets there)
#21
11-16-2011, 08:27 PM
Join Date: Feb 2011
Location: Mid Missouri
Posts: 43
Likes: 0
Received 0 Likes
on
0 Posts
I didn't actually rewire anything, they just had incorrect labels on the battery wires. But yes there are some splits going on there. I did take out wiring off the starter solenoid that i guess was used for a trailer hookup. Its a square four, not flat four. How long has it been since those were used? Its a ****ty week for working on it, hopefully this weekend i can get some time on it.
keith
keith
#22
11-16-2011, 08:33 PM
Join Date: Feb 2011
Location: Mid Missouri
Posts: 43
Likes: 0
Received 0 Likes
on
0 Posts
What holds the headlights in? I'm missing some hardware for them i think. I looked over LMC or something and it looked like a spring hooks into that spot on the tab with the hole drilled in the end of it. Thats all that keeps headlight in?
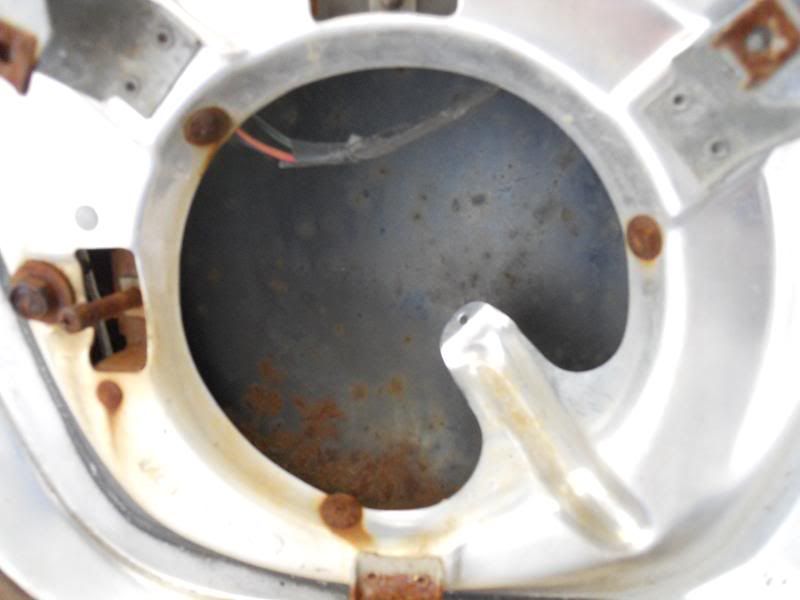
I've got it sitting in there, but just by the adjustment screws/tabs.
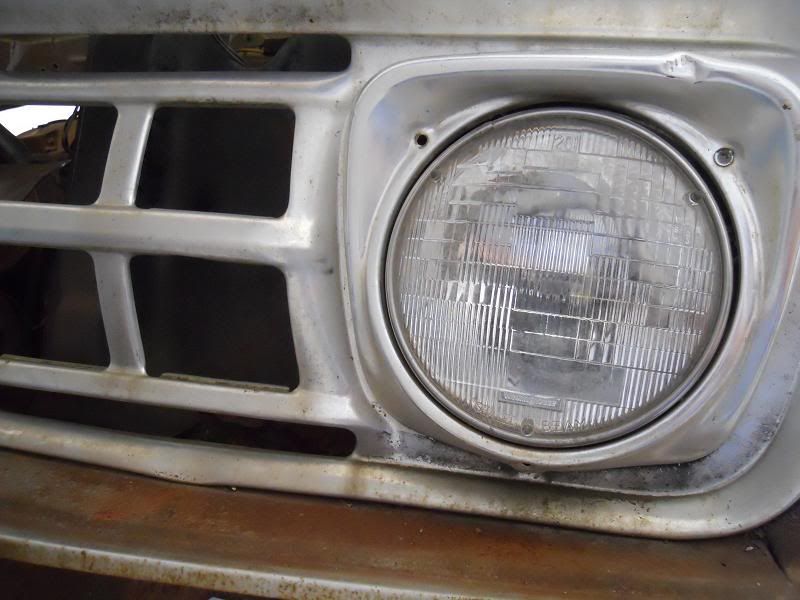
More soon. Thanks for any info!
Keith
I've got it sitting in there, but just by the adjustment screws/tabs.
More soon. Thanks for any info!
Keith
#23
11-16-2011, 08:36 PM
#25
11-16-2011, 09:16 PM
Join Date: Feb 2011
Location: Mid Missouri
Posts: 43
Likes: 0
Received 0 Likes
on
0 Posts
#26
11-17-2011, 01:49 AM
Posting Guru
Join Date: Jan 2000
Location: colbert washington
Posts: 2,281
Likes: 0
Received 0 Likes
on
0 Posts
That is all there is to hold it in. The spring is small and very tight. It holds the headlight bucket in very tight.
#27
12-01-2011, 07:38 PM
Join Date: Feb 2011
Location: Mid Missouri
Posts: 43
Likes: 0
Received 0 Likes
on
0 Posts
Thanks for the headlight verification Buzz, appreciate it.
On the topic of my wiring, i've got a junction spot of sorts just forward of the starter solenoid. Wires go into the main harness there. But near as i can tell it hooks into the hot side of the solenoid and then has wire going down to the block as well. This seems wrong? Would this be grounding out and why i have no power at the key?
But is this junction spot supposed to ground to the fender or is supposed to keep it off the fender. Its all rusted out so i can't tell which it was supposed to do. Thanks for any info.
Keith
#28
12-01-2011, 08:07 PM
#29
12-01-2011, 08:25 PM
How about this....
Yank out all the wiring, and then we will add only the ones you will need later.
HaHa
So when you need heat, we will add wires for that... And when you need wipers, we will add those. LoL
So for now, you only need it to start, that requires 2 wires. It's that easy.
Yank out all the wiring, and then we will add only the ones you will need later.
HaHa
So when you need heat, we will add wires for that... And when you need wipers, we will add those. LoL
So for now, you only need it to start, that requires 2 wires. It's that easy.
#30
12-02-2011, 06:32 AM
Join Date: Feb 2011
Location: Mid Missouri
Posts: 43
Likes: 0
Received 0 Likes
on
0 Posts

