
DIY Painted Headlights - aka a $10 Harley Mod
#1
 08-28-2011, 04:58 AM


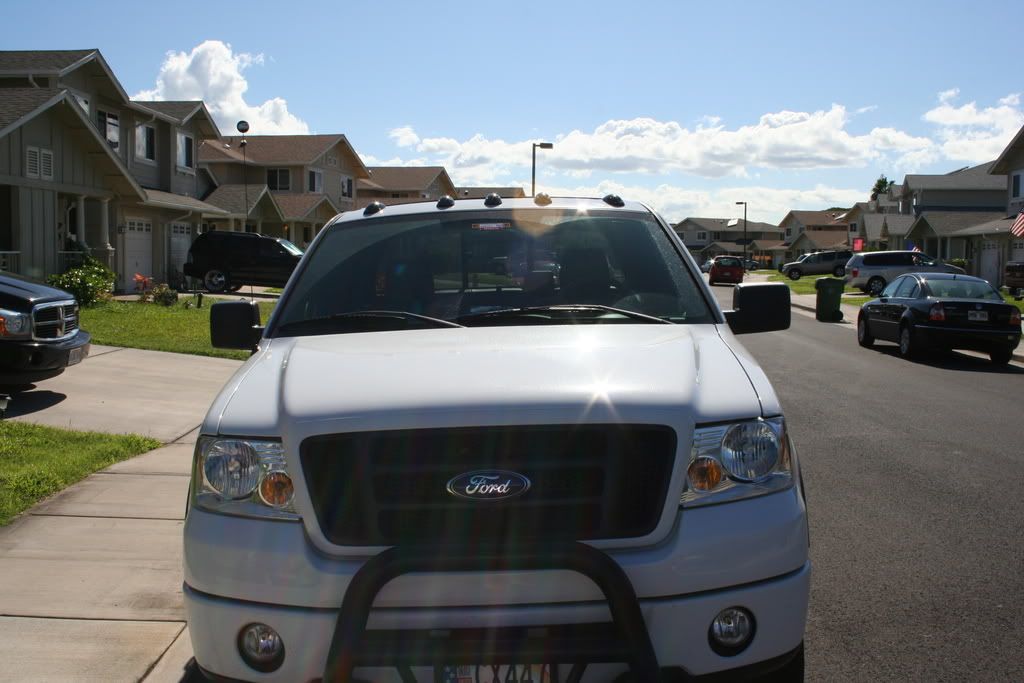
I am a huge fan of the Harley Davidson headlights, but not the pricetag. Even buying cheap Chineese knock-offs, it's still more money than I'm willing to spend.
So, I made my own. I did this on my 2006 F-150 in Oct 2008 and they are still looking good. This is a very easy mod, it just takes a bit of time and $10-20. I did this in my living room watching TV. Took about 2-3 hours for the 1st light, and then maybe 1 hour for the 2nd light (I knew the good pry spots 2nd time around)
WARNING: THIS CAN AND WILL RUIN YOUR HEADLIGHT IF YOU AREN'T CAREFUL. DO NOT OVER-HEAT THE LENS!
I'VE DONE THIS MOD BEFORE AND UNDERSTOOD THE RISK I WAS TAKING. MAKE SURE YOU UNDERSTAND THEM YOURSELF!!!!!
If you do this and break your lights, I will commiserate with you, but please don't gripe to me about doing it. Do this fully understanding the risk, or don't do it at all and instead buy the China knock-offs from eBay
The basics are though:
So, I made my own. I did this on my 2006 F-150 in Oct 2008 and they are still looking good. This is a very easy mod, it just takes a bit of time and $10-20. I did this in my living room watching TV. Took about 2-3 hours for the 1st light, and then maybe 1 hour for the 2nd light (I knew the good pry spots
2nd time around)The basics are though:
Tools:
best of all, I've got about $10 into this mod Oven set at 250F
Screwdriver (recommend 2)
Thin Knife (think Exacto blade, razor blade)
Masking Tape
Straps and/or String
Outdoor Grade Silicone that stays pliant (extremely important)
Paint (recommend Krylon Fusion for Plastic - Flat Black)
The "Method"Screwdriver (recommend 2)
Thin Knife (think Exacto blade, razor blade)
Masking Tape
Straps and/or String
Outdoor Grade Silicone that stays pliant (extremely important)
Paint (recommend Krylon Fusion for Plastic - Flat Black)
Remove bolt in bottom left corner of the assembly
Put the whole assembly in the oven (tray at lowest level)
Heat the assembly for ~5 minutes at a time
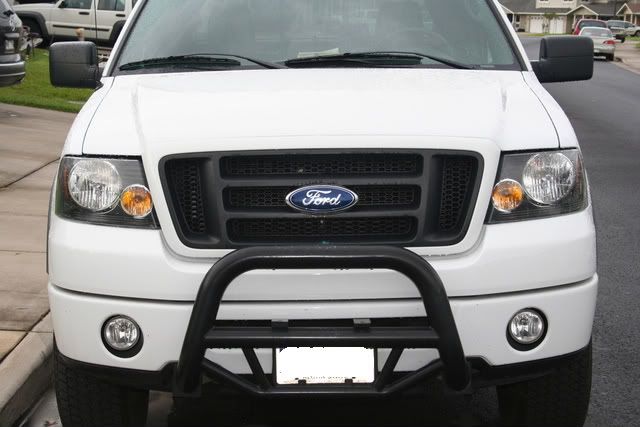
Paint - I used a flat black Krylon Fusion Plastics Paint
Put it back together using outdoor grade silicone that stays pliant.
Put the whole assembly in the oven (tray at lowest level)
Heat the assembly for ~5 minutes at a time
The key here is to get the sealant holding the lens to the casing warm and pliant.
You can easily ruin your headlights. I set a 5 minute timer.
Pull the lens out and use the screwdriver to pry the black casing back from the lensYou can easily ruin your headlights. I set a 5 minute timer.
It takes a bit, but once you get the seal broken, it starts getting easier.
I've found that using 2 flatheads is best. Use 1 to pry, and 1 to provide tension and maintain the gap while resetting your other screwdriver.
Be very patient. And if the rubber stops being pliable, pop the headlight back into the oven for another 5 mintues.
Roughly, it's 5 minutes heat, 3-4 mintues of prying/cutting, rinse and repeat.
Prep - With the case apart, unscrew the chrome piece from the lens. Either "texture" the chrome, or remove it completly by sanding (or some other similar method)I've found that using 2 flatheads is best. Use 1 to pry, and 1 to provide tension and maintain the gap while resetting your other screwdriver.
Be very patient. And if the rubber stops being pliable, pop the headlight back into the oven for another 5 mintues.
Roughly, it's 5 minutes heat, 3-4 mintues of prying/cutting, rinse and repeat.
Paint - I used a flat black Krylon Fusion Plastics Paint
DO NOT PAINT THE REFLECTOR! This will kill your light output.
I wanted contrast, and to tie in with my grill, so I masked off the face of the chrome piece. This left a chrome ring...looks nice IMO
Remove the old sealant from black housing grooves - Oven at 250F again for 5 minutes. The old sealant will pretty much just peel off with some help from a screwdriver.I wanted contrast, and to tie in with my grill, so I masked off the face of the chrome piece. This left a chrome ring...looks nice IMO
Put it back together using outdoor grade silicone that stays pliant.
I had a new tube of Windshield sealant (3M black tar stuff  ) left from a project on my Mustang.
It's a huge tube of caulking I got for $5 (at Safelite) and I personally think better than any RTV or silicone for this application.
Wrap, strap, or tape the casing together. In the pictures below I used those tie-down straps to keep it compressed until the sealant could cure. This is important because the case could spring apart and then subsequently leak.) left from a project on my Mustang. It's a huge tube of caulking I got for $5 (at Safelite) and I personally think better than any RTV or silicone for this application.
#2
08-28-2011, 05:02 AM
#5
08-28-2011, 05:08 AM
#7
08-28-2011, 11:32 AM
Elder User
Join Date: Mar 2007
Location: Canyon Country
Posts: 620
Likes: 0
Received 0 Likes
on
0 Posts
Trending Topics

#10
08-28-2011, 02:37 PM
Postmaster
#12
08-29-2011, 10:49 AM
#13
10-10-2011, 10:41 AM
Elder User
Join Date: Jun 2011
Location: Los Angeles
Posts: 930
Likes: 0
Received 0 Likes
on
0 Posts
I Agree with Tylus on bplack and white truck IMO all the way blacked out tails look good and in anything else they just dont look right all blacked out they look better with a light smoke. DO IT!!!
im gonna try to start this today wish me luck!! lol i have a extra set of head lights so in the case i do ruin these they were just back ups!

#15
10-10-2011, 11:21 AM
Elder User
Join Date: Jun 2011
Location: Los Angeles
Posts: 930
Likes: 0
Received 0 Likes
on
0 Posts
