
1978 F250 Custom Interior
#1
 08-25-2011, 12:27 AM


1978 F250 Custom Interior
Almost finished with my interior, started working on it after I graduated high school 2 years ago. Ive put a lot of time and money into it and kinda wanted to show it off a little. Everything was done by me. I havent seen too many 73-79 interiors that look this nice and clean.
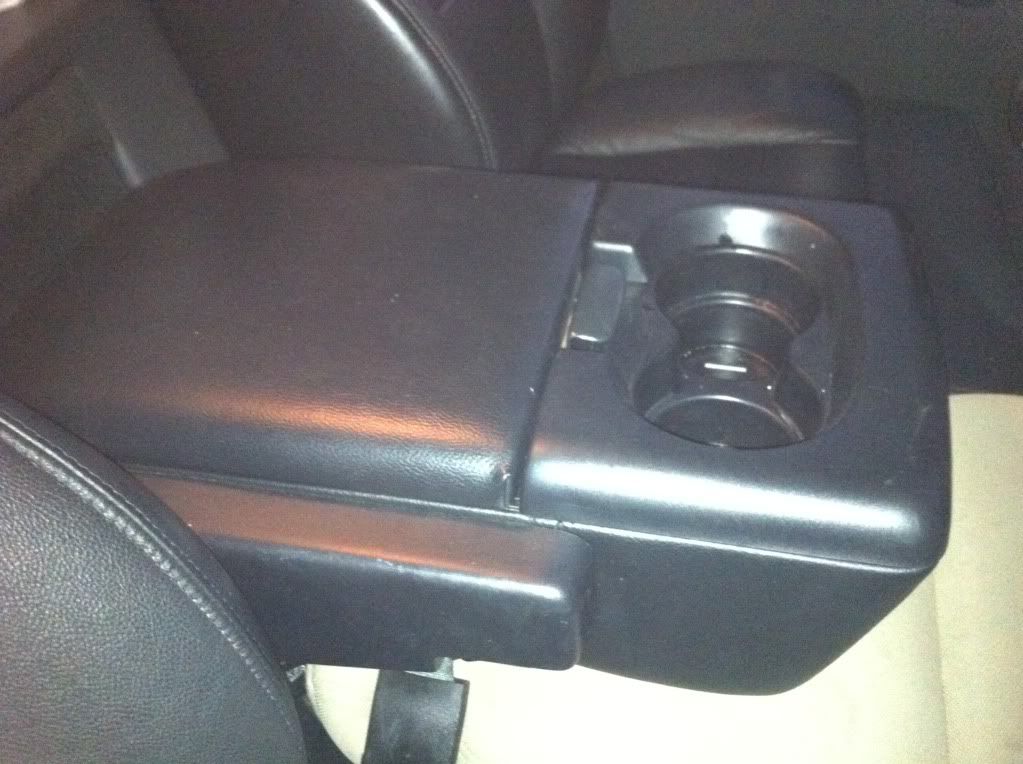
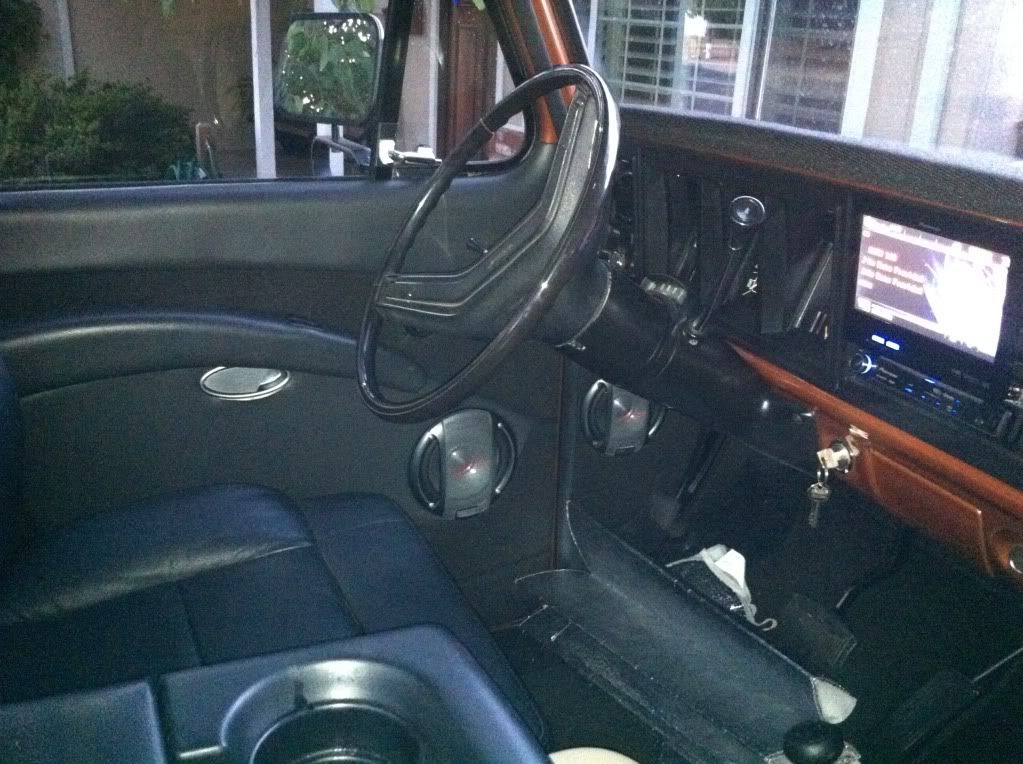
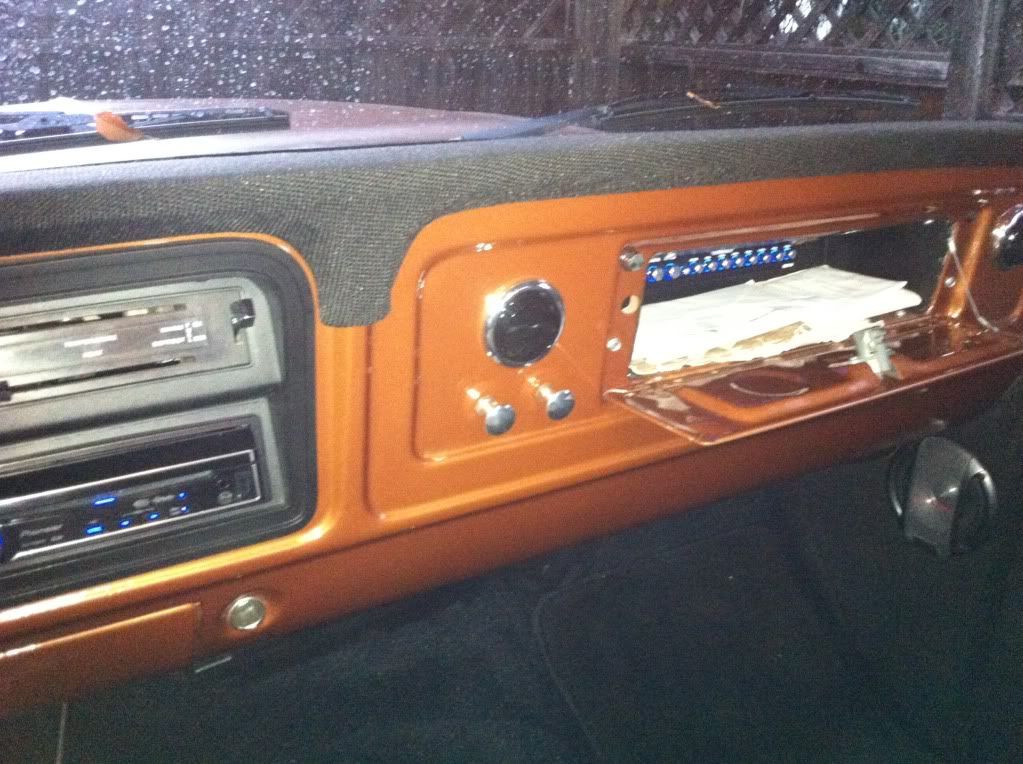
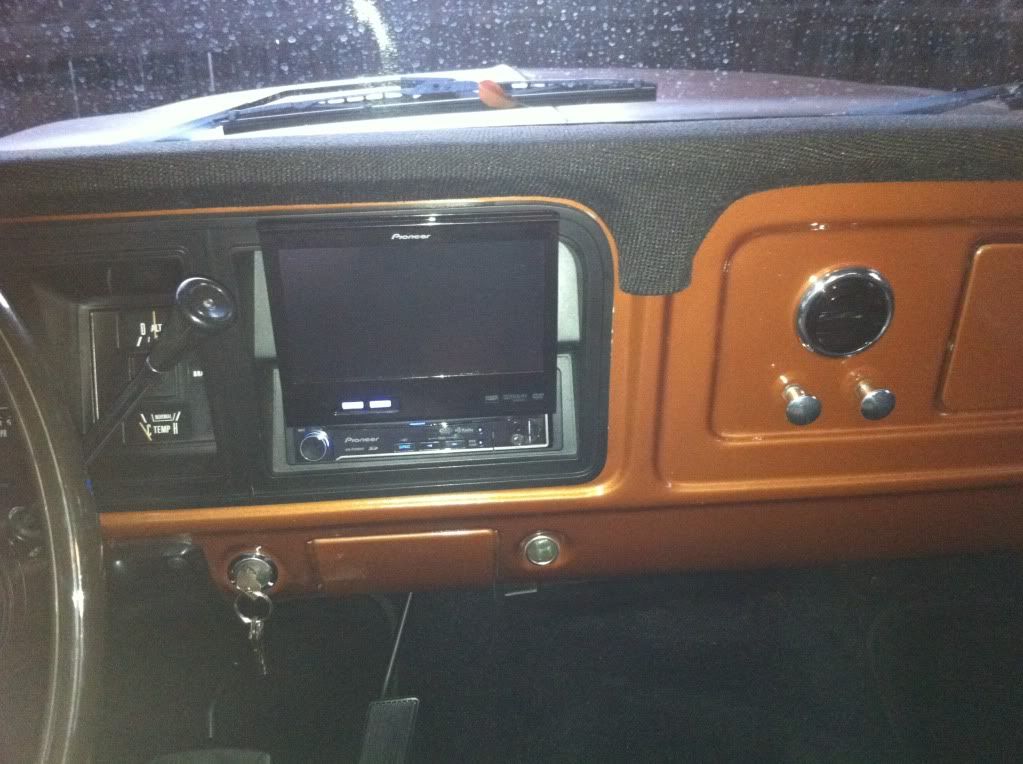
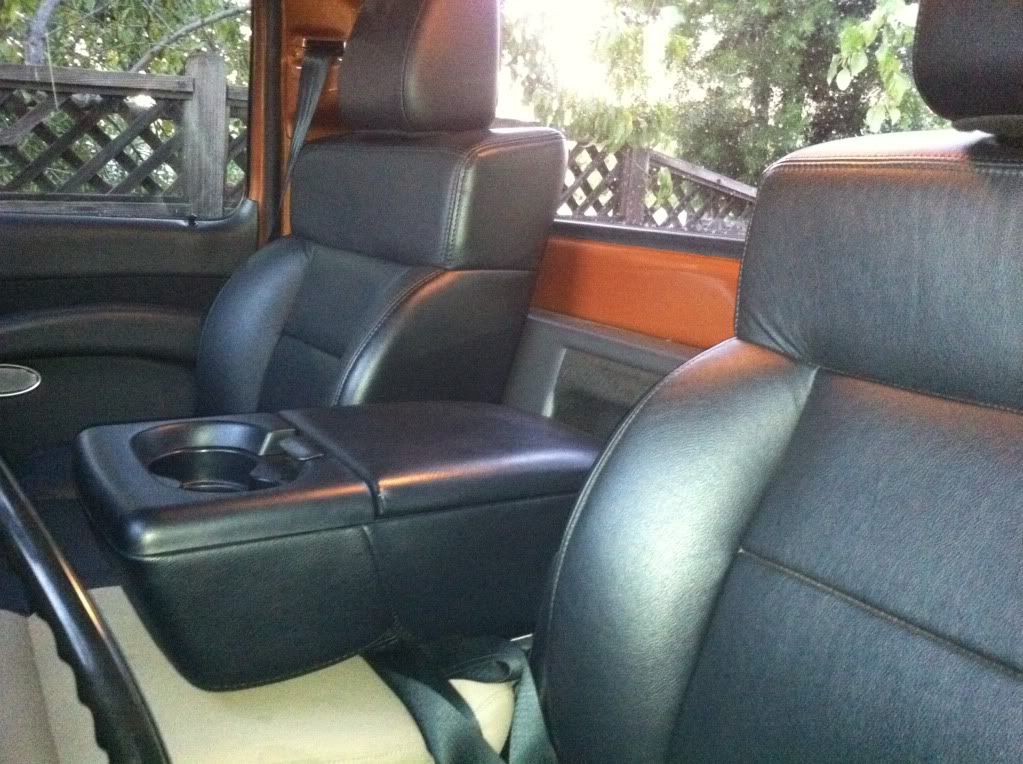
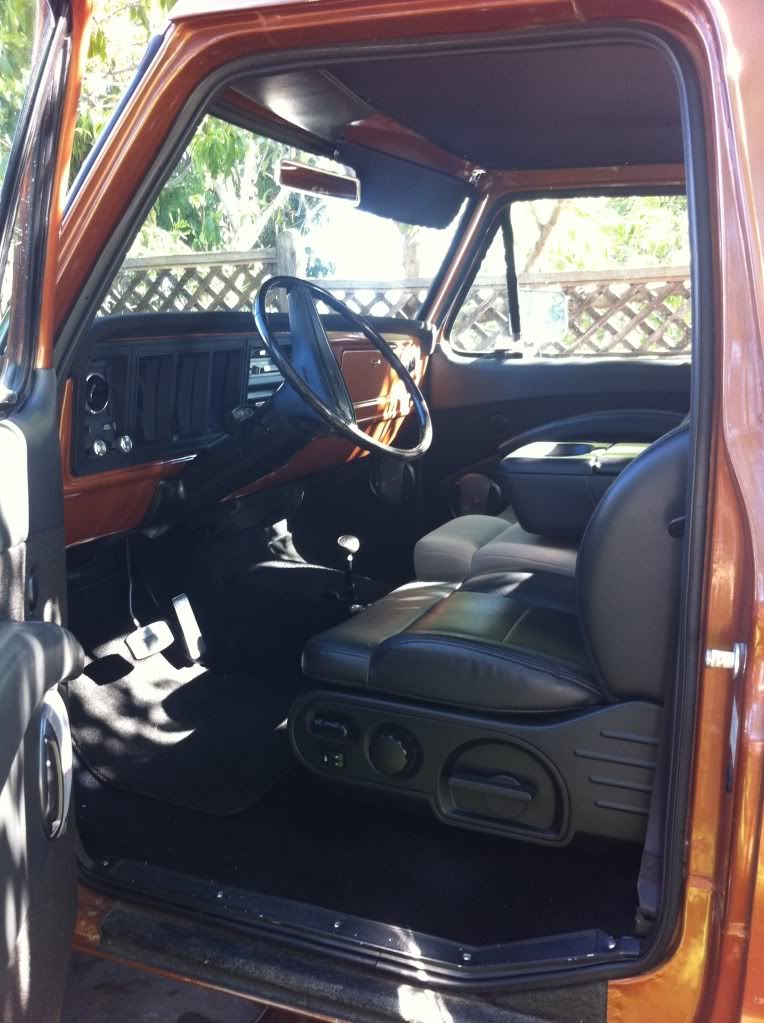
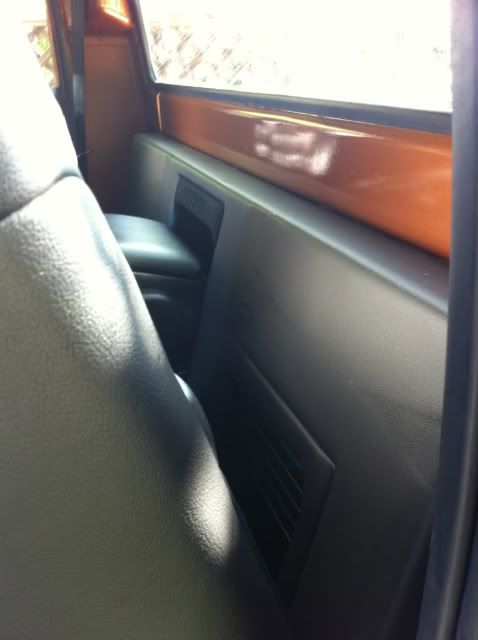
The interior basically started with a Painless blade style fuse block(probably the most important upgrade).All wiring was cleaned up. Everything was stripped out and painted including the cab and dash in factory base/clear. I installed sound deadening mat on the floor, firewall,doors,rabove headliner, and rear panel of the cab behind the seats(really helped with the cab sounding like an empty can). New black carpet and 40/20/40 leather power seats out of a 06 F150. For the seats I had to cut the sliding track off the bottom because of the height, but up and down still works. And the headrests were flipped. I wanted a jump seat for the center console so I still have the bench seat feature(I still need a black leather cushion cover for the jump seat). Seats almost look like they came factory in the truck. I made a new headliner out of masonite and covered it in black headliner material. Door panels were molded out of fiberglass, armrests were made out of MDF and covered in black faux leather and tweed. I have power windows, still need power locks. Tweed kick panels out of masonite. Swapped in tilt column. Custom A/C vents and *****. Gauges and gauge trim were painted.
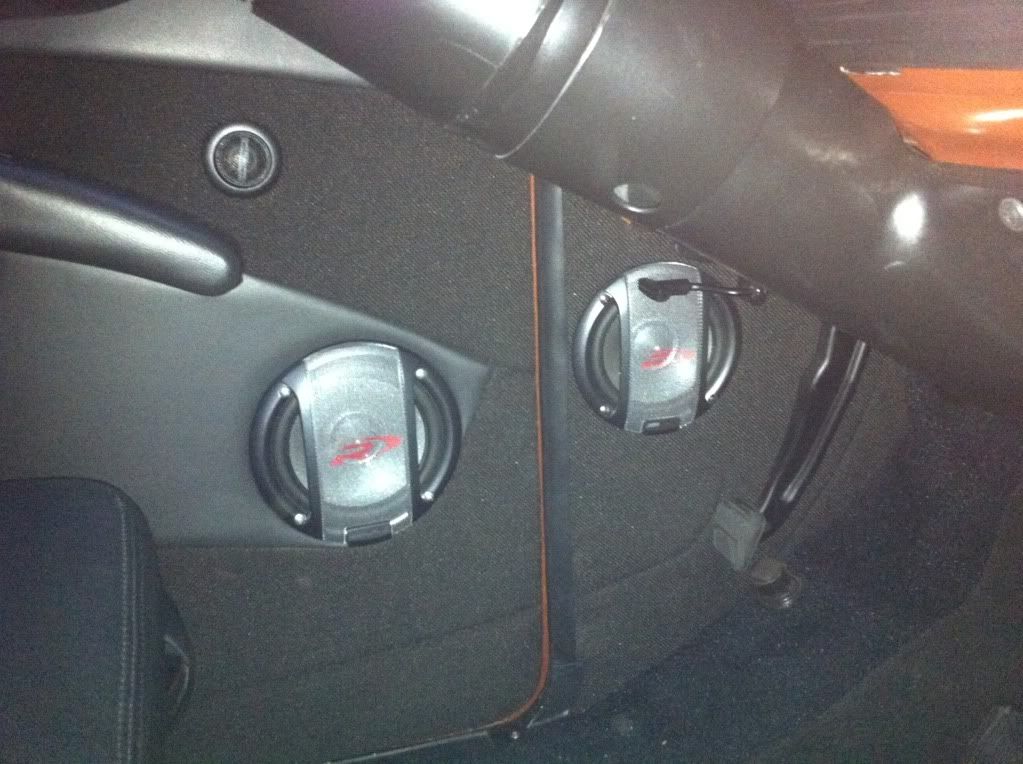
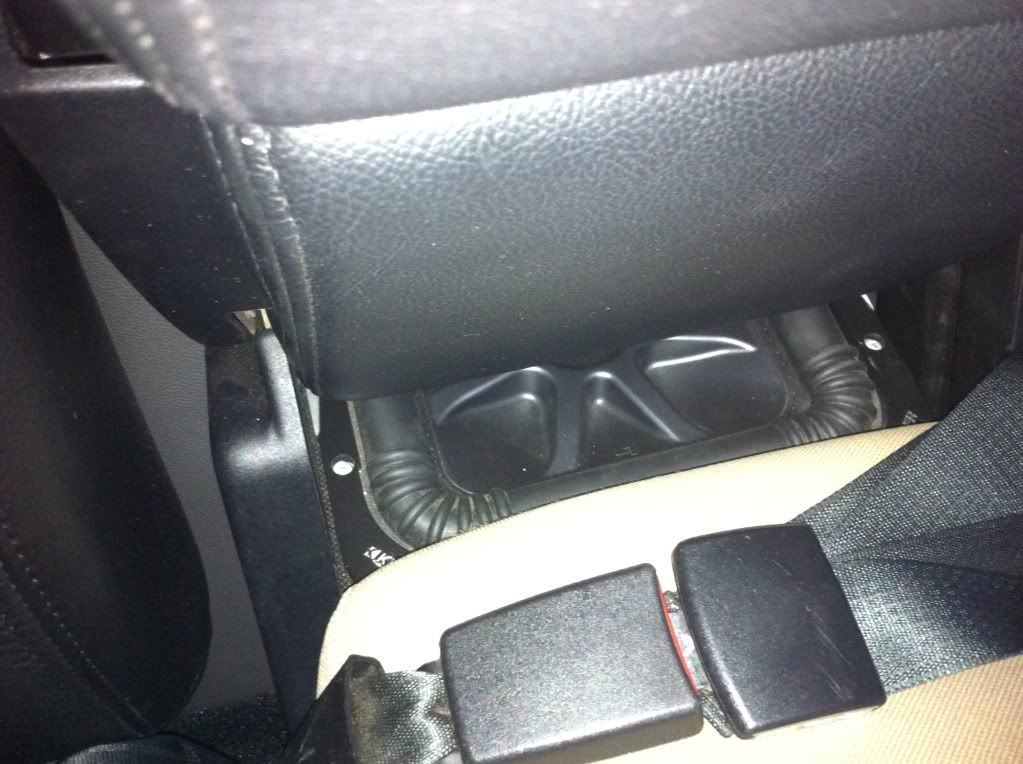
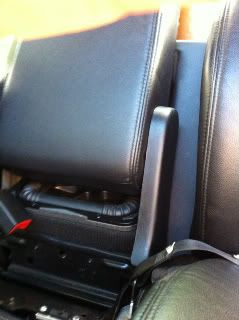
I dont know if anyone has ever put an audio system like I did in one of these trucks. But its louder than the 3" super 44 exhaust when cranked all the way up. Pioneer flip out screen fits perfectly when its open in the dash trim, it almost looks factory. Clarion equalizer hidden in the glove box. Alpine type R component speakers in doors and kick panels. 1 set of tweeters is in the the doors and the other set is hidden under the dash. Components are powered by a pdx 4.100 amp under the jump seat. I made a custom MDF sub enclosure behind the seats that houses a 10" Kicker L7 and 500 watt Alpine amp and covered it in faux leather.
I still want Autometer gauges, steering wheel, and a few odds and ends. But its pretty much finished. I tried to keep everything as clean as possible. Hopefully I can give some of you guys ideas on your projects. Let me know what you think. I will be posting more of the truck later.
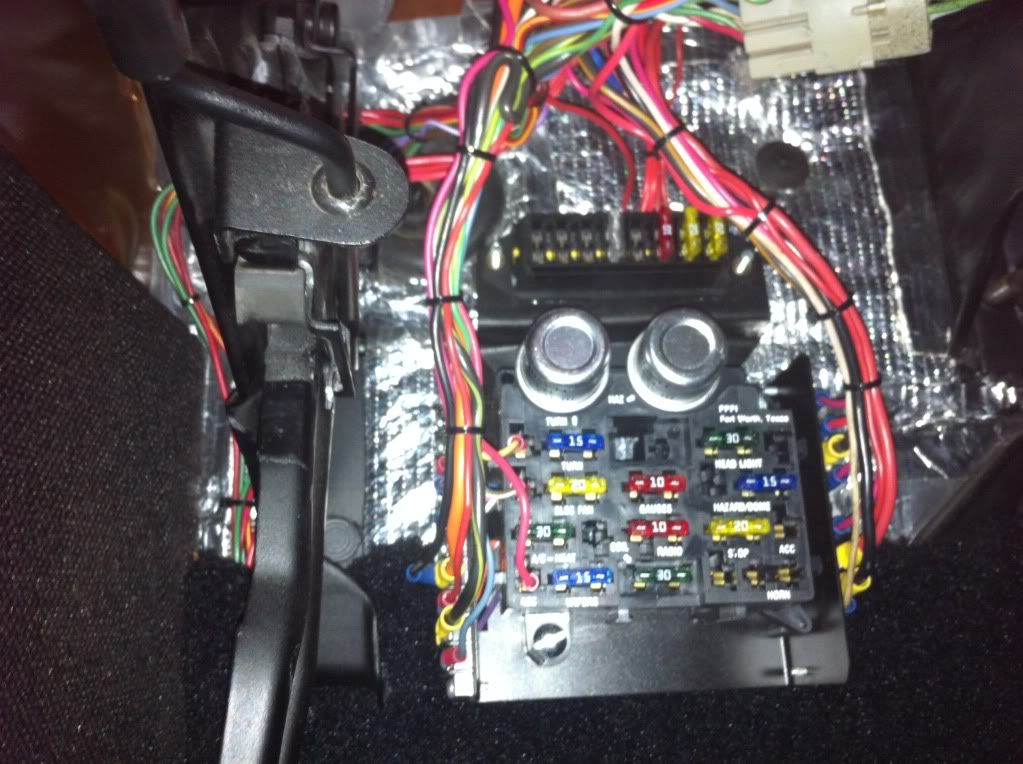
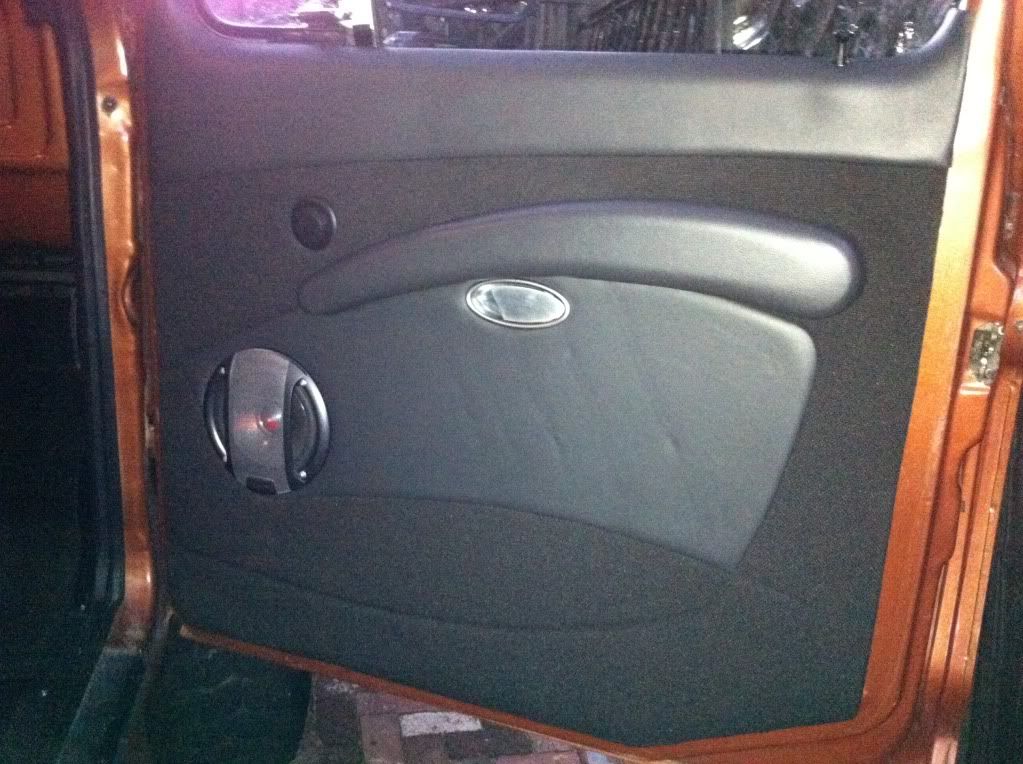
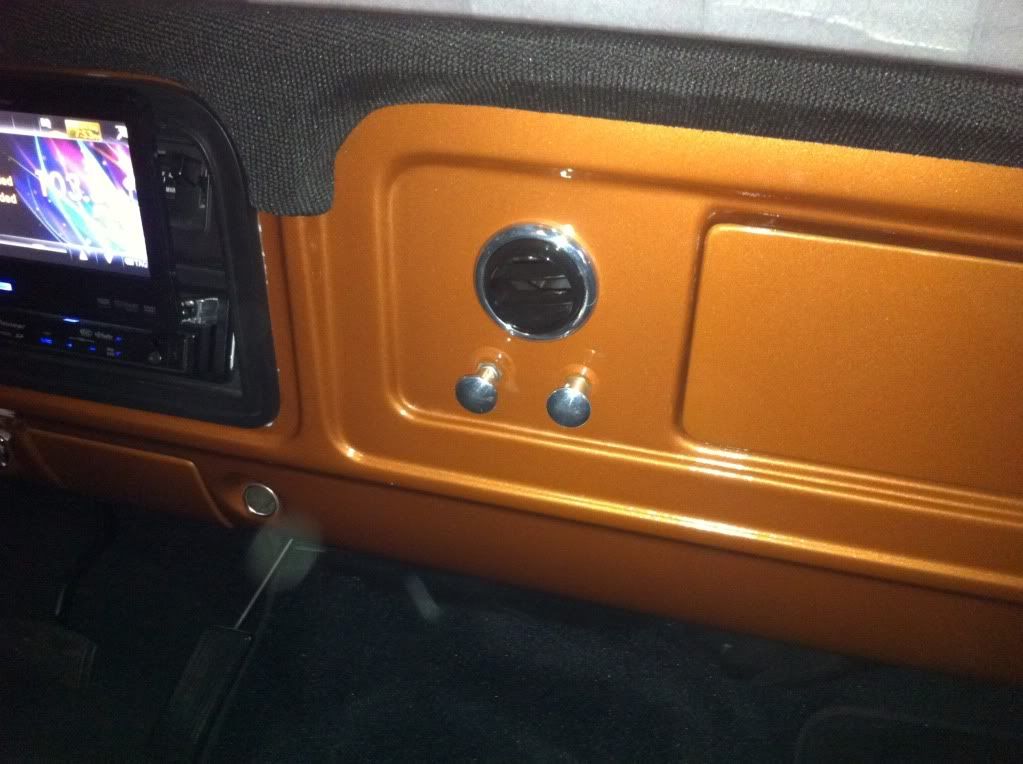


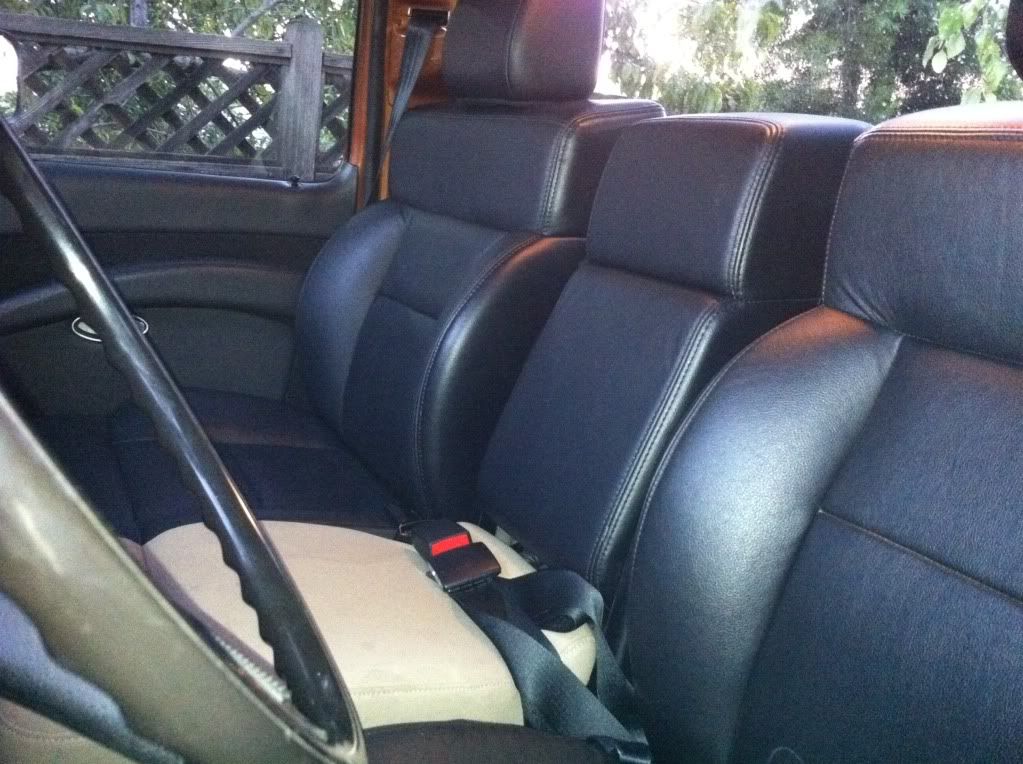
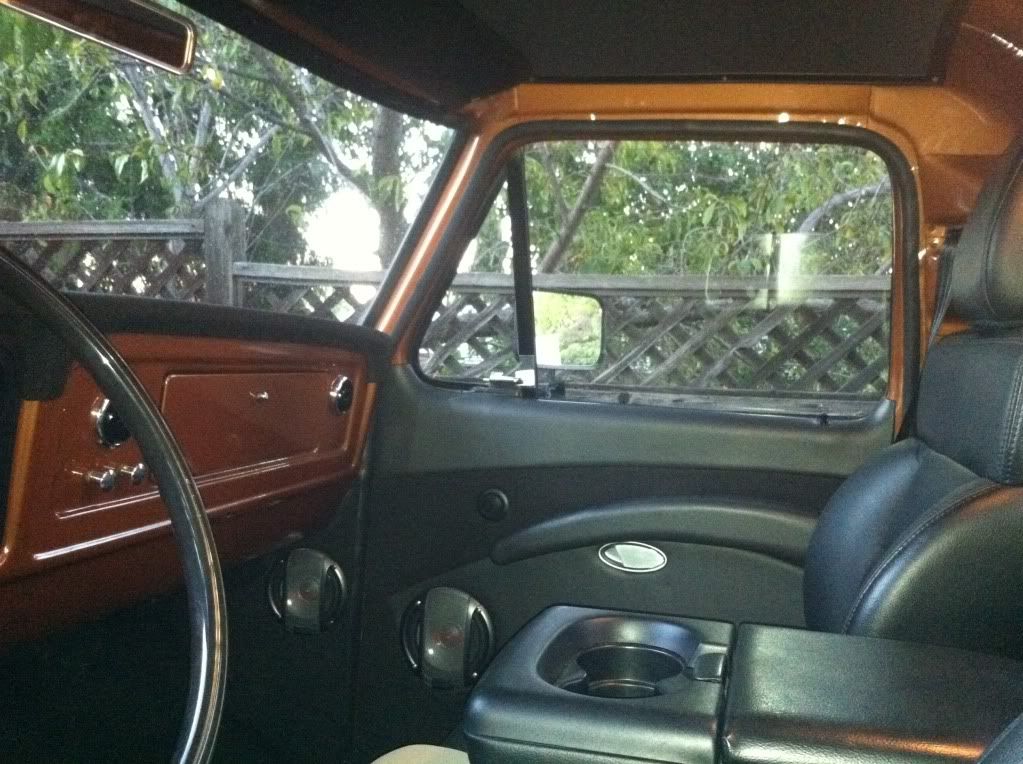
The interior basically started with a Painless blade style fuse block(probably the most important upgrade).All wiring was cleaned up. Everything was stripped out and painted including the cab and dash in factory base/clear. I installed sound deadening mat on the floor, firewall,doors,rabove headliner, and rear panel of the cab behind the seats(really helped with the cab sounding like an empty can). New black carpet and 40/20/40 leather power seats out of a 06 F150. For the seats I had to cut the sliding track off the bottom because of the height, but up and down still works. And the headrests were flipped. I wanted a jump seat for the center console so I still have the bench seat feature(I still need a black leather cushion cover for the jump seat). Seats almost look like they came factory in the truck. I made a new headliner out of masonite and covered it in black headliner material. Door panels were molded out of fiberglass, armrests were made out of MDF and covered in black faux leather and tweed. I have power windows, still need power locks. Tweed kick panels out of masonite. Swapped in tilt column. Custom A/C vents and *****. Gauges and gauge trim were painted.
I dont know if anyone has ever put an audio system like I did in one of these trucks. But its louder than the 3" super 44 exhaust when cranked all the way up. Pioneer flip out screen fits perfectly when its open in the dash trim, it almost looks factory. Clarion equalizer hidden in the glove box. Alpine type R component speakers in doors and kick panels. 1 set of tweeters is in the the doors and the other set is hidden under the dash. Components are powered by a pdx 4.100 amp under the jump seat. I made a custom MDF sub enclosure behind the seats that houses a 10" Kicker L7 and 500 watt Alpine amp and covered it in faux leather.
I still want Autometer gauges, steering wheel, and a few odds and ends. But its pretty much finished. I tried to keep everything as clean as possible. Hopefully I can give some of you guys ideas on your projects. Let me know what you think. I will be posting more of the truck later.
#2
08-25-2011, 12:51 AM

Join Date: Aug 2011
Location: Cape Coral, Florida
Posts: 685
Likes: 0
Received 0 Likes
on
0 Posts
#3
08-25-2011, 01:44 AM

#5
08-25-2011, 08:07 AM
Posting Guru
Join Date: Jan 2001
Location: S. Mississippi
Posts: 2,357
Likes: 0
Received 0 Likes
on
0 Posts
#6
08-25-2011, 08:58 AM
Posting Guru
Join Date: Feb 2011
Location: sacramento
Posts: 1,128
Likes: 0
Received 0 Likes
on
0 Posts
#7
08-25-2011, 10:17 AM

Oooo very nice work! Green... erm... Orange with envy! haha
I have questions though!!!!
How did you mount your sub box, and how exactly did you make it?
I've been pondering the EXACT same idea with a sub box between the two seats, but I guess you beat me to it by a long shot haha.
Why don't you invest in a fancy steering wheel? I like the factory one, don't get me wrong... just something I wanted to comment on.
What kind of material is that stuff on the bottom 2/3 of your door panels made of? I want some!!!
Where did you get those vents from? I friggen want them! lol. They're so nice with that chrome edge. And what the heck are those two **** below the vent for? Are they supposed to simulate the old style A/C vent ****?
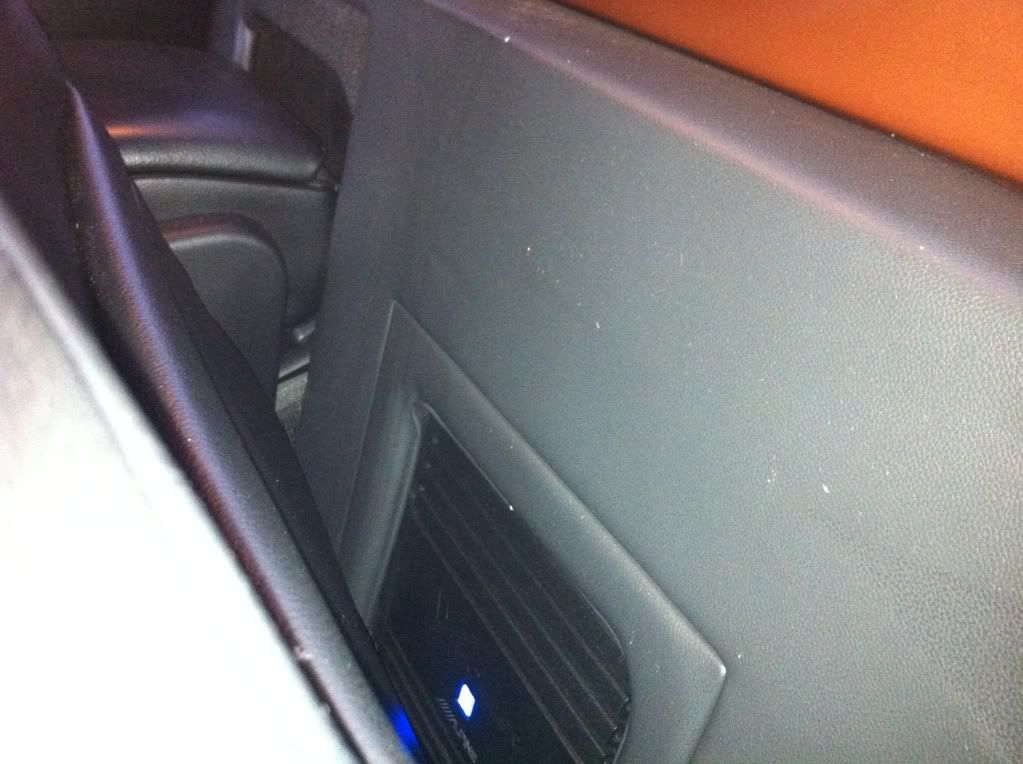
Oh, and I love how you put something in on the cab below the dash, but in front of the door near the dimmer switch. Usually, it's just dead, empty space there... but you actually used it wisely. Very well done!
I have questions though!!!!
How did you mount your sub box, and how exactly did you make it?
I've been pondering the EXACT same idea with a sub box between the two seats, but I guess you beat me to it by a long shot haha.
Why don't you invest in a fancy steering wheel? I like the factory one, don't get me wrong... just something I wanted to comment on.
What kind of material is that stuff on the bottom 2/3 of your door panels made of? I want some!!!
Where did you get those vents from? I friggen want them! lol. They're so nice with that chrome edge. And what the heck are those two **** below the vent for? Are they supposed to simulate the old style A/C vent ****?
Oh, and I love how you put something in on the cab below the dash, but in front of the door near the dimmer switch. Usually, it's just dead, empty space there... but you actually used it wisely. Very well done!
Trending Topics
#8
08-25-2011, 11:49 AM
#9
08-25-2011, 11:58 AM
The sound deadening was basically dynomat, but I bought it on ebay its called edead. Its a lot cheaper, but the same thing as dynomat. And on top of that is the roll out padded mat bought from summit that i sealed down with foil tape. It really helps make the cab sound solid.
#10
08-25-2011, 12:07 PM
Oooo very nice work! Green... erm... Orange with envy! haha
I have questions though!!!!
How did you mount your sub box, and how exactly did you make it?
I've been pondering the EXACT same idea with a sub box between the two seats, but I guess you beat me to it by a long shot haha.
Why don't you invest in a fancy steering wheel? I like the factory one, don't get me wrong... just something I wanted to comment on.
What kind of material is that stuff on the bottom 2/3 of your door panels made of? I want some!!!
Where did you get those vents from? I friggen want them! lol. They're so nice with that chrome edge. And what the heck are those two **** below the vent for? Are they supposed to simulate the old style A/C vent ****?
Oh, and I love how you put something in on the cab below the dash, but in front of the door near the dimmer switch. Usually, it's just dead, empty space there... but you actually used it wisely. Very well done!
The seats hold the sub enclosure in place its not bolted down or anything. Im planning on getting a Grant Heritage steering wheel, just dont have the cash right now. The material on my door panels is black tweed, all the material was ordered from yourautotrim.com, they have great prices. The vents and ***** are made by billet specialties, I bought them from summit. The ***** mount to the original A/C controls.

#13
08-25-2011, 01:00 PM
#14
08-25-2011, 01:06 PM
If that's all part of the seats... man I'm out of date cause I've never seen anything like that before.
#15
08-25-2011, 01:14 PM
The enclosure behind the seats is for the subwoofer which is mounted in the middle under the jumpseat. Its basically an empty sealed enclosure that houses your subwoofer. The size of an enclosure depends on what size subwoofer you use. It looks big, but its actually completely hidden behind the seats, the only part of it you actually see is right above the jump seat.