
1978 F250 Custom Interior
#61
 09-01-2011, 01:31 PM


Looks great! Pretty much exactly what I've been wanting to do to mine. I found a set of power leather black seats out of an 07 HHR. I want all of the creature comforts in an old truck.
When you say you layered the upholstery on the panels, did you cover smaller panels that glued or something to the larger mdf panel?
I really want to try this, even though my last attempt at fiberglassing something turned out to be quite a fiasco (and is still not finished, lol).
When you say you layered the upholstery on the panels, did you cover smaller panels that glued or something to the larger mdf panel?
I really want to try this, even though my last attempt at fiberglassing something turned out to be quite a fiasco (and is still not finished, lol).
#62
09-01-2011, 02:09 PM
Lead Driver
These seats are really tall with the brackets. I wanted to keep all of the power functions on my newer seats and even with keeping them as low as possible mounting wise they still make me sit a bit high. Good thing I'm not really a "tall" guy...
It took a bunch of effort/fab to mount the things, but hey, I'm picky about how work is done on my truck
https://www.ford-trucks.com/forums/8...t-install.html
It took a bunch of effort/fab to mount the things, but hey, I'm picky about how work is done on my truck
https://www.ford-trucks.com/forums/8...t-install.html
#63
09-01-2011, 02:40 PM
These seats are really tall with the brackets. I wanted to keep all of the power functions on my newer seats and even with keeping them as low as possible mounting wise they still make me sit a bit high. Good thing I'm not really a "tall" guy...
It took a bunch of effort/fab to mount the things, but hey, I'm picky about how work is done on my truck
https://www.ford-trucks.com/forums/8...t-install.html
It took a bunch of effort/fab to mount the things, but hey, I'm picky about how work is done on my truck
https://www.ford-trucks.com/forums/8...t-install.html
#64
09-01-2011, 03:00 PM
Lead Driver
Totally understandable, and if I had a standard cab the story would be different. The problem is after my 1st truck (Mazda pickup - standard cab) I haven't wanted another standard cab. While these trucks are different than a mini truck for sure, storage & space in the cab is still lacking too much for me.
I was mainly using my link/pics to show that the bases on these seats are in fact HUGE. The floors in newer trucks are much lower than in our older trucks, so the newer seats are built with taller brackets on the bottom.
I'm only 5'10" - 5'11" as well and with my seat all the way down my head is right where the headliner will be. I built the seat brackets with the seat all the way down like that so the seats can go up if needed (the girl is shorter than i am) and then forward and back as well. I could see possibly wanting the seat in your truck to slide forward a bit in case someone shorter needed to drive it, but I do understand not being able to do any other adjustments.
#65
09-01-2011, 03:36 PM
Posting Guru
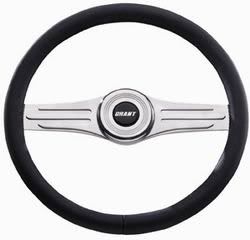
Wow, that is absolutely aMAZING looking! My interior is second on my list of how things get done, behind mechanical (although at leas it's not as far down as body.....), but I've actually thought it's been looking pretty good lately with the dash rehabbed, the seat cleaned, a new headliner, and nice door panels, but GEEZ yours puts mine to shame and then some! The one thing that stands out, to me, is the steering wheel. It's obviously stock, and looks faded like mine and everybody else's! If it were me, and I was going for that siiiick retro-modern look, I would get a brushed aluminum 3 spoke leather sport wheel, maybe even anodized in a yellow-brown, or burnt orange to compliment your interior, but if you are trying to stick stock, I think you owe it to yourself to at least get a nice old wood grain and chrome center plate in good shape and slap it on there. That thing looks like a show truck! And that wheel is one of the only things that, in my opinion, holds it back any.
My questions are though, for those power seats, and especially that sound system and screen, what alternator are you running?! And then, I'm just a few years out of highschool myself, are you in school for anything now? Where and what? And if not, what do you do for work?
I'm in and out of school for Ag, one full year under my belt so far, but I've been working as a welder for myself for about half a year and am LOVING it!
Looks great though again! AleX
#66
09-01-2011, 05:01 PM
Wow, that is absolutely aMAZING looking! My interior is second on my list of how things get done, behind mechanical (although at leas it's not as far down as body.....), but I've actually thought it's been looking pretty good lately with the dash rehabbed, the seat cleaned, a new headliner, and nice door panels, but GEEZ yours puts mine to shame and then some! The one thing that stands out, to me, is the steering wheel. It's obviously stock, and looks faded like mine and everybody else's! If it were me, and I was going for that siiiick retro-modern look, I would get a brushed aluminum 3 spoke leather sport wheel, maybe even anodized in a yellow-brown, or burnt orange to compliment your interior, but if you are trying to stick stock, I think you owe it to yourself to at least get a nice old wood grain and chrome center plate in good shape and slap it on there. That thing looks like a show truck! And that wheel is one of the only things that, in my opinion, holds it back any.
My questions are though, for those power seats, and especially that sound system and screen, what alternator are you running?! And then, I'm just a few years out of highschool myself, are you in school for anything now? Where and what? And if not, what do you do for work?
I'm in and out of school for Ag, one full year under my belt so far, but I've been working as a welder for myself for about half a year and am LOVING it!
Looks great though again! AleX
My questions are though, for those power seats, and especially that sound system and screen, what alternator are you running?! And then, I'm just a few years out of highschool myself, are you in school for anything now? Where and what? And if not, what do you do for work?
I'm in and out of school for Ag, one full year under my belt so far, but I've been working as a welder for myself for about half a year and am LOVING it!
Looks great though again! AleX
Alternator is a powermaster 90 amp, but im definately upgrading to a 140 when I install an electric fan, which is my next project after Im done with putting in the Autometer gauges.
I was going to school I wanted to be a mechanical engineer, but it only took me a semester to figure out I didnt like it. Right now Im trying to get hired as an Apprentice Lineman, but the company Im trying to get hired with is mostly hiring from lineman schools right now.
 Even though I passed all their tests. Haha. So coming up Ill probably be going to NLC.
#67
09-01-2011, 08:45 PM

Nothing to do with the truck, but as far as the job thing goes you should consider something related to doing vehicle interiors. It definitely seems to be your passion and you are clearly good at it. Check out 48days.net It's a web site Dan Miller has for his book "48 Days to the Work You Love" Check out the book and the site, it will help you with the job search.
#68
09-02-2011, 03:52 PM
back to truck stuff...
Like I said I tried some fiberglassing a while back and it didn't work out too well. I think part of my problem was getting the resin on the mat. Do you dunk the mat in it and work it in then spread it out, or spread out the mat and work the resin in or what?
I tried it with the cloth that is woven together, and it shrunk quite a bit in both directions
#69
09-02-2011, 04:51 PM
back to truck stuff...
Like I said I tried some fiberglassing a while back and it didn't work out too well. I think part of my problem was getting the resin on the mat. Do you dunk the mat in it and work it in then spread it out, or spread out the mat and work the resin in or what?
I tried it with the cloth that is woven together, and it shrunk quite a bit in both directions
Like I said I tried some fiberglassing a while back and it didn't work out too well. I think part of my problem was getting the resin on the mat. Do you dunk the mat in it and work it in then spread it out, or spread out the mat and work the resin in or what?
I tried it with the cloth that is woven together, and it shrunk quite a bit in both directions

#70
09-02-2011, 05:07 PM
#71
09-02-2011, 07:27 PM
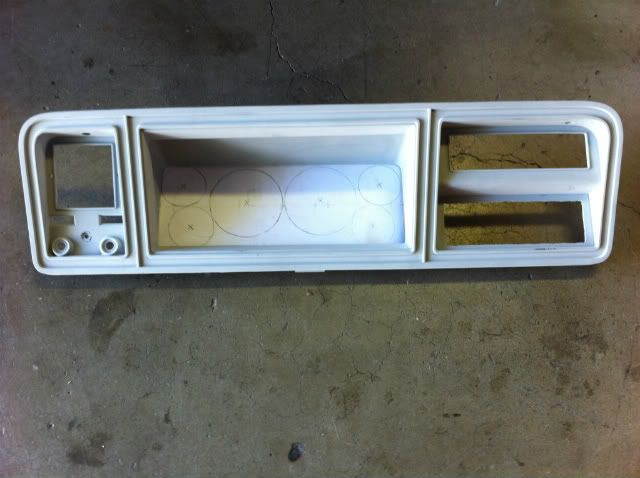
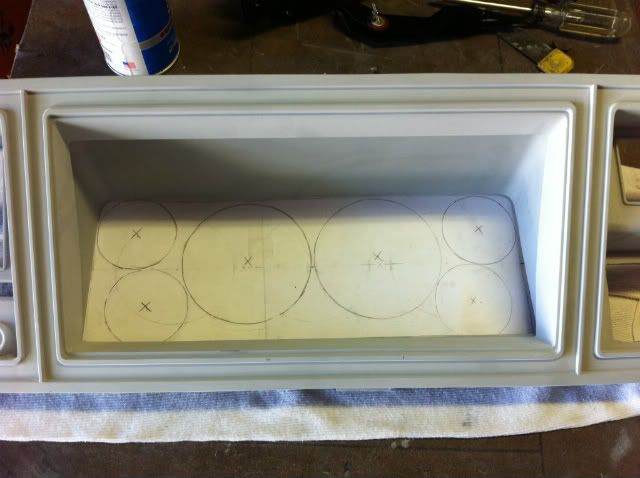
Got all the bezels primed and sanded. Just need to paint with SEM Trim black. Im going to fill them with Autometer Z gauges, the panel the gauges are going to sit in is going to be brushed black aluminum, so its going to be black on black. Aluminum sheet comes in the mail tomorrow. Autometer gauges and indicator lights are going to get ordered next week, so I should be finished pretty soon.
#73
09-03-2011, 08:00 AM
Not being critical (I love your work!) but will the gauges really fit? Are the circles the total gauge size, including bezel? Also, what size gauges are you using? My cluster in my crew cab is beat, and I would like to do something like this eventually, and I really like the look of how you are doing yours. Keep up the GREAT work!
#74
09-03-2011, 09:16 AM
Not being critical (I love your work!) but will the gauges really fit? Are the circles the total gauge size, including bezel? Also, what size gauges are you using? My cluster in my crew cab is beat, and I would like to do something like this eventually, and I really like the look of how you are doing yours. Keep up the GREAT work!
#75
09-03-2011, 10:32 PM