'51 F4 project


#62
 10-09-2011, 01:28 PM

Fleet Owner
#64
10-09-2011, 02:59 PM

Thanks. I got really lucky with this one. Almost rust free CA farm truck. It's a lot farther along than most 51's I've seen on CL and elsewhere. I just need to get rid of the widow makers and rotten tires, and fix a plethora of wiring problems so I can drive it.
In the mean time, I'm doing lots of "little" things to it that don't cost a fortune (like wheels and tires do). Of course, the little things are adding up to a pretty penny too.
In the mean time, I'm doing lots of "little" things to it that don't cost a fortune (like wheels and tires do). Of course, the little things are adding up to a pretty penny too.
#65
10-09-2011, 03:03 PM
I was a little disappointed that no instructions to that effect came with it. Actually, no instructions at all came with it.
#66
10-11-2011, 10:10 PM
Lock the doors on your way out
I read the other posts about why the driver's door has no key lock cylinder. And since I didn't have the key for the passenger door lock, I bought a new cylinder and key. After reading the Shop Manual instructions, I went to change it.
That's when Mr Rust took over. Since the set screw is horizontal, no amount of Liquid Wrench worked, because it couldn't penetrate the threads.
So I got out the heat gun (hole too small to use a torch) and tried that. No help. While it was hot, I cooled it with contact cleaner. No help.
I was selecting a drill bit to remove it completely, and probably destroy the entire mechanism, when I decided to use the same technique I had on the gas pedal bracket's rusted screws... a bigger hammer. I had already whomped on it with a large punch and some pretty hefty swings of the hammer, to no avail.
Since I was down to the choice of beating the holy heck out of it or drilling, I decided to really lay into it. Two whomps and it broke loose. It came out hesitantly, but it came out. I cleaned up the set screw really well, and did my best to clean out the hole.
Next was the easy part... slide in the new lock assembly and tighten the set screw. But the new one must be for a "universal" fit, as the shaft was 3/16" too long. I cut it of, tapered the end to match the original, drilled a little guide hole in the end to match the original, and it works like a champ.
I can now lock up the truck for the first time. Yay!
Oh, and back to the opening statement, when I told my neighbor what I had just installed, he remarked "Yeah, they didn't have door locks on the left doors so you wouldn't get hit by oncoming traffic standing in the street. So you would lock the drivers door from the inside and slide across to exit on the right." I guess everybody knew this but me.
#67
10-16-2011, 07:21 PM
Ignition switch is in
I was going to wait to install the new ignition switch until I redid the wiring harness. But I couldn't stand that toggle switch a PO installed any longer, so I put in the new one today.
While I was at it, I decided to troubleshoot the gas gauge, since it's the only one that doesn't work. I have to admit I should have bought this Shop Manual before I started asking questions on FTE. It answers a lot of those questions... like how to troubleshoot gauges. I discovered the gauge and wiring to the sending unit are good, so that just leaves the sending unit. One more thing to add to my wish list.
And unfortunately, my Shop Manual binding started coming unglued already. I could understand this if the book was as old as the truck, but it's a reprint. Anyone else had that problem with their book?
#68
10-20-2011, 11:12 AM
Once I figured out the front was more or less flexible, I calculated where the mounting holes would locate after I stretched and squashed the front. They line up, so I knew that must be the trick.
I was a little disappointed that no instructions to that effect came with it. Actually, no instructions at all came with it.
I was a little disappointed that no instructions to that effect came with it. Actually, no instructions at all came with it.
 Just thinking aloud.
 Keep at this thing. It's already running better, looking better, sounding better. We should try a come-along on the tie rod... use some nylon webbing to secure it to the tie rod and the rear axle or some point on the frame and pull it out.
#69
10-20-2011, 07:02 PM

#70
10-21-2011, 04:41 PM
Best way to get the tie rod end loose?
After hours of struggling to remove the rusted-in cotter key from the top of the tie rod end, I finally was able to grab it with vise grips and eventually knock it out with a hammer. Now with the nut removed, I can't get the tie rod end to budge. I put the nut back on it partially and beat on it with a hammer, soaked it in Liquid Wrench, beat on it some more, but it won't budge.
I'm looking for suggestions here. Anyone?
I'm looking for suggestions here. Anyone?
#71
10-21-2011, 05:44 PM
Back to my oil leak
It's really hard for me to see where this oil leak is coming out of the oil filter. I looked in the parts manual for gaskets and seals, and this picture is all I can find.
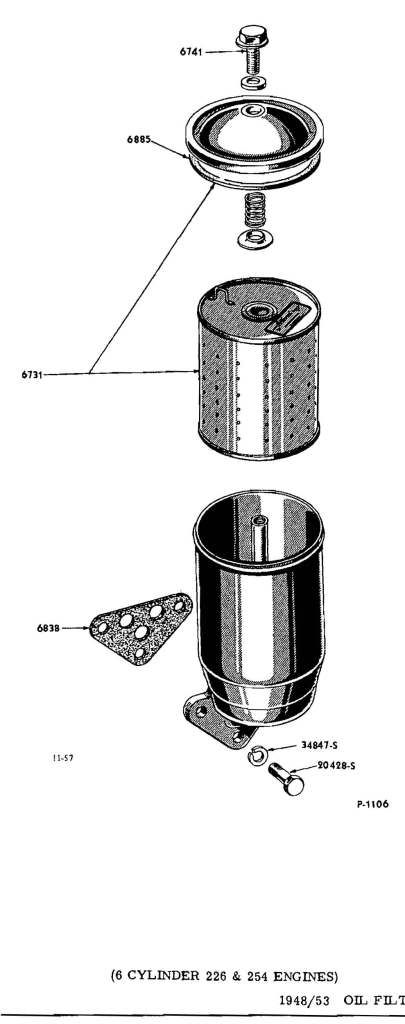
It looks like there's only one rubber seal, 6885, and one gasket, 6838. And of course the washer for the top bolt, 6741.
So my question is, are these the only two places oil could leak from this type of filter (it's not coming out the top bolt)?
Oh btw, mine has a Fram filter in it.
It looks like there's only one rubber seal, 6885, and one gasket, 6838. And of course the washer for the top bolt, 6741.
So my question is, are these the only two places oil could leak from this type of filter (it's not coming out the top bolt)?
Oh btw, mine has a Fram filter in it.
#72
10-21-2011, 08:17 PM
My truck does not leak oil now.
I cleaned the years worth of gunk off the oil filter canister and surrounding areas hoping I could see where the leak originated. Since it was a BAD leak, there was a lot of gunk to clean off the frame, oil pan, bell housing and all around the filter canister.
That picture in the parts manual is a little misleading, as it shows the oil filter canister as one part... which it is not. And, actually, that makes sense now that I know it. Much easier to manufacture in multiple pieces.
There are actually four bolts holding the upper part to the lower part. All four were loose. They are no longer loose, I no longer have to keep an oil catch pan under the truck.
And while I feel a little stupid for not figuring this out sooner, no literature I have been able to find showed me how it is made. I was really putting it off anyway, as I wasn't looking forward to spending the day under the truck scraping off gunk.
#73
10-21-2011, 08:44 PM
#74
10-22-2011, 09:20 AM

After hours of struggling to remove the rusted-in cotter key from the top of the tie rod end, I finally was able to grab it with vise grips and eventually knock it out with a hammer. Now with the nut removed, I can't get the tie rod end to budge. I put the nut back on it partially and beat on it with a hammer, soaked it in Liquid Wrench, beat on it some more, but it won't budge.
I'm looking for suggestions here. Anyone?
I'm looking for suggestions here. Anyone?
Edit: It has been a long time since I had my F4 and do not remember how they fit together but if by chance the tie rod fits in from the top, place a bottle jack under the thread end and put pressure on the tie rod end. Then wack the tie rod with a BFH.
#75
10-22-2011, 09:33 AM
A pickle fork will usually pop the tie rod end out. Of course you'll have to replace the grease seal but they are available.
Edit: It has been a long time since I had my F4 and do not remember how they fit together but if by chance the tie rod fits in from the top, place a bottle jack under the thread end and put pressure on the tie rod end. Then wack the tie rod with a BFH.
Edit: It has been a long time since I had my F4 and do not remember how they fit together but if by chance the tie rod fits in from the top, place a bottle jack under the thread end and put pressure on the tie rod end. Then wack the tie rod with a BFH.
I didn't know what a pickle fork was until I read your message and Googled it. Harbor Freight has them for $8. Actually, my dad had one in his tools when I was a kid, but I never saw him use it, so didn't know what it was for.
And the F4 tie rod fits in from the bottom.

