Help me with a carburetor swap
#1
 06-23-2011, 03:52 PM


Join Date: Jun 2011
Location: Choctaw, OK
Posts: 64
Likes: 0
Received 0 Likes
on
0 Posts
Help me with a carburetor swap
Hey guys, it's me again. My carburetor came in today and I need some help identifying it's parts and figuring out what (if anything) else I'll need to pick up and then how to swap things out with my existing carb. Anyway, here's the new guy right here:

This view represents the driver's side of the carb. I believe that brass fitting is for the climatic choke tube that goes down and installs into the manifold somehow, but I'm not 100% on that. On this side I have a red and a non painted screw also, what function do they serve. Is this how you tune it?

Here we have the passenger side. I count 4 vacuum ports and one yellow screw. The lower three vacuum ports are tiny, maybe 1/8 inch? The upper one appears slightly larger, around 1/4 or so.

So here are my questions:
1. Is that diamond looking thing the gasket? I'm assuming that this is the gasket that goes in between the carb and the intake manifold. If so, do I need any sort of gasket lube or grease or whatnot? If not, what is it and where can I buy a gasket?
2. I'm assuming the red, yellow and non painted screws are for tuning. What does what? How, in general, should one tune a freshly out of the box carburetor?
3. Vacuum lines. My existing carb has about 30 of them it seems coming off of it but they're all cut and stoppered up. I'm assuming that some of these at least will need to be connected. How do I know which one needs to be hooked up, what they need to be hooked up to and where can I buy vacuum hoses?
4. That big back drum looking deal on the back... is that the electric choke? Is that plug n play?
5. Before I tackle this thing (tomorrow), I'm going to read up and watch a few carburetor install videos. Do you guys have any advice, tips or got ya's that I should know about for installing a carb?
#2
06-23-2011, 04:32 PM

Originally Posted by Muidem
So here are my questions:
1. Is that diamond looking thing the gasket? I'm assuming that this is the gasket that goes in between the carb and the intake manifold. If so, do I need any sort of gasket lube or grease or whatnot? If not, what is it and where can I buy a gasket?
1. Is that diamond looking thing the gasket? I'm assuming that this is the gasket that goes in between the carb and the intake manifold. If so, do I need any sort of gasket lube or grease or whatnot? If not, what is it and where can I buy a gasket?
2. I'm assuming the red, yellow and non painted screws are for tuning. What does what? How, in general, should one tune a freshly out of the box carburetor?
The non-painted screw is for setting your cold RPM. This is so it idles higher when the engine's cold and warms up faster. To set this, either wait until the engine's completely cold (sat overnight), then press the gas down once. Start it and rotate this screw until the RPMs sit at around 1700 or so.
If your engine's warm, turn it off. Open the throttle by hand all the way and then manually close the butterfly valve on the top of the carb. Without pressing the gas, start the engine. Then set the screw.
The yellow screw is for setting your idle/fuel mixture. The best way to set this is with a vacuum gauge (best tuning tool in the world). Hook the gauge to direct manifold vacuum and then adjust the screw until you get the highest vacuum reading.
If you don't have one, turn it in until it just starts to stumble, and then back it out right until it smooths out.
3. Vacuum lines. My existing carb has about 30 of them it seems coming off of it but they're all cut and stoppered up. I'm assuming that some of these at least will need to be connected. How do I know which one needs to be hooked up, what they need to be hooked up to and where can I buy vacuum hoses?
4. That big back drum looking deal on the back... is that the electric choke? Is that plug n play?
To set it, the engine needs to be completely cold. Loosen the three screws that hold the cover down. Rotate the cover until it fully closes the butterfly valve on top. Then, rotate it the opposite direction
until the butterfly valve opens about 1/8". Then, start the engine and let it fully warm up. Check the butterfly valve again and it should be completely 100% open. If it's not, loosen the 3 hold down screws again and gently rotate the choke housing until it opens the butterfly completely. Tighten the screws down again. Do all this before setting your idle mixture and RPM screws.
5. Before I tackle this thing (tomorrow), I'm going to read up and watch a few carburetor install videos. Do you guys have any advice, tips or got ya's that I should know about for installing a carb?
As for your other questions listed with your pictures:
Yes, the brass fitting is for the climatic portion of the choke. The electric wire and the heat tube work together to properly open the choke.
On the vacuum lines. The large one on top on every one of these carbs I've seen is capped off. I'm not completely sure what it's for. If you have your old carb and it's capped off, you can cap it off on this one. If nothing was hooked to it on your old carb, you can most likely cap it off as well.
I'm a little fuzzy on which port is which on the lower three, but I believe the lowest one is full manifold vacuum. The one up front is for emissions. And the highest one is ported vacuum for your distributor's vacuum advance. If I have those mixed up, hopefully someone'll chime in.
Good luck.

#3
06-23-2011, 04:59 PM
Join Date: Jun 2011
Location: Choctaw, OK
Posts: 64
Likes: 0
Received 0 Likes
on
0 Posts
Yep, that's the base gasket. It goes between the carb and the manifold. It's possible you may need two. Mine had one between the carb and the EGR spacer, and between the EGR spacer and the manifold. The one between the carb and the EGR spacer was slightly different.
The red screw is for setting your idle once it's warmed up. Once the engine's fully warmed up, rev it a few times to be sure the choke has released, and then turn the screw until the idle sits at 650 RPMs.
The non-painted screw is for setting your cold RPM. This is so it idles higher when the engine's cold and warms up faster. To set this, either wait until the engine's completely cold (sat overnight), then press the gas down once. Start it and rotate this screw until the RPMs sit at around 1700 or so.
If your engine's warm, turn it off. Open the throttle by hand all the way and then manually close the butterfly valve on the top of the carb. Without pressing the gas, start the engine. Then set the screw.
The yellow screw is for setting your idle/fuel mixture. The best way to set this is with a vacuum gauge (best tuning tool in the world). Hook the gauge to direct manifold vacuum and then adjust the screw until you get the highest vacuum reading.
If you don't have one, turn it in until it just starts to stumble, and then back it out right until it smooths out.
You should have a vacuum diagram decal on the radiator support at the front of the engine. This'll tell you where all your lines go. However, do you have all of your emissions equipment and everything still intact? If not, you can probably simplify your vacuum lines. Rubber vacuum lines can be purchased at most any auto parts store. As far as I know, no one sells replacements for the color coded plastic lines.
On the vacuum lines. The large one on top on every one of these carbs I've seen is capped off. I'm not completely sure what it's for. If you have your old carb and it's capped off, you can cap it off on this one. If nothing was hooked to it on your old carb, you can most likely cap it off as well.
I'm a little fuzzy on which port is which on the lower three, but I believe the lowest one is full manifold vacuum. The one up front is for emissions. And the highest one is ported vacuum for your distributor's vacuum advance. If I have those mixed up, hopefully someone'll chime in.
#4
06-23-2011, 05:10 PM
The EGR is one of the few emissions systems that actually makes an engine run better. However, you sound like the common victim of a backyard previous owner hack job. Usually, unless you're willing to spend a lot of time and money, it's easier to just remove everything and simplify your engine.
(The EGR system is present on non-feedback models as well.)
Also, if you're worried about still running a clean engine, just throw a 3-way cat in the exhaust. I actually passed my local emissions tests with both my 1bbl and my 4bbl carb with just a cat and no EGR or smog pump.
The lines you really, truly need are a line for the vacuum advance. A large line from the manifold to the PCV valve, and a large line for the brake booster. That's really about it. Everything else can be capped off at the source and/or completely removed.
If that big, fat line that runs out of the front of the carb is still hooked up, I imagine it's going to the white charcoal canister near the front. This is the vent for the fumes from your fuel bowl. You can remove the hose and have it vent to atmosphere, but that's your call.
Currently, what it does, is store the fumes in the charcoal canister, and then at a given time, a purge valve sucks it out and sends it back into the intake. It helps increase gas mileage ever so slightly. More than likely, though, it's not hooked up or working, so it may be easier to just remove the line.
#5
06-23-2011, 07:57 PM
Join Date: Jun 2011
Location: Choctaw, OK
Posts: 64
Likes: 0
Received 0 Likes
on
0 Posts

If that big, fat line that runs out of the front of the carb is still hooked up, I imagine it's going to the white charcoal canister near the front. This is the vent for the fumes from your fuel bowl. You can remove the hose and have it vent to atmosphere, but that's your call.

More questions!
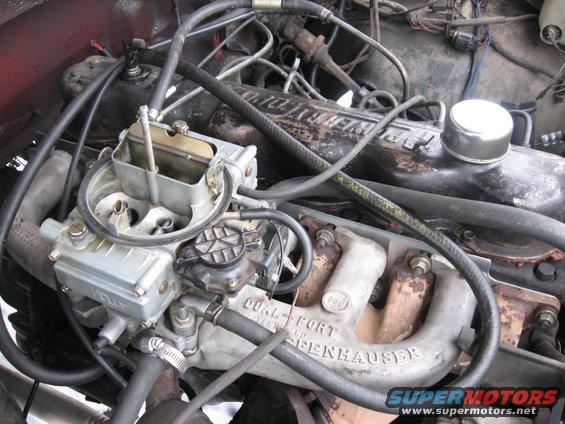
I believe this to be the EGR valve. Can I just take it off when I put the new carburetor on? Anything attached to it that I need to be aware of? It's such a mess that I'm honestly not sure what all is connected to what and it looks like about 60% of those lines connect into some massive vacuum hub type deal. I'd really like to get it cleaned up in there so I can clearly see what's going on.

This question is a double whammy. Here is the wiring harness left over from the original TFI ignition system. The bundle going off to the right side of the picture contains all of the old wires that are no longer in use. As you can see, it's wrapped up into this big bundle and then goes back up into the main department as you can see in the picture. How do I get rid of these wires? I would really REALLY rather not cut them as the truck looks... worked on... enough as is. Is there a convenient plug or something somewhere? I was kind of hoping it would just all come out in one piece.

Part two. This wire is the ONLY thing left attached to the engine from the original wiring harness. I assume it to be some sort of ground. Any ideas what it is for and if I can safely remove it?

#6
06-23-2011, 09:06 PM
Probably the best way of knowing what those vacuum hoses are supposed to go to is to look at the sticker on your radiator support.
Yes, the diaphragm you're pointing to is what opens & closes the EGR valve.
The vapor recovery stuff is good for the environment and I'd leave it connected if possible.
You can clip the old, unused wiring up out of the way someplace so they're not in the way.
I would keep all of your old parts in the event you (or somebody else) wants to return it to stock configuration for emissions-testing reasons.
#7
06-23-2011, 10:36 PM
Post Fiend
Hook up the upper vacuum port (small size) to the dist vacuum port.
Hook the large rubber hose from the "black box (charcoal canister) to the large port on the top/front of the new carb.
Get a new fuel filter, and hook the line up like it currently is.
Make sure you have the vacuum line going to the trans (auto, C6 IIRC) hooked to a manifold vacuum source. Same for the vacuum hose that goes towards the pass fender (controls the heat & A/C system).
Any vacuum ports on the carb or intake that are not being used, make sure they are plugged/capped.
The choke wire *should* be plug n play, same for the climatic choke tube.
Pretty much everything else is just put it back like it is now on the current carb, minus the electrical "plug-zilla".....
Trending Topics
#8
06-24-2011, 08:30 AM
I don't remember, are you doing the full Duraspark II swap? You'll need to if you want to get it running correctly with your new carb. If I remember right, you are, but want to be sure.
If so, that massive bundle of wires does come out in one solid chunk. It goes into the cab through a big rubber grommet in the firewall and then into the computer. Unplug it from the computer inside the cab, pull the big rubber grommet out of the firewall, and then push it all through the big new hole you'll have.
If you want that hole filled (it'd pretty big), leave the rubber grommet in place and cut the wires on both sides.
There'll also be a bunch of vacuum lines that connect to some solenoids on the rear of the valve cover. That cluster of solenoids can be removed as well as all of the accompanying vacuum lines. (You can see them in the upper left of your second to last picture).
The PVC sticks up from the rear end of the valve cover. You can see it in this picture:
There's a hose running from the front of my carb and back to it. Your best bet is to probably just go get a new one. They're usually around $3 - $5, but they're very important to the health of your engine, so you'll want it in place.
And yes, the brake booster is the large canister behind the master cylinder. They don't stop nearly as well without that hooked up.
#9
06-24-2011, 09:34 AM
Post Fiend
AB, he just did the DS2 swap. The carb swap is the final part of his conversion.
Don't you remember us talking him thru it about a week or so back? They say the memory is the second thing to go, I can't recall what's first.........
Don't you remember us talking him thru it about a week or so back? They say the memory is the second thing to go, I can't recall what's first.........
Last edited by Rogue_Wulff; 06-24-2011 at 09:34 AM. Reason: Spullimg errers D'OH!
#10
06-24-2011, 11:25 AM
Join Date: Jun 2011
Location: Choctaw, OK
Posts: 64
Likes: 0
Received 0 Likes
on
0 Posts
If so, that massive bundle of wires does come out in one solid chunk. It goes into the cab through a big rubber grommet in the firewall and then into the computer. Unplug it from the computer inside the cab, pull the big rubber grommet out of the firewall, and then push it all through the big new hole you'll have.
If you want that hole filled (it'd pretty big), leave the rubber grommet in place and cut the wires on both sides.
There'll also be a bunch of vacuum lines that connect to some solenoids on the rear of the valve cover. That cluster of solenoids can be removed as well as all of the accompanying vacuum lines. (You can see them in the upper left of your second to last picture).
The PVC sticks up from the rear end of the valve cover. You can see it in this picture:
There's a hose running from the front of my carb and back to it. Your best bet is to probably just go get a new one. They're usually around $3 - $5, but they're very important to the health of your engine, so you'll want it in place.
And yes, the brake booster is the large canister behind the master cylinder. They don't stop nearly as well without that hooked up.

#11
06-24-2011, 12:02 PM

Post Fiend
Join Date: Jul 2004
Location: Northern California
Posts: 8,786
Likes: 0
Received 18 Likes
on
17 Posts
Originally Posted by Rouge_wulff
Hook up the upper vacuum port (small size) to the dist vacuum port.
Upper vaccum port, passenger side, EGR Valve.
Lower vacuum port directly below the EGR valve port is for the distributor vacuum advance.
The vacuum port to the front passenger side is for Wide open throttle. Probably cap this one.
As for the wiring... These trucks were wired for different options, and different ignition systems. I would advise not cutting any of the wires. If they are not easily removed just put them out of the way. Any secondary harnesses will be able to be unplugged from the main harness.
Check back in the cab where that wire bundle goes. If it just goes to the EEC Computer then you should be able to remove the EEC and that wire bundle from inside the cab. You would have to figure out how to plug up that hole where the wires go through the firewall though.
If your A/C works, and if you have a manual transmission, you are missing some minor components that are designed to eliminate some drivability issues. The A/C throttle solenoid and bracket to increase the opening of the throttle plate when the A/C is on so you have a consistant idle between A/C on/off operation. That and a anti-stall dashpot and bracket. You may or may not need these depending on how the truck runs. If the truck stalls at stop lights at sudden stops, the anti-stall dashpot would fix this. Getting the bracket and dashpot, and even the A/C solenoid for the carb will be a interesting trick though and would require Junk Yard hopping.
#12
06-24-2011, 12:33 PM
Join Date: Jun 2011
Location: Choctaw, OK
Posts: 64
Likes: 0
Received 0 Likes
on
0 Posts
Actually that is for the EGR valve.
Upper vaccum port, passenger side, EGR Valve.
Lower vacuum port directly below the EGR valve port is for the distributor vacuum advance.
The vacuum port to the front passenger side is for Wide open throttle. Probably cap this one.
As for the wiring... These trucks were wired for different options, and different ignition systems. I would advise not cutting any of the wires. If they are not easily removed just put them out of the way. Any secondary harnesses will be able to be unplugged from the main harness.
Check back in the cab where that wire bundle goes. If it just goes to the EEC Computer then you should be able to remove the EEC and that wire bundle from inside the cab. You would have to figure out how to plug up that hole where the wires go through the firewall though.
If your A/C works, and if you have a manual transmission, you are missing some minor components that are designed to eliminate some drivability issues. The A/C throttle solenoid and bracket to increase the opening of the throttle plate when the A/C is on so you have a consistant idle between A/C on/off operation. That and a anti-stall dashpot and bracket. You may or may not need these depending on how the truck runs. If the truck stalls at stop lights at sudden stops, the anti-stall dashpot would fix this. Getting the bracket and dashpot, and even the A/C solenoid for the carb will be a interesting trick though and would require Junk Yard hopping.
So I went to Advanced Auto Parts, Oreilly, and Autozone and not one single one of them had a vacuum gauge. It looks like I'm going to have to order one on Amazon. Do you guys have any brand or model recommendations? My budget is right around $35.
#13
06-24-2011, 12:42 PM
What were we talking about again? "Carb" something... It'll come to me.
Actron CP7803 - Actron Vacuum and Pressure Test Kits - Overview - SummitRacing.com
This is the vacuum gauge I've used for several years and always been really pleased with it.
On your A/C, if you plan to remove it, take your vehicle down to an A/C shop and just ask them to discharge it for you. Dunno what they'll charge you, but it's probably not much. Then, it should be save to fully remove.
Most any and all wires that are connected to that huge bundle coming from the cab can be removed. When I removed it on my '84, I just followed all the trails until I got to the end. Disconnected the wire, and pulled the whole thing out in one chunk. No cutting required. I eventually did go back and cut it later so I could get that big rubber grommet back and fill the hole in the fire wall. A 4" x 2" hole in the middle of winter has quite a breeze. :-18
Agreed though, before cutting any wire, be sure it isn't a component you need, such as things for your starter, alternator, etc. etc.
#14
06-24-2011, 12:59 PM
Join Date: Jun 2011
Location: Choctaw, OK
Posts: 64
Likes: 0
Received 0 Likes
on
0 Posts
What were we talking about again? "Carb" something... It'll come to me.
Actron CP7803 - Actron Vacuum and Pressure Test Kits - Overview - SummitRacing.com
This is the vacuum gauge I've used for several years and always been really pleased with it.
On your A/C, if you plan to remove it, take your vehicle down to an A/C shop and just ask them to discharge it for you. Dunno what they'll charge you, but it's probably not much. Then, it should be save to fully remove.
Most any and all wires that are connected to that huge bundle coming from the cab can be removed. When I removed it on my '84, I just followed all the trails until I got to the end. Disconnected the wire, and pulled the whole thing out in one chunk. No cutting required. I eventually did go back and cut it later so I could get that big rubber grommet back and fill the hole in the fire wall. A 4" x 2" hole in the middle of winter has quite a breeze. :-18
Agreed though, before cutting any wire, be sure it isn't a component you need, such as things for your starter, alternator, etc. etc.
Actron CP7803 - Actron Vacuum and Pressure Test Kits - Overview - SummitRacing.com
This is the vacuum gauge I've used for several years and always been really pleased with it.
On your A/C, if you plan to remove it, take your vehicle down to an A/C shop and just ask them to discharge it for you. Dunno what they'll charge you, but it's probably not much. Then, it should be save to fully remove.
Most any and all wires that are connected to that huge bundle coming from the cab can be removed. When I removed it on my '84, I just followed all the trails until I got to the end. Disconnected the wire, and pulled the whole thing out in one chunk. No cutting required. I eventually did go back and cut it later so I could get that big rubber grommet back and fill the hole in the fire wall. A 4" x 2" hole in the middle of winter has quite a breeze. :-18
Agreed though, before cutting any wire, be sure it isn't a component you need, such as things for your starter, alternator, etc. etc.
That's the gauge I was looking at. <a href="http://www.amazon.com/Actron-CP7803-Vacuum-Pressure-Tester/dp/B0006V2BS2/ref=sr_1_2?s=automotive&ie=UTF8&qid=1308936850&sr= 1-2">Here it is</a> on Amazon for $17, plus I get amazon prime for being a student (hooray for free 2 day shipping).
My plan for the wire bundle is to just disconnect everything but leave the wiring and routing intact. Once I get the truck running decently with the new carb and ignition, I will go back through and pull out everything that is disconnected. That way, I don't have to worry about cutting the wrong wire or figuring out where this particular wire that I need is supposed to go. I think it's a best of both worlds plan.
Also, I went back and reread some posts and it appears I'm going to need a tachometer to tune this properly. My truck, unfortunately, does not have one. Do you have any recommendations for a tach also? I figure I might as well kill two birds with one stone here =)
#15
06-24-2011, 01:04 PM
Post Fiend

OFS and CRS can have their funny moments.
OFS = Old Fart Syndrum.
CRS = Can't Remember ............. ummmmm.......... Stuff, that's it!