A/c Blower defaulting to the defrosters
#31
 05-25-2013, 05:19 PM


For a similar valve configuration that definitely closes on vacuum application look for a Four Seasons part number 74802. I've purchased several of those from this eBay seller: http://www.ebay.com/itm/Frigette-233-821-Four-Seasons-74802-HVAC-Heater-Control-Valve-/261083775427?pt=Motors_Car_Truck_Parts_Accessories&hash=item3cc9ce41c3
Beginning on page 452 of this catalog you can find other valves: [2011 Illustrated Guide] - Powered by PageTurnPro.com (This link will take a few seconds to load---be patient!)
Your check valve should be available just about anywhere parts are sold, NAPA being my main local source. I've not yet needed one of those so no part numbers yet.
HTH
#32
05-25-2013, 09:38 PM
#33
06-26-2013, 09:32 PM

Cross-Country
Join Date: Aug 2011
Location: St. Pete, FL
Posts: 52
Likes: 0
Received 0 Likes
on
0 Posts
Thanks for all the information!!!
I have the exact issue on my 2000 E-350... well, this issue, as well as some of the related issues.
This afternoon, I found a cable/hose hanging underneath the rear of the van near the muffler. After a little research, I found that this had previously been attached to the "Evaporative Emission Canister" The end with the connector (which looks like it has a 1 way valve in it), near the small box that says "to canister" on it, was hanging down, but didn't look like it was really damaged. the other end was in a clip above the canister, but not connected to anything and looked like it had been ripped off of something. Anyone know what this hose is? Is it related to the A/C woes in any way?
Part 2:
I haven't pulled the control panel yet, but when I pulled the cover in the dash, it does not seem like I have any vacuum in any of those lines. I also checked the lines at the passenger floor area. Again, did not seem to have any vacuum.
When I shut off the engine, I can hear a slow hiss/leak behind the battery area. There is a vacuum line that runs along that area, but it is not leaking. The hiss only lasts for a minute or so (long enough to lose pressure I assume), but I can't pin point exactly where it's coming from.
I know my next step will be pulling the control panel and checking everything back there, but is there something glaring that I'm missing, or that should also be at the top of my "check next list"?
#34
07-05-2013, 08:33 PM

I've had this 1998 E350 van with the V10 engine for over 10 years. I pull a trailer with it, so most of the time I'm into the gas pedal rather heavily. Needless to say, Lot's of pedal means low vacuum, and low vacuum means all the cold air goes on the windshield, and not on to me. I've been putting off fixing this problem for years but finally it got so bad that it would not come off the default defrost position. Trying to find the vacuum leak on the line that goes to the A/C controls seems almost impossible.
So I started under the hood, removed the battery & battery tray, then I went under the vehicle, then under the fender, then through the engine compartment from inside the cab. This was before I Googled the problem and found this web site. To my surprise, it is a much bigger problem than I realized. Judging by this web site, this problem has been resolved in many ways, most of them difficult, time consuming, or expensive.
Here is a procedure that allows you to fix the leaking vacuum line problem in probably an hour or so. The beauty is, you do not have to remove, any A/C or heater component, the dashboard, the headlight, the engine access panel, the front wheel, or the battery. You do not have to drill, cut, or bend any metal. You just need a few tools. I don't know if this would work on all E-series vans or not, but it worked on my Van. Tools & parts you need: a drill motor, small bit (I used an 1/8"), flash light or trouble light, long screwdriver (or punch), "J" hook, in line connector, RTV or other sealant, optional: tape, tie-raps, shrink tubing, Vacuum line, vacuum reservoir, (I got from a junkyard) wrench to remove negative battery terminal. Safety First!
First use procedures listed earlier in this thread to identify where the vacuum leak is. If the leak is between the vacuum line coupling located between the engine oil fill and the windshield washer fill, and where it comes through the fire wall just above the carpeting in the passenger side foot well, this procedure should work for you.
First raise the hood & separate the vacuum line at the junction. Push the left hand piece of separated line towards the passenger side to take the slack out of the line. Go inside the passenger side door remove the right side foot well panel for better access. If you are a big guy or not to flexible you may wish to remove the lower dash panel and metal structure behind it. Caution, there is an airbag above the working area. Looking up under the dashboard, identify where the vacuum line comes through the black plastic ac/ heater box, to the right of the vacuum actuator and below the large damper door. Carefully, pull the line so the grommet that is part of the line, pulls out of the hole. Continue to pull the line until you feel resistance, then push it back in a little bit. Drill small holes in a circular pattern above the existing hole, being careful not to damage the vacuum line. With the long screwdriver push through the thin black plastic that you have just drilled through. Repeat the drilling procedure below the original hole & push through the remaining thin black plastic material. At this point you should have an oblong irregular shaped hole roughly 1" by 2 1/4". pull on the line and you should see the white and black check valve. If you are lucky you may have disconnected the 2 3/4" rubber vacuum hose from the vacuum reservoir. If not cut the rubber hose, being careful not to separate or damage the two black plastic vacuum lines that are connected to the check valve. Use the "J" hook if necessary. With the rubber line disconnected from the valve, and if you have made the hole big enough, you should be able to pull the check valve with lines attached through the opening. Next remove the check valve & insert the inline connector. If the valve is good, save it for later use. If you don't ever want to have a vacuum leak in this area again, use one or more of the following items (tape, shrink tubing, tie raps) to insure there are no leaks or the connector cannot come apart. Take the check valve if it is good and insert it into the separated lines under the hood. Black side of valve toward the engine, white side towards the other line. Plug the other white check valve opening. Hook up battery & go for a test drive. If you feel good about the amount of air that is coming through the dash vents, you are probably ok. I was thrilled, I haven't had that much cold air in my face in years. If you are not happy, go back to the under hood check valve remove the plug and run the rubber vacuum hose to a convenient place and attach the reservoir. I put mine above the power distribution box on the drivers side. Seal up the hole under the dashboard with RTV or what ever sealer you prefer, reattached any panels that were removed. You are through! I'm sure others have used this procedure or a similar one to resolve the vacuum leak problem. Let me know what you think!
#35
07-09-2013, 08:32 PM

I had the same problem last year. I found the vacuum line from the engine on the firewall, just above the evaporator and blower motor housing. I couldn't find it underneath the truck, so I found where it entered the cabin and began pulling. As everyone has stated the rubber hose that connects to the vacuum reservoir was crumbling apart. Rather than try to replace the hose, I simply ordered a new vacuum reservoir from Amazon for about $20 and ran a new hose to the vacuum line that comes off the engine. I tucked the new vacuum reservoir up under the dash (as best I could) in the passenger footwell. I secured it with double-sided tape. The new reservoir is triangular, so it fit well. It is an AC Delco #10403762.
#36
07-09-2013, 08:53 PM
I had the same problem last year. I found the vacuum line from the engine on the firewall, just above the evaporator and blower motor housing. I couldn't find it underneath the truck, so I found where it entered the cabin and began pulling. As everyone has stated the rubber hose that connects to the vacuum reservoir was crumbling apart. Rather than try to replace the hose, I simply ordered a new vacuum reservoir from Amazon for about $20 and ran a new hose to the vacuum line that comes off the engine. I tucked the new vacuum reservoir up under the dash (as best I could) in the passenger footwell. I secured it with double-sided tape. The new reservoir is triangular, so it fit well. It is an AC Delco #10403762.
#38
07-11-2013, 05:34 AM
#39
09-04-2013, 04:38 PM
I finally decided to tear into this project today.My vac line coming off motor had already been replaced by another kinda clear/white hose.When I cut the opening in the passenger wheel well I saw the vacuum reservoir but there was no hose attached.The replaced clear/white hose was routed thru here and went inside the firewall at the passenger footwell.
This hose was connected to the factory black hose that goes up to the controls under the access panel on top of the dash.
So as far as I can tell,there is no vacuum reservoir at all.I get good vacuum at all acuaters and after un plugging and re plugging some of the hoses to check for vacuum,the air seems to be blowing stronger than before.
But I still have the same issue of default defrost on accelerating.The only thing I saw when I opened up the wheel well was the flat reservoir...No 3 way check valve....Anybody??????
#40
09-05-2013, 06:56 AM
The check valve is when you have a reservoir attached. Under acceleration the heater vacuum port on the intake manifold will see a reduction in vacuum which allows the servos or actuators to revert to their normal states. Once the vacuum level returns to that port your servos then travel to the position called for by the Function Control (Heat, Vent, A/C, etc)
The check valve keeps vacuum in the reservoir during acceleration, doesn't let the trapped vacuum leak back into the induction stream.
How's that?
The check valve keeps vacuum in the reservoir during acceleration, doesn't let the trapped vacuum leak back into the induction stream.
How's that?
#41
09-05-2013, 10:55 AM
The check valve is when you have a reservoir attached. Under acceleration the heater vacuum port on the intake manifold will see a reduction in vacuum which allows the servos or actuators to revert to their normal states. Once the vacuum level returns to that port your servos then travel to the position called for by the Function Control (Heat, Vent, A/C, etc)
The check valve keeps vacuum in the reservoir during acceleration, doesn't let the trapped vacuum leak back into the induction stream.
How's that?
The check valve keeps vacuum in the reservoir during acceleration, doesn't let the trapped vacuum leak back into the induction stream.
How's that?
If the reservoir and check valve have been bypassed totally,then you would expect the vacuum to default to defrost under acceleration.What I don't know is if the check valve is built into the vac reservoir and has failed was that the reason for bypassing it?..
If the reservoir does not have a built in check valve,then the check valve had failed.Right?The reservoir doesn't have anyway to fail.Correct?
By the way this is a 2002 E-250...if that helps.
#42
09-05-2013, 11:23 AM
I decided to just order the ac delco part with the built in check valve...Seems to be the simplist way to solve the problem..
Rockauto has it for $12.50 plus shipping...Sears has same part for $52.00
#43
09-06-2013, 05:43 AM
This is a commonly asked issue here which is why I included what seems to be TMI in your case---sorry for that!
The new reservoir should be the cure especially at that huge price difference.
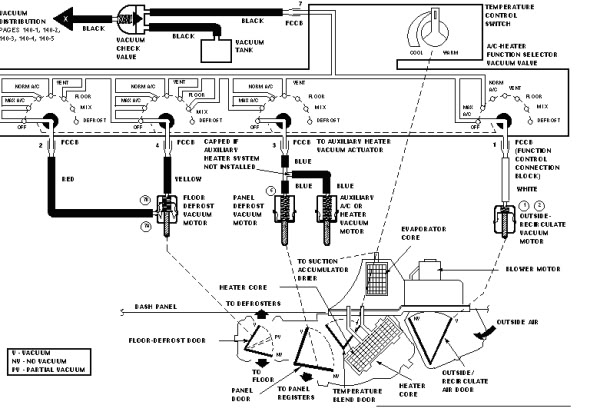
A bit after the fact however the diagram/schematic shows a check valve separate from the reservoir. If the check valve fails or the reservoir leaks your condition would exist.
Thanks for the update!
The new reservoir should be the cure especially at that huge price difference.
A bit after the fact however the diagram/schematic shows a check valve separate from the reservoir. If the check valve fails or the reservoir leaks your condition would exist.
Thanks for the update!
#44
09-08-2013, 11:48 AM
This is a commonly asked issue here which is why I included what seems to be TMI in your case---sorry for that!
The new reservoir should be the cure especially at that huge price difference.

A bit after the fact however the diagram/schematic shows a check valve separate from the reservoir. If the check valve fails or the reservoir leaks your condition would exist.
Thanks for the update!
The new reservoir should be the cure especially at that huge price difference.
A bit after the fact however the diagram/schematic shows a check valve separate from the reservoir. If the check valve fails or the reservoir leaks your condition would exist.
Thanks for the update!
Part arrived Saturday works like a charm...The in and out connections on the reservoir are 2 different sizes(1/8"and 1/4" I believe)So I spent more time running down to the auto parts store for hose and adapters..
I tucked it up under the pass side dash and secured it with furnace?a/c tape...Witch I also used on all the hose connections.
Pretty easy fix for a PITA issue.thanks to everyone who contributed info to this thread.

#45
09-16-2013, 03:22 PM

New User
Join Date: Jan 2012
Location: Los Angeles 90043
Posts: 21
Likes: 0
Received 0 Likes
on
0 Posts