
Double Din Install
#1
 05-16-2011, 10:42 AM


Double Din Install
First off I would like to apologize for the poor pictures. When I set out to do this, I was taking pictures like a mad man. After I finished and was eating lunch, my phone's sd card went currupt and earsed everything on it pictures included. This is the best I can do until I take another dash apart.
First start by removing the factory head unit. You can buy the removal keys or just cut and bend a coat hanger. Either way they work just fine, and unplug the harness and antenna. Then remove your head light switch. (small screwdriver into the little space on the bottom, push screwdriver down while pulling switch out) It will pop right out when done right, don't force it.
Pull dash free from the main dash, I always start from the headlight switch around the top and then back to the switch. They are just clips that hold it in place. Remember it's made of plastic not steel, even steady pressure, don't yank on it.
Now unplug 4X4 switch, airbag on/off harness (standard or extended cab guys, crew cab guys it is there just in a dummy spot in the dash you still need to unplug it) and finally the power port outlet.
Now your dash is free. Take it over to a workbench or table with the new head unit. Test fit the unit into the hole to see where you ill have to trim. I did mine by setting the radio in from the front. On the picture below, I have drawn arrows in red to show where you will need to sand or file. * note: every radio is different, measure twice cut once!
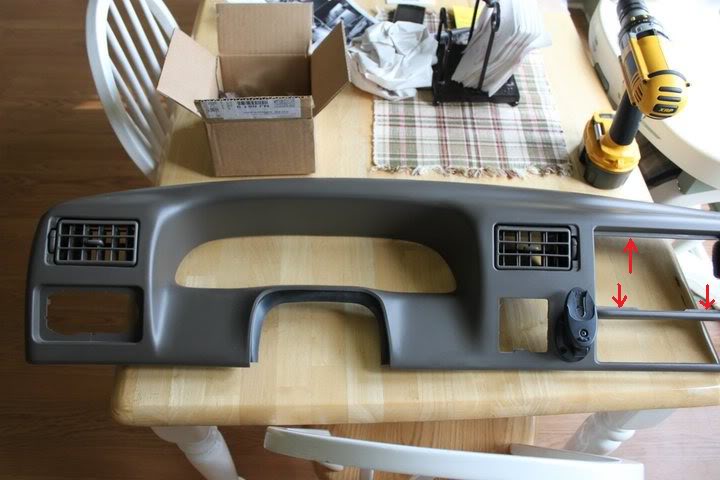
I wound up having to remove the upper and lower lips completely to get my Pioneer AVH-3200BT to fit.
Once the radio would fit in the dash hole, I attached the Metra 95-5818 mounting kit to the new head unit. The radio would fit into the hole and slide almost all the way in, however it was stopping about 1/4" shy of locking into place. That is when I noticed the side stops of the mounting kit were too wide.
I used file to remove some material from the sides of the tabs. It is highlighted in pink where I filed. Remember, you only have on shot with this kit, don't take too much off. If I recall I took 1/16" off each side.

Now reattach the mounting kit to the radio and go for on last fit. It should look something like this when done.


Once it is locked into the dash you will hear it click and turn it over and look for the locks to be set on the mounting brackets. Should look like this from behind.

Now hook up the wire harness, plug in the antenna, back up camera and what ever else you bought with it start the re assembly. I recommend a test run of the radio before everything gets put back together.
Once your dash is back in and radio verified to be working, we'll dress up the last bit of it.

Try each of the trim ring to see which one fits the best. For me it was the one with the longer legs on it. I cut the legs off flush with the trim ring. The cut line is illustrated by the yellow lines in the second picture in this post. Now to attach it to the head unit I used 3M automotive trim tape. It is double side and works great. I only put it on the two thick sides of the trim ring then trimmed the excess tape with a razor blade. Remove the red cover on the tape line up the trim ring and press it into place. Your radio is now installed and looks good.

Good Luck and let me know if you have any questions. I will update this post when I get better pictures of the dash pieces.
First start by removing the factory head unit. You can buy the removal keys or just cut and bend a coat hanger. Either way they work just fine, and unplug the harness and antenna. Then remove your head light switch. (small screwdriver into the little space on the bottom, push screwdriver down while pulling switch out) It will pop right out when done right, don't force it.
Pull dash free from the main dash, I always start from the headlight switch around the top and then back to the switch. They are just clips that hold it in place. Remember it's made of plastic not steel, even steady pressure, don't yank on it.
Now unplug 4X4 switch, airbag on/off harness (standard or extended cab guys, crew cab guys it is there just in a dummy spot in the dash you still need to unplug it) and finally the power port outlet.
Now your dash is free. Take it over to a workbench or table with the new head unit. Test fit the unit into the hole to see where you ill have to trim. I did mine by setting the radio in from the front. On the picture below, I have drawn arrows in red to show where you will need to sand or file. * note: every radio is different, measure twice cut once!
I wound up having to remove the upper and lower lips completely to get my Pioneer AVH-3200BT to fit.
Once the radio would fit in the dash hole, I attached the Metra 95-5818 mounting kit to the new head unit. The radio would fit into the hole and slide almost all the way in, however it was stopping about 1/4" shy of locking into place. That is when I noticed the side stops of the mounting kit were too wide.
I used file to remove some material from the sides of the tabs. It is highlighted in pink where I filed. Remember, you only have on shot with this kit, don't take too much off. If I recall I took 1/16" off each side.
Now reattach the mounting kit to the radio and go for on last fit. It should look something like this when done.
Once it is locked into the dash you will hear it click and turn it over and look for the locks to be set on the mounting brackets. Should look like this from behind.
Now hook up the wire harness, plug in the antenna, back up camera and what ever else you bought with it start the re assembly. I recommend a test run of the radio before everything gets put back together.
Once your dash is back in and radio verified to be working, we'll dress up the last bit of it.
Try each of the trim ring to see which one fits the best. For me it was the one with the longer legs on it. I cut the legs off flush with the trim ring. The cut line is illustrated by the yellow lines in the second picture in this post. Now to attach it to the head unit I used 3M automotive trim tape. It is double side and works great. I only put it on the two thick sides of the trim ring then trimmed the excess tape with a razor blade. Remove the red cover on the tape line up the trim ring and press it into place. Your radio is now installed and looks good.
Good Luck and let me know if you have any questions. I will update this post when I get better pictures of the dash pieces.
#3
05-16-2011, 09:17 PM
Hit it!
#5
05-17-2011, 06:21 AM
Posting Guru
Join Date: Jul 2007
Location: Charles Town, WV
Posts: 1,360
Likes: 0
Received 0 Likes
on
0 Posts
#6
05-17-2011, 10:06 PM

Junior User
Join Date: Jan 2010
Location: Yucca Valley Ca.
Posts: 90
Likes: 0
Received 0 Likes
on
0 Posts
#7
05-20-2011, 08:09 AM
Posting Guru
Join Date: Jul 2007
Location: Charles Town, WV
Posts: 1,360
Likes: 0
Received 0 Likes
on
0 Posts
Trending Topics
#8
05-20-2011, 08:38 AM

Senior User
Join Date: Jun 2006
Location: Lubbock, TX
Posts: 222
Likes: 0
Received 0 Likes
on
0 Posts
#9
05-20-2011, 10:42 AM

#10
05-26-2011, 11:59 AM
Junior User
Join Date: Jan 2010
Location: Yucca Valley Ca.
Posts: 90
Likes: 0
Received 0 Likes
on
0 Posts
#11
05-26-2011, 01:15 PM
LOL I opened the box for my clarion and then took my truck to a shop... I wimped out.
But i have a friend that owns an auto stereo shop and he installed it for me for about $50.
Plus I had him custom install a c.b into my cubby hole... (After I had already tried by using a swaz-all ooops.)
But i have a friend that owns an auto stereo shop and he installed it for me for about $50.
Plus I had him custom install a c.b into my cubby hole... (After I had already tried by using a swaz-all ooops.)
#12
05-26-2011, 01:45 PM
Join Date: Jan 2006
Location: Gulf Coast of Florida
Posts: 5,406
Likes: 0
Received 0 Likes
on
0 Posts
#13
05-26-2011, 10:31 PM
Senior User
Join Date: May 2009
Location: North GA
Posts: 189
Likes: 0
Received 0 Likes
on
0 Posts
#14
05-27-2011, 02:45 AM
Also note for ANYONE INSTALLING AN AFTERMARKET RADIO:
When you pull out the factory radio there will be 2 bolts on the top holding the dash trim on. Take those out and leave them out, or that dash trim and radio will be stuck there forever.
#15
05-27-2011, 02:48 AM