How to make your own glow plug wiring harness
#1
 03-26-2011, 01:09 PM


Join Date: May 2010
Location: Central Maine
Posts: 25
Likes: 0
Received 0 Likes
on
0 Posts
How to make your own glow plug wiring harness
While replacing my glow plugs, I ran into the need for a new wiring harness when my old one literally crumbled in my hands. This procedure should work for all 7.3 as far as I know, however I will say I have a 93. You may need different connectors but the wiring lengths should be the same for all 7.3's.
I installed the finished product a couple of weeks ago and it's working well for me. I'm describing this here to save people from re-inventing the flat tire but if you choose to follow these instructions it's your choice and I have no liability express or implied for any consequences that arise during the creation or use of the product described here. Ok now that I've cleared this with legal here we go...
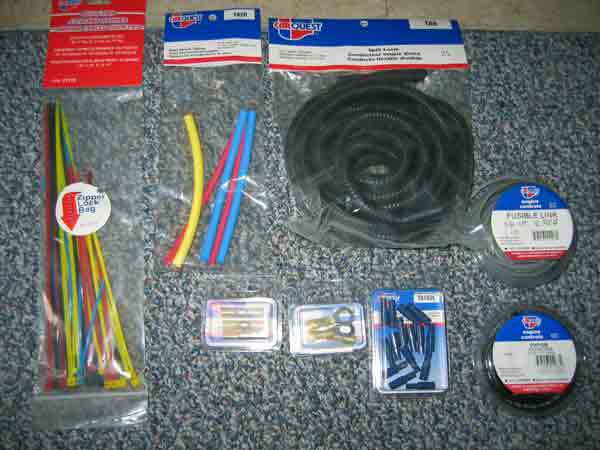
Parts list and cost as of March 2011
8 feet of Fusible link 14 gauge; 15 ft = $8
5 feet of fusible link 10 gauge; 15 ft = $10
8 #14 gauge wire bullet connectors to connect the wiring to the glow plugs; for 1993 model, some other years require spade connectors check your existing glow plug connections; 15 pieces = $4
2 3/8” post ring terminal connectors to connect harness to the relay 3 pieces = $4
2 14-8 steel crimp sleeves - these are crimp connectors that are large enough to accommodate and join together 4 pieces of #14 gauge with one piece of #10 gauge; 7 pieces = $5 this item was not available at my local car parts store, but my local hardware store had it in stock
2 3/8” heat shrink tubing – approximately 3” long each; package of 3 from local hardware store = $2
1 10 gauge heat shrink tubing approx 3“ long; assortment package $5
2 14 gauge heat shrink tubing approx 3” long each; included in assortment package
Dialectic grease, single use tube $1
Package of assorted zip ties long enough to go around split loom and fasten it to the pre-existing vehicle wiring; $7
Split loom for heat and weathering protection; $6

Tools
High quality crimping tool. I have a Klein tools Journeyman universal combination pliers and it works great, one of my favorite tools in my electrical toolbox, part number J12098 – price less than $40.

Wire stripper for preparing wire for crimp connections – I always use my Klein with good results – but they make special tools for removing wire insulation. To each their own, but if you use the universal Klien tool or something like it be careful not to strip away any wire with the insulation.
Scissors to cut heat shrink tubing and zip ties although I prefer wire snips for that.
Source of heat for heat shrink tubing, could be a heat gun or lacking that, a propane torch or lacking that, a lighter
Procedure
Passenger Side Harness
Cut a piece of #10 wire to 13.75”
Use dialectic grease on all connections.
Crimp a 3/8” terminal to one end of the wire .
Cut a 1.5” piece of #10 heat shrink tubing and feeding from the unconnected side slide into place so that the middle of the tubing is centered about near where the connector ends
Cut the following lengths of #14 wire
4.25”
8.5”
10.75”
12.5”
Crimp a bullet connector to the end of each piece of #14. Use dialectic grease.
Cut four 1” pieces of #14 heat shrink tubing and feeding from the unconnected side slide into place so that the middle of the tubing is centered about near where the connector ends.

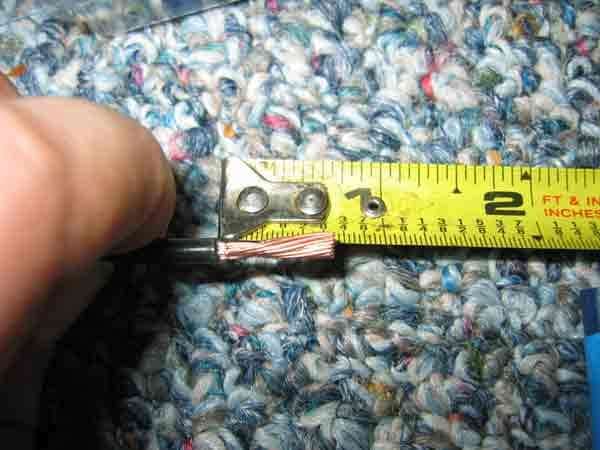
Strip 5/8" - 1” of insulation from the unconnected ends of each of the 5 wires.
Using the Klein tool or similar, quality pliers, gently but firmly twist together the #10 wire, the 10.75” and 12.5” pieces of #14 wire. The goal here is to have a smooth and narrow as possible uniform wire. I think of it like stretching taffy or cotton candy. The trick is to get just enough pressure on the wires as I spin aka twist the pliers and “stretch” the wires. Twist or pull too hard and you weaken or break the wire. Not hard enough and you won’t get a smooth uniform narrow wire. If you’ve never tried this before, I recommend practicing with some short pieces or scrap before trying it on the harness wire. You will need to do this to fit all the wires in the crimp sleeve, alternatively you may be able to find a crimp sleeve which is more appropriate for this amount of wire.

Using the Klein tool or similar aka quality pliers gently but firmly twist together the 4.25” and 8.5” pieces of #14 wire.
Slide a 3” piece of 3/8” insulation over the longer set of wires.

Apply dialectic grease to the wire ends.
Place the thicker wire cluster through a 14-8 sleeve, and while holding the sleeve so the wire is as flush with the wall of the sleeve as possible; slide the smaller wire cluster in from the other end of the sleeve. The goal is to have the tip of each cluster protruding just slightly from the sleeve. It’s a tight fit and you may have to retwist and smooth the wires if you push too hard. Try a slight jiggling or rotating motion and you push the second wire cluster into the sleeve, it seemed to help when I did it that way.

Crimp that sleeve… show it who’s boss.
Slide the heat shrink tubing over the connection.
You're basically done!

Apply heat to all the tubing (just enough to get it to shrink)
The pigtails connect as follows:
Shortest pigtail, 4.25" goes to #5 cylinder plug
Next longest pigtail, 8.5” goes to #7 cylinder plug
Next longest pigtail, 10.75” goes to #3 cylinder plug
The longest pigtail, 12.5” goes to the #1 cylinder plug
Cylinder labeling top down view
FIREWALL
7 8
5 6
3 4
1 2
Passenger side Driver’s Side
Front Bumper
You'll want to protect the wire with loom, and be use to use some dialectic on the connections to the glow plugs.
Driver’s Side Harness
The procedure is essentially identical.
The wire dimensions are
42” of #10 wire
The following length pieces of #14 wire
6.75”
11.5”
14.25”
18.5”
The pigtails connect as follows:
Shortest pigtail, 6.75” goes to #2 cylinder plug
Next longest pigtail, 11.5” goes to #4 cylinder plug
Next longest pigtail, 14.25” goes to #6 cylinder plug
The longest pigtail, 18.5” goes to the #8 cylinder plug
The harness is ready to be installed.

This is where the split loom comes into play. There's no need to remove the old wiring harness unless you want to. You can protect the new harness with split loom and zip tie it to the existing harness runs. It's a whole lot less work than removing the old harness and running the new harness in the old loom.
Miller time or Long Trail time, depending on your taste.
I installed the finished product a couple of weeks ago and it's working well for me. I'm describing this here to save people from re-inventing the flat tire but if you choose to follow these instructions it's your choice and I have no liability express or implied for any consequences that arise during the creation or use of the product described here. Ok now that I've cleared this with legal here we go...
Parts list and cost as of March 2011
8 feet of Fusible link 14 gauge; 15 ft = $8
5 feet of fusible link 10 gauge; 15 ft = $10
8 #14 gauge wire bullet connectors to connect the wiring to the glow plugs; for 1993 model, some other years require spade connectors check your existing glow plug connections; 15 pieces = $4
2 3/8” post ring terminal connectors to connect harness to the relay 3 pieces = $4
2 14-8 steel crimp sleeves - these are crimp connectors that are large enough to accommodate and join together 4 pieces of #14 gauge with one piece of #10 gauge; 7 pieces = $5 this item was not available at my local car parts store, but my local hardware store had it in stock
2 3/8” heat shrink tubing – approximately 3” long each; package of 3 from local hardware store = $2
1 10 gauge heat shrink tubing approx 3“ long; assortment package $5
2 14 gauge heat shrink tubing approx 3” long each; included in assortment package
Dialectic grease, single use tube $1
Package of assorted zip ties long enough to go around split loom and fasten it to the pre-existing vehicle wiring; $7
Split loom for heat and weathering protection; $6
Tools
High quality crimping tool. I have a Klein tools Journeyman universal combination pliers and it works great, one of my favorite tools in my electrical toolbox, part number J12098 – price less than $40.
Wire stripper for preparing wire for crimp connections – I always use my Klein with good results – but they make special tools for removing wire insulation. To each their own, but if you use the universal Klien tool or something like it be careful not to strip away any wire with the insulation.
Scissors to cut heat shrink tubing and zip ties although I prefer wire snips for that.
Source of heat for heat shrink tubing, could be a heat gun or lacking that, a propane torch or lacking that, a lighter
Procedure
Passenger Side Harness
Cut a piece of #10 wire to 13.75”
Use dialectic grease on all connections.
Crimp a 3/8” terminal to one end of the wire .
Cut a 1.5” piece of #10 heat shrink tubing and feeding from the unconnected side slide into place so that the middle of the tubing is centered about near where the connector ends
Cut the following lengths of #14 wire
4.25”
8.5”
10.75”
12.5”
Crimp a bullet connector to the end of each piece of #14. Use dialectic grease.
Cut four 1” pieces of #14 heat shrink tubing and feeding from the unconnected side slide into place so that the middle of the tubing is centered about near where the connector ends.
Strip 5/8" - 1” of insulation from the unconnected ends of each of the 5 wires.
Using the Klein tool or similar, quality pliers, gently but firmly twist together the #10 wire, the 10.75” and 12.5” pieces of #14 wire. The goal here is to have a smooth and narrow as possible uniform wire. I think of it like stretching taffy or cotton candy. The trick is to get just enough pressure on the wires as I spin aka twist the pliers and “stretch” the wires. Twist or pull too hard and you weaken or break the wire. Not hard enough and you won’t get a smooth uniform narrow wire. If you’ve never tried this before, I recommend practicing with some short pieces or scrap before trying it on the harness wire. You will need to do this to fit all the wires in the crimp sleeve, alternatively you may be able to find a crimp sleeve which is more appropriate for this amount of wire.
Using the Klein tool or similar aka quality pliers gently but firmly twist together the 4.25” and 8.5” pieces of #14 wire.
Slide a 3” piece of 3/8” insulation over the longer set of wires.
Apply dialectic grease to the wire ends.
Place the thicker wire cluster through a 14-8 sleeve, and while holding the sleeve so the wire is as flush with the wall of the sleeve as possible; slide the smaller wire cluster in from the other end of the sleeve. The goal is to have the tip of each cluster protruding just slightly from the sleeve. It’s a tight fit and you may have to retwist and smooth the wires if you push too hard. Try a slight jiggling or rotating motion and you push the second wire cluster into the sleeve, it seemed to help when I did it that way.
Crimp that sleeve… show it who’s boss.
Slide the heat shrink tubing over the connection.
You're basically done!
Apply heat to all the tubing (just enough to get it to shrink)
The pigtails connect as follows:
Shortest pigtail, 4.25" goes to #5 cylinder plug
Next longest pigtail, 8.5” goes to #7 cylinder plug
Next longest pigtail, 10.75” goes to #3 cylinder plug
The longest pigtail, 12.5” goes to the #1 cylinder plug
Cylinder labeling top down view
FIREWALL
7 8
5 6
3 4
1 2
Passenger side Driver’s Side
Front Bumper
You'll want to protect the wire with loom, and be use to use some dialectic on the connections to the glow plugs.
Driver’s Side Harness
The procedure is essentially identical.
The wire dimensions are
42” of #10 wire
The following length pieces of #14 wire
6.75”
11.5”
14.25”
18.5”
The pigtails connect as follows:
Shortest pigtail, 6.75” goes to #2 cylinder plug
Next longest pigtail, 11.5” goes to #4 cylinder plug
Next longest pigtail, 14.25” goes to #6 cylinder plug
The longest pigtail, 18.5” goes to the #8 cylinder plug
The harness is ready to be installed.
This is where the split loom comes into play. There's no need to remove the old wiring harness unless you want to. You can protect the new harness with split loom and zip tie it to the existing harness runs. It's a whole lot less work than removing the old harness and running the new harness in the old loom.
Miller time or Long Trail time, depending on your taste.
Last edited by rosesrfree4u; 03-26-2011 at 06:11 PM. Reason: ammended last picture
#2
03-26-2011, 05:26 PM

Join Date: Mar 2005
Location: Marlboro Mental Hospital.
Posts: 60,973
Received 3,101 Likes
on
2,163 Posts
#3
03-26-2011, 05:45 PM
Postmaster
Join Date: Apr 2009
Location: Malahat/Cowichan Valley
Posts: 4,086
Likes: 0
Received 0 Likes
on
0 Posts
#4
03-26-2011, 06:03 PM
Join Date: May 2010
Location: Central Maine
Posts: 25
Likes: 0
Received 0 Likes
on
0 Posts
I used fusible link because that was what the factory harness was made of. It's identifiable by markings on the insulation. I'm not sure why the factory harness was made with it, but they probably had a reason. All the measurements are to factory length. The crimp connector is identical to factory. I tried to exactly replicate the original harness. The bullet connectors are likely to be the weak point. The extra heat shrink insulation should help.
The homemade version costs less than 50 dollars for the parts, not bad
but given a choice for the same money I'd definetly rather buy one and have it shipped, you have a International part number for their harness to fit the 7.3?
The homemade version costs less than 50 dollars for the parts, not bad
but given a choice for the same money I'd definetly rather buy one and have it shipped, you have a International part number for their harness to fit the 7.3?
#5
03-26-2011, 07:54 PM
Post Fiend
#6
03-26-2011, 08:48 PM
Posting Guru
Join Date: Dec 2006
Location: Massachusetts
Posts: 1,389
Likes: 0
Received 0 Likes
on
0 Posts
#7
03-27-2011, 07:23 AM
Join Date: Mar 2005
Location: Marlboro Mental Hospital.
Posts: 60,973
Received 3,101 Likes
on
2,163 Posts

Trending Topics
#8
03-27-2011, 01:27 PM
Post Fiend

#10
10-04-2012, 10:14 AM
Join Date: May 2010
Location: Central Maine
Posts: 25
Likes: 0
Received 0 Likes
on
0 Posts
#11
07-11-2014, 02:59 PM
#12
07-11-2014, 05:11 PM

http://www.ebay.com/itm/Glow-Plug-Wiring-Harness-For-1990-to-1994-Ford-F250-F350-6-9L-IDI-and-7-3L-IDI-/380841718051?pt=Motors_Car_Truck_Parts_Accessories&hash=item58abef7123&vxp=mtr
#13
07-12-2014, 12:24 AM
I made my own harness; I just ran oh, 10ga wire to each GP. Mounted the GP controller on the passenger side fender, then ran a bundle of 8 wires over the alternator and across the front, splitting into two bundles of 4 going down each side of the engine. Works nicely, though even with solid 10ga wire, there's a slight difference in heat between the front-most and rear-most GPs(With a manual setup and running crummy GPs way too long, the front ones failed long before the ones behind it); optimally would be to make all 8 wires the exact same length(thus having the same resistance) and bundle up the excess cleanly somehow.
Fusible link wire is just regular wire, though the wire gauges may be different -- Wikipedia says that you use a 4 gauge smaller fusible link wire to protect something; 16ga fusible link to protect 10ga wire. Also, I suspect the insulation is rated for *much* higher temp
Fusible link wire is just regular wire, though the wire gauges may be different -- Wikipedia says that you use a 4 gauge smaller fusible link wire to protect something; 16ga fusible link to protect 10ga wire. Also, I suspect the insulation is rated for *much* higher temp
#14
12-13-2017, 12:16 PM

New User
Join Date: Jan 2014
Location: Washougal WA,
Posts: 16
Likes: 0
Received 0 Likes
on
0 Posts
#15
12-14-2017, 10:02 AM

Why go to all the trouble to make a GP Harness for the 7.3 bullet style glow plugs,
when you can buy a GP harness for a 6.0 engine and just change the end plug?
I have seen a set of both sides of the harness for $20 to $25 shipped.
https://www.ford-trucks.com/forums/1...-for-50-a.html
Charlie
when you can buy a GP harness for a 6.0 engine and just change the end plug?
I have seen a set of both sides of the harness for $20 to $25 shipped.
https://www.ford-trucks.com/forums/1...-for-50-a.html
Charlie