1948 - 1956 F1, F100 & Larger F-Series Trucks Discuss the Fat Fendered and Classic Ford Trucks

Repair post on the HAMB by MP&C

Thread Tools
 
Search this Thread
 
  #16  
Old 02-07-2011, 01:33 PM
thepitshop's Avatar
thepitshop
thepitshop is offline
Posting Guru
Join Date: Jun 2006
Location: manitoba
Posts: 1,126
Likes: 0
Received 1 Like on 1 Post
definately one of the guys on allmetalshaping that keep me coming back to that site! Absolutely amasing work you do!
 
  #17  
Old 02-07-2011, 06:24 PM
AXracer's Avatar
AXracer
AXracer is offline
Hotshot
Join Date: Oct 2004
Location: Durham NC
Posts: 15,844
Received 53 Likes on 34 Posts
Originally Posted by MP&C
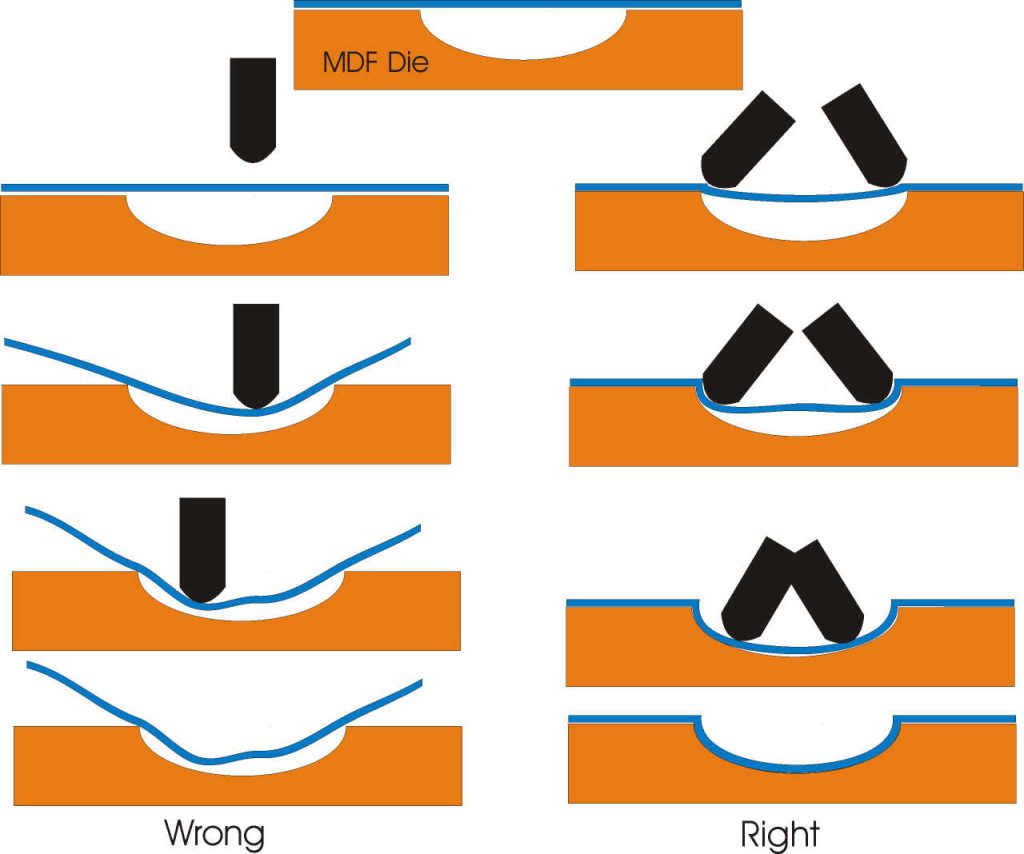
Bob, If you could form the "valleys" into some MDF board (or similar) with a router, and could slightly oversize the metal panel (cut off excess later)that would allow you to clamp/screw the outer perimeter to help prevent movement, it should eliminate the need for prestretching. A "window frame" layer or two of the same material will help in the clamping process, but you may find through trial and error a need to make smaller "window frames" to clamp around each valley. An appropriate sized steel rod with a rounded tip and a dead blow would do a pretty nice job of forming the beads, stretching the metal as you went.
To add to this: when die forming (the process described above) The biggest mistake is trying to move too much metal all at once, which results in pulling in the surrounding metal rather than doing localized stretching. Try this: rout or carve a 1 1/2" dish shaped recess into a piece of mdf. Lay a 6" diameter piece of 20 ga sheetmetal over it. Pound the metal with the ball end of a ball peen hammer trying to drive it into the recess with as few heavy blows as possible. The entire piece of metal will lift up around the edges and distort into a ruffled bowl shape. Now do the same with a fresh sheet by first carefully locating the recess under the metal and holding the sheet in place while using lightoverlapping tapping around the edge of the depression barely hard enough to leave an impression in the metal. Direct the blows at an angle towards the edge rather than straight down. Slowly work around and around until you have formed a shallow dish with a sharp edge that self indexes into the recess in the die. Now start tapping in concentric circles from the edge to the center, working around and around each circle until the metal reaches the die surface. By the time you reach the center you will have a nice nearly smooth dish in the center of a flat piece of metal. You will be pleasantly surprised at how quickly you can do this without distorting the surrounding metal.
 
  #18  
Old 02-07-2011, 08:59 PM
bobbytnm's Avatar
bobbytnm
bobbytnm is offline
Roast em' if you got 'em
Join Date: Mar 2005
Location: Rio Rancho, NM
Posts: 19,557
Received 3,841 Likes on 1,840 Posts
Nice diagram AX. It follows along the explanation nicely

Thanks
Bobby
 
  #19  
Old 02-08-2011, 10:47 AM
CharlieLed's Avatar
CharlieLed
CharlieLed is offline
Lead Driver
Join Date: Aug 2006
Location: Brentwood, TN
Posts: 7,867
Received 467 Likes on 303 Posts
If you are interested in learning about hammerforming, here is a DVD from Ron Covell and Ron Fournier that covers many aspects of the technique from simple scoops to a complete fender. If you can buy it, rent it, or borrow it then it will be well worth the effort....
 
Attached Images  
  #20  
Old 02-09-2011, 06:17 PM
MP&C's Avatar
MP&C
MP&C is offline
Tuned
Join Date: Aug 2007
Location: Maryland
Posts: 431
Received 20 Likes on 10 Posts
Ax, thanks for the clarification!
 
  #21  
Old 02-10-2011, 10:51 AM
AXracer's Avatar
AXracer
AXracer is offline
Hotshot
Join Date: Oct 2004
Location: Durham NC
Posts: 15,844
Received 53 Likes on 34 Posts
A hammer is considered a "precision" tool when used properly. Machinists rely on hammers to make tiny adjustments to setups. To use a hammer in a precision manner, do NOT grasp it like a carpenter would to drive nails! Instead hold the hammer near the end of the handle with a relaxed grip and the index finger extended straight along the top of the handle pointed at the head of the hammer, in a manner similar to tapping the finger tip on a table top. Keeping the wrist straight and the upper arm against the body swing from the elbow. Ideally the surface to be struck should be at the same height as the elbow. Let the weight of the hammer deliver the force, not your muscles. You will gain much control over exactly where the hammer strikes and the angle of the blow. This technique is especially important when using a body hammer to shape metal. You can do a lot more work in less time with "love taps" than with "beating it into submission" Save that for driving nails or demolition work.
 
Related Topics
Thread
Thread Starter
Forum
Replies
Last Post
EndorphinJunky
Ford Truck Parts for Sale
424
03-23-2015 05:15 PM
BigSix1
1987 - 1996 F150 & Larger F-Series Trucks
12
08-23-2014 11:14 AM
bobj49f2
1948 - 1956 F1, F100 & Larger F-Series Trucks
8
08-15-2010 12:31 AM
mike L
1987 - 1996 F150 & Larger F-Series Trucks
17
07-13-2006 02:23 PM


Quick Reply: Repair post on the HAMB by MP&C


All times are GMT -5. The time now is 05:51 PM.