Airbags Installation VIDEO
#106
 11-13-2011, 02:10 PM


Join Date: Jul 2006
Location: South Louisiana
Posts: 57
Likes: 0
Received 0 Likes
on
0 Posts
Okay, air bags are officially installed. Had the same issues with my truck that I had when I helped cuz install his. B&W hitch makes the install a little more cumbersome. The passenger side through-frame bolt on the hitch is supposed to be used to hold the bag bracket, too, but there just isn't enough threads left over to make me feel confident, so I bought a longer bolt and replaced it. If you follow the instructions, the bottom bracket will be tilted forward somewhat, because that's the way the spring block is installed on the axle, at least on the two trucks I've installed these on (F250 SRW). The bags are squeezed a little more on the front-facing side. I used the "Most 4X4's" lower bracket setting and it gave me about 1/2" clearance between the jounce bracket and the bottom bag bolt. I think the trick is to set the bracket for the least amount of clearance but don't strap it to the axle just yet. If you strap it prematurely, this setting will not allow you to get the bag bolt in, so you have to raise the bracket, install the bolt, then let the bracket back down and strap it to the axle.
I sent the air compressor kit back for a credit. After crawling around under the truck for 2 hours looking for a safe place to route hoses and wiring, I convinced myself that with my style of towing, I didn't need to go through the hassle of what looked like a 2 day project. I carry a 150 lb compressor that's powered from my 7-way plug to keep trailer tires inflated. Since I'm back there hooking up the trailer anyway, I'll just use that to top off the bags. Operationally, they make a tremendous difference. Makes for a much more pleasant tow and my headlights actually point at the ground again. I highly recommend them. Thanks to all who shared their experiences, it did make my second installation a little easier.
Ken
#107
02-23-2012, 11:18 AM
Senior User
Join Date: May 2011
Location: Manassas, VA
Posts: 167
Likes: 0
Received 0 Likes
on
0 Posts
Resurrecting an old thread...
I have the 2535 bags and sat down with the instructions last night. Firestone must have received a fair amount of feedback on installation issues. There is an entire page with a warning about getting the dimple on top of the bag in the correct hole on the top bracket, or you could void the warranty for leaking in this area. Also, there is a figure depicting the correct way to set up the bottom barcket, with text describing that the barcket should be set at the lowest position that will allow clearance between the lower bag bolt and the jounce stop.
Beyond that, the instructions are pretty lame, referencing incorrect figures, etc. Sitting with the instructions and Epic's original video made it all make sense though.
Waiting for the Air Lift kit to get here before I install both.
#108
02-23-2012, 12:38 PM
Join Date: Apr 2004
Location: North of Salt Lake City
Posts: 5,159
Likes: 0
Received 26 Likes
on
24 Posts
Resurrecting an old thread...
I have the 2535 bags and sat down with the instructions last night. Firestone must have received a fair amount of feedback on installation issues. There is an entire page with a warning about getting the dimple on top of the bag in the correct hole on the top bracket, or you could void the warranty for leaking in this area. Also, there is a figure depicting the correct way to set up the bottom barcket, with text describing that the barcket should be set at the lowest position that will allow clearance between the lower bag bolt and the jounce stop.
Beyond that, the instructions are pretty lame, referencing incorrect figures, etc. Sitting with the instructions and Epic's original video made it all make sense though.
Waiting for the Air Lift kit to get here before I install both.
I have the 2535 bags and sat down with the instructions last night. Firestone must have received a fair amount of feedback on installation issues. There is an entire page with a warning about getting the dimple on top of the bag in the correct hole on the top bracket, or you could void the warranty for leaking in this area. Also, there is a figure depicting the correct way to set up the bottom barcket, with text describing that the barcket should be set at the lowest position that will allow clearance between the lower bag bolt and the jounce stop.
Beyond that, the instructions are pretty lame, referencing incorrect figures, etc. Sitting with the instructions and Epic's original video made it all make sense though.
Waiting for the Air Lift kit to get here before I install both.
And, you do have to pay attention to get the nipple in the right hole. On my first try, I used the wrong one and the bag was only half on the lower bracket. That was obviously wrong so I rotated it until it clicked into the proper hole.
Bottom line, my airbags have served very well for over a year with zero signs of trouble. Brackets are straight and no signs of wear. The bolts have not needed any additional re-torquing either. My fifth wheel pin weight is 3,700 - 3,900 lbs so I know I'm getting full value out of the airbags.
#109
02-23-2012, 01:04 PM

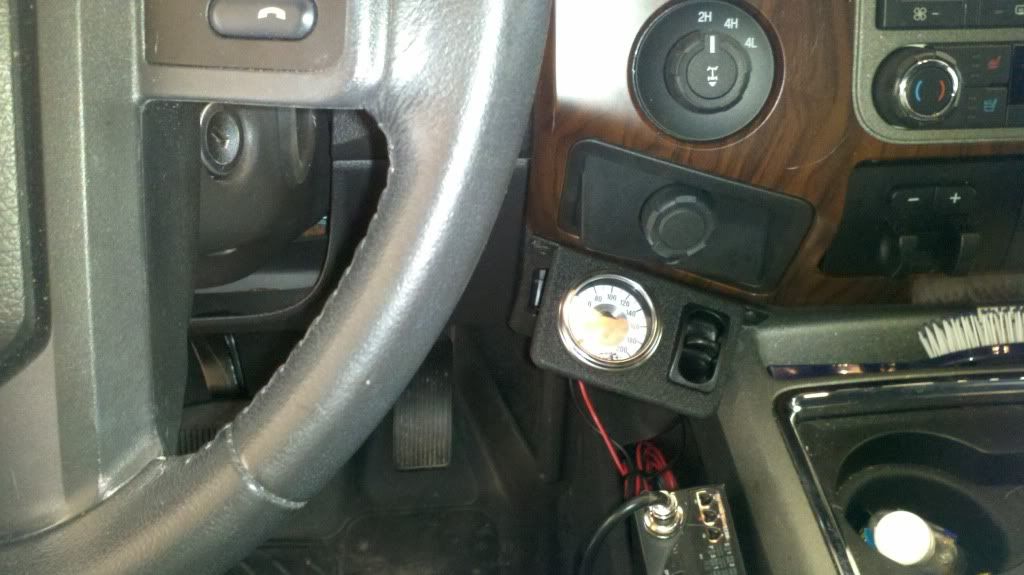
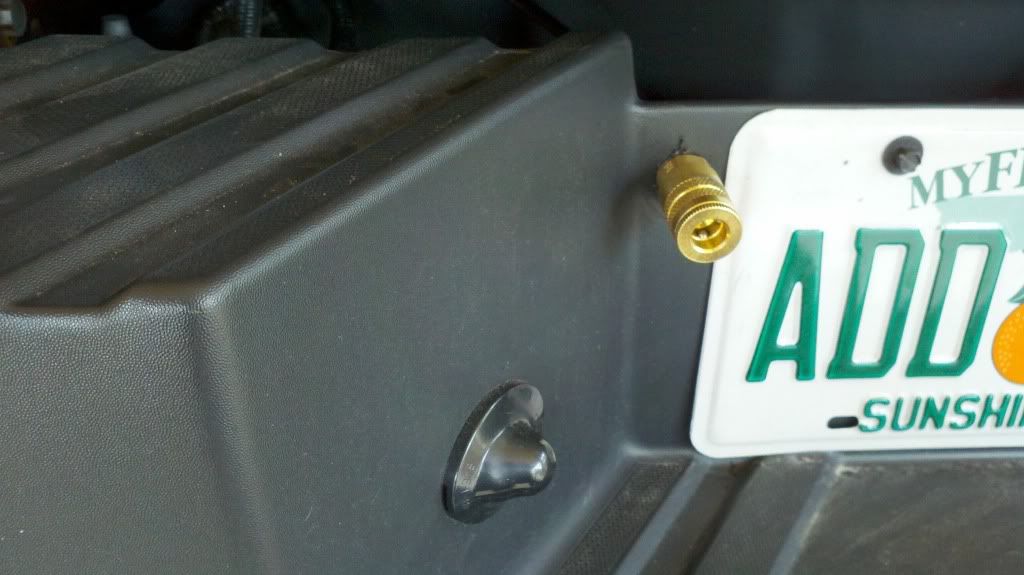
I just installed my Firestone air bags 2 days ago. Instructions were almost no help but with Epic's video and some other well documented posts on here the install went fairly well. 2 hours it was not however. I did the driver's side first and it took me about 3.5 hours, mainly because I was being very cautious and did not want to mess anything up. Passenger side only took about 30-45 min. What I learned was to install the top bracket first and then competely put the bottom bracket together and just leave it loose on the axle. Then put the air bag in place and position everything after that. My lower brackets were in the middle position for clearance, tried the lowest and that only left about 1/8 inch for the bolt on airbag itself. I did not use the fancy compressor so I routed my airlines to the back and mounted them in the trailer hitch bracket right beside the large round trailer plug. Put the left side on top and the right directly under it. Thanks to all that had input on this.
#110
02-23-2012, 03:10 PM

Just installled the air lift wireless system last weekend. It went pretty good, they have made a few changes since Epics video. There is now only 1 electrical wire to hook up to an ignition source. The provided a couple of extra air line T's that I installed on each side and ran to the rear bumper. Then I can still air or release air from the bags in case the compressor or control modules fail. Mounted the compressor and modules above the spare tire on the cross over member and ran the air intake to the inside of the cab to keep clear air coming in to the compressor.
#111
02-23-2012, 07:39 PM

SPONSOR
Join Date: Jul 2011
Location: Michigan
Posts: 543
Likes: 0
Received 0 Likes
on
0 Posts
Along the lines of us redesigning our WirelessAir kit, I should also mentioned that many of the kits that fit the newer SD trucks have also been redesigned. Many customers were having troubles installing our original kits and have been redesigned to be a two piece upper bracket. If you are interested in learning more you can read the full story here.
#112
02-24-2012, 08:47 AM
So Mike, I was going to send this question off to AirLift but will do it here for all to benefit.
If we are using a compressor/tank combo what is the correct way to air up the bags?
A simple 12 volt solenoid, same as the horns? Or does it need to be restricted to keep air flow down?
The supplied compressors are capable of 150 psi IIRC, but that is at a low air flow.
I was thinking a storage tank at 150-200 psi dumping air into the bags might be too much too quick for the controller to accurately maintain the fill rate.
#113
02-24-2012, 11:37 AM
SPONSOR
Join Date: Jul 2011
Location: Michigan
Posts: 543
Likes: 0
Received 0 Likes
on
0 Posts
I was recently looking into this for a couple of other people and just recently heard some more information.
After doing some bench testing our engineers feel that the manifold can handle it. Now that was 150 psi, I don't believe they were looking at the 200 psi. If you are running that much you may want to consider a regulator.
The only stipulation they suggested was that the solenoid plumbed in place of the compressor (the one coming from the tank to the manifold), needs to be fed with a relay rather than just connecting it the compressor wire for the kit. Please let me know if that make sense or not. I can put together a wiring diagram of what I'm describing if that would help.
#114
02-24-2012, 11:40 AM
Join Date: Apr 2004
Location: North of Salt Lake City
Posts: 5,159
Likes: 0
Received 26 Likes
on
24 Posts
I was recently looking into this for a couple of other people and just recently heard some more information.
After doing some bench testing our engineers feel that the manifold can handle it. Now that was 150 psi, I don't believe they were looking at the 200 psi. If you are running that much you may want to consider a regulator.
The only stipulation they suggested was that the solenoid plumbed in place of the compressor (the one coming from the tank to the manifold), needs to be fed with a relay rather than just connecting it the compressor wire for the kit. Please let me know if that make sense or not. I can put together a wiring diagram of what I'm describing if that would help.
After doing some bench testing our engineers feel that the manifold can handle it. Now that was 150 psi, I don't believe they were looking at the 200 psi. If you are running that much you may want to consider a regulator.
The only stipulation they suggested was that the solenoid plumbed in place of the compressor (the one coming from the tank to the manifold), needs to be fed with a relay rather than just connecting it the compressor wire for the kit. Please let me know if that make sense or not. I can put together a wiring diagram of what I'm describing if that would help.
#115
02-24-2012, 11:51 AM
<!--[if gte mso 9]><xml> <w:WordDocument> <w:View>Normal</w:View> <w:Zoom>0</w:Zoom> <w:PunctuationKerning/> <w:ValidateAgainstSchemas/> <w:SaveIfXMLInvalid>false</w:SaveIfXMLInvalid> <w:IgnoreMixedContent>false</w:IgnoreMixedContent> <w:AlwaysShowPlaceholderText>false</w:AlwaysShowPlaceholderText> <w:Compatibility> <w:BreakWrappedTables/> <w:SnapToGridInCell/> <w:WrapTextWithPunct/> <w:UseAsianBreakRules/> <w ontGrowAutofit/> </w:Compatibility> <w:BrowserLevel>MicrosoftInternetExplorer4</w:BrowserLevel> </w:WordDocument> </xml><![endif][if gte mso 9]><xml> <w:LatentStyles DefLockedState="false" LatentStyleCount="156"> </w:LatentStyles> </xml><![endif][if gte mso 10]> <style> /* Style Definitions */ table.MsoNormalTable {mso-style-name:"Table Normal"; mso-tstyle-rowband-size:0; mso-tstyle-colband-size:0; mso-style-noshow:yes; mso-style-parent:""; mso-padding-alt:0in 5.4pt 0in 5.4pt; mso-para-margin:0in; mso-para-margin-bottom:.0001pt; mso-pagination:widow-orphan; font-size:10.0pt; font-family:"Times New Roman"; mso-ansi-language:#0400; mso-fareast-language:#0400; mso-bidi-language:#0400;} </style> <![endif]-->
I figured on a regulator from the beginning, regulating down to the bag range, 100-120psi. My concern was that the manifold could handle and properly regulate the possible flow coming from a solenoid compared to the �ramped up� air flow using a live compressor.
ontGrowAutofit/> </w:Compatibility> <w:BrowserLevel>MicrosoftInternetExplorer4</w:BrowserLevel> </w:WordDocument> </xml><![endif][if gte mso 9]><xml> <w:LatentStyles DefLockedState="false" LatentStyleCount="156"> </w:LatentStyles> </xml><![endif][if gte mso 10]> <style> /* Style Definitions */ table.MsoNormalTable {mso-style-name:"Table Normal"; mso-tstyle-rowband-size:0; mso-tstyle-colband-size:0; mso-style-noshow:yes; mso-style-parent:""; mso-padding-alt:0in 5.4pt 0in 5.4pt; mso-para-margin:0in; mso-para-margin-bottom:.0001pt; mso-pagination:widow-orphan; font-size:10.0pt; font-family:"Times New Roman"; mso-ansi-language:#0400; mso-fareast-language:#0400; mso-bidi-language:#0400;} </style> <![endif]-->
I figured on a regulator from the beginning, regulating down to the bag range, 100-120psi. My concern was that the manifold could handle and properly regulate the possible flow coming from a solenoid compared to the �ramped up� air flow using a live compressor.
That is not a problem, don�t see why it would be necessary though. The compressor current draw is more then the solenoid, especially as you fill the bags.
Have at it, but it is a fairly simple process to add the relay.
Now � how about getting those engineers to work on allowing to manifold assemblies to work with the wireless kit?
That would be something useful (and still in the instructions)
ontGrowAutofit/> </w:Compatibility> <w:BrowserLevel>MicrosoftInternetExplorer4</w:BrowserLevel> </w:WordDocument> </xml><![endif][if gte mso 9]><xml> <w:LatentStyles DefLockedState="false" LatentStyleCount="156"> </w:LatentStyles> </xml><![endif][if gte mso 10]> <style> /* Style Definitions */ table.MsoNormalTable {mso-style-name:"Table Normal"; mso-tstyle-rowband-size:0; mso-tstyle-colband-size:0; mso-style-noshow:yes; mso-style-parent:""; mso-padding-alt:0in 5.4pt 0in 5.4pt; mso-para-margin:0in; mso-para-margin-bottom:.0001pt; mso-pagination:widow-orphan; font-size:10.0pt; font-family:"Times New Roman"; mso-ansi-language:#0400; mso-fareast-language:#0400; mso-bidi-language:#0400;} </style> <![endif]--> Now � how about getting those engineers to work on allowing to manifold assemblies to work with the wireless kit?
That would be something useful (and still in the instructions)
#116
02-25-2012, 07:16 AM
SPONSOR
Join Date: Jul 2011
Location: Michigan
Posts: 543
Likes: 0
Received 0 Likes
on
0 Posts
The diagrams below are originally taken from the instructions in the WirelessAir kit, and modified accordingly.
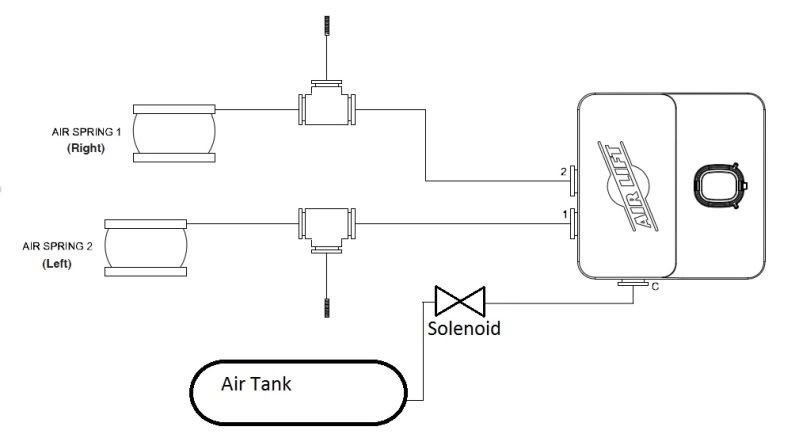
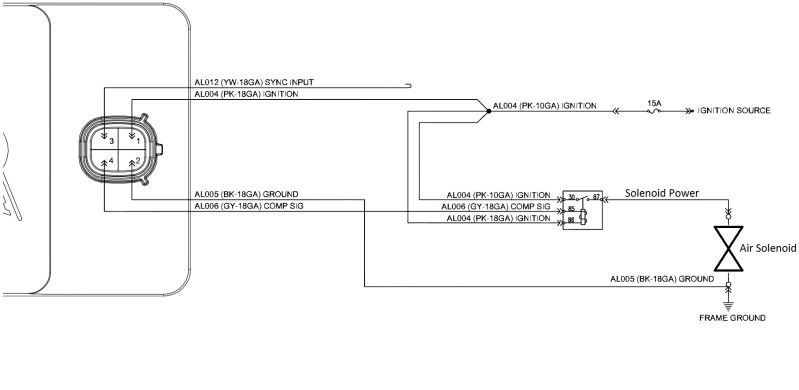
In both places where I have added the solenoid, the compressor was per the original diagrams. Whatever on-board air system you would add or currently have would feed into the tank on the diagram. From here it would plumb to a solenoid/valve and then feed into the manifold.
They way our systems traditionally work is when the user calls for more pressure in the bags it tells the compressor to run until it sees the requested pressure in each bag. With the setup in the diagrams the system would think it is telling the compressor to turn on but would actually be opening the valve from the tank which would instantly send high pressure air to the manifold.
I did find out that I misspoke earlier, the initial testing done was not at 150 psi, it was only 105 psi. This was done as the bags in these kits are only rated for 100 psi. Any pressure above this should be regulated down, my apologies for the mistake.
The information above and in the previous post is the suggested way to connect the Wireless systems to an on-board air setup. This setup has had very limited testing done at this point. Modifying the original configuration will void your warranty, so tying the systems together should only be done by people who are adamant about using the on-board air system to feed the wireless unit.
#117
02-25-2012, 08:59 AM
There are several solutions for air supply.
I found two inline regulators so far, one can be preset.
Milton Mini Air Regulator — 1/4in. NPT Inlet, 250 PSI, Model# S-1145 | Air Filters, Lubricators + Regulators | Northern Tool + Equipment
Pre-Set 1/4 in. Pressure Regulator
I will keep searching. I am looking for 200 --> 100 psi regulation. Flow can be done with a pipe plug, just drill a small hole.
So, something for AirLift to consider making available to end users, inline 12 volt solenoids with pre-set regulators for volume tank users.
The stuff is already out there, just needs to be adapted. I am sure there are many users who could use this addition.
#118
02-25-2012, 05:08 PM
SPONSOR
Join Date: Jul 2011
Location: Michigan
Posts: 543
Likes: 0
Received 0 Likes
on
0 Posts
I've expressed to Airlift a couple of times the overwhelming interest in combining a previous on board air setup with one of our controllers. There is also word that we are developing a wireless on-board air system but no word on any sort of completion date.
I will pass along the info about offering a regulator/solenoid combo as well. I haven't tried looking yet but if I do come across something I'll be sure to pass it along.
I will pass along the info about offering a regulator/solenoid combo as well. I haven't tried looking yet but if I do come across something I'll be sure to pass it along.
#119
02-25-2012, 08:37 PM
SPONSOR
Join Date: Jul 2011
Location: Michigan
Posts: 543
Likes: 0
Received 0 Likes
on
0 Posts
Found a 0-200 psi regulator from Viair, that's reasonably priced. I'm not sure how well it would stand up to the elements though.
Viair Regulator
Viair Regulator
#120
02-26-2012, 02:44 PM
NEW Compressor Install
Today I installed the Airlift 25690 Quickshot with the Viair 450C 100% duty compressor......Very easy installation (Thanks to Epic)......I have a long bed, the additional room allowed me to install underneath towards the front of the bed, side by side......
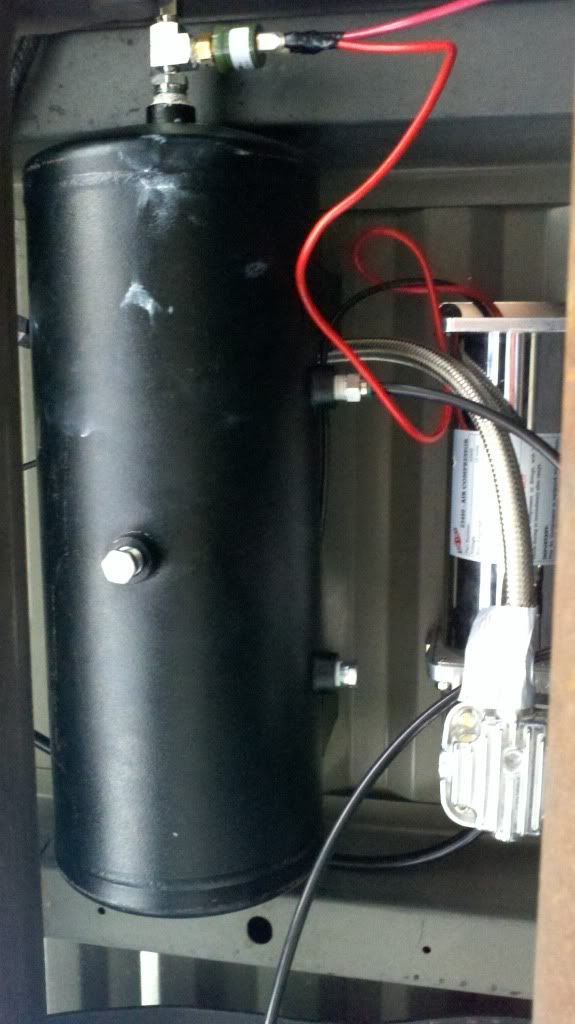
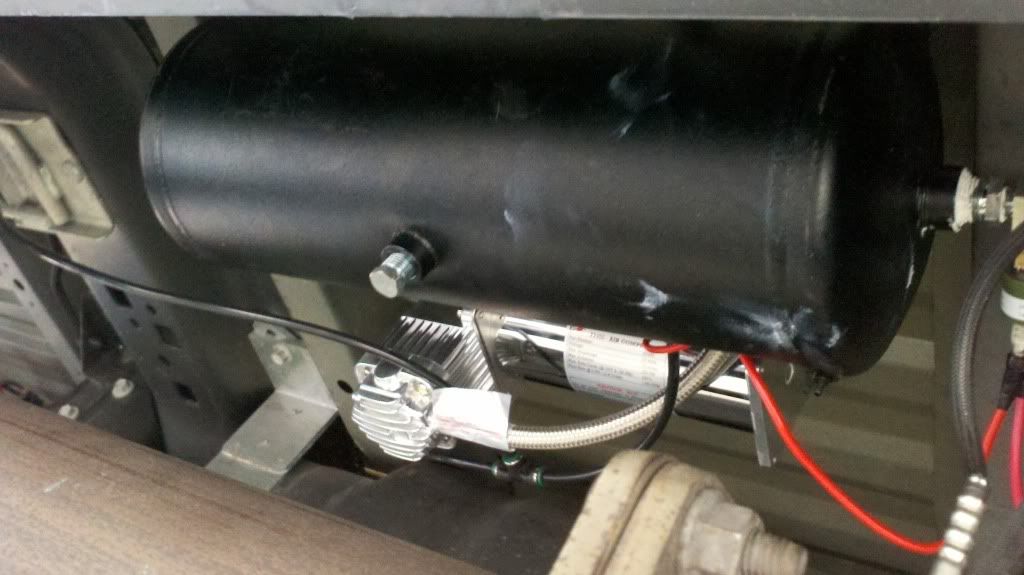
Very pratical.....
Very pratical.....