Mustang II on a 56. Pictures included.
#31
 02-18-2011, 05:58 AM

Elder User
Join Date: Oct 2010
Location: 50 miles west of Chicago
Posts: 838
Likes: 0
Received 0 Likes
on
0 Posts
sam beat me too it as as i was gonna say the same thing about taking one apart !!!!!!!!!! mine started out a wee bit ago as fixing the noisy worn out valvesprings and has morphed into well the frames tweaked lets bolt all our extra stock suspension pieces and some new springs to it and swap the body etc. over ...... too now goin to get / waiting for my dropped axle , filling holes and body work planned , swapping some parts on the flatty .............. dain amazing how it start's snowballing !!!!!!!!!!!!!!!!!!!!!!!

Damn, isin't that the truth. I was just going to fix a few wires and put in a switch and now i am re-wiring the truck from the dash forward...

jim

#32
02-21-2011, 05:45 PM
More progress over the weekend and today. I still need to finish boxing in the frame.
Got the crossmember welded in over the weekend. Not very pretty but I think the welds will hold. Had some trouble with my welder but finally got if straightened out. I wish I could go back and redo it with prettier welds.
Having trouble uploading pictures and I don't want to subscribe to any photo websites. I have too much crap out there as it is.
I will post pics when the FTE process is repaired.
#33
02-23-2011, 12:56 PM
@O#*^$%(*@&#$%)*#@)($^@)#*^%()!!!!!!!!!!!
@O#*^$%(*@&#$%)*#@)($^@)#*^%()!!!!!!!!!!!
First let me state that I am not an automotive engineer. I wish I was.
I just found out I installed the Heidt's crossmember wrong.
I followed the instructions from "Heidt's Rod Shop' to the 'T'. I had the frame slightly lower in the front as per step 1. I had the crossmember tight against the frame as in step 6. I just didn't notice the slight slant to the crossmember until a friend pointed it out yesterday.
The instructions mention grinding the crossmember uprights to get the member to fit between the frame rails if needed but nowhere does it say to grind the front horizontal mount point to adjust the install angle and make the lower control arms level to the ground at proposed ride height.
I called Heidt's and their response was; "I will admit that our instructions do need to be made a bit more clear cut." Really? WTF?!?!?!?!?! That's the understatement of the year!!
The bad news; It is parallel with the frame which means that when the truck is at current proposed ride height the back edge of the lower control arms will be slightly elevated and the control arms will not be level to the ground. Apparently this creates a problem with handling and braking performance.
The good news; It is parallel to the frame and not tilted either way.
I have 2 options.
Option 1: Cut out the crossmember and reinstall it with a slight tilt so that the control arms will be parallel to the ground at ride height with the rear slightly elevated.
Option 2: Change the rear end mounts (means C-notching the frame and putting a hump in the bed) so that the frame will be level to the ground at ride height effectively lowering the rear of the truck.
I am leaning toward Option 2, even though it means losing some of the hauling capability, because this will not be a working truck but a pleasure truck. Maybe having the truck ride with the frame level will help the handling?
#34
02-23-2011, 01:35 PM

well, you need the lower control arms level with the roadway, regardless of the rest of the chassis position. the caster/camber to lean the wheel back and in at the top.. otherwise you will have chaos..
on my 56 with volare, the OP put it in UNDER the chassis without any notch.. so the front is lower than it should be, forcing the caster way out..
it is jittery as all get out and scary .. I get to cut it out and start over!!..
I did level my MII crossmember with the chassis in ride height position on the other chassis..
Sam
#35
02-24-2011, 09:27 PM
OK, so I figured out what was wrong with how I was trying to upload pictures. Here's the crossmember welded in.
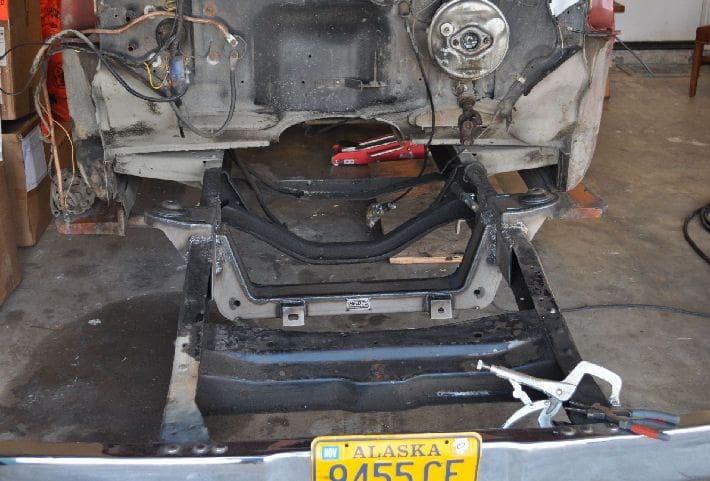
I still need to finish the frame boxing. Welds are not pretty as I was listening to advice from a friend that does body work and had the welder set way too hot for the size of wire we were using. It worked OK for horizontal welding but then when I went out of position to vertical or overhead it really sucked.
I have decided the solution for the crossmember install dilemma. I am going to notch the frame at the rear and let the truck ride with the frame level. I have a couple pics of it mocked up with the rear wheels on and the fronts in place but not attached just to see how it will look.

Front quarter view.

Rear quarter view.
I am going to attach the front end components this weekend so I will know exactly where it sits before trying to do anything to it.
I will take pictures with the regular camera and not my cell phone when I am done.
I still need to finish the frame boxing. Welds are not pretty as I was listening to advice from a friend that does body work and had the welder set way too hot for the size of wire we were using. It worked OK for horizontal welding but then when I went out of position to vertical or overhead it really sucked.
I have decided the solution for the crossmember install dilemma. I am going to notch the frame at the rear and let the truck ride with the frame level. I have a couple pics of it mocked up with the rear wheels on and the fronts in place but not attached just to see how it will look.
Front quarter view.
Rear quarter view.
I am going to attach the front end components this weekend so I will know exactly where it sits before trying to do anything to it.
I will take pictures with the regular camera and not my cell phone when I am done.
#36
02-24-2011, 09:39 PM

#38
02-24-2011, 11:49 PM
The wheels are Bullitt Motorsport from American Muscle. 18x8.5 front and 20x10 rear. I bought the fronts back in Sept. of 2009 and planned to buy the rears a couple months later. My house caught fire and I had to postpone the purchase until Sept. of 2010. The only problem is they were unavailable at the time. I called a few places around the country and found a store that had a pair of the 20x10 and bought them while I had the chance. I was really sweating finding a pair that matched the front for a while.
I need to get the bed disassembled and cut out the sides and wood for the tubs before I can put it back on with the rear tires on. They are wider than the fronts and the bed won't fit until I tub it. They have 1.8" of offset and 7.2" backspacing and fit the '05 to '11 Mustang GT and V6. The rear tires are 295/35x20. Initial measurements put them inside the fenders by about 3/4" or so.
I need to get the bed disassembled and cut out the sides and wood for the tubs before I can put it back on with the rear tires on. They are wider than the fronts and the bed won't fit until I tub it. They have 1.8" of offset and 7.2" backspacing and fit the '05 to '11 Mustang GT and V6. The rear tires are 295/35x20. Initial measurements put them inside the fenders by about 3/4" or so.
#40
02-25-2011, 08:38 AM
Elder User
Join Date: Sep 2006
Location: Katy(Houston), Texas
Posts: 741
Likes: 0
Received 0 Likes
on
0 Posts
Sorry to hear about the cross member issue. It's really coming together nicely and it's amazing how fast progress is going.
I'll never understand why the MII manufacturers can't get it together and write up a decent set of directions. I had a few problems with mine but with the help of a lot of guys and gals on this board I eventually got it in (I hope it's correct). Hopefully nothing pops up when I get the frame going. Your problem had me thinking since its been a while since I welded it in. They need to either sit down and do a good documentation on a install or get a coustomer to document it for them, but by now you would think they would have it together for their customers. Ok, I'm through b*tching..
Looking good though
#41
02-26-2011, 12:23 AM
Minor modification may be necessary
Caveat Emptor. I started unpacking parts to see what I had and get ready to mock up the front end for steering, motor mounts and ride height for the c-notch in the rear.
My Heidt's crossmember has the lower control arm tubes welded in for strut rod elimination. I had the factory do it so I wouldn't screw it up. I tried one of the bolts for the control arms in the holes. There is a bit of offset at the end of the tube where it contacts the front plate and the freaking bolts won't go in without some reaming of the 3/16 plate they butt welded the tube to.
One of the upper control arms came from Ride Tech with the ball joint installed upside down. I have no bolts for the upper control arms.
So, I also found this store in OKC that is called "Metal Supermarkets" They advertise a person being able to buy any amount and any size of steel and they would even cut it for you. I thought; "Great." I called them and ordered 4 pieces of 3/4" OD DOM tube with an ID of 7/16 to use for the motor mounts (got 2 extra in case I goof them up). I asked them to cut it 3 5/8" long. I get there and pick up the steel and head over to Fastenal for some bolts and at Fastenal, while I am trying bolts to go through the tube and attach the motor mounts, I check the length of the bolts against the mount. I put the tube in the mount and find it is 1/8" too short. Check the others and they are anywhere from 3/16" to 1/16" off. I call the guy I talked to at the Metal Supermarket when I ordered them and he says; "We cut those on a band saw. It's hard to get them exact." I said; "You mean to tell me you sold me 4 pieces of steel that are too short for me to use?" He says; "We can cut them again but what if they are too long?" I tell him; "If they are too long I can grind them and shorten them but I can't stretch them out." He grudgingly says; "Bring them back and we'll get you some more." I bring them back and this time I bring the mount in with me. His guy comes in from the back with the 4 new pieces and hands them over. I try them all and one of them is 1/16" too short so he has to go cut it again.
What has happened to quality control in this country? Do people not take pride in their craftsmanship anymore?
#43
02-26-2011, 06:05 AM
Mountain Pass
Join Date: Sep 2010
Location: Oconomowoc, WI
Posts: 182
Likes: 0
Received 0 Likes
on
0 Posts
In the steel an fabrication business I am finding it hard to hire a guy that can MEASURE. They don't know what a 1/16th is, can't convert fractions to a real number. If they have to add 3/16ths and 1/4 they melt down. I told my wife I qas quitting and gonna work out of the garage for the rest of my life. I would rather work odd jobs than train annother snot nosed kid to work. They all wanna be the boss. -------------rant over------------- sorry to go off like that
#44
02-28-2011, 12:04 AM
More progress this weekend. Each weekend I try to set a goal and achieve it. Keeping it attainable and realistic is sometimes challenging. This weekend it was to install one wheel for actual ride height and mock-up purposes. I returned the upper control arm with the upside down ball joint to Ride Tech to exchange it. They were pretty good about it. So, that being done, I only had one upper control arm to install.

Once I used a Dremel tool on the slots in the upper control arm mounts and on the forward hole for the lower control arms the bolts fit perfectly. Using the Wilwood Pro Spindle - Standard ride height.

I figured I could leave off the steering arm and caliper and caliper mount to lighten things up on the spindle. It didn't occur to me until I tried to bolt the shock in that I should have left the disc off for mock up purposes. Those things are heavy!

One wheel installed. Anyone know how to align one wheel? I love the tread pattern of those Nitto Invo tires.
I have to admit these Strong Arms from Ride Tech are stout and heavy!
With this I know where the truck will sit at ride height so I can finish figuring out how to do the c-notch. I am liking the idea of having the truck ride level. This is getting more exciting after every weekend.
Side note: I need to contact Ride Tech again. They sent me the wrong Shockwaves. I ordered the single adjustable ones. Good thing they are easy to talk to.
Oops! my bad. I have the correct shockwaves. They changed suppliers and I didn't recognize that the adjustment **** is at the top of the shock and not at the bottom as my older rear shockwaves were.
Once I used a Dremel tool on the slots in the upper control arm mounts and on the forward hole for the lower control arms the bolts fit perfectly. Using the Wilwood Pro Spindle - Standard ride height.
I figured I could leave off the steering arm and caliper and caliper mount to lighten things up on the spindle. It didn't occur to me until I tried to bolt the shock in that I should have left the disc off for mock up purposes. Those things are heavy!
One wheel installed. Anyone know how to align one wheel? I love the tread pattern of those Nitto Invo tires.
I have to admit these Strong Arms from Ride Tech are stout and heavy!
With this I know where the truck will sit at ride height so I can finish figuring out how to do the c-notch. I am liking the idea of having the truck ride level. This is getting more exciting after every weekend.
Side note: I need to contact Ride Tech again. They sent me the wrong Shockwaves. I ordered the single adjustable ones. Good thing they are easy to talk to.
Oops! my bad. I have the correct shockwaves. They changed suppliers and I didn't recognize that the adjustment **** is at the top of the shock and not at the bottom as my older rear shockwaves were.
Last edited by BACAGrizz; 02-28-2011 at 09:43 AM. Reason: Correction on shockwaves.
#45
02-28-2011, 05:41 AM
Elder User
Join Date: Oct 2010
Location: 50 miles west of Chicago
Posts: 838
Likes: 0
Received 0 Likes
on
0 Posts
It appears the even though ride tech is easy to work with they need to step up their quality control or at least start it.....
I agree on the project deal. I try to get something done everytime I am working on the truck. Can be small, can be big just get it done. This keeps me going and motivated.
jim
I agree on the project deal. I try to get something done everytime I am working on the truck. Can be small, can be big just get it done. This keeps me going and motivated.
jim