How to upgrade the stock sound on an Aerostar
#1
 11-30-2010, 01:10 PM

How to upgrade the stock sound on an Aerostar
I figured since this is a fairly popular modification, that it should be posted here, and probably made into a sticky. I have upgraded the sound on several Aerostars, in several different ways. I have done some things the wrong way, and had to redo them, and done others the right way from the start.
So the basics.
The stock Aerostar radio has fairly low power output. The speakers like many stock speakers are acceptable, but not great. The Aerostar has factory radio controls in the back on most models that allow passengers in the mid seat to operate some basic controls.
The stock setup does have an ok layout, and is pretty easy to use. But few have the CD player. The problem with the stock setup is the wiring. Ford opted for a common ground system. This works ok with the stock radio, and at low power levels, but tends to create a lot of sound distortion as volume increases, even if high quality speakers are used.
I will break this down into three levels of upgrades, plus a custom level. Depending on your budget and what kind of power you want to run will decide which level you should go with.
Regardless of which level you go with, you will need the following tools.
vehicle specific radio harness adapter is needed for a clean install that can be removed and replaced at a later date. You can splice the wires, but it makes it a nightmare should the unit ever need to be replaced again. It is an inexpensive part, make sure you have this before starting.
wire cutters/stripper is needed for obvious reasons. You need to join the wires on the head unit to the wires on the harness adapter
gold plated crimp connectors and crimp tool (good pliers will work ok too) if you choose to crimp the wires together.
or
soldering iron and solder
heat shrink tubing and a heat source
Electrical Tape for a cleaner and more professional install. Soldering provides the best connections since they cannot loosen over time and there are good electrical pathways. Heat shrink tubing is preferred to seal and protect the connection versus simply wrapping the joint in tape, but either will work fine. You can still use the tape to wrap bundles of wire together to keep things near and tidy.
Metric and Star Wrench Set Some of the trim panels that need to be removed are held in place with star drive screws that also usually have a hex head. All sizes are metric.
Flat and Phillips Screwdrivers may be needed
Ford Radio Removal Tool Other tools can be substituted, not expensive, but you can also make your own. I recommend a professional one.
To get to the radio, you need to remove several panels. The first panel is the one underneath the steering column. This is held on by three screws. After removing the screws, the panel can be pulled off. It is held at the top by clips, just pull straight back with firm pressure to release the panel. The next panel is the console. It may have a screw on the side near the steering column, and should have one or two screws behind the ash tray. To remove the ash tray, just pull it out, then squeeze the spring loaded catch. The panel is also attached with clips, it is easier to remove by starting at the area nearest the steering column, then work your way across the top. There will be wires connecting to switches and lights in the panel. You will need to carefully disconnect these.
Once the panel is out of the way, you will need to use the radio removal tool to remove the factory stereo. It just slides into the two holes on either side. The pry outward on the tool as you pull it. It should pull the radio right out. Disconnect the electrical connectors and antenna. If the radio is not stock, the installation and removal tools that came with the new unit should work to remove the old radio.
When installing the radios mounting bracket, slide it into the opening and make sure everything looks right. Decide how far in you want the radio to go. You can go in all the way, or you can set it a little bit further out so long as it still clears the panel. When you are happy with the placement, bend the little metal tabs in the bracket so they engage the opening. This locks the bracket in place and ensures the radio will be held securely and can not slide out without using the proper removal tool. Getting the placement correct is important, because if it is wrong, you will have to pull the radio back out and adjust it later. Don't be afraid to put the panel back on to make sure everything fits properly.
You will also need other things based upon the upgrade level
Level 1
This basically consists of a new head unit connected to the stock wiring and speakers. You would just connect your harness adapter to the new stereo wiring. I prefer making all the connections before putting anything in the dash. Usually the colors on the harness adapter will match the colors on the radio harness. Be sure to check the description on each wire to be sure. From there everything is plug and play. The rear radio controls in the Aerostar will no longer work properly. The speaker on/off will still function. Make sure the radio is properly secured per the above instructions.
Level 2
This consists of upgrading the wiring and/or the speakers in addition to replacing the speakers. It is a waste to replace the speakers with better higher powered ones without upgrading the wiring due to the common ground setup of the factory wiring. You will need to remove any other panels to feed your wiring through. You can bypass the harness adapter for the speaker wires, but a cleaner setup would be to cut the speaker wires right after the connector and splice the new wires on there. This way the whole setup will still be plug and play. This can effectively drive speaker power levels of up to 45 watts per channel. The rear speakers can be more challenging to wire up. You can either run the mid speakers and bypass the hatch speakers, or you can run the mid and hatch speakers in series which will produce a high ohm load that won't hurt most systems. This approach may be quieter however depending on the power output and ratings of the speakers. You can hook them up in parallel, but you do so at your own risk as it can overload most head units. This method will disable the rear speaker controls entirely. Many head units have a sub output as well, adding a sub will be discussed further in the custom section below.
Level 3
This is similar to level 2 except that you use an external amp to run the speakers. This solution lets you run much higher power levels and more powerful speakers. This will require you to purchase not only an amp, but also an installation kit which consists of the heavy gauge wiring, a high power fuse, and other stuff you need. You will need to route the power cable from the battery to the amp, which will usually involve drilling a hole through the firewall. You would place an amp in a convenient location, such as under the driver seat, and then run the power and ground connections. It is important to get a good clean ground connection. Run all your new speaker wire to the amp instead of the head unit. Route the RCA cables from the head unit to the amp. It is strongly recommended that you use good quality shielded RCA cables such as Monster Cable to prevent interference from being carried by the cables. I prefer to run the cables under the driver or passenger side door trim or under the carpet next to the door trim. Make sure you label the speaker wires, since this type of setup strays from the factory layout and it is easier to mark your connections now versus later.
Custom Installation:
If you choose to run larger than stock sized speakers, or place them in non-factory locations, you just have to do what you will think will work well. The stock dash speakers are small and wimpy, and the location is hard to get to. I prefer to bypass them and run speakers in the door instead. That way, you can run larger better sounding speakers, and they are easier to get to. The hard part of this is feeding the wire through the rubber bellows, but if you want to protect the wire you need to. This approach sounds much better than any speaker in the stock location. I prefer mounting the speaker towards the back of the door right beneath the armrest portion. This gives better clearance behind the panel. Because Aerostar have large interiors, all kinds of custom stereo work can be done, its just a matter of budget.
As far as subwoofers go, installing one is not unlike installing an amp. You will need a speaker box, and the location will have to be chosen based on the size sub, and how your interior is set up.
Lastly, there is an option for installing a separate amp with the stock radio, which has the benefit of keeping everything stock looking and the rear controls will still mostly work. You would intercept the factory speaker wires and run them to line level converters, which adapt to RCA connectors. Then you can run the RCA cables to a separate amp and run new speaker wire to the speakers. The headphone jacks and speaker on/off button won't work however, unless you specifically route the wiring to do so. This method is not highly recommended because you still get stuck with the stock cassette deck unless you replace it with one that has a CD player.
Again, which method you choose will depend a lot on budget, how much sound you are trying to produce, etc.
#3
12-03-2010, 05:48 PM

Just wondering, how big of an amplifier can you install using the stock common ground wiring? How about through a common/float adapter?
I'm guessing the stock system is limited to about 30 watts per channel using 4 ohm speakers, and typically they come with only about 25 watts.
It's easier for aftermarket makers to design high power amplifiers with both speaker wires floating, but it's also possible to design high power amps that can use common ground.
#4
12-04-2010, 12:44 AM
Hard to say. You don't need a lot of power to run a line level converter, so your amp will be unaffected. Since you would need new wring to run from the amp to the speakers anyway, I would say your power limit will depend on how many batteries you install.
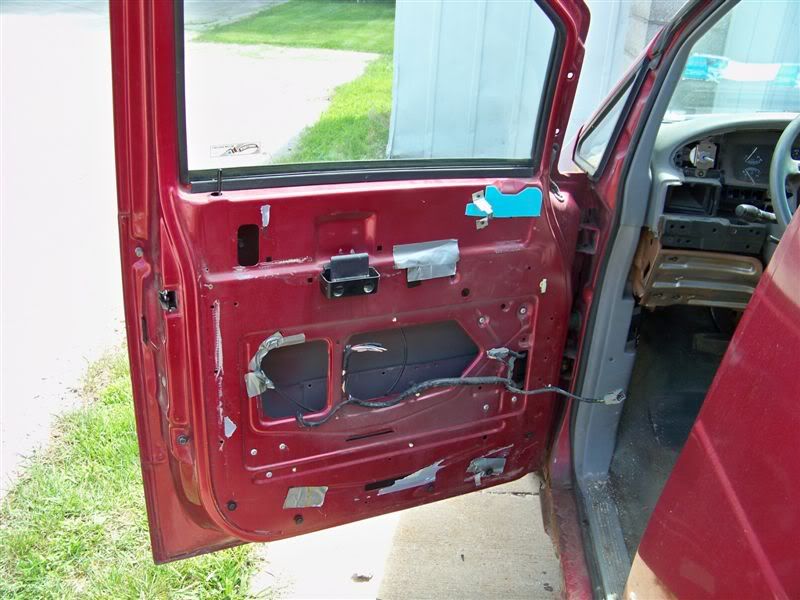
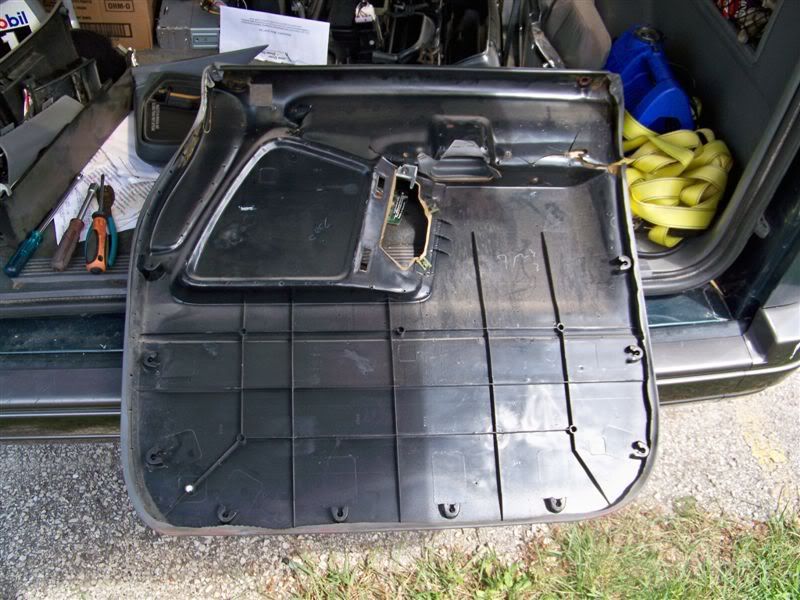
This is the door speakers on my van.


Yes I know the tweeters are on different locations on each door. I put them on the passenger side before realizing I couldn't do the sam on the driver side.
I later replaced the speakers themselves (Rockford Fosgate Prime) with Kenwood Excelon. The Rockford's couldn't handle the power my amp puts out, and I blew one of them about a week after I installed them. The Kenwoods cost more, but sounded much better anyway.
With the location I choose, the speakers fit just fine, no interference issues.
For the record, you are gonna want to put some dynomat or some kind of foam insulation in the doors. A good sound system is undermined by road noise. I am going to do that on mine too. Aerostars are not known to be quiet inside anyway, but when the insulation goes missing, it doesn't help.
This is the door speakers on my van.
Yes I know the tweeters are on different locations on each door. I put them on the passenger side before realizing I couldn't do the sam on the driver side.
I later replaced the speakers themselves (Rockford Fosgate Prime) with Kenwood Excelon. The Rockford's couldn't handle the power my amp puts out, and I blew one of them about a week after I installed them. The Kenwoods cost more, but sounded much better anyway.
With the location I choose, the speakers fit just fine, no interference issues.
For the record, you are gonna want to put some dynomat or some kind of foam insulation in the doors. A good sound system is undermined by road noise. I am going to do that on mine too. Aerostars are not known to be quiet inside anyway, but when the insulation goes missing, it doesn't help.
#5
12-10-2010, 09:48 AM
#6
12-15-2010, 08:55 AM
So I did just attempt running some hatch speakers in my personal van. The results were pretty good. I ran them in parallel for the increased sound output. But as I mentioned beforehand, this will run the speakers with just a 2 ohm load, which can damage some amps and head units. Make sure in advance that your unit can handle a 2 ohm load or that the amps wattage ratings are far greater than the combined speaker draw. Also make sure the mid and hatch speakers have similar power requirements. If you put dissimilar speakers, one will draw more power than the other and can end up causing problems. You just want to make sure they have similar peak ratings and similar RMS ratings. It is also best if you can keep them the same brand.
#7
05-14-2011, 05:28 PM

I put 4000 watts and new head unit from Alpine in mine. lots of wire, crimping, etc..
System Ground.JPG - Windows Live
System Ground.JPG - Windows Live
Trending Topics
#8
06-01-2011, 08:52 AM

For the record, you are gonna want to put some dynomat or some kind of foam insulation in the doors. A good sound system is undermined by road noise. I am going to do that on mine too. Aerostars are not known to be quiet inside anyway, but when the insulation goes missing, it doesn't help.
Just ordinary sheet lead 1/64" thick. This will stop almost all noise, then you won't need an amp.
#9
06-01-2011, 03:31 PM
Actually, suspended lead works best. Lexus used to make double-layer body panels filled with essentially asphalt in critical areas. I'm not sure what they do now.
One of my friends at CalTech started making speakers in the early 80s, and his first flagship model was called the Lead Cylinder. It used these lead sheets rolled into cylinders that the midrange and tweeter was mounted on, and had conical foam cores behind them on the inside. The idea was to eliminate the back waves and resonance. The improved design went to pyramidal MDF cabinets for the midrange and tweeter. The midrange cabinet enclosed a foam-lead-foam sandwich, which enclosed the inner cabinet that contained the driver. All the frequencies that affected imaging were fed to that midrange driver, which was made completely resonance free. They were by far the most 3-D sounding speakers I've ever heard. There are better speakers now, but they cost a lot more.
However, since there is no way for me to reproduce that level of performance in any automobile, I don't bother anymore.
#10
06-02-2011, 02:35 PM
I suppose that one could tweak the speaker to give you darn near anything you needed. I have never found a stock radio wanting myself but there again I usually listen to talk shows.
My point on the sheet lead is that you can kill off almost all outside noise if you were to line the interior with the lead that would only leave the glass as a point of sound transmission. the nice thing about the lead is that it is real easy to install and it doesn't take up much room.
My point on the sheet lead is that you can kill off almost all outside noise if you were to line the interior with the lead that would only leave the glass as a point of sound transmission. the nice thing about the lead is that it is real easy to install and it doesn't take up much room.
#11
06-03-2011, 08:34 AM
I've found the stock Aerostar system usually very wanting. Between the noise that comes in, so you have to turn it up more, and the cheap wiring, and the common ground, and the rear speaker control, and the stock radio itself, they just don't sound good, and when you turn them up, they just distort the sound. With all the ones I've experienced, talk radio suffers the most. You really have to turn it up to hear them, and spoken word, especially male voices, distort the most. Its just hard to get good sound out of a paper speaker.
#12
06-22-2011, 08:24 PM
Posting Guru
#13
06-23-2011, 07:48 AM
Yes I have, and no, it is not worth it. The sound has to be reflected off the glass. The location is ok for raising the sound stage, but a better location for tweeters would be on the pillars. If you do run mids and tweets in the dash, you still need bigger ones in the doors for the full sound, and you need a crossover to direct the sound where it needs to go. I much prefer having the larger more serious speakers in the door where you actually have some room.
#14
08-13-2011, 08:48 PM

cant find a good ground
I was wondering if anyone can help I can't seem to find a good ground in the rear of my aerostar for the amp.
I have the 12v cable ran, the remote wire ran to the headunit, I just can't find a good ground to get the amp to turn on, any help will be appreciated. Thanks in advance
I have the 12v cable ran, the remote wire ran to the headunit, I just can't find a good ground to get the amp to turn on, any help will be appreciated. Thanks in advance
#15
08-14-2011, 02:19 AM
For a good ground, run a self tapping screw at some suitable location. Make sure the screw is not going to damage any wiring or go somewhere it shouldn't. Any location should do. If that doesn't work, you might need to run a dedicated ground back to the battery (still ground to the chassis anyway).